In this project, you will implement your own physics
simulation engine. This basic engine emits spheres and
has them bounce off other sphere and plane colliders.
Getting Started
To get started, clone the GitLab repository that was created for you.
The skeleton code has comments marked with // TODO denoting where
to write your code. You are encouraged to read through this document and review the
Particle System lectures carefully.
If you are having trouble cloning the repo (for example not all files
show up), make sure to install git-lfs.
The Simulator project has the scenes SimTest* which make use of
PhysicsSimulation.cs and PhysicsProperties.cs. When
working on your physics engine, you'll probably want to spend most of your
time verifying your implementation in the SimTest* scenes first before
continuing on.
You can compare your implementation with our provided reference behavior here
The skeleton code is also avaliable
here which contains
the unmodified test scenes, in case you modified them by accident.
Requirements
Part A: Create a physics simulation system that:
Has two distinct forces acting on a sphere
In the script PhysicsProperties.cs, gravity (f=mg)
is already implemented. You should implement viscous drag (f=-k_d*v)
for this project.
Updates the position and velocity of spheres
In the script PhysicsSimulation.cs, compute a sphere's
position and velocity by solving the system of forces using Euler's
method in the function ComputeSphereMovement.
Implements collision detection
You must detect collision and respond to other spheres and planes that can be added to your scene:
Plane collision: A natural position for the plane is to have it act as a ground for your scene,
but it could be placed anywhere. Planes have a width and height which correspond to the x and z
scale of the Transform component.
Sphere collision: Objects colliding with the sphere should reflect off the sphere depending on the
sphere's normal at the point of collision and the sphere's incoming velocity direction.
Part B: Maze Game
With your physics engine working (spheres should collide and bounce off other colliders), navigate to
the MazeGameController.cs script to implement the necessary steps to make the MazeGame scene work.
In the scene, the ball should roll around the maze and collide with the Collectibles (SphereCollider) and the walls (PlaneCollider).
Part C: Rube Goldberg machine:
In part C you will use your creativity to design and implement a Rube Goldberg machine. This part is
more open ended. You will have to implement springs and force fields.
Part A: Physics Simulation
Program Overview
First, navigate to the SimTest1 scene. In the scene, there is an
Emitter that uses the PhysicsSimulation.cs script to emit spheres.
When playing this scene, spheres will be periodically emitted, but
since you have not yet implemented any physics, they will not yet move.
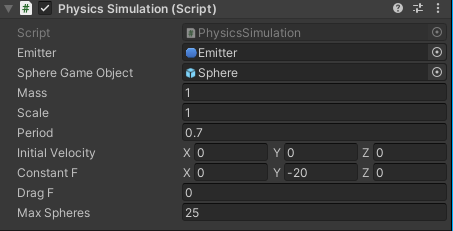
You can change the properties of the emitted spheres by changing
the following parameters. Scale is the size of a sphere. Period
controls how often a sphere is emitted. Max Spheres controls how
many spheres exist in a scene simultaneously (for performance).
Note: changing these values during play does not update the simulation
in real time. Any changes must be made before playing the scene.
There are also PlaneCollider and SphereCollider gameobjects that use the
CustomCollider.cs script to mark the respective plane and sphere
primitives as colliders for our physics engine implementation. Each PlaneCollider
or SphereCollider also has the restitution constant of the range [0,1] used
in calculating collision force attenuation.
If you want to add additional colliders, navigate to the Prefabs/Colliders folder
and drag PlaneCollider/SphereCollider into the scene.
Skeleton Code
There are three major components in our physics simulation system:
Sphere objects (or balls) which have physics properties such as mass, position, and velocity
Forces
An engine for simulating the effect of the forces acting on the spheres that solve for the position and velocity of each sphere at every time step
The skeleton code already provides a general outline of a simulation
engine. Specifically, at every frame, the engine first spawns the
spheres by calling the EmitSpheres function. The spheres are spawned
at the world coordinates of the Emitter Gameobject. Then, for each
sphere, we need to:
Calculate total forces acted on a sphere and solve for the sphere's position and
velocity using Euler's method in the ComputeSphereMovement function.
Detect collision and calculate collision response for the sphere in the
OnCollision function.
Implement Viscous Drag Force
Complete the TODO in PhysicsProperties.cs to implement a
viscous drag force class. You must implement the constructor as well as the
GetForce and SetDragCoefficient methods. The
GetForce method should return a force vector which is the drag force
exerted on a given Sphere. The SetDragCoefficient should
update the coefficient of the drag force such that a subsequent call to
GetForce will respect the new drag coefficient.
The ComputeSphereMovement Function
The ComputeSphereMovement function is called every frame for each
sphere (see FixedUpdate), and updates a Sphere's velocity and position.
Complete the TODO in ComputeSphereMovement in
PhysicsSimulation.cs. Refer to lecture notes. In general, you will need to:
Clear forces
Calculate total forces acted on a sphere
Solve the system of forces using Euler's method (derivatives)
Update sphere's position and velocity
Hint: Use Unity's Time.deltaTime which is the interval in
seconds from the last frame to the current.
Once you finish this part, you should be able to see the emitted spheres move
in the SimTest* scenes.
The OnCollision function
The OnCollision function in PhysicsSimulation.cs
checks if a collision occurred between a ball and a collider, and also
handles the collision interaction (bouncing). It returns a boolean
indicating whether a collion occurred. Although we need to update a
sphere's position and velocity in world space, checking for collisions is
much easier in a collider's canonical (local) space. The skeleton already
handles conversion from world to local space for both position and
velocity of a sphere in the OnCollision function. Depending
on whether the collider is a sphere or plane, we need separate checks.
Complete the three following 3 steps:
Detect SphereCollider collision
Implement the TODO: Detect collision with a sphere collider
in OnCollision. Refer to lecture notes. You will need to check
if a ball closely collides with a SphereCollider and if it is coming
towards the collider.
In the OnCollision function:
The variable collisionOccured denotes whether our ball is within distance of collision with another SphereCollider.
The variable isEntering denotes whether our sphere is flying towards another SphereCollider.
The variable normal denotes the normal vector of the SphereCollider at the point of collision with the ball.
You will need to compute the 2 conditions above to determine whether a collision
between our ball and another PlaneCollider has occured. The PlaneCollider normal
that you calculate here will also be used for collision response calculation in 2.3.c.
Detect PlaneCollider collision
Implement the TODO: Detect sphere collision with a plane collider
in OnCollision. Refer to lecture notes.
Note: you don't yet need to implement the TODO: Follow these steps to ensure the
sphere always on top of the plane, since you will do that in part B: MazeGame.
However it is possible some of your SimTest* scenes don't match the solutions until you
finish this, in particular when balls rolling on a plane or roll off an edge.
Since PlaneColliders are finite planes, you will also need to use the PlaneCollider's
width and height to determine collisions. By default, a 1x1 unit plane in Unity has an
actual size of 10x10 units, thus the skeleton code already calculates the appropriate
planeHeight and planeWidth by multiplying the x (height)
and z(width) scale by 10. The default plane also has its normal pointing in the
+y-axis, which is (0,1,0). This means that in the PlaneCollider's local frame, its normal
points in the (0,1,0) direction.
In the OnCollision function:
The variable collisionOccured denotes whether our ball is within distance of collision with the PlaneCollider.
The variable isEntering denotes whether our sphere is flying towards the PlaneCollider.
The variable normal denotes the normal vector of the PlaneCollider at the point of collision with the ball. This will be the plane’s normal vector except when the collision occurs at an edge or at a corner. In those case, it will point from the edge/corner towards the ball.
You will need to compute the 2 conditions above to determine whether a collision
between our ball and another PlaneCollider has occured. The PlaneCollider normal
that you calculate here will also be used for collision response calculation in 2.3.c.
Note: a ball coming towards a PlaneCollider from underneath should not collide with the collider.
Collision Response
Implement the TODO: Update the sphere's velocity, remember to bring the velocity to world space in OnCollision.
At this point in the code, collisionOccurred and isEntering should be properly
set for both the SphereCollider and the PlaneCollider case. Refer to lecture
notes on how to calculate the new velocity vector and use the normal vector
you calculated for both cases and calculate the new local velocity. Since we
are operating in the collider's local space, you will need to convert this
local velocity to world velocity and assign it to the ball. [Hint: look
at the function colliderTranform.TransformDirection() and
colliderTransform.TransformPoint().
Part B: Maze Game
In this part, you will be building a 3D maze game using the physics engine you have just created in Part A.
In the game, the player tilts the board to guide the ball around the maze to its destination while picking
up some objectives and avoiding obstacles.
MazeGame Requirements
We have already created a simple MazeGame for you with all the necessary components such as the maze area,
the control system, and the Emitter which spawns the player sphere. However, the game does not yet handle
or detect collisions.
Handle collision detection and response
Use what you implemented in part A to complete the 2 TODOs in the MazeGameController.cs script to simulate
the physics and handle the collisions so that the sphere rolls on the ground, picks up Collectible objects,
and collides with the EndWall.
Ensure the sphere always rolls on the ground
The reason why the sphere sinks to the ground is because we don't consider the normal force from the plane.
Consider a stationary sphere sitting on a plane. In the next timestep, the ball falls below the plane, but
our mechanism of collision reflects the direction of velocity, which is zero. Hence, the sphere is not kept
on the ground.
To fix this, we simply always position the sphere on top of the collider when there is a collision.
Complete the TODO: Follow these steps to ensure the sphere always on top of the plane in OnCollision
function in PhysicsSimulation.cs. The sphere should be able to roll around the maze after that.
Once you have done this, ensure you can pick up all the collectibles (orange spheres) and get to the end of the maze with
you ball correctly colliding off surfaces. By default, the arrow keys are used to rotate the maze.
SimTest References
In 16:9 aspect ratio, captured after parts A and B are completed.
1
2
3
4
5
6
Part C: Rube Goldberg Machine
Overview
Before you start working on part C, make sure you have finished parts A and B, and check the TURN-IN instructions below.
You will need to submit your code for parts A and B without any code from part C. To do this, copy the source files you
modified in part A into a .zip file titled part_ab.zip. These files should be
PhysicsProperties.cs, PhysicsSimulation.cs, and MazeGameController.cs.
Note: your solution for parts A and B will be checked against only the source files you provide in
part_ab.zip. If you want to double check your work before submitting, clone the skeleton
code here, insert your scripts, and then check the solution.
For part C, you may modify any of the source files as well as add your own. Just make sure any new files
are added to your repository.
You will create a Unity scene where you simulate a ball physically interacting with a Rube Goldberg machine
that you create. For this part, you will need to implement some more forces, in addition to
forces you have created in previous parts. You will probably need to make major changes to the
skeleton-code and you code in part A and B. Here are the requirements you need to include in your
final deliverable. You must not use Unity's built in physics.
The scene must start with a single ball being emitted
The ball must interact with the following throughout the Rube Goldberg scene:
From the previous part:
The ball must roll and bounce on walls and floors
The ball must have airtime (e.g using a ramp or bouncing)
The ball must have drag
New for this part
The ball must interact with a force field. Here are some examples
magnetic attraction or repulsion between the ball and some other object
wind from a fan
something else
NOTE: This force field cannot just be a constant force
The ball must interact with a springy object with force based collisions. Here is an example:
A squishy sponge. In this case, the sponge would exert force on the ball based on how far in the ball “squished into” the sponge (like a spring).
Note. The springy object must visually respond to the interaction. It doesn't need to be fancy. For example for a squishy sponge, a ball should not just sink into a cube, be completely covered and then bounce out. Instead you can for example create a dent in the sponge, or lower one plane of the sponge as the ball is sinking into it.
The ball must interact with a compound object made from springs connecting multiple particles together. Here is an example
A cloth-like object made out of spheres, like a hammock, which the ball can roll through.
There must be a clear “goal” that the ball must reach by traversing through your rube goldberg machine
Turn-in Information
Please follow the general instructions here. More details below:
Your code for part A should be in a file named part_ab.zip. This should contain the files
PhysicsSimulation.cs, PhysicsProperties.cs, and MazeGameController.cs without any code from
part C. Make sure you add this to the repository.
In README.md, describe any bells, whistles, or anything special you implemented.
Artifact Submission
For your artifact, you will be submitting a recording of your Rube-Goldberg machine. You must submit
the video as an MP4, other video formats will not count. Most recording software should allow you
to select an output format.
If you need to convert your video file, various online tools exist, or you could install
ffmpeg, a command line tool for converting video and audio formats.
Assuming you have added the program to your system's path, you can run:
ffmpeg -i <Your Video File> artifact.mp4
Which will convert your video named <Your Video File> to an MP4 named
artifact.mp4. The file does not need to be named this, however.
Bells and Whistles
You are required to implement at least one bell and one whistle. Any additional ones
you implement are worth extra credit. You are also encouraged to come up with your
own extensions for the project. Run your ideas by the TAs or Instructor, and we'll
let you know if you'll be awarded extra credit for them. If you do decide to do
something out of the ordinary (that is not listed here), be sure to mention
it in the README.md file when you submit the project.
Come up with another whistle and implement it. A whistle is something that extends the use of one of the things you are already doing. It is part of the basic model construction, but extended or cloned and modified in an interesting way. Ask your TAs to make sure this whistle is valid.
Modify your particle system so that the particles' velocities get initialized with the
velocity of the hierarchy component from which they are emitted. The particles
may still have their own inherent initial velocity. For example, if your model
is a helicopter with a cannon launching packages out if it, each package's
velocity will need to be initialized to the sum of the helicopter's velocity
and the velocity imparted by the cannon.
Particles rendered as points or spheres may not look that realistic. You can achieve more
spectacular effects with a simple technique called billboarding. A
billboarded quad (aka "sprite") is a textured square that always
faces the camera. For full credit, you should load a texture with
transparency, and use the Textured Material or your own Material that has alpha blending.
Use the billboarded quads you implemented above to render the following effects.
Each of these effects is worth one whistle provided you have put in a whistle
worth of effort making the effect look good.
Fire (You'll probably want to use
additive blending for your particle)
Add baking to your particle system. For simulations that are expensive to process, some
systems allow you to cache the results of a simulation. This is called
"baking." After simulating once, the cached simulation can then
be played back without having to recompute the particle properties at each time
step. See this page for more information on how
to implement particle baking (although, note that this is an old webpage that refers to a different project. The function names may not apply, but the general logic for integrating baking is still useful).
Euler's method is a very simple technique for solving the system of differential equations that
defines particle motion. However, more powerful methods can be used to
get better, more accurate results. Implement your simulation engine using
a higher-order method such as the Runge-Kutta technique. ( Numerical Recipes,
Sections 16.0, 16.1) has a description of Runge-Kutta and pseudo-code.
Add levers (seesaws, hinged doors).
Add object that are “alive”: actuated with
“muscles”, and reacting to the external stimuli
(e.g. when ball gets near start moving)
Make a game out of it, where the game gives you a start and goal,
along with a half-finished Rube Goldberg machine. The goal for
the player is to place certain given objects (springs, cloth,
walls, etc.) in order for the ball to reach the goal. Note: The
game must be fully playable and contained within a unity
scene, which means when you press the “Unity play button”, the
physical simulation shouldn't start, but instead the game should
start. You must create a ui for allowing the player to place
objects within the scene. Note: The player is not allowed to
use the built in Unity scene editing tools playing the games,
the placing of the objects must be contained withih the game.
Perform collision detection with more complicated shapes. For complex scenes, you
can even use the accelerated ray tracer and ray casting to determine if a
collision is going to occur. Credit will vary with the complexity shapes
and the sophistication of the scheme used for collision detection.
x2
Add flocking
behaviors to your particles to simulate creatures moving in flocks, herds, or
schools. A convincing way of doing this is called "boids"
(see here for a short flocking guide, and here for a demo and for more
information). For full credit, use a model for your creatures that makes
it easy to see their direction and orientation (as a minimal example, you could show this with colored pyramids, oriented towards the direction in which the creatures are pointing). For up to one
more bell, make a realistic creature model and have it move realistically
according to its motion path. For example, a bird model would flap its
wings to gain speed and rise in the air, and hold its wings outstretched when turning or gliding.
x4
Incorporate rigid-body simulations into your
program, so that you can correctly simulate collisions and response between
rigid objects in your scene.
Monster Bells
Disclaimer: please consult the course staff before spending any serious time on these. They are quite difficult, and credit can vary depending on the quality of your method and implementation.
Inverse kinematics
The hierarchical model that you created is controlled by forward kinematics;
that is, the positions of the parts vary as a function of joint angles. More
mathematically stated, the positions of the joints are computed as a
function of the degrees of freedom (these DOFs are most often
rotations). The problem is inverse kinematics is to determine the DOFs of a
model to satisfy a set of positional constraints, subject to the DOF
constraints of the model (a knee on a human model, for instance, should not
bend backwards).
This is a significantly harder problem than forward kinematics. Aside from
the complicated math involved, many inverse kinematics problems do unique
solutions. Imagine a human model, with the feet constrained to the ground. Now
we wish to place the hand, say, about five feet off the ground. We need to
figure out the value of every joint angle in the body to achieve the desired
pose. Clearly, there are an infinite number of solutions. Which one is
"best"?
Now imagine that we wish to place the hand 15 feet off the ground. It's
fairly unlikely that a realistic human model can do this with its feet still
planted on the ground. But inverse kinematics must provide a good solution
anyway. How is a good solution defined?
Your solver should be fully general and not rely on your specific model
(although you can assume that the degrees of freedom are all rotational).
Additionally, you should modify your user interface to allow interactive
control of your model though the inverse kinematics solver. The solver should
run quickly enough to respond to mouse movement.
If you're interested in implementing this, you will probably want to consult
the CSE558
lecture notes.
Interactive Control of Physically-Based Animation
Create a character whose physics can be controlled by moving a mouse or
pressing keys on the keyboard. For example, moving the mouse up or down
may make the knees bend or extend the knees (so your character can jump), while
moving it the left or right could control the waist angle (so your character
can lean forward or backward). Rather than have these controls change
joint angles directly, as was done in the modeler project, the controls should
create torques on the joints so that the character moves in very realistic
ways. This monster bell requires components of the rigid body simulation
extension above, but you will receive credit for both extensions as long as
both are fully implemented.. For this extension, you will create a
hierarchical character composed of several rigid bodies. Next,
devise a way user interactively control your character.
This technique can produce some organic looking movements that are a lot of
fun to control. For example, you could create a little Luxo Jr. that hops
around and kicks a ball. Or, you could create a downhill skier that can
jump over gaps and perform backflips (see the Ski Stunt example below).
If you want, you can do it in 2D, like the examples shown in this paper (in
this case you will get full monster bell credit, but half credit for the rigid
body component).