CSE 466 Lab 8:
Building the Electrocardiograph, Part 1
Introduction
In this lab you'll use the amplifier circuit you built in Lab 7. Then you will interface it to the Teensy and your LCD for use in next week's lab.
Objectives
In this lab, you will learn about:
- principles of bioelectric sensing
- use of an instrumentation amplifier to amplify heart signals
- standard ECG signal waveforms
Suggested Reading and Resources
To Do:
NOTE: Read through the entire lab so you know what is coming, and you can plan accordingly.
This is a time to use Good Design Process.
I. Display a heart trace on the LCD
Connect your circuit from Lab 7 to your Teensy board to your choice of Analog inputs.
- Write sketch called Cardio1.ino that converts your input signal in 12 bits resolution and displays it on the LCD.
- Suggested sample rate is 250 Hz., although you may adjust this to serve your purposes.
- You should trigger the ADC with the PDB, similar to what we did in Lab 5 Part 2. This will greatly reduce sample jitter.
- You should buffer the data, to save 30 seconds of cardio trace data.
- We suggest that the display should write from left to right, and wrap around erasing the old trace as it writes.
- You might want to look ahead at the next sections, so that you can accomodate display and control requirements.
II. Add a calibrated grid to your display, and some controls
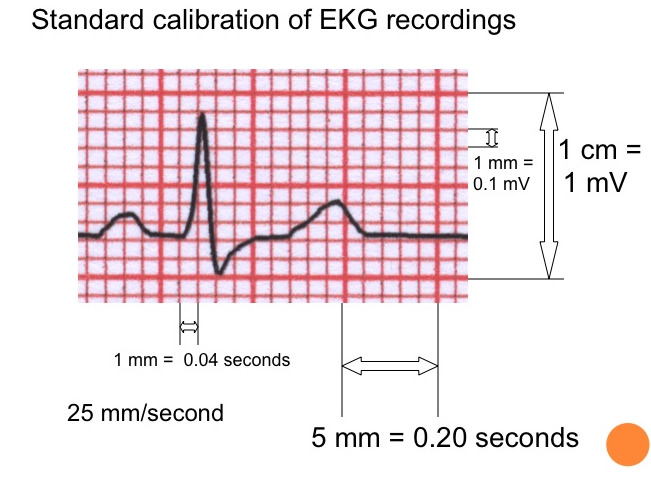
You should add a grid to your display, with the following characteristics. The measurements shown are for a standard printout, so your squares do not need to be 1 mm.
Your grid measurements should be proportional for your screen, and preserve the relationship between small square size and time/voltage:
- Add button control for push-to-START and push-to-STOP, as well as implementing auto-stop after 30 seconds.
- You should not record or display data until the incoming signal has stabilized.
- You may wish to display a message indicating that the unit is stabilizing.
- You can check your calibration by creating an appropriate signal on the frequency generator.
III. Write your data to the SD card.
You should open a file on the SD card and write your 30 seconds of data to the card. See SD card reader hints in Lab 6.
- The file consists of a header, a data portion, and an End-of file mark.
- The header contains a unique file identifier followed by the sample rate in samples per second. The identifier might be your four initials followed by an incrementable number:
- Header example: ABCD001, 250
- In the data portion each sample is written as an ASCII text decimal number, from 0 to 4095, and separated by a comma and a space with 8 samples in a line.
- The End-of-file mark is a final line containing "EOF".
- After recording 30 seconds of data, you should open the file, write the data, and close the file. You sould be able to record multiple files, and they should be readable on another computer. See the ReadWrite.ino example in the SD library.
IV. (Optional:) Continue with Parts I and II in Lab 9 if you have time.
Deliverables
- Demonstrate your working sketch and the data on the SD card to a TA during the first 30 minutes of next week's lab.
- Your sketch should have both partner's names in comments at the beginning.
- Turn in your Cardio1.ino, and a sample file from the SD card.
- All deliverables should be uploaded to your Catalyst Dropbox before or during the first 30 minutes of next week's lab.