User Interface > GUI
Contents
Visual Display | User Controls
Visual Display:
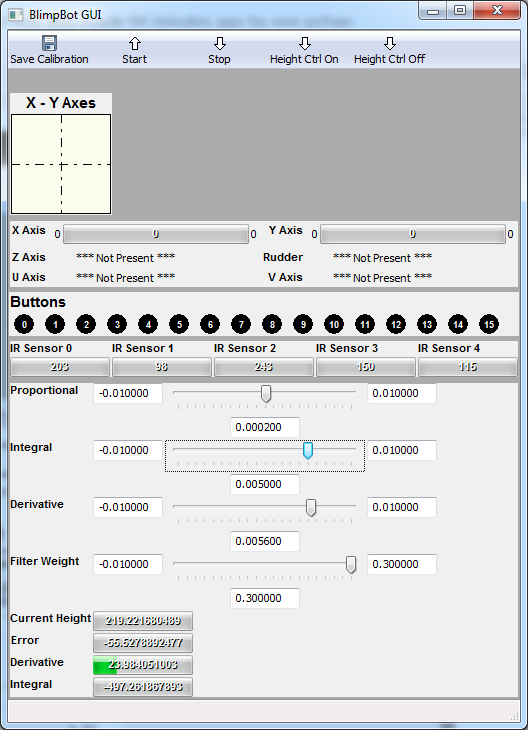
The visual display contains everything the user needs to know about the current status of the blimp. The toolbar on top gives some basic controls Save Calibration which allows the user to save settings for Autonomous Altitude Control (AAC), Start which sends a start command to the blimp bot allowing other commands to be executed, Stop which sends a stop command preventing motors and sensors from executing commands, Height Ctrl On begins data logging, and Height Ctrl Off disables data logging. Furthermore the Visual GUI provides feedback for the controller. The first visual display is the axes display. The Y Axis is currently mapped to forward and back movement while the XAxis is mapped to left and right. Thus the top right quadrant corresponds to the blimp moving forward and turning to the right, while the top left is forward and turning to the left. This data is presented both on a graph and through data values ranging from 0 to 65535, 32767 being the median (motors not moving). Following the Axis information is button information, for our set up we currently have 9 buttons, but only 4 are currently mapped to a command (Described in the User Control section). Afterwards we have the IR Sensor panel which displays each IR sensors reading. Finally we have Height Control settings and data. | Back to contents |
User controls:
Our Blimpbot control has been implemented through the use of a visual display on the computer and through a gamepad (or microsoft steering wheel). The user controls the Blimpbot primarily through the gamepad. The user can use the D-Pad to provide direction and speed. The individual buttons on the gamepad have also been mapped to control blimp height, setting Autonomous Altitude Control (AAC) height, and disabling AAC. The visual portion of the user interface allows the user to send Start and Stop commands while also providing visual feedback for the gamepad. | Back to contents |
Gamepad Specifics:
The up and down arrows on the D-Pad correspond to the Y axis controlling how much forward/reverse movement is desired. The left and right arrows on the D-Pad correspond to the X axis controlling how much power to provide to each side of the blimp. The X and A buttons have been mapped to manual altitude control, allowing the user to fly the blimp to a desired altitude. B and C control the Autonomous Altitude Control (AAC). B will enable and set the AAC at the current height. C on the other hand will disable AAC and the user will be required to use X and A to maintain blimp altitude. | Back to contents |

Steering Wheel Specifics:
The floor pedals for the steering wheel correspond to the Y axis controlling how much forward/reverse movement is desired in our implementation completely releasing the pedal will cause the blimp to go in reverse, while fully compressing the pedal will cause the blimp to go foward. The steering wheel itself controls the X axis controlling how much power to provide to each side of the blimp. The X and A buttons have been mapped to manual altitude control, allowing the user to fly the blimp to a desired altitude. B and C control the Autonomous Altitude Control (AAC). B will enable and set the AAC at the current height. C on the other hand will disable AAC and the user will be required to use X and A to maintain blimp altitude. | Back to contents |
