HuskyMaps Server
Large-scale integration and closed-form solutions.1
Learning Goals
Extending a large, existing code base.
We’ve actually already built most of the components for HuskyMaps. Unlike prior homeworks, this one starts with a gigantic code base that somebody else wrote. This is very realistic experience, since in the real world, we usually don’t start developing projects completely from scratch. As a result, you should expect to spend a decent amount of time familiarizing yourself with the provided code so that you know how to interface with it and what your code needs to do.
Wrangling slightly messy real-world datasets into useful data structures.
In the real-world, big data is often noisy, incomplete, and biased. Sometimes, these problems can be addressed by changing the source of the data (perhaps a job for a data scientist to wrangle), but often, we will need to interact with such messy data ourselves.
Table of contents
- Getting the Assignment
- Overview
- Rastering
- StreetMapGraph
- Searching
- Routing
- Final Testing Notes
- Optional Extensions
- Submission
Getting the Assignment
- Task
- Pull the skeleton repository to get the
huskymapsassignment.
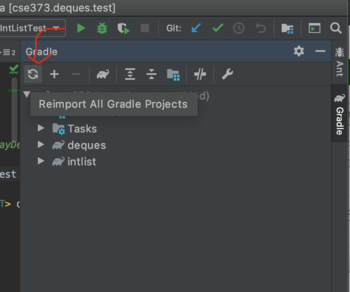
If IntelliJ doesn’t properly recognize the new files or complains about failing to resolve classes or interfaces from previous assignments or external libraries, refresh Gradle manually through the Gradle tool window (on the right by default):
- Task
- Download and extract additional resources used in this assignment.
- Download tiles.zip and extract it into your project, under
huskymaps/resources. You should end up with a bunch of files in thetilesdirectory, likehuskymaps/resources/tiles/d#_x#_y#.jpg. - Optionally download seattle.osm.gz and place it the
resourcesfolder. (I.e., path in your project should behuskymaps/resources/seattle.osm.gz.) This file contains data about roads and locations in Seattle.- By default, we use the smaller dataset in
seattle-small.osm.gz, which only includes streets around the U-Distrct. We recommend using the smaller dataset while you’re testing since it loads faster, but when you’re ready to try the larger one, simply change the constantOSM_GZ_RESOURCE_NAMEinhuskymaps.utils.Constantsfrom/seattle-small.osm.gzto/seattle.osm.gz.
- By default, we use the smaller dataset in
- Recommended
- Verify that IntelliJ has loaded all dependencies properly by running the
huskymaps.MapServerclass.
If everything is set up correctly, you should see some of the following diagnostic messages appear in your IntelliJ console:
[Thread-0] INFO org.eclipse.jetty.util.log - Logging initialized @1869ms
[Thread-0] INFO spark.webserver.JettySparkServer - == Spark has ignited ...
[Thread-0] INFO spark.webserver.JettySparkServer - >> Listening on 0.0.0.0:8080
[Thread-0] INFO org.eclipse.jetty.server.Server - jetty-9.3.2.v20150730
[Thread-0] INFO org.eclipse.jetty.server.ServerConnector - Started ServerConnector@a48a5fb{HTTP/1.1,[http/1.1]}{0.0.0.0:8080}
[Thread-0] INFO org.eclipse.jetty.server.Server - Started @2930ms
- Note
- If you’re using Windows, a popup might appear saying “Windows Defender Firewall has blocked some features of this app.” If this happens, you should allow access.
What’s happening here is that your computer is now acting as a web server with your Java code ready to respond to web requests. The web server will continue running in IntelliJ: you can think of it as if there’s an infinite loop waiting until someone loads the map.
Let’s see it in action. In a new web browser tab, navigate to the following address to connect to your running web server: http://localhost:8080/map.html
Upon visiting this page, your web browser sends a request to the Java web server asking for the map image. Since you haven’t implemented the backend, this data will never arrive. Poor web browser. Instead, you should see the following message show in your IntelliJ Console:
Since you haven't implemented rasterizeMap, nothing is displayed in your browser.
If you set a breakpoint in huskymaps.rastering.Rasterer.rasterizeMap, you’ll be able to inspect the request sent from the web browser! In this homework, we’ll be making changes to the logic for HuskyMaps so that it’ll be able to handle requests from a web browser.
By the end of this homework, with a little extra work, you can even host your application as a publicly-available web app.
Overview
- Background
- An overview of the components of the HuskyMaps server.
For the most part, the code for the HuskyMaps server is broken up into packages that separate its functionality into distinct components:
huskymaps.graph: The data structures and supporting code that represent the map data.huskymaps.handlers.*: Code relating directly to handling HTTP requests received by the server. The classes in these packages use the classes from the rest of the app to process requests and build responses. You probably won’t need to look at these files to complete the assignment, but feel free to take a peek anyway if you’re curious.huskymaps.routing: The component that computes shortest paths.huskymaps.rastering: The component that builds the map image displayed by the app.huskymaps.searching: The component that handles search box queries.huskymaps.utils: Some miscellaneous data and methods, mostly related to math and working with latitude/longitude coordinates.huskymaps.MapServer: The main entry point of the application. Running this starts the server.
Rastering
- Background
- Understand the task at hand.
Rastering is the task of converting information into a pixel-by-pixel image. Given a requested depth and a bounding box of a rectangular region of the world, specified by its latitude/longitude coordinates, provide images of the appropriate resolution that cover that region.
As specific example (taken from testSmallDepth7.html), the web browser might make the following RasterRequest.
RasterRequest{ullat=47.655195, ullon=-122.309108, lrlat=47.651298, lrlon=-122.301519, depth=7}
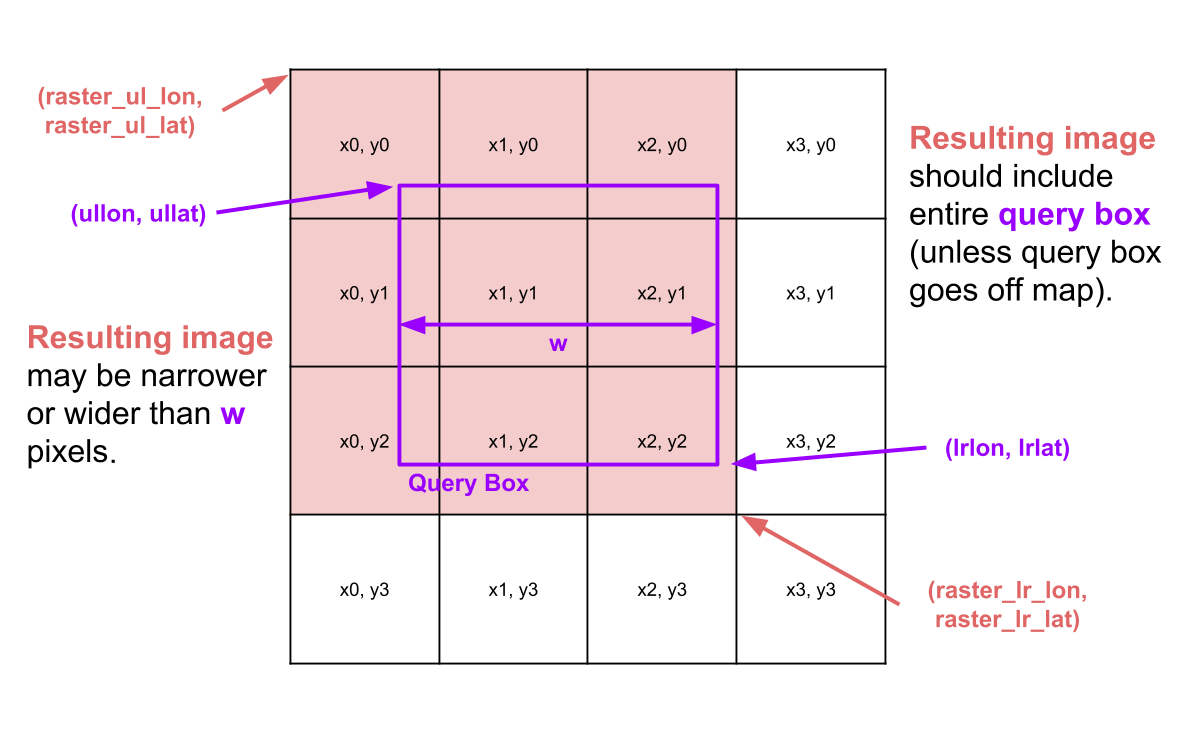
This means that the browser wants the area of Seattle delineated by the rectangle between longitudes -122.309108 (left edge, ullon) and -122.301519 (right edge, lrlon), latitudes 47.655195 (upper edge, ullat) and 47.651298 (lower edge, lrlat). We refer to the bounding box requested by the browser as the query box.
Additionally, depth=7 specifies that the browser is requesting tiles at the seventh zoom level, which happens to be the most detailed map tiles in our application.
- Note
- The left edge longitude is more negative than the right edge longitude since Seattle is to the left of the prime meridian. Conversely, the upper edge latitude is more positive than the lower edge latitude since Seattle is above the equator.
To display the requested information, you need street map tiles, which you should have downloaded into huskymaps/resources/tiles. Each map tile is a 256x256-pixel image, and there are tiles at various zoom levels. The more zoomed in, the more individual road labels are visible. For example, the files d0_x0_y0.jpg and d0_x1_y0.jpg represent the entire map region. The files d1_x0_y0.jpg, d1_x0_y1.jpg, … also encompass the entire map, but at double the resolution. (Note that our map is rectangular—the width is double the height.)
At depth , there are images with names ranging from dD_x0_y0 to dD_xk_yj, where is and is . As increases from to , we move eastwards. As increases from to , we move southwards. In total, there are 43,690 unique map tiles.
Our task is to figure out which of these tiles to display. For the example above, your implementation of rasterizeMap should compute the following 2-D array of strings.
[["d7_x140_y53.jpg", "d7_x141_y53.jpg", "d7_x142_y53.jpg", "d7_x143_y53.jpg"],
 ["d7_x140_y54.jpg", "d7_x141_y54.jpg", "d7_x142_y54.jpg", "d7_x143_y54.jpg"],
 ["d7_x140_y55.jpg", "d7_x141_y55.jpg", "d7_x142_y55.jpg", "d7_x143_y55.jpg"]]
This means that the browser should display d7_x140_y53.jpg in the top left, then d7_x141_y53.jpg to its right, and so forth. For this query box, our rastered image is a combination of 12 images arranged in 3 rows of 4 images each. The provided starter code in RasterAPIHandler will stitch these 12 individual images into the following 1024x768 pixel result.
Provided Constants
- Background
- Read through
huskymaps.utils.Constants, which contains necessary constants for rastering.
In huskymaps.utils.Constants, there are four constants that define the bounding box of the entire map region available in our app.
ROOT_ULLAT- Latitude of the upper edge of the map.
ROOT_ULLON- Longitude of the left edge of the map.
ROOT_LRLAT- Latitude of the lower edge of the map.
ROOT_LRLON- Longitude of the right edge of the map.
The depth-0 images d0_x0_y0.jpg and d0_x1_y0.jpg cover the coordinates given by ROOT_ULLAT, ROOT_ULLON, ROOT_LRLAT, and ROOT_LRLON. Likewise, the 8 depth-1 images cover the same coordinates but at double the detail level and resolution.
We have provided four additional constants in huskymaps.utils.Constants for processing tiles of a certain depth.
NUM_X_TILES_AT_DEPTH- Number of tiles spanning the width of a given depth.
NUM_Y_TILES_AT_DEPTH- Number of tiles spanning the height of a given depth.
LON_PER_TILE- Gives longitudinal distance spanned by a tile at given depth
LAT_PER_TILE- Gives latitudinal distance spanned by a tile at given depth
The bounding box for any particular tile can be computed using the LON_PER_TILE and LAT_PER_TILE. For example, we can figure out the upper-left corner of d7_x140_y53.jpg with the following computation.
double lat = ROOT_ULLAT - (LAT_PER_TILE[7] * 53);
double lon = ROOT_ULLON + (LON_PER_TILE[7] * 140);
- Note
- The latitude uses subtraction while the longitude uses addition because of Seattle’s location relative to the prime meridian and the equator.
With just these constants, we actually know enough to determine the tiles required for any requested query box in constant time!
- Tip
- Can you rearrange the sample equations above to figure out the tile number, given the longitude and latitude of a coordinate?
- Warning
- You will very likely get latitude and longitude or x and y mixed up at least once. You may also likely mix up which way is up vs. down for y. Make sure to check for that!
Implement
- Task
- Implement the following method in
DefaultRasterer:
| Signature | Description |
|---|---|
TileGrid rasterizeMap(Coordinate ul, Coordinate lr, int depth) | Takes a user query and finds the grid of images that best matches the query. |
You’ll probably also want to look at the Coordinate, Tile, and TileGrid classes before you begin.
Edge Cases
- Query box extends past an edge of the map, beyond where data is available.
- Query box extends past multiple edges—potentially all 4 edges, causing it to include the entire dataset.
- Query box includes no tiles.
If a query box extends beyond the region covered by our tile images, return a grid containing only the tiles that we have data for. In other words, your grid should not contain null items (this frequently happens when your 2D array is too big) or Tile objects that do not represent actual images.
We need to handle the last edge case a little differently: Since TileGrid doesn’t support a 0x0 grid, we need to give it an arbitrary tile. (The user should still correctly not see anything on their screen, since this TileGrid would be off-screen on the user’s browser.)
Runtime
Rasterer.rasterizeMap should take time linear in the number of tiles that match the query.
You should not iterate through / explore all tiles to search for intersections with the query box. Suppose there are tiles intersecting a query box, and tiles total. Your entire query should run in time, not time.
Testing
It can be hard to use the HuskyMaps web app to debug since it involves user input and has a lot of moving parts. In addition to the tests in RastererTests, we’ve provided two map test files in the huskymaps/data/simple folder named testFullDepth1.html and testSmallDepth7.html. These special test files make the same call to your server each time a web browser visits the file so that errors can be easily reproduced.
To help with debugging these tests, you might find your browser’s JavaScript console handy. In Chrome on Windows, press F12 to open up the developer tools and tap the Network tab. All browser requests will be listed under type XHR. You can also see the results returned by your rasterizeMap method in the Console tab.
StreetMapGraph
- Background
- Take a look at the code for
StreetMapGraphandNode, which the next two classes will use.
huskymaps.graph.StreetMapGraph is an implementation of AStarGraph<Node>. Each vertex of the graph is represented as a Node corresponding to a real, physical location in Seattle. Each Node has a latitude, longitude, and, optionally, a name and importance. Nodes represent both points of interest (such as the “University of Washington” light rail station) and locations along a road (which can be unnamed). Many vertices don’t have edges—specifically those that correspond to places rather than spots along a road.
Searching
- Task
- Implement the following methods in
DefaultSearcher:
| Signature | Description |
|---|---|
List<String> getLocationsByPrefix(String prefix) | Returns a list of location names that prefix-match prefix. |
List<Node> getLocations(String locationName) | Returns a list of locations whose names exactly match locationName. |
Runtime
- Task
- Meet the following runtime requirements:
getLocationsByPrefixshould run in time, where is the total number of locations and is the number of results. -getLocationsshould run in in time, where is the number of results.
Testing
Since most of the work in this component is done by your code from previous assignments, the grading for this section will be very light: we only have a few tests on the grader, all of which are included in our provided code.
Routing
- Task
- Implement the following methods in
DefaultRouter:
| Signature | Description |
|---|---|
Node closest(Coordinate c) | Finds the Node nearest to where a user double-clicks on the map. Only considers Nodes with neighbors. |
List<Node> shortestPath(Coordinate start, Coordinate end) | Returns a List of nodes representing the shortest path from the node closest to a start location to the node closest to the destination location. |
You should use your k-d tree to implement closest, but make sure to first project the map data down from a spherical model of the Earth to a flattened 2-D map (Euclidean geometry) using projectToPoint. (The calls to projectToPoint are included in the provided code, so just make sure to actually use the output.) This ensures that your k-d tree won’t be affected by the spherical curvature of the Earth.
- Note
- While this approach is accurate for small areas of Earth, it doesn’t scale well outside of the Seattle geographic region because the projection gets increasingly distorted. For a more general solution, the common recommendation is to convert the coordinate points to points in 3-dimensional space with the origin centered on Earth, but this requires a more complex k-d tree implementation.
Runtime
- Task
- Meet the following runtime requirements:
closestshould run in time, where is the total number of locations.shortestPathshould be “fast.” (It should basically just callclosesttwice, then use aShortestPathFinderto find the shortest path; we don’t have an exact runtime for yourAStarPathFinderin this class, so we can’t use big- notation here.)
Testing
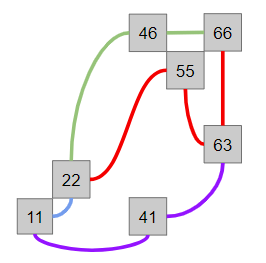
To test your implementation, try running the RouterTinyTests first. This is a tiny graph that you can work out by hand. Each edge represents a different way (colors picked such that they should appear distinct, so long as you are not 100% achromatopsic). You can decompress huskymaps/data/tiny.osm.gz and open tiny.osm in a text editor (or in IntelliJ, as a plain text file) for more details. We’ve also included a suite of full integration tests in RouterTests.
Final Testing Notes
While we have timing requirements, there are no timing-specific tests for this assignment. So long as your implementation does not take unreasonably long to run on the autograder, it should pass even if it’s not the most efficient way to solve the problem.
Additionally, since this assignment uses data structure from previous assignments, our grader tests will attempt to use our solution data structures instead of yours, to prevent double-penalizing you for bugs in old code. In order for this to work properly, you must call the create[...] methods provided in each class you implement, instead of using your own constructors. (During grading, we override these methods to use our data structures. This also means that you can force the grader to use your own implementation by deliberately not using these methods, if you’re confident that your old implementations are correct.)
Optional Extensions
Heroku Deployment
Optionally, you can deploy your HuskyMaps project to the web for free. Make sure that you’ve submitted the project first and have received full credit on Gradescope as we’ll be making changes that are incompatible with the Gradescope autograder.
An easy way to deploy apps to the web is by distributing them as a JAR with dependencies in IntelliJ. A JAR with dependencies is a type of Java ARchive that includes all your code as well as the external libraries (dependencies) used in the project. A JAR with dependencies is a useful way to distribute code that can run anyone else’s machine even without setting up IntelliJ like we did in the first homework. We need to package all the resources, including all 43,690 map tiles, into a single file.
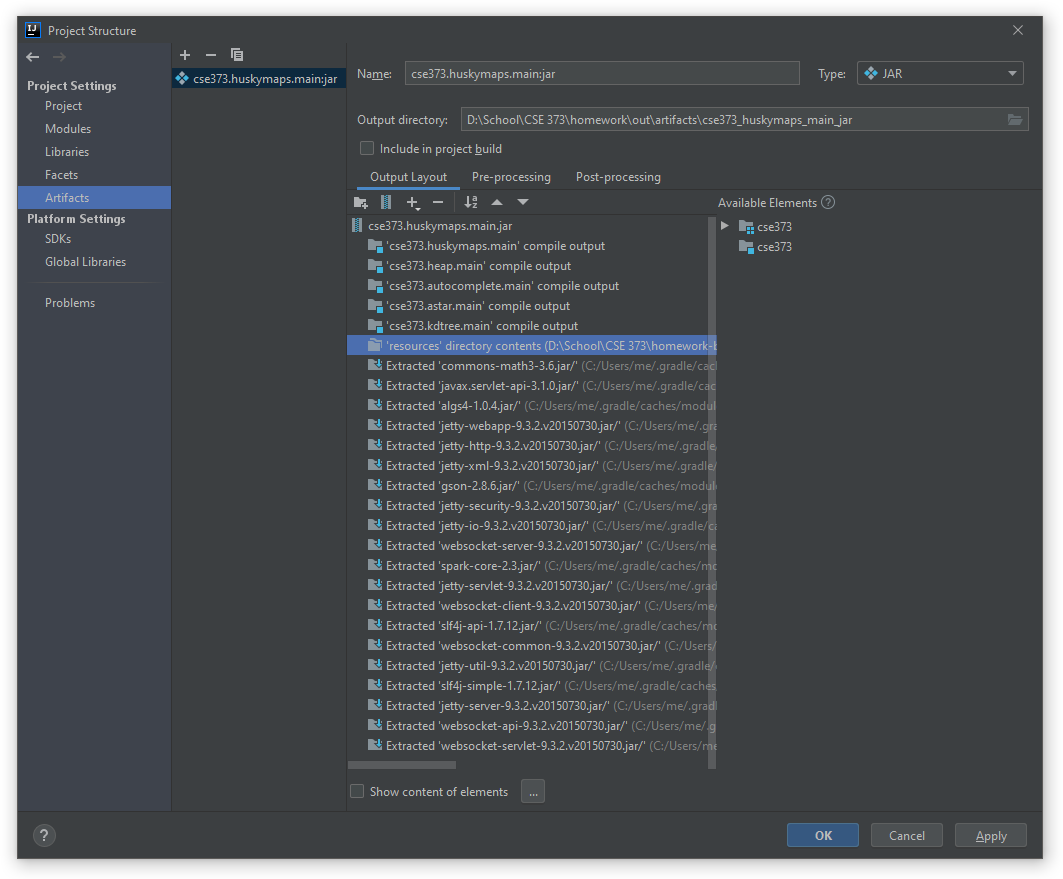
- Configure IntelliJ to build the JAR:
- From the File menu, tap Project Structure, Artifacts, +, JAR, From modules with dependencies….
- In the Module dropdown, select the module for
cse373.huskymaps.main. In the Main Class field, tap on the folder icon on the right end and select theMapServerclass. Make sure that Directory for META-INF/MANIFEST.MF is set to the folder for[your project dir]/huskymaps/resources. Then, click OK. - By default, IntelliJ seems not to pick up our resource files, so we need to configure that manually. Under the Output Layout tab:
- Deselect the icon for Sort Elements by Names and Types (the icon with the down arrow from a to z).
- Click the + icon (Add Copy of), then select Directory Content. Select the
huskymaps/resourcesdirectory in your project, then hit OK. - With the newly-added item for ‘resources’ directory contents selected, hit the up-arrow icon (Move Up (disbled if elements are sorted)) repeatedly until the ‘resources’ directory contents item is above all the Extracted ‘… .jar’ items. (It doesn’t matter where it is relative to the ‘cse373. …’ compile output items; above/below/between those should all be fine.)
- If you changed the value for
OSM_GZ_RESOURCE_NAMEinhuskymaps.utils.Constants, set it back to its original value:/seattle-small.osm.gz. (The Heroku free instance does not have enough memory to load the full graph inseattle.osm.gz.) - Build your JAR. From the Build menu, Build Artifacts…. This will create your JAR with dependencies in
out/artifacts. (This may take a while, since IntelliJ needs to copy all the resources into the JAR.)
Test your JAR by running it from the terminal. In a terminal window, navigate to out/artifacts (not huskymaps/out/artifacts) and run java -jar with the name of your JAR file. Without configuring anything else, the MapServer will run just as it did in IntelliJ!
Once you have a runnable JAR file, set up the Heroku Command Line Interface and create a Heroku app.
- Create a free Heroku account.
- Set up Heroku Command Line Interface.
- In your terminal, navigate to your personal repository and login to Heroku CLI with
heroku login. - Run
heroku plugins:install javato install the Java plugin. - Run
heroku create huskymaps-YOUR_UW_NETID. This will create a Heroku app with the namehuskymaps-YOUR_UW_NETIDvisible in your Heroku Dashboard. Finally, deploy your JAR to your Heroku app by running
heroku deploy:jar PATH_TO_JAR.jar --app huskymaps-YOUR_UW_NETID --jdk 11
Check the status of your deployment in the Heroku Dashboard. Your app will be deployed at https://huskymaps-YOUR_UW_NETID.herokuapp.com. On the first use, it typically takes about 10–20 seconds for the Java server to start up and load the OSM database file.
Map Customization
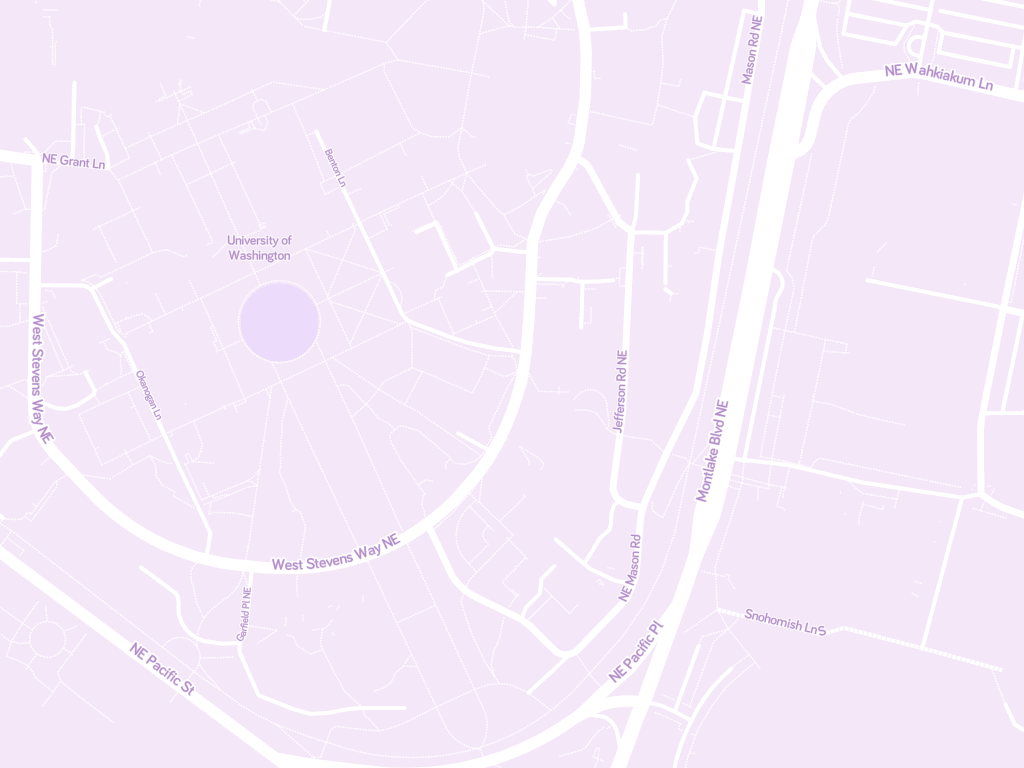
The map tiles for HuskyMaps are provided by MapBox, an open source mapping platform for custom designed maps. Our beautiful map tileset is the “Ice Cream” style by Maya Gao available from the public MapBox Gallery. You can also create your own custom map style in MapBox Studio and download the tileset to your computer for free.
- Create a free MapBox account and save the access token to a file called
token. Make sure the token is not in your personal repository. - Choose an existing style from the MapBox Gallery or create your own style in MapBox Studio.
- Download get_mapbox_tiles.py and config.py to the same directory containing the
token. Install Python 3 if it isn’t already installed. - From a terminal window, execute the following command, substituting in
USERNAMEandSTYLEfor your username and style ID from MapBox Studio. This command will download 43,690 tiles from the MapBox API and place them in a (new) folder calledout.python3 get_mapbox_tiles.py --username=USERNAME --style=STYLE token out
Since it costs MapBox money to run this service, free accounts have a monthly limit. get_mapbox_tiles.py uses the Static Tiles API, which currently allows up to 200,000 monthly tile requests for free. You don’t need to share any payment information with MapBox to use a free account.
Turn-By-Turn Navigation
Optionally, you can also implement turn-by-turn navigation directions by completing the Router.routeDirections method. This is totally optional, not worth any points, but it is awfully cool. We will provide no guidance for this part, but see the NavigationDirection class if you’re interested.
Submission
Commit and push your changes to GitLab before submitting your homework to Gradescope.
- Note
- We have your repository configured to avoid pushing all of the extra
datafiles that will slow down the autograder. Don’t commit or submit anyxml.gz,json, orjpgfiles. Doing so may waste your internet bandwidth, slow down the autograder, or even crash your computer.
© Mapbox, © OpenStreetMap, Improve this map. Data available under the Open Database License.
Components include the JavaSpark web framework and Google Gson library. Alan Yao for creating the original version of this project. Colby Yuan and Eli Lipsitz for substantial refactoring of the front end. Rahul Nangia for substantial refactoring of the back end.
Josh Hug. 2018. Bear Maps: Creating Routes with Open Street Maps. In Nifty Assignments 2018. http://nifty.stanford.edu/2018/hug-bear-maps.html ↩