Getting Started
Learning the workflow for regular project assignments.
Table of contents
- Overview
- Adding a Partner
- Pair Programming
- Merging
- Getting the Assignment
- General Assignment Structure
- Inheritance in Test Classes
- Submission Rate Limiting
Overview
Project 0 was focused on setup and review in a style vaguely reminiscent of CSE 143. The other assignments in this course will differ significantly in two ways:
- You will be allowed to work and submit together with a partner.
- The assignment specifications will often be more vague, in order to encourage you to discuss with your partner, or with other students.
- Reminder
- When discussing with students other than your partner or when using online resources, always cite your collaborations as comments in your code, and otherwise follow the collaboration policies for projects.
Adding a Partner
Students not working with a partner may ignore this section.
First things first: you will not need to tell the course staff who your partner is or whether you have one at all until you submit the assignment.
There are multiple ways to work on the same codebase for these assignments, but here’s our recommended way:
- Arbitrarily choose one of the two group members, and work in that member’s personal GitLab repository. It doesn’t matter which member you choose, since the code from project 0 will not be needed again.
- The chosen partner gives the other member access to their repository on GitLab. That partner should:
- Navigate to the Settings » Members page from the sidebar of their repository’s webpage on GitLab.
- Invite the other member (using their UW NetID) with Maintainer permissions. (Any role less permissive will not allow them to push to the master branch.)
- The other member clones the chosen member’s repository as described in project 0.
Afterwards, both partners should have the chosen member’s repository cloned and should be able to push and pull from the chosen partner’s GitLab repository.
- Note
- If your group decides to terminate the partnership after the assignment, the chosen member should revoke the other member’s access to their GitLab repository. (The other member should remember to pull one last time before this happens, so that they can manually copy the latest version of code into their own repo. Otherwise, the submitted code should still be accessible from Gradescope afterwards, but downloading the code this way may be more cumbersome than simply using Git.)
Pair Programming
When working on code in your group, we strongly recommend against trying to divide-and-conquer the separate sections of assignments. Not all sections require the same amount of time and effort, and sections of an assignment often depend on previous sections, so splitting work this way will likely reduce your ability to understand the assignment rather than saving any time.
Instead, we recommend pair programming—this will ensure that both parties contribute equally and that both parties know what the code does and how to use it later. Additionally, discussing and writing code together will greatly improve your ability to plan and debug as you work.
If you have 5–10 minutes, take a look at this document about pair programming. It has several tips and motivations for pair programming, and even includes a recap at the end if you only have 1 minute to spare.
- Note
- Due to current global circumstances, you’ll need to pair program by screen-sharing through an online video calling application, such as Zoom.
Merging
If your group decides against pair programming for whatever reason and instead decides to work separately and simultaneously, you may need to pull and merge any new commits pushed to GitLab by your partner before you are able to push yourself.
Git will try to automatically attempt a merge when you pull: if the two sets of commits involve different files, it will just apply both sets; additionally, if both sets of changes alter different parts of the same file, Git will attempt to integrate both sets of changes automatically.
However, if both sets of changes touch the same line, you’ll need to manually resolve the merge; this is called a merge conflict. Check out IntelliJ’s page on resolving merge conflicts; there’s a nifty window that will pop up that should help you resolve these relatively pain-free. Also feel free to come to office hours if you have trouble with this stuff.
- Warning
- If you aren’t careful in this process and cancel the merge (e.g., by clicking “Abort”), your repository may be left in a half-merged state, which will prevent most Git functionality from working properly. If anything goes wrong, we recommend coming in to office hours for help unless you’re confident in your Git knowledge—Googling and trying random things may create more issues, and these things tend to be difficult to debug via the discussion board.
Getting the Assignment
- Note
- For those working in groups, only 1 member needs to go through this process. After that member pushes the changes, the other member can then acquire the changes by pulling normally (from the default origin remote). Having both members go through this process separately is likely to cause merge conflicts.
To get the skeleton (starter) code for the assignment, first open IntelliJ. IntelliJ should automatically open your most-recently-used project, which will likely be your personal repository for this class.
Edit: We forgot to update some of the configuration files, so here are some necessary instructions to adjust:
- In the menu bar, tap on the VCS, then hover over Git and tap Remotes…
- Select the option whose name is
skeletonand has20wispecified. Click the pencil button in the lower left corner of that window to edit the selected option, and replace the20wiin the URL with20sp.
In the menu bar, tap on the VCS item, then hover over Git and tap Pull… in the submenu.
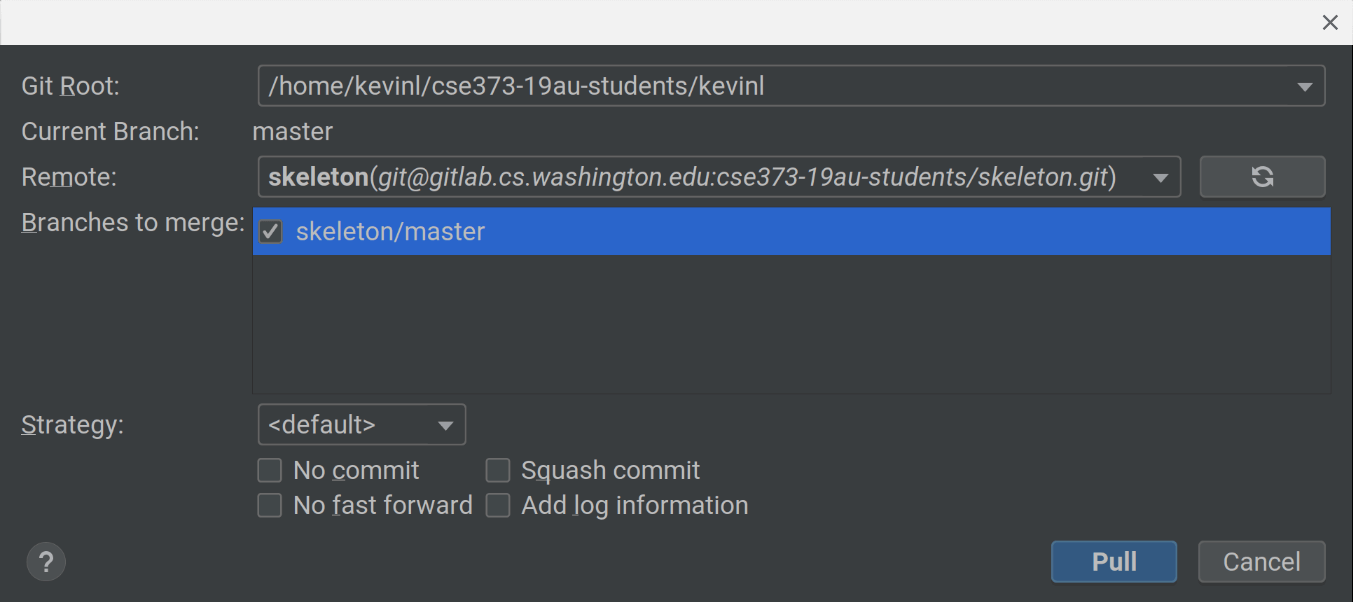
In the window that appears, change the “Remote” to skeleton and select skeleton/master in the “Branches to merge”. If there are no branches to merge, try tapping the refresh icon next to the remote to update the list of branches. Then, tap the blue Pull button to get the project skeleton code.

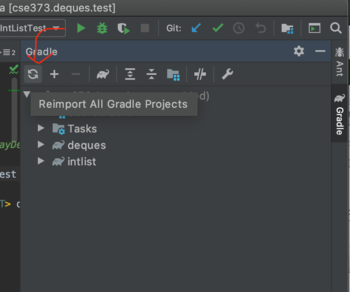
If the deques folder that you just pulled isn’t bolded in the file explorer like cse143review, and you can’t seem to run any tests, it is likely that IntelliJ didn’t react to the change in time. We can manually ask it to reimport your project.
On the far right-hand side of IntelliJ, there’s a Gradle tool window that you can bring up. Click on “Reimport All Gradle Projects” (refresh button):

General Assignment Structure
Most of the project assignments in this course share the same overall project structure: we’ll provide an interface or abstract class representing the main ADT or algorithm for the assignment, and the main assignment will involve implementing that in subclasses. In this assignment, the main interface is deques.Deque, and you’ll be working in the ArrayDeque and LinkedDeque classes in the same package.
Like in the previous assignment, changes to other classes or any new files you add will be ignored during grading, but you will often need to import or use these other classes in your implementation.
Assignments will also include client packages that act as users of the ADT/data structure you implement. In this assignment, the client is contained in the experiments package, which displays runtime plots of some provided experiment methods that use the deques you implement.
However, unlike the previous assignment, this and all future assignments will have extremely lax restrictions on classes you are allowed to import: in general, all imports are allowed except for classes that solve exactly the same problem presented in the assignment.
For example, for this assignment, the only restricted imports are for Java’s own deque and list implementations.
Inheritance in Test Classes
Given that we’ll often be working with different implementations of an ADT that provide identical functionality, it stands to reason that the code for testing the functionality of different implementations would also look similar.
In order to share test code, our provided tests are often written in an abstract base test class, where each test method calls an abstract method to obtain the instance of the class to test. This way, we can create multiple subclasses of this base class, each overriding the abstract method to construct instances of the different ADT implementations.
In this assignment, the base test class is BaseDequeTests, and its subclasses ArrayDequeTests and LinkedDequeTests test ArrayDeque and LinkedDeque respectively.
As it turns out, this design pattern has dedicated support in IntelliJ, so attempting to run an abstract test class or a test method in one of them will cause IntelliJ to bring up a menu allowing you to select which implementation to run.
Submission Rate Limiting
Finally, a note on the rate limits enforced by the Gradescope autograder: project 0 included nominal rate limiting, but from this project onward, the limiting will gradually get stricter. The limiting is intended to discourage you from abusing the autograder system (e.g., by spamming submissions just to see feedback on grader-only tests, without thinking about changes you’re making), so most students working normally should never actually hit the limit.
To make the system easier to understand, we describe the limiting in terms of submission tokens: you’ll start each assignment with the maximum number of tokens for that assignment, and grading a submission consumes 1 token. Tokens will recharge some rate (depending on the assignment) as long as you’re under the max token count. If you make a submission with no tokens remaining, your submission will not be graded, and you’ll need to resubmit after you get a token back. (The submission feedback on Gradescope should include the time of your next token recharge.)
- Tip
- Since token recharging is time-based, it will always be to your benefit to start early on assignments.
- Tip
- The ability to store up multiple tokens should allow you to work more flexibly, so you can (and should) take breaks to eat/sleep/etc. without feeling like you’re “wasting” tokens. If you’re having a hard time writing or debugging some code, it will often be more efficient to take a break and return later with a fresh mindset, rather than repeatedly bashing your head against the problem.
- Note
- The grader will (silently) refund your token if no sections score above 0 (e.g., all tests fail, or you have a compilation error).
For this assignment, the max token count is 6, and 1 token will recharge every 10 minutes.
Now, you should be ready for the programming portion of the assignment.