Here is how to create waveforms in Designworks (one of several). This method
has worked good for me. I dont know all the in-depth details of designworks, but here is what to do. If you figure out a simpler way, that is as accurate and repeatable, please let me know:
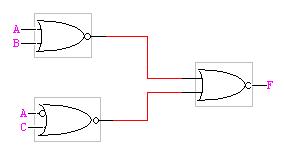
- Create your circuit in Flat Mode-General, this is the most basic of Designwork's modes and has a minimum of options enabled and seems
to be good for simulation. The circuit should have all the input and output wires named. Save the circuit.
- Choose test vector from the designwork's Tools menu. This tool lets us specify values on certain wires at specific times. What you should have is a spreedsheet-like window. For the following example, I assume I have a circuit with inputs of A and B, and outputs of X and Y. In row 0, we will put three basic types of instructions to the simulator:
- In (0,0) type: $Time.
- In (0,1) type: $I A;
in (0,2) type: $I B.
- In (0,3) type: $O X;
in (0,4) type: $O Y.
The meaning of the commands is as follows:
- $Time tells the simulator that this is the time that the command
should be executed. In the $Time column we will specify the times we
want the simulator to change.
- $I name, tells the simulator that the wire with label equal to
"name" is an input. In $I columns we will specify the values we want
the wires to be.
- $O name, similarly tells the simulator that wire with label equal
to "name" is an output. In $O columns we will read our output.
- To set the times up to be correct do the following (I think there is an easier way, but the intuative way I tried didnt work). Instead of setting up absolute times, set up relative times. Ie, instead of saying, at this time, set these values, we are going to say, after a certain time from the last input change, set the values. The way we accomplish this is through the $Delay ($D for short) command. So if I want to set up my values to change every 10 clock ticks I will fill the $Time column with $D 10.
- Fill in the values in the input columns that you want the input signals to be.
- Open the timing window from the Tools menu in Designworks.
- In the circuit, choose the input and output wires (all at once or
one and a time) and from the timing menu in the circuit window, choose
add to timing. (Note that the timing window won't stay on top of the
circuit. Resize the windows so they can co-exist.)
- In the test vector window, choose link to active circuit from the options menu.
- In the test vector window, choose copy to timing from the options menu. ( This step may not be neccesary)
- In the simulator window (which should open with the timing) click on reset.
- In the test vector window, click the reset button. (This will clear any outputs, but leave the input and time)
- In the test vector window, click walk.
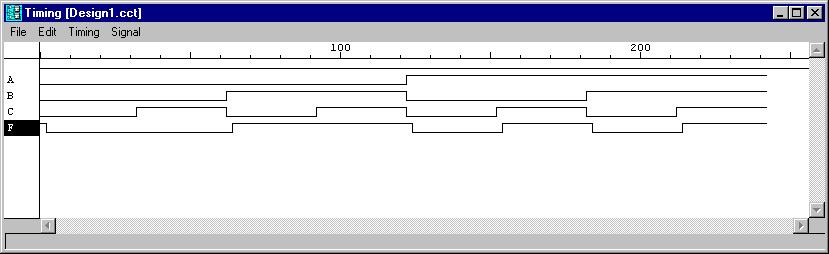
- The waveform and the output values should now be in the
timing and test vector windows respectivaly.
- Repeat steps 9-12 for new waveforms.
Click here to see an example of a test vector for this circuit and the waveform.
Note: There are other ways to do waveforms, but this is the quickest and most accurate and easiest to duplicate that ive found.


