Homework 4: Multithreaded Web Server
- Use POSIX sockets to create a server that accepts IPv4 and IPv6 client connections.
- Parse HTTP requests from a byte stream, including partial reads and multiple requests on one connection.
- Use a thread pool to process concurrent client connections and coordinate graceful server shutdown.
- Integrate the HW3 query processor into a web server that generates HTTP responses and serves static files.
- Prevent cross-site scripting and directory traversal attacks by escaping untrusted input and validating file paths.
Goals
In this assignment you will build on your HW3 implementation to implement a multithreaded Web server front-end to your query processor. In Part A, you will read through some of our code to learn about the infrastructure we have built for you. In Part B, you will complete some of our classes and routines to finish the implementation of a simple Web server. In Part C, you will fix some security problems in our Web server.
General Implementation Notes
- In HW4, as with HW2 and HW3, you don't need to worry about
propagating errors back to callers in all situations.
You will use
Verify333()calls to spot some kinds of errors and cause your program to crash. However, no matter what a client does, or what input the web server reads, your web server must handle that; only internal issues (such as out of memory) should cause your web server to crash out. - As before, you may not modify any of the existing header files or class definitions distributed with the code. If you wish to add extra "helper" functions, you can do that by including additional static functions in the implementation (.cc) files.
- You also may not modify the
Makefiledistributed with the project. In particular, there are reasonable ways to do the necessary string handling without using the Boost Regex library.
Suggested Work Schedule
To help you schedule your time, here's a suggested order for the parts of this assignment. We're not going to enforce a schedule; it's up to you to manage your time.
- Read over the project specifications and understand which code is responsible for what.
- Finish
ServerSocket.cc. Make sure to cover all functionality, not just what is in the unit tests. - Implement
FileReader.cc, which should be very easy, andGetNextRequest()inHttpConnection.cc. - Complete
ParseRequest()inHttpConnection.cc. This can be tricky, as it involves both Boost and string parsing. - Finish the code for
http333d.cc. - Implement
HttpServer_ThrFn()inHttpServer.cc. - Complete
ProcessFileRequest()andProcessQueryRequest()inHttpServer.cc. At this point, you should be able to search the "333gle" site and view the webpages available under/static/, e.g.http://localhost:5555/static/bikeapalooza_2011/index.html. - Fix the security issues with the website, if you have any.
- Make sure everything works as it is supposed to.
Multithreaded Web Server
Part A: Read Through Our Code
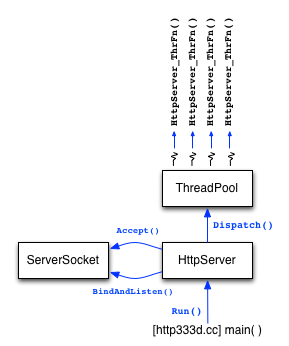
Our web server is a fairly straightforward multithreaded application. Every time a client connects to the server, the server dispatches a thread to handle all interactions with that client. Threads do not interact with each other at all, which greatly simplifies the design of the server.
The figure above shows the high-level architecture of the
server.
There is a main class called HttpServer that uses a
ServerSocket class to create a listening socket, and
then sits in a loop waiting to accept new connections from clients.
For each new connection that the HttpServer receives,
it dispatches a thread from a ThreadPool class to handle
the connection.
The dispatched thread springs to life in a function called
HttpServer_ThrFn() within the
HttpServer.cc file.
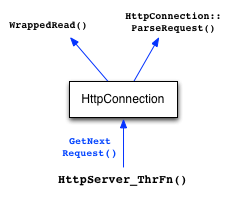
The HttpServer_ThrFn() function handles reading
requests from one client.
For each request that the client sends, the
HttpServer_ThrFn() invokes GetNextRequest()
on the HttpConnection object to read in the next
request and parse it.
To read a request, the GetNextRequest() method invokes
WrappedRead() some number of times until it spots the
end of the request.
To parse a request, the method invokes the
ParseRequest() method (also within
HttpConnection).
At this point, HttpServer_ThrFn() has a fully
parsed HttpRequest object (defined in
HttpRequest.h).
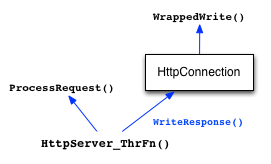
The next job of HttpServer_ThrFn() is to process the
request.
To do this, it invokes the ProcessRequest() function,
which looks at the request URI to determine if this is a request for
a static file, or if it is a request associated with the search
functionality.
Depending on what it discovers, it either invokes
ProcessFileRequest() or
ProcessQueryRequest().
Once those functions return an HttpResponse, the
HttpServer_ThrFn() invokes the
WriteResponse() method on the
HttpConnection object to write the response back to the
client.
Our web server isn't too complicated, but there is a fair amount of plumbing to get set up. In this part of the assignment, we want you to read through a bunch of lower-level code that we've provided for you. You need to understand how this code works to finish our web server implementation, but we won't have you modify this plumbing.
Part A Instructions
- Change to a directory with your local copy of your CSE 333
GitLab repository, which has your
hw1/,hw2/,hw3/, andprojdocs/directories in it. Usegit pullto retrieve the newhw4/folder with the starter code for this assignment. You will need thehw1/,hw2/, andhw3/directories in the same folder as your newhw4/folder since hw4 links to files in those previous directories. By default, the HW4Makefilebuilds and links your HW1, HW2, and HW3 libraries. To use the provided solution libraries instead, setUSE_SOLUTION_BINARIES = truenear the top of theMakefile. - Run
maketo compile the HW4 binaries. One of them is the usual unit test binary calledtest_suite. Run it to discover failing unit tests that you'll need to fix. The second binary is the web server itself:http333d. Try running it to see its command line arguments. When you're ready to run it for real, you can use a command like:$ ./http333d 5555 ../projdocs unit_test_indices/*
(You might need to pick a different port than 5555 if someone else is using that port on the same machine as you.) - Run the server in
solution_binaries/using a similar command line:$ ./solution_binaries/http333d 5555 ../projdocs unit_test_indices/*
Use a web browser to explore what the server should look like when it is finished:- If you are running the code on a lab computer or the CSE Home VM: Launch Firefox or Chrome on that machine, visit http://localhost:5555/, and try issuing some searches. As well, visit http://localhost:5555/static/bikeapalooza_2011/Bikeapalooza.html and click around. This is what your finished web server will be capable of.
- If you are running the code on
attuover an SSH connection: Follow the same steps as above, but navigate to the address for the instance ofattuyour code is running on. For example, if you are running your code onattu4, you would visit the following addresses: http://attu4.cs.washington.edu:5555/ and http://attu4.cs.washington.edu:5555/static/bikeapalooza_2011/Bikeapalooza.html
- When you are done with the
http333dserver, shut it down gracefully using/quitquitquit(e.g., http://attu4.cs.washington.edu:5555/quitquitquit). Use this method whenever you run the server under Valgrind so it can finalize its heap-checking statistics.If you're not using Valgrind to collect statistics, another way to shut down the server is to open another terminal window on the same machine that is running the server and run the command
kill pidwherepidis the server process id. Use theps -ucommand on the same machine (attu or local VM) to find that process id. You also can shut down the server by typing control-C in the window where it is running, but this abrupt stop isn't as graceful and will definitely make it hard for Valgrind to report accurate statistics (if you want them). - Read through
ThreadPool.handThreadPool.cc. You don't need to implement anything in either, but several pieces of the project rely on this code. The header file is well-documented, so it ought to be clear how it's used. (There's also a unit test file that you can peek at.) - Read through
HttpUtils.handHttpUtils.cc. This class defines a number of utility functions that the rest of HW4 uses. You will have to implement some of these utilities. Make sure that you understand what each of them does, and why. - Finally, read through
HttpRequest.handHttpResponse.h. These files define theHttpRequestandHttpResponseclasses, which represent a parsed HTTP request and response, respectively.
Part A is complete when HW4 builds, you can run the supplied server and visit both its search and static-file pages, and you understand the roles of the provided thread pool, HTTP utilities, request, and response classes.
It's time to start coding in Part B.
Part B: Basic Web Server
You are now going to finish a basic implementation of the
http333d web server.
You will need to implement some of the event handling routines at
different layers of abstraction in the web server, culminating with
generating HTTP and HTML to send to the client.
Part B Instructions
- Take a look at
ServerSocket.h. ImplementBindAndListen()andAccept()inServerSocket.cc. Your implementation must handle both IPv4 and IPv6 clients. This stage is complete when the following test passes:$ ./test_suite --gtest_filter=Test_ServerSocket.TestServerSocketBasic
- Read through
FileReader.handFileReader.cc. ImplementFileReader::ReadFile(), including its failure cases and support for binary data. This stage is complete when the following test passes:$ ./test_suite --gtest_filter=Test_FileReader.TestFileReaderBasic
- Read through
HttpConnection.handHttpConnection.cc. First implementGetNextRequest(). It must handle partial reads and preserve bytes belonging to a subsequent request. - Implement
ParseRequest()inHttpConnection.cc. This stage is complete when both HttpConnection tests pass:$ ./test_suite --gtest_filter=Test_HttpConnection.*
- Read through
HttpUtils.handHttpUtils.cc. ImplementIsPathSafe()andEscapeHtml(). This stage is complete when the relevant utility tests pass:$ ./test_suite --gtest_filter='Test_HttpUtils.TestHttpUtilsIsPathSafe*:Test_HttpUtils.TestEscapeHtml'
- Implement
GetPortAndPath()inhttp333d.cc. Verify that valid arguments start the server and that malformed ports, unreadable static directories, unreadable index files, and missing index arguments are rejected. - Read through
HttpServer.handHttpServer.cc, then implementHttpServer_ThrFn(). Verify that one client can send multiple requests on a connection, that responses are written, and that/quitquitquitshuts down the server gracefully. - Implement
ProcessFileRequest()andProcessQueryRequest()inHttpServer.cc. Exercise both web search and static file serving in a browser. You'll probably need to look at the source of pages that our solution binary serves and emulate that HTML to get the same "look and feel" to your server as ours. If you wish, you can change the appearance of the front page ("dark mode", different graphics, etc.) but you should not change or add to the functionality of the server beyond the appearance now. If you want to do more, see the Bonus section below. This stage is complete when searches return useful results, links open the indexed files under/static/, static text and binary files load with appropriate content types, and the fulltest_suitepasses.
At this point, your web server should run correctly, and everything
should compile with no warnings.
Try running your web server and connecting to it from a browser as
described above.
Also try running the test_suite under valgrind to make
sure there are no memory issues.
Finally, launch the web server under Valgrind to make sure there are
no issues or leaks; after the web server has launched, exercise it by
issuing a few queries, then shut it down with
/quitquitquit so Valgrind can finalize its report.
(The supplied code does have some leaks, but your code should not
make things significantly worse.)
Part C: Fix Security Vulnerabilities
Now that the basic web server works, you will discover that your web server (probably) has two security vulnerabilities. We are going to point these out to you, and you will repair them.
Part C Instructions
It's likely at this point that your implementation has two security
flaws. (However, please note: it is possible that the way you
implemented things above means you have already dealt with these
flaws).
You may find that some of the functions defined in
HttpUtils.cc will be very helpful in fixing these
security flaws in your web server.
- The first is called a "cross-site scripting" flaw.
See this for background if you're curious:
http://en.wikipedia.org/wiki/Cross-site_scripting
Try typing the following query into our example web server, and into your web server, and compare the two. (Note: do this with Firefox or Safari; it turns out that Chrome will attempt to help out web servers by preventing this attack from the client-side!)
hello <script>alert("Boo!");</script>Your browser will pop up a dialog box saying "Boo!" when you use your flawed server. To fix this flaw, you need to "escape" certain types of untrusted input from the client before you relay it to output. We've provided you with an escape function in
HttpUtilsthat detects input which requires escaping and performs any necessary replacement, and you should implement it. - Use
ncto connect to your web server, and manually send a request for the following URL. (Browsers are smart enough to help defend against this attack, so you can't just type it into the URL bar, but nothing prevents attackers from directly connecting to your server with a program of their own!)/static/../hw4/http333d.cc
This second flaw is called a directory traversal attack. Instead of trusting the file pathname provided by a client, you need to normalize the path and verify that it names a file within your document subdirectory tree (which would be
../projdocs/if the example command shown in part A was used to start the server). If the file path names something outside of that subdirectory, you should return an error message instead of the file contents. We've provided you with a function inHttpUtils.hto help you test to see if a path is safe or not.
Part C is complete when the following tests pass, the script query is displayed as text rather than executed, and a traversal request does not return a file outside the static document directory:
$ ./test_suite --gtest_filter='Test_HttpUtils.TestHttpUtilsIsPathSafe*:Test_HttpUtils.TestEscapeHtml'
Fix these two security flaws, assuming they do in fact exist in your
server.
As a point of reference, in solution_binaries/, we've
provided a version of our web server that has both of these flaws in
place (http333d_withflaws).
Feel free to try it out, but DO NOT leave this server running,
as it will potentially expose all of your files to anybody that
connects to it.
(Also, do not leave your http333d server running at
least until after you've patched these vulnerabilities for the same
reason.)
Congrats, you're done with the CSE 333 project sequence!!
Bonus Tasks
Before starting bonus work, submit the required assignment using
the hw4-submit tag as described in the
Submission section.
When the bonus work is complete, commit and push it, then create and
push an hw4-bonus tag.
We grade bonus work only when that tag is present.
Also, if you do any of the bonus parts of the project, you
must add a readme-hw4-bonus.md text file to your
hw4/ directory and include this in the files you push to
your GitLab repository.
This file should contain a brief description of the additions you
have done and describe how to use them.
This should be brief: a few sentences or a couple of
paragraphs should probably be sufficient.
- The first bonus task is to perform a performance analysis of
your web server implementation, determining what throughput your
server can handle (measured both in requests per second and bytes
per second), what latency clients experience (measured in seconds
per request), and what the performance bottleneck is.
You might want to look at the
httperftool for Linux to generate synthetic load.You should conduct this performance analysis for a few different usage scenarios; e.g., you could vary the size of the web page you request, and see its impact on the number of pages per second your server can deliver. If you choose to do this bonus task, please include a PDF file in your submission containing relevant performance graphs and analysis.
- The second bonus task is to figure out some
interesting feature to add to your web server, and implement it!
As one idea, find the implementation of a "chat bot", such as
Eliza, and add it to your web server.
As another idea, implement logging functionality; every time your
server serves content, write out some record with a timestamp to a
log file; make the log file available through the web server itself.
As a third idea, change the results page to show context from
matching documents, similar to how Google shows excerpts from
matching pages; specifically, make it so that each result in the
result list shows:
x words + <bold>hit word</bold> + y words
for one or more of the query words that hit.This part of the assignment is deliberately open-ended, with much less structure than earlier parts. The (small) amount of extra credit granted will depend on how interesting your extension is and how well it is implemented.
Testing
As with the previous assignments, you compile your implementation by
using the make command.
This will result in several output files, including an executable
called test_suite.
You can run all of the tests with the usual command:
$ ./test_suite
You can also run selected tests by providing command-line arguments
to test_suite.
This is extremely helpful for debugging specific parts of the
assignment, especially since test_suite can be run with
these settings through valgrind and gdb!
Some examples:
- To only run the
HttpConnectiontests, enter:$ ./test_suite --gtest_filter=Test_HttpConnection.*
- The
ServerSockettests can take a while to run, so to run all tests except for those, enter:$ ./test_suite --gtest_filter=-Test_ServerSocket.*
You can specify which tests are run for any part of the assignment. You do need to know the names of the tests, and you can find them by running:
$ ./test_suite --gtest_list_tests
Style
In addition to passing the tests, we want to see that your code is readable and of good quality. This includes several aspects:
- Modularity: Your code should be sufficiently factored,
and we will look to see if there is any redundancies that can be
removed.
If you do create any additional private (e.g.,
static) helper functions, be sure to include good comments for that function that explains the inputs, outputs, and behavior. - Good Practices: Your code should follow the C++ programming practices that we have established in the exercises. Refer to the Style Focus sections of previous exercise specifications for more details.
- Readability: You should attempt to mimic the style of code that we've provided to you. Aspects you should mimic are conventions you see for capitalization and naming of variables, functions, and arguments, the use of comments to document aspects of the code, and how code is indented.
- Linter: We use the
cpplint.pytool to check your code for style issues. Make sure that you have fixed all issues reported by the linter before submitting. - Style Guide: You also will find it useful to refer to the CSE 333 Style Guide.
When in doubt, come to office hours or post on the discussion board. We are happy to answer questions about style and readability.
Submission
When you are ready to turn in your assignment, follow the
Git Basics guide
to create a hw4-submit tag on the commit with your completed
project. Commit and push all necessary files before you push
the tag.
After pushing the tag, clone a fresh copy of your repository into a new,
empty directory, check out the hw4-submit tag, and verify that
everything builds and works. If your project doesn't build when the
staff repeat these steps to grade it, you may lose a large amount of
credit even if your work is otherwise correct.
hw1/libhw1.a, hw2/libhw2.a, and hw3/libhw3.a, which is needed to build hw4.
Either run "make" in the hw1/, hw2/, and hw3/ directories, or copy the versions from the solution_binaries/ folders into the right places.
hw4-bonus tag and push that after adding
the bonus code to your repository.
Also, verify that the hw4-submit tag is still present and that it includes only the required parts of the project.
Grading
At a high-level, your grade comes down to two things:
- Does it work? Most of your grade is how many of our unit tests your code passes. We also run a few extra tests that aren't in the suite we hand you, so aim to handle the general case rather than just the provided examples. If something fails, it's on you to track down why and fix it before the next assignment builds on top of it.
- Is it well written? We also read your code and grade it against the style guidelines described above.
Both matter, so give correctness and code quality your attention as you go. If you get stuck, please come to office hours early rather than the night before the deadline!