Homework 3: On-Disk Inverted Index
- Serialize an in-memory inverted index to disk in a portable, big-endian, architecture-neutral binary format.
- Read on-disk hash-table structures by following byte offsets through an index file.
- Implement C++ classes (constructors, inheritance, and member functions) that service word and document lookups against an index file.
- Build a query processor that searches across multiple on-disk indices and ranks the combined results.
- Use Verify333() checks and valgrind to write robust, leak-free C++ that manipulates on-disk data.
Problem Description
In this assignment, you will build on the search engine you wrote in Homework 2 by moving its inverted index out of memory and onto disk. You will write the code that saves an index to a file, reads it back, and answers queries against one or more on-disk indices.
- In Part A, you will write code that takes an in-memory inverted index produced by HW2 and writes it out to disk in an architecture-neutral format.
- In Part B, you will write C++ code that walks through an on-disk index to service a lookup.
- In Part C, you will write a query processor that serves queries from multiple on-disk indices.
As with HW2, you don't need to worry about propagating errors back to
callers in all situations. You will use Verify333() to
spot errors and crash your program if they occur; we will not be using
C++ exceptions in HW3.
As before, you may not modify any of the existing header files or
class definitions distributed with the code. If you want extra helper
functions, add static functions in the implementation
(.cc) files.
Setup
Once you've pulled your Gitlab repo, build HW3 with make on the CSE Linux machines. It
links against your hw1/ and hw2/
libraries. If your HW1 or HW2 code isn't
working, edit the Makefiles so USE_SOLUTION_BINARIES=true to
link to a staff solution binary instead.
The HW3 modules. HW3 is organized as a pipeline that turns an in-memory index into an on-disk index and then services queries against one or more of those on-disk indices. The table below describes how each module fits into that design; the sections that follow walk through them in order.
| Module | Role in the design |
|---|---|
| LayoutStructs | The structs that define the on-disk file format shared by every other module. |
| Utils | Helper routines for byte-order conversion and checksums that keep the file format portable. |
| WriteIndex | Writes an in-memory index out to a file on disk (the write side). |
| buildfileindex | The program that crawls a directory tree and calls
WriteIndex to save the index. |
Readers (FileIndexReader,
HashTableReader, DocTableReader,
IndexTableReader, DocIDTableReader) |
Classes that read the tables back out of an on-disk index (the read side). |
| QueryProcessor | Uses the readers to answer a query across one or more indices and rank the results. |
| filesearchshell | The interactive prompt that runs user queries through the
QueryProcessor. |
Build and test. Run make to compile the
project, then run the test suite with ./test_suite.
Because most of the implementation is still missing, the tests will
fail (and might crash out) until you start completing the
assignment.
As before, you must implement all components as specified and you
may not modify any header files or class definitions. You are, of
course, free to add private (static) helper functions
in the .cc files when that makes sense.
Part A: Memory-to-File Index Marshaller
Background
Keeping a search engine index in memory is problematic, since memory is expensive and also volatile. So, in Part A, you're going to write some C++ code that takes advantage of your HW2 implementation to first build an in-memory index of a file subtree, and then it will write that index into an index file in an architecture-neutral format.
What do we mean by architecture-neutral? Every time we need to store a binary integer in the file's data structure, we will store it in big endian representation. This is the representation that is conventionally used for portability, but the bad news is that this is the opposite representation than most computers you use: x86 computers are little endian. So, you will need to convert integers (whether 16-bit, 32-bit, or 64-bit) into big endian before writing them into the file. We provide you with helper functions to do this.
The good news is that we're going to keep roughly the same data structure inside the file as you built up in memory: we'll have chained hash tables that are arrays of buckets containing linked lists. And, our inverted index will be a hash table containing a bunch of embedded hash tables. But, we need to be very precise about the specific layout of these data structures within the file. So, let's first walk through our specification of an index file's format. We'll do this first at a high level of abstraction, showing the major components within the index file. Then, we'll zoom into these components, showing additional details about each.
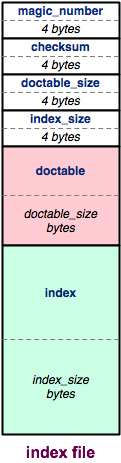
At a high-level, the index file looks like the figure on the right. The index file is split into three major pieces: a header, the doctable, and the index. We'll talk about each in turn.
Header: an index file's header contains metadata about the rest of the index file.
The first four bytes of the header are a
magic number,
or format indicator.
Specifically, we use the 32-bit number 0xCAFEF00D.
We will always write the magic number out as the last step in
preparing an index file.
This way, if the program crashes partway through writing the file,
the magic number will be missing, and it will be easy to tell that
the index file is corrupt.
The next four bytes are a checksum of the doctable and index regions of the file. A checksum is a mathematical signature of a bunch of data, kind of like a hash value. By including a checksum of most of the index file within the header, we can tell if the index file has been corrupted, such as by a disk error. If the checksum stored in the header doesn't match what we recalculate when opening an index file, we know the file is corrupt and we can discard it.
The next four bytes store the size of the doctable region of the file. The size is stored as a 32-bit, signed, big endian integer.
The final four bytes of the header store the size of the index region of the file, in exactly the same way.
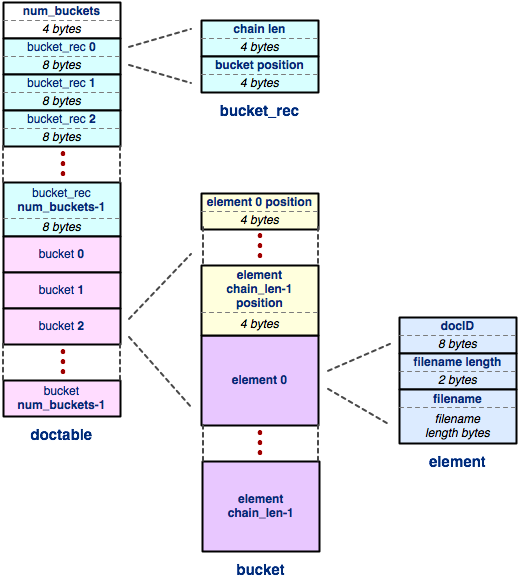
Doctable: The doctable region maps each 64-bit
document ID to an ASCII string holding that document's filename.
It is the id_to_name table from the
DocTable you wrote in HW2, stored in a file instead of
in memory:
struct doctable_st {
  HashTable* id_to_name;   // the doctable region is this table
  HashTable* name_to_id;
  DocID_t    max_id;
};
Only id_to_name is written to the index file.
name_to_id exists so that DocTable_Add()
can recognize a filename it has already seen, and nothing in HW3
looks up a document by name, so it never reaches disk.
The doctable consists of three regions, described below.
num_buckets: this region is the simplest; it is just a 32-bit big endian integer that represents the number of buckets inside the hash table, exactly like you stored in your HashTable.- an array of
bucket_recrecords: this region contains one record for each bucket in the hash table. Abucket_recrecord is 8 bytes long, and it consists of two four-byte fields. The chain len field is a four byte integer that tells you the number of elements in the bucket's chain. (This number might be zero if there are no elements in that chain!) Thebucket positionfield is a four byte integer that tells you the offset of the bucket data (i.e., the chain of bucket elements) within the index file. The offset is just like a pointer in memory, or an index of an array, except it points within the index file. So, for example, an offset of 0 would indicate the first byte of the file, an offset of 10 would indicate the 11th byte of the file, and so on. - an array of buckets: this region contains
one bucket for each bucket in the hash table.
A bucket is slightly more complex; it is a little embedded data
structure.
Specifically, each bucket contains:
- an array of element positions: since elements are variable-sized, rather than fixed-sized, we need to know where each element of the bucket lives inside the bucket. For each element, we store a four-byte integer containing the position (i.e., offset) of the element within the index file.
- an array of elements: at each position specified in the element positions array lives an element. Since this is the docid-to-filename hash table, an element contains a 64-bit document ID and a filename. The document ID is an unsigned, big endian integer. Next, we store a 16-bit (2 byte) signed, big endian integer that contains the number of characters in the file name. Finally, we store the filename characters (each character is a single ASCII byte). Note that we do NOT store a null-terminator at the end of the filename; since we have the filename length in an earlier field, we don't need it!
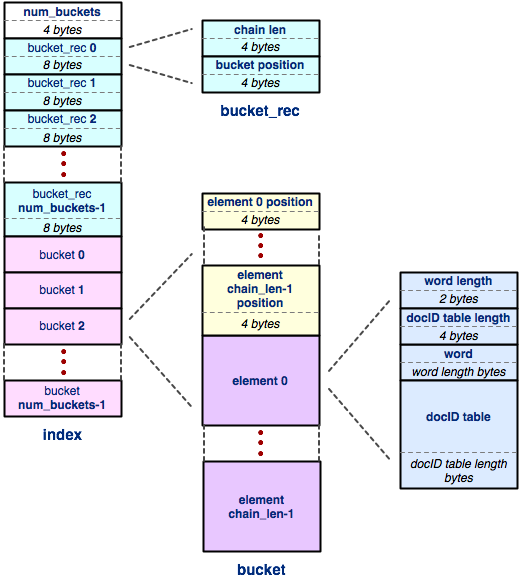
Index: The index is the most complicated of the three regions within the index file. The great news is that it has pretty much the same structure as the doctable: it is just a hash table, laid out exactly the same way. The only part of the index that differs from the doctable is the structure of each element. Let's focus on that.
An index maps from a word to an embedded docID hash table, or docID table. So, each element of the index contains enough information to store all of that. Specifically, an index table element contains:
- a two-byte signed integer that specifies the number of characters in the word.
- a four-byte signed integer that specifies the number of bytes in the embedded docID table.
- an array of ASCII characters that represents the word; as before, we don't store a NULL terminator at the end.
- finally, the element contains some variable number of bytes that represents the docID table. So, all we need to understand now is the format of the docID table. We're sure its format will come as no surprise at this point...
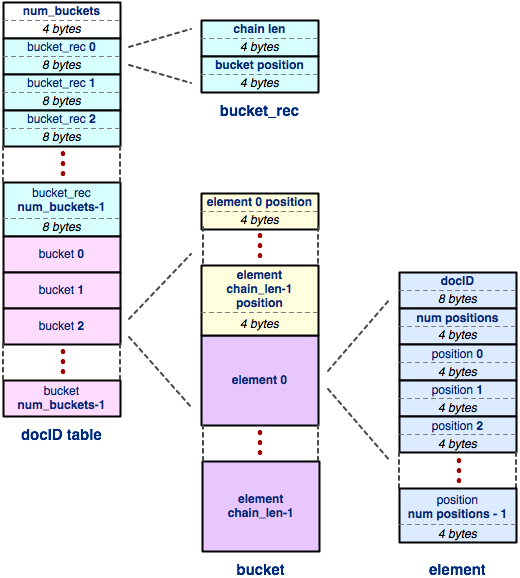
docIDtable: like the "doctable" table, each
embedded "docIDtable" table within the index is just a hash table!
A docIDtable maps from a 64-bit docID to a list of
positions within that document that the word can be found in.
So, each element of the docID table stores exactly that:
- a 64-bit (8-byte) unsigned integer that represents the docID.
- a 32-bit (4-byte) signed integer that indicates the number of word positions stored in this element.
- an array of 32-bit (4-byte) signed integers, sorted in ascending order, each one containing a position within the docID that the word appears in.
So, putting it all together, the entire index file contains a header, a doctable (a hash table that maps from docID to filename), and an index. The index is a hash table that maps from a word to an embedded docIDtable. The docIDtable is a hash table that maps from a document ID to a list of word positions within that document.
Instructions
The bulk of the work in this homework is in this step. We'll tackle it in parts. (If you haven't already, complete the Setup steps above to pull the starter code, wire up your HW1/HW2 libraries, and build the HW3 binaries.)
- Take a look inside
Utils.handLayoutStructs.h. These header files contain some useful utility routines and classes you'll take advantage of in the rest of the assignment. We've provided the full implementation ofUtils.cc. - Next, look inside
WriteIndex.h; this header file declares theWriteIndex()function, which you will be implementing in this part of the assignment. - Also, look inside
buildfileindex.cc; this file makes use ofWriteIndex()and your HW2CrawlFileTree(), to crawl a file subtree and write the resulting index out into an index file. - Try running the
solution_binaries/buildfileindexprogram to build one or two index files for a directory subtree, and then run thesolution_binaries/filesearchshellprogram to try out the generated index file. - Finally, it's time to get to work!
Open up
WriteIndex.ccand take a look around inside. It looks complex, but all of the helper routines and major functions correspond pretty directly to our walkthrough of the data structures above. Start by reading throughWriteIndex(); we've given you part of its implementation. Then, start recursively descending through all the functions it calls, and implement the missing pieces. (Look forSTEP Nin the text to find what you need to implement.)
Compilation
As you work, rebuild often with make and fix any
compiler errors before moving on. Then use the steps below to test
your writer against real index files.
- Once you think you have the writer working,
compile and run the
test_suiteas a first step. Next, use yourbuildfileindexbinary to produce an index file (we suggest indexing something small, like./test_tree/tinyas a good test case). After that, use thesolution_binaries/filesearchshellprogram that we provide, passing it the name of the index file that yourbuildfileindexproduces, to see if it's able to successfully parse the file and issue queries against it. If not, you need to fix some bugs before you move on!If you write the index files to your personal directories on a CSE lab machine or on attu, you may find that the program runs very slowly. That's because home directories on those machines on a network file server, andbuildfileindexdoes a huge number of small write operations, which can be quite slow over the network. To speed things up dramatically we suggest you write the index files into/tmp, which is a directory on a local disk attached to each machine. Be sure to remove the files when you're done so the disk doesn't fill up. - As an even more rigorous test, try running the
hw3fsckprogram we've provided insolution_binariesagainst the index that you've produced.hw3fsckscans through the entire index, checking every field inside the file for reasonableness. It tries to print out a helpful message if it spots some kind of problem.Once you pass
hw3fsckand once you're able to issue queries against your file indices, then rerun yourbuildfileindexprogram under valgrind and make sure that you don't have any memory leaks or memory errors.Congrats, you've passed part A of the assignment!
Part B: Index Lookup
Background
Now that you have a working memory-to-file index writer, the next step is to implement code that knows how to read an index file and lookup query words and docids against it. We've given you the scaffolding of the implementation that does this, and you'll be finishing our implementation.
Instructions
- Start by looking inside
FileIndexReader.h. Notice that we're now in full-blown C++ land; you'll be implementing constructors, manipulating member variables and functions, and so on. Next, open upFileIndexReader.cc. Your job is to finish the implementation of its constructor, which reads the header of the index file and stores various fields as private member variables. As above, look for"STEP N"to figure out what you need to implement. When you're done, recompile and re-run the test suite. You should pass all the tests fortest_fileindexreader.cconce you have implementedFileIndexReadersuccessfully. - Next, move on to
HashTableReader.h. Read through it to see what the class does. Don't worry about the copy constructor and assignment operator details (though if you're curious, read through them to see what they're doing and why). This class serves as a base class for other subclasses. The job of aHashTableReaderis to provide most of the generic hash-table lookup functionality; it knows how to look through buckets and chains, returning offsets to elements associated with a hash value. Open upHashTableReader.cc. Implement the"STEP N"components in the constructor and theLookupElementPositionsfunction. When you're done, recompile and run the unit tests to see if you passtest_hashtablereader.ccunit test. - Now it's time to move on to
DocTableReader.h. Read through it, and note that it is a subclass ofHashTableReader. It inheritsLookupElementPositions()and other aspects, but provides some new functionality. Next, open upDocTableReader.cc,and implement the"STEP N"functionality. See how well you do on its unit test (and valgrind) when you're done. - Next, lets move on to
IndexTableReader.h. Read through it and understand its role. Next, open upIndexTableReader.ccand implement the"STEP N"functionality. Test against the unit tests (and valgrind). - Next, do the same with
DocIDTableReader.handDocIDTableReader.cc. - We're almost there!
Open up
QueryProcessor.hand understand how it is supposed to work. Check outtest_queryprocessor.ccfor more information. Now open upQueryProcessor.ccand read through our implementation of the constructor and destructor.This part of the assignment is the most open-ended. We've given you the function definition for
ProcessQuery(), and also a clue about what you should be building up and returning. But, we've given you nothing about its implementation. You get to implement it entirely on your own; you might want to define static helper functions in the.ccimplementation file, you might want to define other structures to help along the way, etc.; it's entirely up to you. But, once you're finished, you'll need to pass our unit test to know you've done it correctly. (Remember that as with all of our project code, you cannot change any of the.hheader files, even though in non-assignment C++ code we might want to add additional private data or functions to these.)As a hint, you should be able to take inspiration from what you did to implement the query processor in HW2. Here, it's only a little bit more complicated. You want to process the query against each index, and then combine each index's results together and do a final sort (use the STL's
sort). Remember that processing a query against an index means ensuring all query words are present in each matching document, and remember how ranking works. Then, once you have query results from each index, you'll append them all together to form your final query results.One more hint, once you think you have this working, move on to Part C and finish our
filesearchshellimplementation. You'll be able to test the output of yourfilesearchshellagainst ours (insolution_binaries/) as a final sanity check.Also, now would be a great time to run valgrind over the unit tests to verify you have no memory leaks or memory errors.
You're done with part B!
Part C: Search Shell
Background
For Part C, your job is to implement a search shell, just like in HW2, but this time using your HW3 infrastructure you completed parts A and B.
Instructions
- Open up
filesearchshell.ccand read through it. Note that unlike parts A and B, we have given you almost nothing about the implementation of thefilesearchshellbesides a really long (and hopefully helpful) comment. Implementfilesearchshell.cc. - Try using your
filesearchshellbinary. You can compare the output of your binary against a transcript of our solution. The transcripts should match precisely, except perhaps for the order of equally ranked matches. You can also walk yourfilesearchshellagainst a very tiny index,tiny.idx, in the debugger to see if it's reading the correct fields and jumping to the correct offsets. - Also, note that you can hit control-D to exit
the
filesearchshell.filesearchshellought to clean up all allocated memory before exiting. So, run yourfilesearchshellunder valgrind to ensure there are no leaks or errors.
Congrats, you're done with (the mandatory parts) of HW3!!
Bonus Tasks
If you want to do any of the bonus parts, first create a
hw3-final tag in your repository to mark the version of
the assignment with the required parts of the project.
That will allow us to more easily evaluate how well you did on the
basic requirements of the assignment.
REMINDER: you may not modify the header files for the normal
submission.
Any bonus code you add must not be present in the
hw3-final tag, otherwise it could cause your basic
submission to behave incorrectly when it is evaluated.
Then, when you are done adding additional bonus parts, you
must create a new tag hw3-bonus after committing
your additions, and push the additions and the new tag to your
GitLab repository.
If we find a hw3-bonus tag in your repository we'll
grade the extra credit parts; otherwise we'll assume that you just
did the required parts.
You may, if needed, modify header files to add additional member
functions for the bonus part of the assignment, but you may not
modify any existing function declarations, and the code you submit
under the basic hw3-final tag must not show any of the
changes you make for the bonus part.
Also, if you do any of the bonus parts of the project, you
must add a readme-hw3-bonus.md text file to your
hw3/ directory and include this in the files you push
to your gitlab repo.
This file should contain a brief description of the bonus work you
have done.
This should be brief: a few sentences or a couple of
paragraphs at the most for each extra part plus any requested
analysis should probably be sufficient.
- (Easy): You've probably noticed that the books seem to
be consistently ranked higher than other document types in the
corpus.
This is for a pretty simple reason: books are long, so any given
query word will, on average, appear more often in a book than in
an email message, inflating the rank of the book.
Solve this problem by normalizing the rank contribution of a word
within a document by the document length; you'll have to modify
the information calculated by hw2 and stored by hw3.
In other words, instead of defining the rank contribution of a
word in a document to be the word frequency, define it to be the
(word frequency) / (number of words in the document).Do an informal study that evaluates whether this ranking is better or worse, and present your evidence.
- (Medium): Normalized term frequency is a
better ranking function, but it also has a flaw: some words
(e.g., "the" or "person") are inherently more frequently used than
others (e.g, "leptospirosis" or "anisotropic").
There is a different ranking contribution function called
"tf-idf", or term frequency inverse document frequency, that tries
to compensate for this.
Calculating tf-idf involves keeping track of how often a word
appears across an entire corpus of documents, and normalizing term
frequency within a document by the frequency across all documents.
So, tf-idf measures how much more frequently than average a word
appears in a given document.
(Here's the wikipedia page on tf-idf.)
Implement tf-idf ranking. You'll have to populate a new hashtable for corpus word frequency and incorporate it into the index file format. Do an informal study that evaluates whether this ranking is better or worse than term frequency, and present your evidence.
- (Hard): use valgrind to do a performance analysis of hw3 query processing, and identify any major performance bottlenecks. If you find some obvious performance bottlenecks, attempt to optimize the code to reduce them. Present graphs that demonstrate the performance before and after your optimization, and the evidence you used to decide what to optimize.
Testing
As with the previous projects, when you compile your code with the
make command, the result is several output files,
including an executable program called test_suite.
You can run all of the tests in that suite with the command:
$ ./test_suite
It is possible to run only some of the tests by providing
command-line arguments for test_suite.
This is extremely helpful for debugging specific parts of the
assignment, especially since test_suite can be run with
these settings through valgrind and gdb!
Some examples:
- To only run the
QueryProcessortests, enter:$ ./test_suite --gtest_filter=Test_QueryProcessor.*
- To test only a single index for
QueryProcessor, enter:$ ./test_suite --gtest_filter=Test_QueryProcessor.TestQueryProcessorSingleIndex
- The
WriteIndextests can take a while to run, so to run all tests except for those, enter:$ ./test_suite --gtest_filter=-Test_WriteIndex.*
You can find the names of all available tests by running:
$ ./test_suite --gtest_list_tests
test_suite as your only
debugging tool.
The test setup and code are complex enough that it can be hard to
isolate problems effectively without spending excessive amounts of
time trying to reverse-engineer the details of the
test_suite code.
A very effective testing technique is to create some small test
cases with a few directories and a handful of short files, where you
can draw out on paper the expected data structures and the expected
disk file contents when those data structures are written to disk.
Then use programs like hexdump and others to examine
the created index files in detail to see if there are any bugs or if
everything looks correct.
(Tools for examining and debugging disk files will be covered
further in sections.)
Style
In addition to passing the tests, we want to see that your code is readable and of good quality. This includes several aspects:
- Modularity: Your code should be sufficiently factored,
and we will look to see if there is any redundancies that can be
removed.
If you do create any additional private (e.g.,
static) helper functions, be sure to include good comments for that function that explains the inputs, outputs, and behavior. - Good Practices: Your code should follow the C++ programming practices that we have established in the exercises. Refer to the Style Focus sections of previous exercise specifications for more details.
- Readability: You should attempt to mimic the style of code that we've provided to you. Aspects you should mimic are conventions you see for capitalization and naming of variables, functions, and arguments, the use of comments to document aspects of the code, and how code is indented.
- Linter: We use the
cpplint.pytool to check your code for style issues. Make sure that you have fixed all issues reported by the linter before submitting. - Style Guide: You also will find it useful to refer to the CSE 333 Style Guide.
When in doubt, come to office hours or post on the discussion board. We are happy to answer questions about style and readability.
Submission
When you are ready to turn in your assignment, follow the
Git Basics guide
to create a hw3-submit tag on the commit with your completed
project. Commit and push all necessary files before you push
the tag.
After pushing the tag, clone a fresh copy of your repository into a new,
empty directory, check out the hw3-submit tag, and verify that
everything builds and works. If your project doesn't build when the
staff repeat these steps to grade it, you may lose a large amount of
credit even if your work is otherwise correct.
hw3-bonus tag and push that after adding
the bonus code to your repository.
Also, verify that the hw3-submit tag is still present and that it includes only the required parts of the project.
Grading
At a high-level, your grade comes down to two things:
- Does it work? Most of your grade is how many of our unit tests your code passes. We also run a few extra tests that aren't in the suite we hand you, so aim to handle the general case rather than just the provided examples. If something fails, it's on you to track down why and fix it before the next assignment builds on top of it.
- Is it well written? We also read your code and grade it against the style guidelines described above.
Both matter, so give correctness and code quality your attention as you go. If you get stuck, please come to office hours early rather than the night before the deadline!