Homework 2: In-Memory Search Engine
- Read a file into memory and parse its text into words with byte-offset positions.
- Recursively crawl a directory tree and index the text files it contains.
- Build an in-memory inverted index that maps words to per-document posting lists.
- Implement a console search shell that ranks and returns documents matching a query.
- Reuse and compose the HW1 LinkedList and HashTable modules while managing memory with malloc/free.
Problem Description
malloc/free, and the semantics of
the LinkedList and HashTable implementations.
In this assignment, you will use the LinkedList and HashTable modules that you built in Homework 1 in order to finish our implementation of a file system crawler, indexer, and search engine. Be sure to follow good C practices and maintain good code quality as you complete the assignment.
- In Part A, you will build a module that reads the content of a file into memory, parses it into a series of words, and builds a linked list of (word, position) information.
- In Part B, you will build modules that convert a series of these linked lists into an in-memory inverted index (for more info, see the inverted index Wikipedia article).
- In Part C, you will use this in-memory, inverted index to build a query processor that has a console-based interface.
Setup
Step 1: Navigate to the directory containing your cse333
GitLab repository on a CSE Linux machine and run
git pull to retrieve the starter code for hw2 and the
test data for the project. Confirm that you now see the
hw2 directory:
$ git pull
...git output...
$ ls
cpplint.py  gtest/  hw1/  hw2/
Note that you still need the hw1 directory: hw2 reuses
your Homework 1 LinkedList and HashTable, so it won't build without
it.
Step 2: Enter the hw2/ directory. It contains a
subdirectory called libhw1/ with symbolic links to the
header files and the libhw1.a archive from
../hw1. Make sure you have compiled everything in
../hw1 before building hw2. If you don't think your HW1
solution is up to the job, you can use ours instead: copy
../hw1/solution_binaries/libhw1.a over your
../hw1/libhw1.a.
Step 3: ls the hw2/ directory. As
with HW1, you only edit the .c files marked with
(*); the header files are read-only references that you
may not modify. Here are the most important files:
| File | Description |
|---|---|
| Makefile | Builds the project (both the C program and the C++ test
cases) with the make command on the CSE Linux
machines. |
| solution_binaries/ | Linux executables (test_suite and
searchshell) compiled from the staff solution. Run
them to see how a finished hw2 should behave. |
| libhw1/ | Symbolic links to your Homework 1 headers and
libhw1.a. Recompile ../hw1 whenever
you change it. |
| test_tree/ | A tree of text files and subdirectories used as sample input
for crawling and searching. Explore it, starting with its
README.TXT file. |
| FileParser.h | Public API for the Part A file parser. Read it carefully to understand the expected behavior. |
| FileParser.c (*) | The partially-completed Part A implementation you will finish; look for the comments labeled "STEP X". |
| DocTable.h, CrawlFileTree.h, MemIndex.h | Public APIs for the Part B modules: the document table, the file-tree crawler, and the in-memory inverted index. |
| DocTable.c (*), CrawlFileTree.c (*), MemIndex.c (*) | The partially-completed Part B implementations, also labeled with "STEP X" comments. |
| searchshell.c (*) | A mostly-empty skeleton you complete in Part C to build the interactive query shell. |
| test_*.cc | Our Google Test unit tests. As you finish more STEPs, more tests pass and the cumulative score climbs. |
Step 4: Run make to compile the project, then try
running the test suite with ./test_suite. Because most
of the implementation is still missing, it should fail (and might not
even terminate) until you start completing the assignment.
As in HW1, you must implement all components as specified and you may
not modify any header files. You are, of course, free to add private
(static) helper functions when that makes sense.
In-Memory File System Search Engine
Part A: File Parser
You're going to write a module that reads the contents of a text file into memory and then parses the text file to look for words within it. As it finds words, it will build up a HashTable that contains one record for each word. Each record will contain a lowercase copy of the word, and also a sorted linked list. Each record of the linked list contains an offset within the file that the word appeared in (the first character in the file has offset zero). However, our word parser won't be very smart. It will treat as a word any non-zero sequence of alphabetic characters separated by non-alphabetic characters.
So, graphically, what your module will do is take a text file that contains something like this, where '\n' represents the newline control character that appears at the end of each line in the input file:
My goodness!  I love the course CSE333.\n
I'll recommend this course to my friends.\n
and produces a data structure that looks like this:
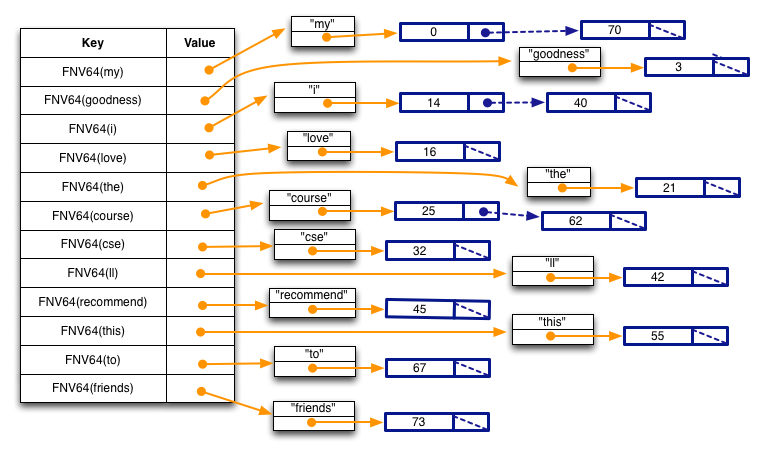
Specifically, note a few things:
- Each key in the hash table is the result of calling the
HashTable module's
FNVHash64()function, passing the string as the first argument, and thestrlen(string)as the second argument. - Each element in the hash table is a pointer to a heap-allocated structure that contains two fields; a string and a linked list. Note the string is lower-cased, and that our parser is not very smart: because it treats any sequence of alphabetic characters surrounded by non-alphabetic characters as words, the word I'll will be misparsed as the two words i and ll.
- Each element in the linked list is an integer representing the position in the text file at which the word starts; this is both its byte offset and, since we are only handling ASCII files, the number of characters from the start of the file (each ASCII character is exactly 1 byte). So, the word "my" starts at offset 0 in the text file, the word "i" appears twice, once at offset 14 and once at offset 40, and the word "course" appears twice, once at offset 25 and once at offset 62.
- Each list is sorted in ascending order.
Part A Instructions
- Your job in Part A is to finish the implementation of
FileParser.c. Start by reading throughFileParser.hand make sure you understand the semantics of the functions. Also, look at theWordPositionsstructure defined inFileParser.hand compare it to the figure above. The functionParseIntoWordPositionsTable()builds a HashTable that looks like the figure, and each value in the HashTable contains a heap-allocatedWordPositionsstructure. - Similar to HW1, look through
FileParser.cto get a sense of its layout, and look for all occurrences of STEP X (e.g., STEP 1, STEP 2, ...) for where you need to add code. Be sure to read the full file before adding any code, so you can see the full structure of what we want you to do. Once you're finished adding code, run the test suite and you should see some tests start to succeed!
Part B: File Crawler and Indexer
At a high-level, a search engine has three major components: a crawler, an indexer, and a query processor. A crawler explores the world, looking for documents to index. The indexer takes a set of documents found by the crawler, and produces something called an inverted index out of them. A query processor asks a user for a query, and processes it using the inverted index to figure out a list of documents that match the query.
File System Crawler
Your file system crawler will be provided with the name of a directory in which it should start crawling. Its job is to look through the directory for documents (text files) and to hand them to the indexer, and to look for subdirectories; it recursively descends into each subdirectory to look for more documents and sub-sub-directories. For each document it encounters, it will assign the document a unique "document ID", or "docID". A docID is just a 64-bit unsigned integer.
Your crawler itself will build two hash tables in memory, adding to them each time it discovers a new text file. The two hash tables map from docID to document filename, and from document filename to docID:
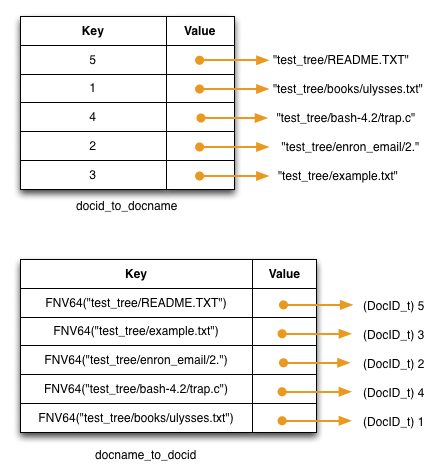
For each document the crawler finds, it will make use of your Part
A code to produce a word hashtable using
ParseIntoWordPositionsTable().
Indexer
This is the heart of the search engine.
The job of the indexer is to take each word hashtable produced by
ParseIntoWordPositionsTable(), and fold its contents
in to an inverted index.
An inverted index is just a hash table that maps from a word to a
"posting list," and a posting list is just a list of places that
word has been found.
Specifically, the indexer should produce an in-memory hash table that looks roughly like this:
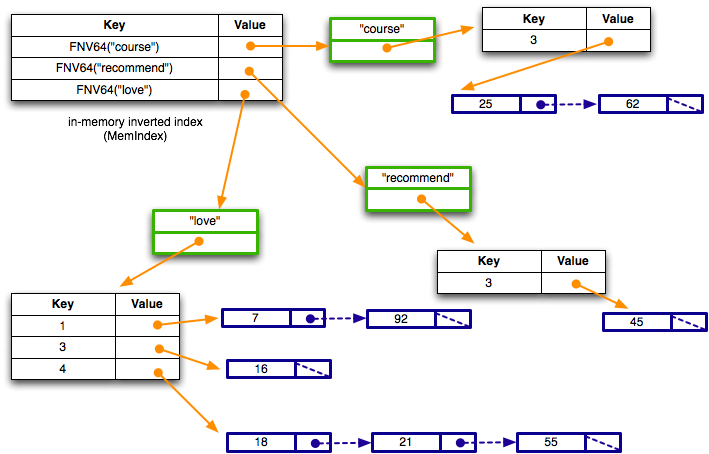
Walking through it, the inverted index is a hash table that maps from a (hash of a) word to a structure. The structure (shown in green) contains the word as a string, and also a HashTable. The HashTable maps from the docID (not the hash of docID) to a LinkedList. The LinkedList contains each position that word appeared in that docID.
So, based on the figure, you can see that the word "course" appeared in a single document with docID 3, at byte offsets 25 and 62 from the start of file. Similarly, the word "love" appears in three documents: docID 1 at positions 7 and 92, docID 3 at position 16, and docID 4 at positions 18, 21, and 55.
Part B Instructions
The bulk of the work in this homework is in this step. We'll tackle it in parts.
- Take a look at
DocTable.h; this is the public interface to the module that builds up the docID-to-docname HashTable and the docname-to-docID HashTable. Make sure you understand the semantics of everything in that header file; note how we can now implement procedural-style class composition! We create a single DocTable structure that contains both of these tables, so when you implementDocTable_Allocate(), you'll end up malloc'ing a structure that contains two HashTables, and you'll allocate each of those HashTables. - Take a look inside
DocTable.c; this is our partially completed implementation. Be sure to read the full file. Your job, as always, is to look for the "STEP X" comments and finish our implementation. Once you've finished the implementation, re-compile and re-run thetest_suiteexecutable to see if you pass our tests. If not, go back and fix some bugs! - Now, take a look inside
CrawlFileTree.h; this is the public interface to our file crawler module. Make sure you understand the semantics of everything in that header file. Next, read through the fullCrawlFileTree.cand then complete our implementation. Once you're ready, re-compile and re-run thetest_suiteexecutable to see if you pass more tests. If not, go back and fix some bugs! - Finally, take a look inside
MemIndex.h. This is the public interface to the module that builds up the in-memory inverted index. Make sure you understand the semantics of everything in that header file and note how we implement procedural-style inheritance! Next, read the fullMemIndex.c, and then complete our implementation. (This is the most involved part of the assignment.) Once you're ready, re-compile and re-run thetest_suiteexecutable to see if you pass our tests. If not, go back and fix some bugs! - Once you've passed all of the tests, re-run the test suites under valgrind and make sure you don't have any memory leaks or other memory issues.
Part C: Query Processor
Now that you have a working inverted index, you're ready to build your search engine. The job of a search engine is to receive queries from a user, and return a list of matching documents in some rank order.
For us, a query is just a string of words, such as:
course friends my
The goal of our search engine is to find all of the documents that contain all of the words. So, if a document has the words "course" and "my" but not the word "friends," it shouldn't match.
To execute a query, first the query processor must split the query
up into a list of words (the strtok_r() function is
useful for this).
Next, it looks up in the inverted index the list of documents that
match the first word.
This is our initial matching list.
Next, for each additional word in the query, the query processor uses the inverted index to get access to the HashTable that contains the set of matching documents. For each document in the matching list, the query processor tests to see if that document is also in the HashTable. If so, it keeps the document in the matching list, and if not, it removes the document from the matching list.
Once the processor has processed all of the words, it's done. Now, it just has to rank the results, sort the results by rank, and return the sorted result list to the user.
For us, our ranking function is very simple: given a document that matches against a query, we sum up the number of times each query word appears in the document, and that's our rank. So, if the user provides the query "foo" and that words appears on a document 5 times, the rank for that document given that query is 5. If the user provides a multi-word query, our sum includes the number of times each of the words in the query appears. So, if the user provides the query "foo bar", the word "foo" appears in the document 5 times, and the word "bar" appears 10 times, the rank of the document for that query is 15. The bigger the sum, the higher the rank, and therefore the "better" the search result.
Part C Instructions
We have provided a mostly empty skeleton file
searchshell.c.
It is up to you to complete it by implementing a program that uses
the Linux console to interact with the user.
When you run the query processor (called searchshell
: you can try a working searchshell in the
solution_binaries/ directory), it takes from a
command-line argument the name of a directory to crawl.
After crawling the directory and building the inverted index, it
enters a query processing loop, asking the user to type in a search
string and printing the results.
If the user signals end-of-file when the program asks for a search
string (i.e., control-D from the Linux terminal
keyboard), the program should clean up any allocated resources
– particularly memory – and shut down.
When you are ready, try running ./searchshell to
interact with your program and see if your output matches the
transcript from a search session with
our solution.
Alternatively, compare your searchshell to the searchshell we
provided in the solution_binaries/ directory.
Note that our ranking function does not specify an ordering for two
documents with the same rank.
Documents that have the same rank may be listed in any order, and
that might be different from the ordering in the sample transcript
or produced by the solution_binaries version of
searchshell.
Bonus Tasks
If you do work on either of the bonus tasks, you must also
include a hw2-bonus tag in your repository.
While grading, we will use whichever commit has that tag to examine
the bonus, so it may be the same or a different commit from the one
that has hw2-final.
If you do not have a hw2-bonus tag in your repository,
we will assume you did not choose to submit anything for the bonus.
-
When searching text documents for a given query, some words in the query do not add any value to the quality of the search results. These words are known as stop words and include common words such as the, is, and, at, which, there, on, and so on. Some Web search engines filter these stop words, excluding them from both their indexes and ignoring them in queries; this results in both better search quality and significantly more efficient indexes and query execution.
Implement a stop word filter. The search shell should accept a second, optional argument "-s" that will act as a flag for turning the filter on. When the flag is not specified, your program should not filter any stop words. It is up to you to decide how you will implement the stop word filter (and where you'll get your list of stop words), but be sure to create a
README.mdfile and explain in that file what changes you had to make and how your filter works. Stop words that have apostrophes in them should be handled the same way that you've handled the words in the documents. -
You probably noticed that we went to a lot of trouble to have you include word position information in our inverted index posting lists, but we didn't make use of it. In this bonus task, you will! In addition to letting you search for words, modern search engines also let you search for phrases. For example, I could specify the following query:
alice "cool fountains" flowers
This query would match all documents that contain all of the following:
- the word alice,
- the phrase cool fountains (i.e., the words cool and fountains right next to each other, in that order),
- the word flowers.
Using the positions information in the inverted index postings list, implement support for phrase search. You'll have to also modify the query processor to support phrase syntax; phrases are specified by using quotation marks. Be sure to create a
README.mdfile that describes what changes you had to make to get phrasing to work.
Testing
As with hw1, you can compile your implementation by using the
make command.
This will result in several output files, including an executable
called test_suite.
After compiling your solution with make, you can run
all of the tests for the homework by running:
$ ./test_suite
You can also run only specific tests by passing command-line
arguments into test_suite.
This is extremely helpful for debugging specific parts of the
assignment, especially since test_suite can be run
with these settings through valgrind and
gdb!
Some examples:
- To only run the
FileParsertests, enter:$ ./test_suite --gtest_filter=Test_FileParser.*
- To only test
ReadFileToStringfromFileParser, enter:$ ./test_suite --gtest_filter=Test_FileParser.ReadFileToString
You can specify which tests are run for any of the tests in the assignment : you just need to know the names of the tests! You can list them all out by running:
$ ./test_suite --gtest_list_tests
test_suite code.
Be sure to also run your code on small sample files and directories
where you can predict in advance exactly what data structures
should be created and what their contents should be, and then use
gdb or other tools to verify that things are working
exactly as expected.
Style
In addition to passing the tests, we want to see that your code is readable and of good quality. This includes several aspects:
- Modularity: Your code should be sufficiently factored,
and we will look to see if there is any redundancies that can be
removed.
If you do create any additional private (e.g.,
static) helper functions, be sure to include good comments for that function that explains the inputs, outputs, and behavior. - Good Practices: Your code should follow the C programming practices that we have established in the exercises. Refer to the Style Focus sections of previous exercise specifications for more details.
- Readability: You should attempt to mimic the style of code that we've provided to you. Aspects you should mimic are conventions you see for capitalization and naming of variables, functions, and arguments, the use of comments to document aspects of the code, and how code is indented.
- Linter: We use the
cpplint.py --clinttool to check your code for style issues. Make sure that you have fixed all issues reported by the linter before submitting. - Style Guide: You also will find it useful to refer to the CSE 333 Style Guide.
When in doubt, come to office hours or post on the discussion board. We are happy to answer questions about style and readability.
Submission
When you are ready to turn in your assignment, follow the
Git Basics guide
to create a hw2-submit tag on the commit with your completed
project. Commit and push all necessary files before you push
the tag.
After pushing the tag, clone a fresh copy of your repository into a new,
empty directory, check out the hw2-submit tag, and verify that
everything builds and works. If your project doesn't build when the
staff repeat these steps to grade it, you may lose a large amount of
credit even if your work is otherwise correct.
hw1/libhw1.a, which is needed to build hw2.
Either run "make" in the hw1/ directory, or copy the version from the solution_binaries/ folder into the right place.
hw2-bonus tag and push that after adding
the bonus code to your repository.
Also, verify that the hw2-submit tag is still present and that it includes only the required parts of the project.
Grading
At a high-level, your grade comes down to two things:
- Does it work? Most of your grade is how many of our unit tests your code passes. We also run a few extra tests that aren't in the suite we hand you, so aim to handle the general case rather than just the provided examples. If something fails, it's on you to track down why and fix it before the next assignment builds on top of it.
- Is it well written? We also read your code and grade it against the style guidelines described above.
Both matter, so give correctness and code quality your attention as you go. If you get stuck, please come to office hours early rather than the night before the deadline!