Homework 1: Linked Lists & Hash Tables
- Implement a doubly-linked list in C.
- Implement a chained hash table in C.
- Practice manual memory management with malloc and free.
- Debug pointer-heavy code with gdb and valgrind.
Problem Description
malloc/free puzzles, and these can cause awful bugs that take time and patience to find and fix.
See the Hints section below for guidance on
getting started!
In previous courses, you used programming languages with a built-in library of basic data structures. For example, in Java, you had access to ArrayList, LinkedList, Stack, and HashMap. These data structures could be used out-of-the-box, and you could rely on them to be correct and efficient.
The C standard library does not provide these luxuries. In fact, it provides you with very little.
In this assignment, we have created an interface and a rough skeleton for two data structures:
- a doubly-linked list (Part A)
- a chained hash table (Part B)
These data structures are designed to be generic, i.e. they can store arbitrary payloads of any type supplied by the user of the data structure. In future assignments, we will repeatedly use the data structures that you implement in this assignment to build a more complex system
Complete Part A before Part B: the chained hash table uses your doubly-linked list, so the hash table can't work until the list does. This ordering is specific to HW1 – later assignments do not require finishing earlier parts first.
Setup
Step 1: Clone the homework repository from GitLab to your CSE Linux account using
git clone git@gitlab.cs.washington.edu:cse333-26su-students/cse333-26su-hw-<netid>.git
Step 2: After you have a local copy of the homework repository, navigate into the repository and confirm you see at least the following directories and files:
$ ls
cpplint.py  gtest/  hw1/
Although you will not need to modify any of these files, it is helpful to know what they are:
-
cpplint.pyis a linter which checks your code for style issues. You should be familiar with this from the previous exercises. -
gtest/is a directory that contains code for the Google Test framework, which we will use to test your code.
Step 3: Enter the hw1/ directory and `ls` its contents. There are a lot of files but let's go over the most important ones:
First, we have some executable files that you will probably run multiple times throughout the development process:
| File | Description |
|---|---|
| Makefile | Builds both parts of the assignment with the
make command on the CSE Linux machines. Note that it contains build instructions for both the C program we are implementing and the C++ test cases. |
| solution_binaries/ | Linux executables compiled from the staff solution. You should run them to see what your finished assignment should do! |
When you are working on the doubly-linked list implementation from Part A, you will primarily be working with the files below. You only edit LinkedList.c; the rest are read-only references:
| File | Description |
|---|---|
| LinkedList.h | Defines and documents the public API of the linked list. Read it carefully to understand how the list is expected to behave. |
| LinkedList_priv.h | A private header, included by LinkedList.c,
that defines the list's internal layout. These details would
normally live inside the .c file, but we expose
them so the unit tests can verify the internals. |
| LinkedList.c (*) | The partially-completed implementation you will finish; look for the comments labeled "STEP X". |
| example_program_ll.c | A small example program that shows how a user allocates a list, adds elements, iterates over them, and cleans up. |
| test_linkedlist.cc | Our Google Test unit tests for the linked list. As you finish more steps, the tests get further and print a cumulative score. |
When you are working on the hash table implementation from Part B, you will be working with the files below. You only edit HashTable.c; the rest are read-only references:
| File | Description |
|---|---|
| HashTable.h | Defines and documents the public API of the hash table. |
| HashTable_priv.h | A private header, included by HashTable.c, that
defines the table's internal layout, exposed so the unit tests
can verify the internals. |
| HashTable.c (*) | The partially-completed implementation you will finish, also labeled with "STEP X" comments. |
| example_program_ht.c | A small example that inserts, looks up, and removes elements and iterates over a hash table. |
| test_hashtable.cc | Our Google Test unit tests for the hash table. |
Step 4: Run make from the hw1
directory on a CSE Linux machine to confirm the starter code
builds; you should end up with new binaries inside that directory.
Because the implementations aren't finished yet, these binaries
won't work correctly: example_program_ll halts with an assertion error or segfault, and test_suite reports failing tests (and may even crash before finishing).
solution_binaries/ show the correct behavior, and running them under Valgrind (for example, valgrind --leak-check=full ./solution_binaries/test_suite) reports no memory issues.
Part A: Doubly-Linked List
Background
At a high-level, a doubly-linked list looks like this:
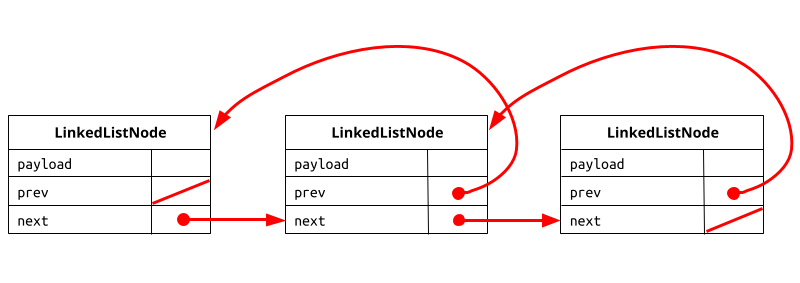
Each node in a doubly-linked list has three fields:
- a payload which contains the data stored in the node,
- a pointer to the previous element in the list (or
NULLif there is no previous element), and - a pointer to the next element in the list (or
NULLif there is no next element).
If the list is empty, there are no nodes.
If the list has a single element, both of its next and previous
pointers are NULL.
What makes implementing this in C tricky? Quite a few things:
- Our list should hold arbitrary payloads, so each node stores a pointer supplied by the user. Since that pointer might reference something the user malloc'ed, we also need to help free the payload when the list is destroyed.
- We want to hide the implementation behind a clean API. Users shouldn't have to worry about the next and previous pointers when they add and remove elements. Instead, we give them simple functions for adding and removing elements plus a Java-like iterator for navigating the list.
- C isn't garbage-collected, so you must manage memory yourself. When you add a node, you may need to malloc a structure on the heap. When you remove a node, you may need to free something. And when you destroy the list, you must free anything allocated to prevent a memory leak.
Given all of these complications, our actual linked list data structure ends up looking like this:
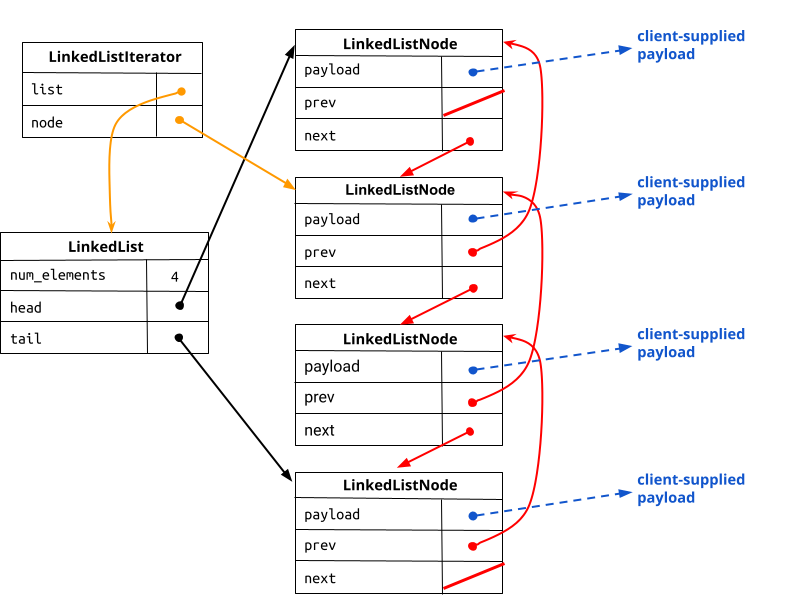
Specifically, we define the following types and structures:
- LinkedList: holds the list's metadata, such as the head and tail pointers. We malloc and initialize one when a user asks for a new, empty list.
- LinkedListNode: a single node that stores the user-supplied payload.We malloc a new node for each element and splice it into the list while keeping track of pointers.
- LLIterator: lets users navigate the list. It tracks the list it belongs to and the node it currently points at. One catch: removing a node could leave other iterators pointing at freed memory, so users must free any live iterators before mutating the list (unless the mutation is done through that same iterator).
Instructions
- Read
LinkedList.handLinkedList_priv.hfirst – this is what a user of our data structure sees. Once you understand these headers, you will know the structures and the behavior each function must provide. You may not modify any header files or interfaces, as we may test your.cfile against the original headers in our autograder. - Open
LinkedList.cand complete each function at the comment marked "STEP X". Please keep the "STEP X" comments so your graders can find your code. The early steps are relatively straightforward; the later ones are trickier. You may add privatestatichelper functions in the.cfile.
Compilation
As you work, rebuild often by running make from the
hw1 directory and fix any compiler errors you
introduce before moving on.
Building produces the test_suite and
example_program_ll binaries.
- Run the linked list tests to check your progress:
$ ./test_suite --gtest_filter=Test_LinkedList.*
As you finish more STEPs, more tests should pass and the cumulative score should climb. - Once tests are passing, re-run them under
Valgrind to catch memory
errors and leaks:
$ valgrind --leak-check=full ./test_suite
For reference, the solution binary (./solution_binaries/test_suite) reports no memory issues. - When the
Test_LinkedListtests pass and Valgrind reports no memory issues, Part A is done!
Part B: Chained Hash Table
Background
A chained hash table is a data structure that consists of an array of buckets, with each bucket containing a linked list of elements. When a user inserts a key/value pair into the hash table, the hash table uses a hash function to map the key into one of the buckets, and then adds the key/value pair onto the linked list. There is an important corner case: if the key of the inserted key/value pair already exists in the hash table; our implementation of a hash table replaces the existing key/value pair with the new one and returns the old key/value pair to the user.
Over time, as more and more elements are added to the hash table, the linked lists hanging off of each bucket will start to grow. As long as the number of elements in the hash table is a small multiple of the number of buckets, lookup time is fast: you hash the key to find the bucket, then iterate through the (short) chain (linked list) hanging off the bucket until you find the key. As the number of elements gets larger, lookups become less efficient, so our hash table includes logic to resize itself by increasing the number of buckets to maintain short chains.
As with the linked list in Part A, we've given you a partial implementation of a hash table. Our hash table implementation looks approximately like this:
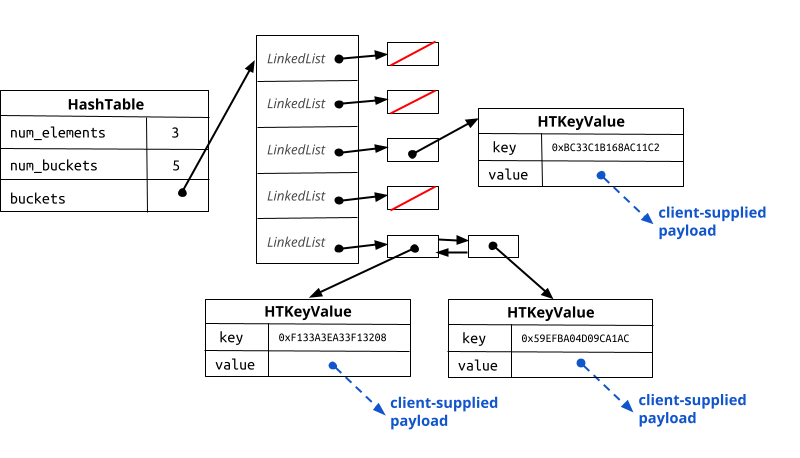
Specifically, we defined the following types and structures:
- HashTable: holds the table's metadata, such as the
number of elements and the bucket array. Allocating one mallocs
the table, the bucket array, and a
LinkedListfor each bucket. - HTIterator (not shown in the diagram): lets users iterate through every element. It tracks the table it belongs to plus a linked list iterator for walking the current bucket's chain.
Instructions
- Read through
HashTable.handHashTable_priv.hfirst to get a sense of the interface, then look atexample_program_ht.cto see how a program inserts, looks up, and removes elements and iterates over the table. - Open
HashTable.c, find the missing pieces (marked with "STEP X" comments, as before), and implement them. Please keep the "STEP X" comments so TAs can easily identify your code while grading.
Compilation
Just like Part A, rebuild often with make and fix any
compiler errors before moving on. The hash table tests live in the
same test_suite binary.
- Run the hash table tests to check your progress:
$ ./test_suite --gtest_filter=Test_HashTable.*
As you finish more STEPs, more tests should pass and the cumulative score should climb. - Once tests are passing, re-run them under
Valgrind to catch memory
errors and leaks:
$ valgrind --leak-check=full ./test_suite
For reference, the Part B staff solution (./solution_binaries/test_suite) also reports no memory issues, and its source is a handy reference for how to use the data structures. - When the
Test_HashTabletests pass and Valgrind reports no memory issues, Part B is done!
Bonus: Code Coverage Statistics
We provide a second Makefile, Makefile.coverage, that
invokes the gcov code coverage tool. Figure out how to
(a) use it to generate coverage statistics for
LinkedList.c and HashTable.c, (b) confirm
that HashTable's coverage is worse than LinkedList's, and (c) write
additional HashTable unit tests to improve it. We deliberately
give few instructions here – figuring out how is part of the
bonus!
Put your extra tests in a separate file from the original test
suite, and make sure they don't change the existing scoring
mechanism (we'll be checking). Also add a
readme-hw1-bonus.md file to your hw1/
directory describing your work: your observations about the original
coverage, the tests you added, and the results. A few sentences to a
couple of paragraphs is plenty.
To submit the bonus, tag the relevant commit hw1-bonus
and push it (see the
Git Basics guide
for tagging). This is in addition to the
hw1-submit tag, which must still be present and still
work properly (pass all tests, no memory issues). The two tags may
point to the same commit or different ones. Without a
hw1-bonus tag, we'll assume you didn't submit the bonus
(which won't affect your grade).
Testing
You should compile your implementation by using the
make command.
This will result in several output files, including an executable
called test_suite.
After compiling your solution with make, you can run
all of the tests for the homework by running:
$ ./test_suite
You can also run only specific tests by passing command-line
arguments into test_suite.
This is extremely helpful for debugging specific parts of the
assignment, especially since test_suite can be run
with these settings through valgrind and
gdb!
Some examples:
- To only run the
LinkedListtests, enter:$ ./test_suite --gtest_filter=Test_LinkedList.*
- To only test
PushandPopfromLinkedList, enter:$ ./test_suite --gtest_filter=Test_LinkedList.PushPop
You can specify which tests are run for any of the tests in the assignment : you just need to know the names of the tests! You can list them all out by running:
$ ./test_suite --gtest_list_tests
One caution though: some parts of test_suite are
fairly complex.
If one of the larger tests fails, it can often be very frustrating
to try to debug your code by digging through the complex test code
to figure out what happened.
An often effective strategy is to use the test_suite
program to identify parts of your code that seem to be misbehaving,
then write some small test programs of your own to isolate the
problems in a much simpler setting and debug/fix them there.
Style
In addition to passing the tests, we want to see that your code is readable and of good quality. This includes several aspects:
- Modularity: Your code should be sufficiently factored,
and we will look to see if there is any redundancies that can be
removed.
If you do create any additional private (e.g.,
static) helper functions, be sure to include good comments for that function that explains the inputs, outputs, and behavior. - Good Practices: Your code should follow the C programming practices that we have established in the exercises. Refer to the Style Focus sections of previous exercise specifications for more details.
- Readability: You should attempt to mimic the style of code that we've provided to you. Aspects you should mimic are conventions you see for capitalization and naming of variables, functions, and arguments, the use of comments to document aspects of the code, and how code is indented.
- Linter: We use the
cpplint.py --clinttool to check your code for style issues. Make sure that you have fixed all issues reported by the linter before submitting. - Style Guide: You also will find it useful to refer to the CSE 333 Style Guide.
When in doubt, come to office hours or post on the discussion board. We are happy to answer questions about style and readability.
Hints
Here is some collected advice for getting started, avoiding common pitfalls, and debugging effectively on this assignment.
General Advice
- Draw diagrams
- Watch that
HashTable.cdoesn't violate the modularity ofLinkedList.h(i.e., don't access private or hidden implementation details of the linked list). - Watch for pointers to local (stack) variables
(
0x7fff…addresses). A common symptom is variables that appear to spontaneously change values for no reason. - Keep track of the types of things.
Is this variable a
Thing, aThing*, aThing**, or atypedef'edThing*? - Use
git add/commit/pushoften to save your work. If you make many small commits, you can revert your code to a previous working state more easily. Don't push.ofiles, executables, or other build products. They add clutter, make clean rebuilds harder, aren't portable, etc. -
If you add unit tests for the bonus parts, put them in a new file and adjust the bonus
Makefile.coverageas needed.
Debugging
- Write and run little tests to track down problems; don't kill lots of time trying to debug large
test_suitecode. - Use
gdbto debug if you're getting segfaults! - If
Verify333fails, use its information to figure out what function it calls on failure. Put a breakpoint there.
Submission
When you are ready to turn in your assignment, follow the
Git Basics guide
to create a hw1-submit tag on the commit with your completed
project. Commit and push all necessary files before you push
the tag.
After pushing the tag, clone a fresh copy of your repository into a new,
empty directory, check out the hw1-submit tag, and verify that
everything builds and works. If your project doesn't build when the
staff repeat these steps to grade it, you may lose a large amount of
credit even if your work is otherwise correct.
hw1-bonus tag and push that after adding
the bonus code to your repository.
Also, verify that the hw1-submit tag is still present and that it includes only the required parts of the project.
Grading
At a high-level, your grade comes down to two things:
- Does it work? Most of your grade is how many of our unit tests your code passes. We also run a few extra tests that aren't in the suite we hand you, so aim to handle the general case rather than just the provided examples. If something fails, it's on you to track down why and fix it before the next assignment builds on top of it.
- Is it well written? We also read your code and grade it against the style guidelines described above.
Both matter, so give correctness and code quality your attention as you go. If you get stuck, please come to office hours early rather than the night before the deadline!