MuSHR Lab Information
Overview
Please read this entire guide carefully before coming to the MuSHR Lab (CSE 006) to conduct experiments. We have prepared 5 MuSHR cars (v3) and 8 Ubuntu 18.04 workstations. Due to the limited number of cars (and safety protocols), you must reserve a 3-hour time slot on the shared MuSHR Lab Calendar at least a day in advance. Only 3 people may be scheduled for each 3-hour time slot.
You must complete all three COVID-19 safety training sessions (UW EH&S, Allen School, MuSHR Lab) before entering the lab.
Questions or issues? Contact Mohit Shridhar.
Location
CSE 006 is located in the basement of the Allen Center. Take the elevator/stairs down to B1, and enter through the hallway.
Floor Plan with Safety Zones
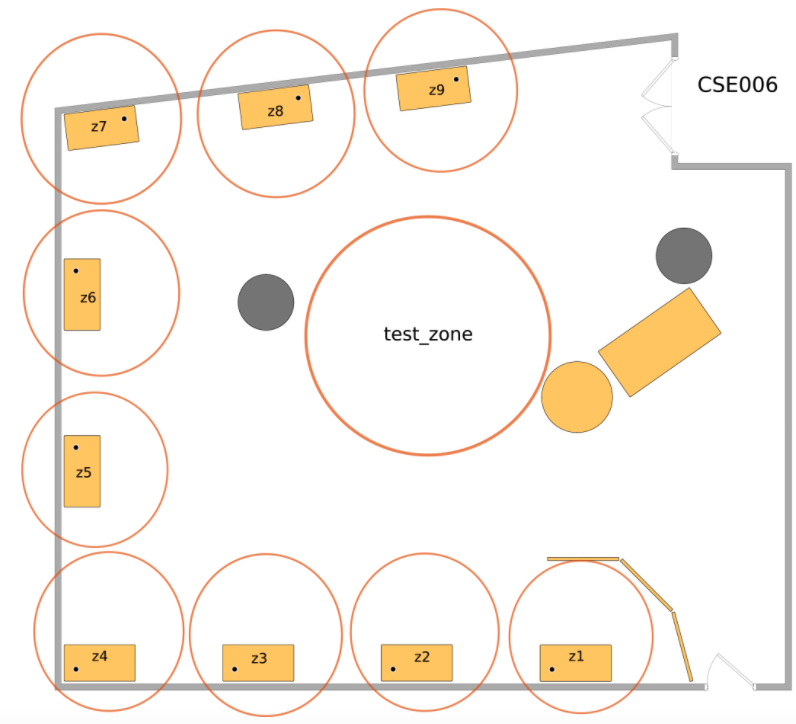
CSE 006 floor plan with each workstation zone marked with a red circle. Do not move the office drawers in the test zone!
1. Lab Usage and Safety
Documents: MuSHR Lab Safety Plan.
Before entering the lab
Complete the lab safety training.
Read the MuSHR Lab Safety Plan carefully. Follow all instructions specified in the document.
Reserve a 3-hour time slot on the MuSHR Lab Calendar Spreadsheet at least a day in advance. Fill out a block with
ZX CX Name, e.g.Z9 C1 Mohit Shridharto indicate workstation zoneZ9and MuSHR carC1, and summarize your planned experiment workflow in the description (e.g., testing particle filter parameters).We recommend a maximum of 3 people in the lab at a time. The lab will be open throughout the week, so there will be ample time slots available.
Before coming to campus on the day of your reservation, complete the Allen School daily attestation of wellness and daily check-in. Never come to the lab (or any other shared facility) if you are experiencing any symptoms.
After entering the lab
Remember to keep your Husky Card with you at all times. Both the basement restroom and CSE 006 require card-key access. Don’t lock yourself out!
Wear a mask at all times and maintain at least 6 feet of distance from others.
Do not move the office drawers in the middle of the room. These drawers are part of the map we’ve provided, which you will use for localization.
Only use the workstation and MuSHR car you reserved in the calendar. If you are having issues, check the calendar to see if other workstations and/or cars are available.
Start charging batteries (2 per car) with chargers located next to your workstation. Only charge batteries when you are physically present in the lab. Do not leave them charging overnight.
Leaving the lab
Unplug the batteries from your MuSHR car and connect them to their respective chargers. Put the car back on the table.
Don’t leave your belongings. Clean up your workspace (any cables, tools, etc.) and return anything you took to where you found them.
Logout from the
cse478user account. A cleaning script will automatically remove your repository. Push all of your changes and plots to GitLab, or you will lose them. Please don’t modify any other files outside of your source files.If you are the last person to leave the lab (even if someone is scheduled to come in later): do a quick check around the room to make sure that none of the chargers are in charging mode (should flash green to indicate not-charging), and turn off the lights.
2. MuSHR Car Experiments
Official Guides: MuSHR Quickstart | Build Instructions | System Overview | Teleoperation
The following is a supplementary guide to getting started with MuSHR cars in the lab. Reading the official guides before coming in will save you valuable debugging time.
Each MuSHR car requires 2 batteries: one for the servo motor and another for the on-board Jetson computer. The motor battery has red-circular connectors and the Jetson battery has white clip-connectors. The batteries can be found at the charging station next to your workstation. Press the blue button on the charger to start/stop charging. Remember to only charge batteries when you are physically present in the lab.
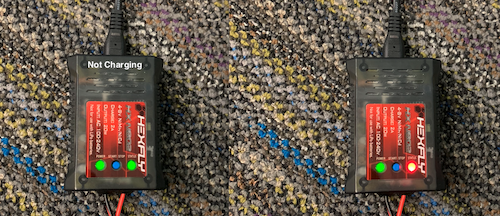
(Left) Not charging: flashing green light vs. (Right) Charging: solid red light
After connecting the batteries, the on-board Jetson computer should boot up within a few seconds (2 mins max) and a green light should start blinking inside the front of the car. The motor battery can be placed in the holder at the bottom of the car, and the Jetson battery can be placed inside the 3D-printed shell. Ensure that the cables and connectors won’t get tangled with the wheels once they start spinning.
Each car is connected to the “University of Washington” WiFi and has a static IP address. Check here to find the IP address for your car. Then, from your workstation, SSH into the car
ssh robot@<robot_ip_addr> -Xwith the passwordprl_robot. Do not change the password, username, or hostname of the robot, otherwise the car cannot be used by the next person.To set up the network connection, set
export ROS_IP=<robot_ip_addr>inside the SSH session. Then, open a separate terminal from the workstation and setexport ROS_MASTER_URI=http://<robot_ip_addr>:11311. This connects your workstation ROS session to the car (using the car as the ROS Master).Note: For every new terminal you open on your workstation, remember to set the
ROS_MASTER_URI! Otherwise, your workstation will look for a local ROS Master.To teleoperate the robot, press the PS Button on the PS controller. Once the controller is connected, the LED should stop flashing white. Inside the SSH session, run
roslaunch mushr_base teleop.launch. If no errors are thrown (everything goes right), you should be able accelerate and steer the car with the joystick.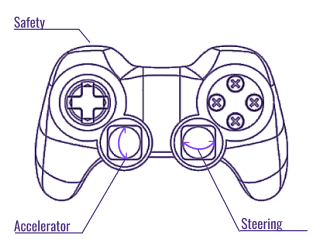
PS Joystick Controls
In your local terminal (where you set
ROS_MASTER_URI), you should be able to list the current ROS topics being published by the car withrostopic list. You should be able to see all the published sensor feeds from the camera, LIDAR, etc.Start
rviz, click the “Add” button on the bottom left corner, select “By Topic”, and add a “Laser” or “Camera” topic to visualize.
Troubleshooting
Official Debugging Guides: Workflow & Troubleshooting
As in most cases with physical robots, things will go wrong. Be patient with the debugging. Read the Workflow & Troubleshooting tutorial for additional tips.
In general, if something isn’t working, try connecting directly to the on-board Jetson computer with an HDMI cable. Unplug the RealSense and LIDAR USB cables (blue and gray wires) and connect a keyboard and mouse. (There are extra HDMI-DVI cables, keyboards, and mice by the car storage table.) The Jetson also runs Ubuntu; you can log in to the robot user account with the password prl_robot. Here are some common issues:
Jetson won’t boot up or no green light
You probably need to charge the batteries. Also, sometimes the Jetson takes a while to boot up. Connect to the HDMI port to see what’s going on.Can’t SSH into the car
The car probably disconnected from the UW Wifi. Connect to the HDMI port and follow the network setup instructions here. Make sure the robot is on the “University of Washington” WiFi. Check the IP address with ifconfig. You should be able to ping the robot ping <robot_ip_addr> from any computer on the “University of Washington” Network, including your workstation.
Can’t start RViz, run rostopic list, or launch teleop.launch
This probably means something is wrong with the network connection. Check that ROS_IP and ROS_MASTER_URI are set correctly. See this for more info.
Teleoperation/Joystick not working
Check that the PS Controller is charged. You can charge it with a mini-USB cable from the steel rack. If the controller is blinking white, then something went wrong with the Bluetooth connection. Connect to the Jetson’s HDMI port and follow the Bluetooth setup instructions in Step 14 of the Hardware Guide.
VESC Controller Error
VESC is the servo motor controller. This means the motor battery needs to be charged or isn’t connected properly.
RealSense Camera Initialization Error
Check that the RealSense cable (blue USB) is plugged in. (That said, your projects won’t use the RealSense at all.)
3. ROS and Catkin Workspaces
All workstations have ROS Melodic and MuSHR dependencies pre-installed. Unlike in your virtual machine, all dependencies are installed locally so you can directly interface with hardware and network devices from the workstation.
This also means you can easily brick the system with careless
sudo apt-get installorsudo apt-get purgecommands. So be very careful when installing additional dependencies and copy-pasting random code from StackOverflow. Be particularly skeptical of solutions that require reinstalling NVIDIA drivers, etc.
The Catkin workspaces on the workstations are identical to the VMs used for the projects. Dependencies are pre-compiled inside ~/dependencies_ws and your repos should be placed inside ~/mushr_ws:
$ # Activate Dependencies Workspace
$ source ~/dependencies_ws/devel/setup.bash
$ # Clone your repo
$ cd ~/mushr_ws/src
$ git clone git@gitlab.cs.washington.edu:cse478/21sp/your_repo_name.git mushr478
$ # Build your workspace
$ cd ~/mushr_ws
$ catkin build
$ # Don't forget to source your workspace in every terminal you open!
$ source ~/mushr_ws/devel/setup.bash
When you log out, an automated script will remove your repository with
rm -rf ~/mushr_ws/src/*and restore a clean~/.bashrc. Push all of your changes and plots (to GitLab or somewhere else), or you will lose them. If the user before you forgot to log out, runsh ~/.clean_scriptto execute the cleaning script.
References
Workstation Reference
The workstations have Ubuntu 18.04, ROS Melodic, and other MuSHR dependencies pre-installed. You can log into the workstations with the username cse478. You will receive the password in your email; do not share and do not change them!
- Z1: hare
- Z2: thlioh
- Z3: joro
- Z4: rth
- Z5: dsterba
- Z6: maco
- Z7: airled
- Z8: tkjos
- Z9: rjwysocki
MuSHR Car Reference
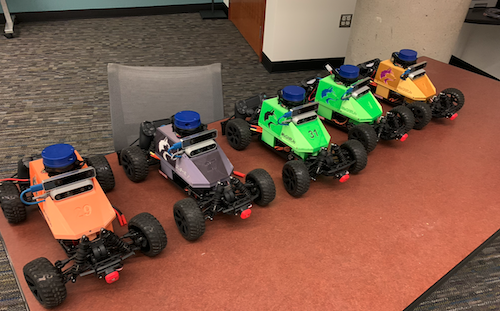
MuSHR cars: c1, c2, c3, c4, and c5
- C1: Car 29 - Orange, IP address:
10.19.104.108 - C2: Car 27 - Gray, IP address:
10.19.103.8 - C3: Car 31 - Green, IP address:
10.19.141.103 - C4: Car 01 - Green, IP address:
10.18.178.174 - C5: Car 01 - Yellow, IP address:
10.19.107.122
We’ve provided extra HDMI-DVI cables, keyboards, and mice (located near the car storage) if you need to connect directly to a MuSHR car’s on-board Jetson computer.
Tutorial: Building a Map with Hector Mapping
We’ve provided a map of CSE 006 in your cse478/maps directory, but here’s a quick tutorial if you want to try it for yourself!
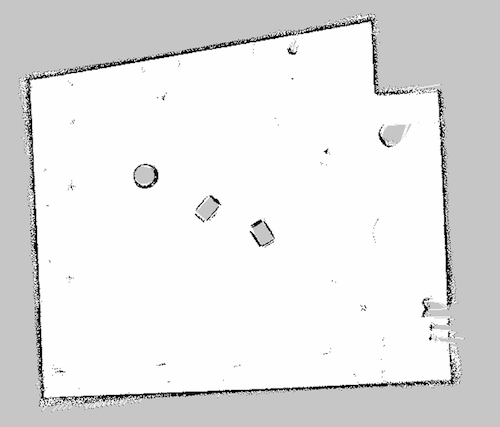
CSE 006 map. Origin marked by the green tape cross in the room.
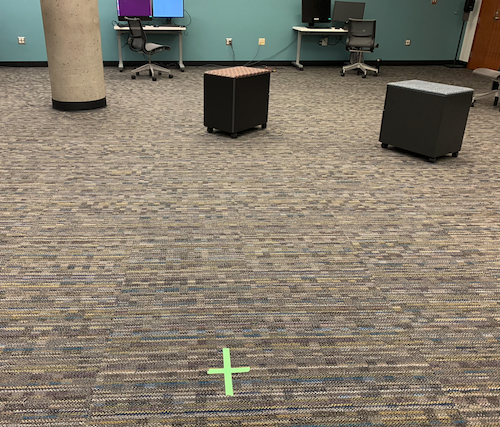
Map origin.
Move the car to the origin marked by the green tape.
Set up teleoperation by following Section 2.
Open a new terminal and set
export ROS_MASTER_URI=http://<robot_ip_addr>:11311. Then runrosrun hector_mapping hector_mapping _odom_frame:=base_linkIn another terminal (again, with
ROS_MASTER_URIset), runrvizand add the live “Map” topic to the visualizer. You should see a gray and black map.Drive the car slowly around the room. Avoid making jerky accelerations or turns.
Once you are satisfied with the map, you can save it with
cd <save_path> & rosrun map_server map_saver -f 'cse_006_02apr_02'.