Steps
-
The outliner and naming
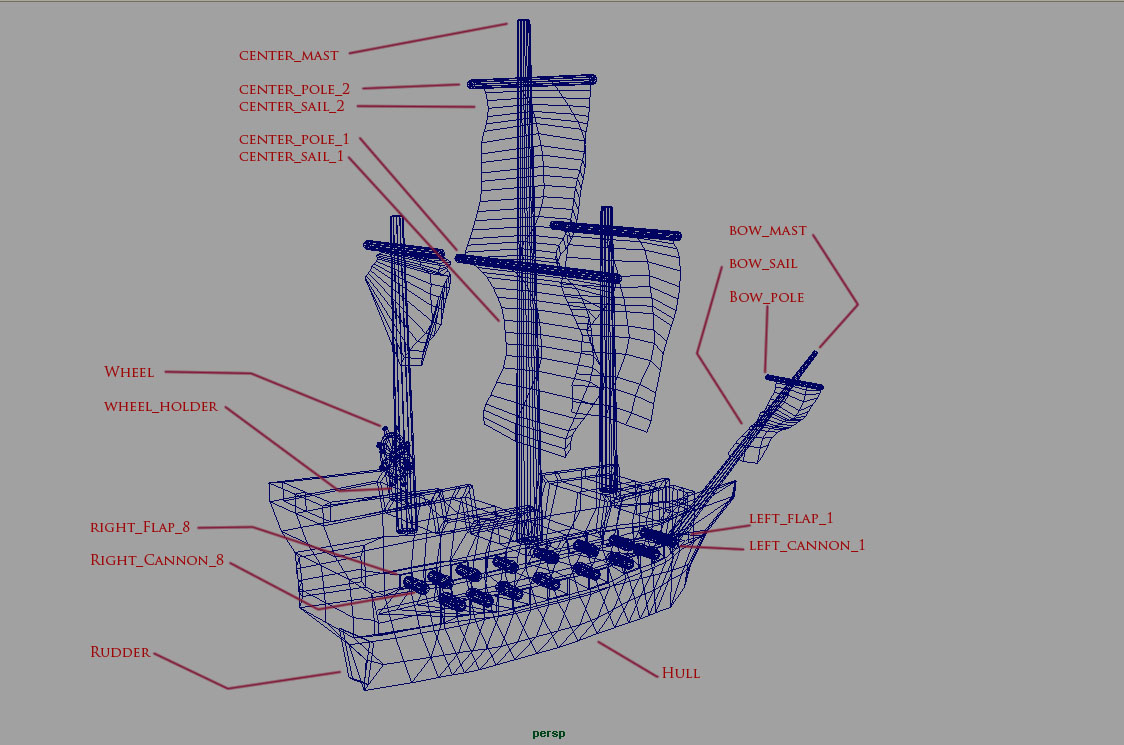
If you look at the outliner, window -> outliner, you will notice that it is very messy and unorganized. Nothing is named so let's start by fixing this. name the cannons "side_cannon_#". example left_cannon_5. name the flaps the same as the corresponding cannon. example "side_flap_#". name the ship hull "ship_hull". name the masts "bow_mast", "front_mast", "center_mast", "rear_mast". name the sails the same as the mast, example "rear_sail", for the center sails name them "center_sail_#". Name the poles (peice that holds up the sail), like the corresponding sail. example center_pole. name the steering wheel "wheel" and the wheel holder "wheel holder". finally name the rudder "rudder".
-
Pivot Points
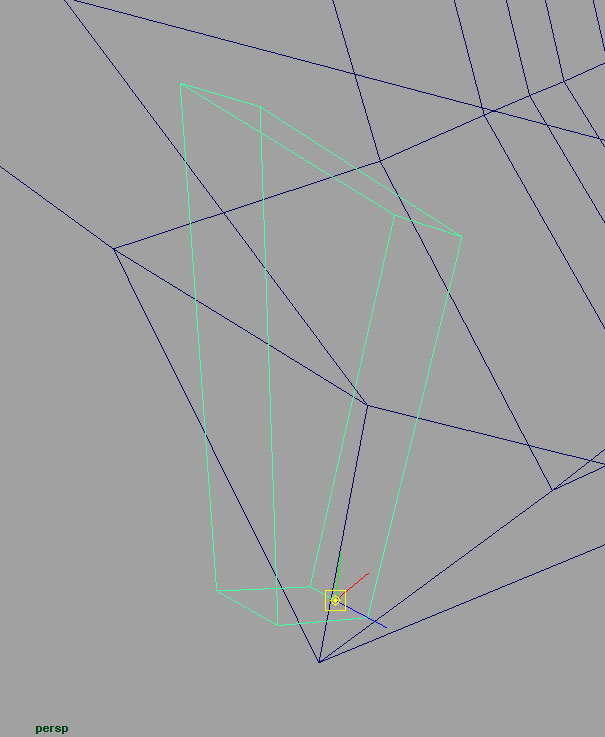
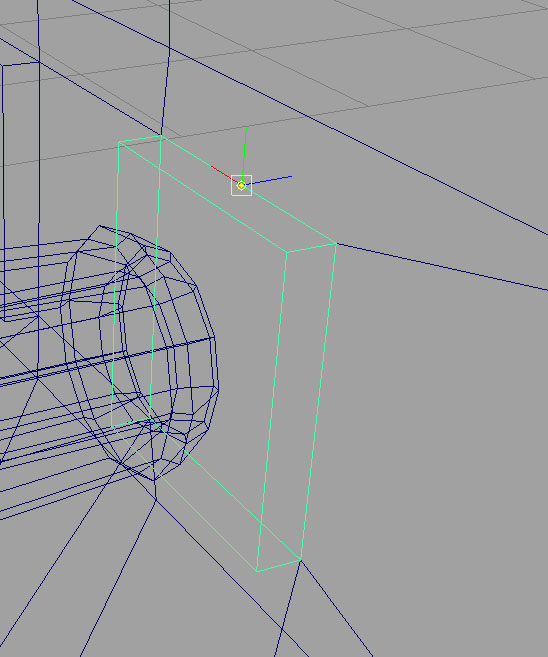
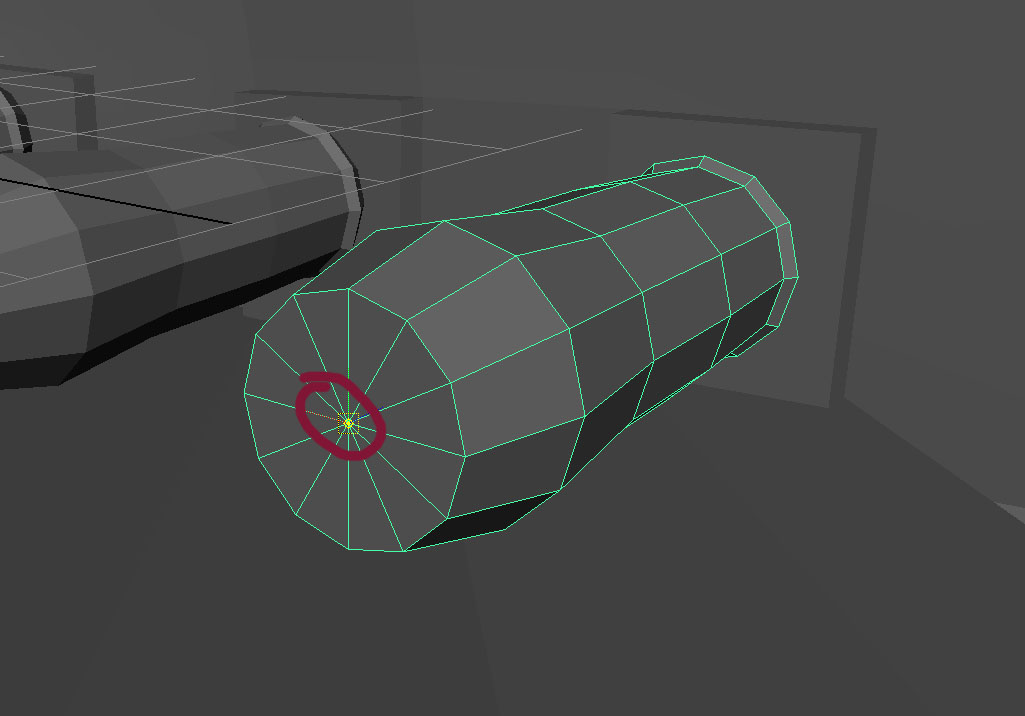
Next major thing we need to do is set up some basic pivot points. If you select the wheel and try to move it, you will notice the pivot is off. We would imagine that the wheel should rotate from it's center. To fix this select the wheel, then do to modify -> center pivot. This should fix this issue. We are going to also make the rudder animate. So select the rudder and press "w" to make sure you are using the move tool. You will notice again the pivot isn't in the right position. press "insert" this will make the move tool turn into the pivot tool. Move the pivot to the bottom center edge like in the picture. You can snap the pivot to the edge by pressing "c" middle mouse dragging over the edge. Next we need to change the pivots of the flaps. Select a flap, again the pivot is wrong. Press insert to get to the pivot tool if not already there. The pivot is going to be placed on its upper outside edge of the boat. This will make it hinge upward like a door. Finally we need to place the pivots of the cannons. Use the pivot tool to move the pivot to the back of the cannon. You can use the snap vertex "v" button to snap the pivot to the back vertex.
-
grouping
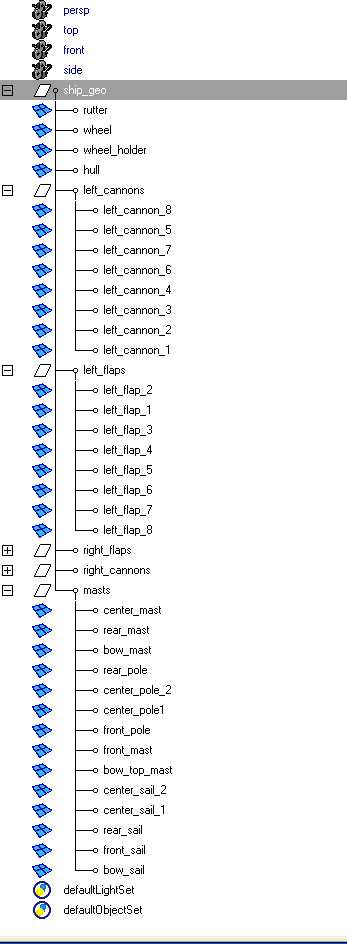
With the outliner still open, you can notice that although now we understand what everything is named, we should make some groups for further organization. Select all the left cannons and group them together(cntl + g). name this group "left_cannons". Select all the left flaps and group them together(cntl + g). name this group "left_flaps". Do the same for all the right cannons and flaps. Select all the masts, sails and poles and group them together. name this group "masts". Select all the 5 new groups, the rudder, wheel, wheel holder, hull and group them together. name this group "ship_geo". all geometry should be in or under this group.
-
Creating the anims
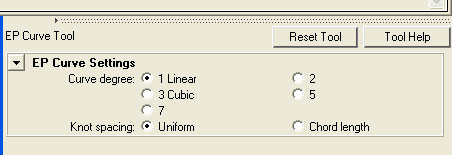
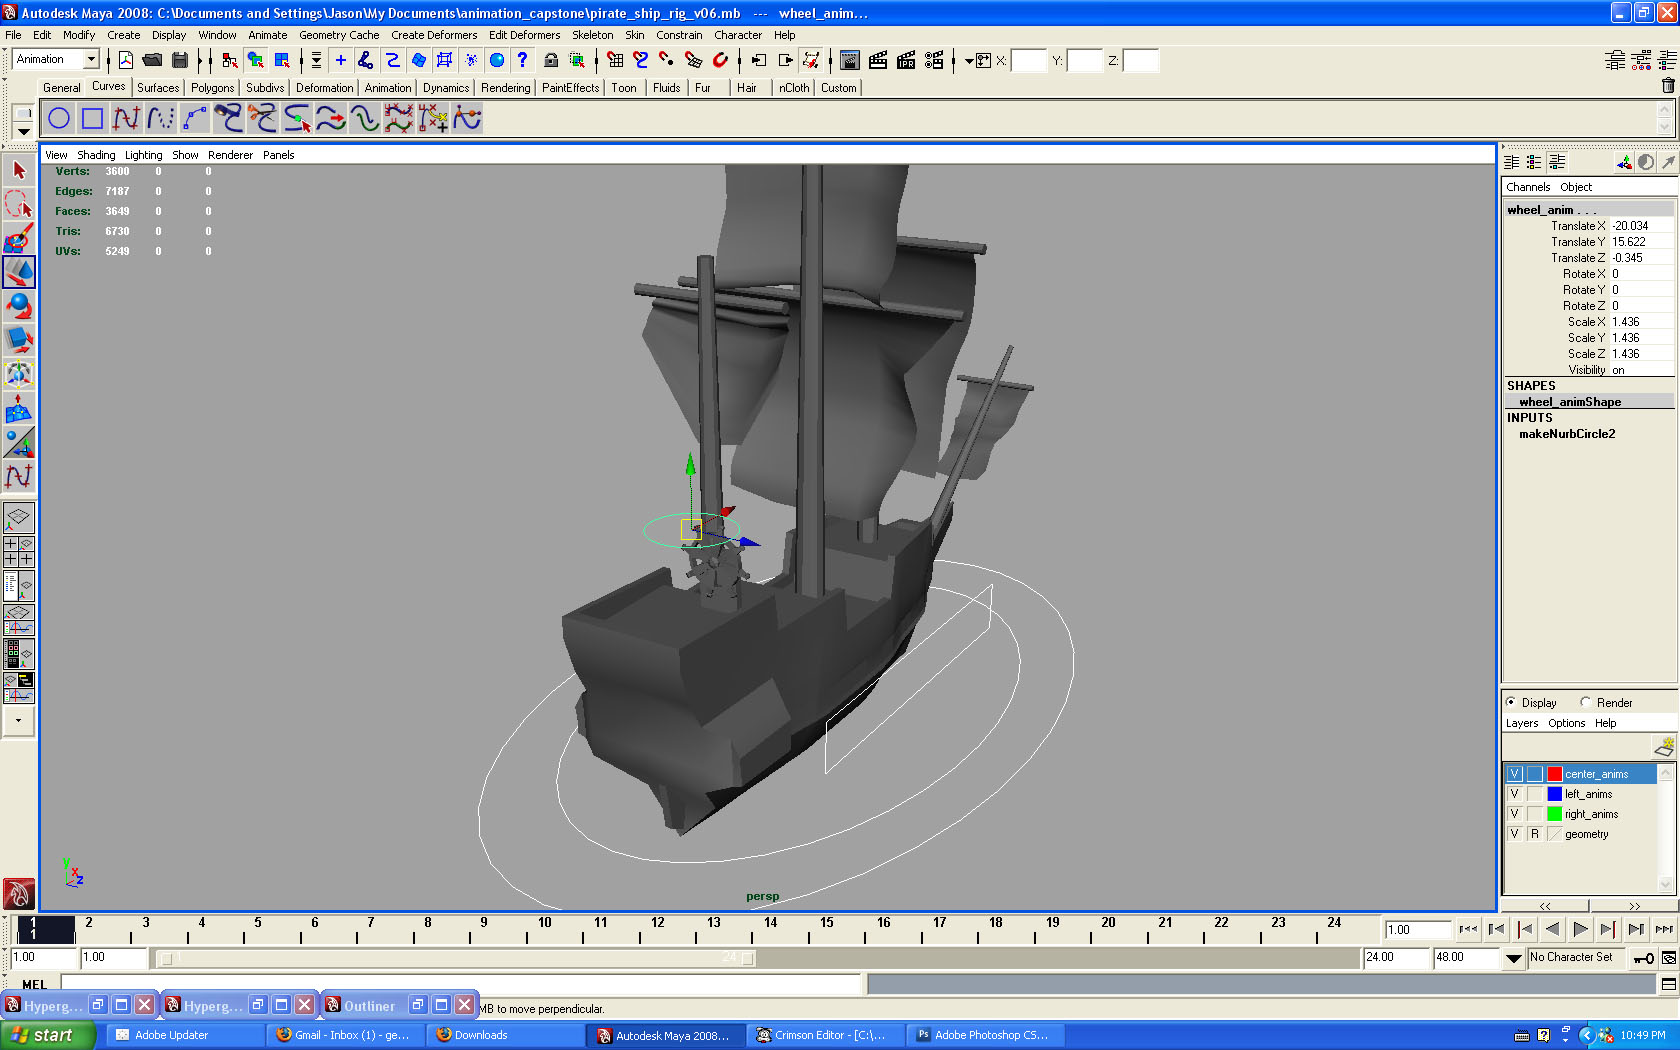
Now we should make some anims(or controls) so we can animate the ship easily. We need to create two nurbs curves that will act as the top con and one as the ship anim. in your curves shelf press the create nurbs circle button. place this around the bottom of the ship, roughly ship shaped. rename the curve "top_con_anim". Duplicate the curve and scale it inward. rename the new curve "ship_anim". create another curve and place it above the wheel. rename it "wheel_anim". Now we need to create two square curves that will act as the cannon anims. In the side view, press the Ep curve tool from the curves shelf. In the tools option box, make sure 1(linear is selected.) holding grid snap("x" key). create a rectangle arround the cannon area. move it to the side of the cannons. rename it "left_cannon_anim". duplicate it and move it to the other side of the ship. rename this curve "right_cannon_anim".
What is the difference between the "top_con_anim" and the "ship_anim"??? The top con is there to put the ship in the initial position of the animated scene. The ship anim is there to let the animator move the ship relative to it's initial position. This way if we ever need to move the ship to it's starting point we can zero out the ship_anim.
-
Some more grouping
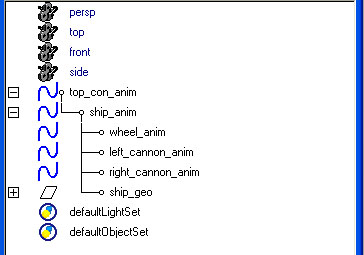
Ok now that we have named and created the curves we should group them correctly in the outliner. First we need to freeze transformations on the anims. Open the outliner, group the ship_anim under the top_con_anim. (middle mouse drag the ship_anim over the top_con_anim) parent the ship_geo, wheel_anim, left and right_cannon_anim under the ship_anim. Now when you move the top_con everything should follow. When you move the ship anim everything but the top con will move.
We need to freeze transforms on the curves because it will allow the animator to easily go back to the default position. They do this by zeroing out all the attributes.
-
Lock and Hide Attributes
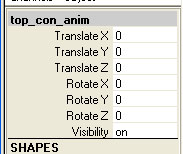
Now we need to lock and hide the unwanted attributes. When rigging, you should make sure that the animator only has control over the things that are important to animation. You don't want them to be able to key anything that shouldn't be animated. If you look at the top con. The animator should only be able to translate, rotate and toggle visiblity on the ship, not scale. Select the scale attributes in the channel box. right click over any of the attrs. from the drop down menu select lock and hide selected. The attributes will disappear from the channel box, this will stop the animators from set key frames on these attributes. We need lock and hide attributes on the other anims. Follow the same proceedure to lock and hide these attrs as well.
- ship anim: lock and hide the scale and visibility attrs
- cannon anims: lock and hide all the attrs
- wheel anim: lock and hide all the attrs
animators make objects move by setting keys(or values) on attributes at different times. By setting different keys at different times the object will look animated.
-
setting up the wheel anim
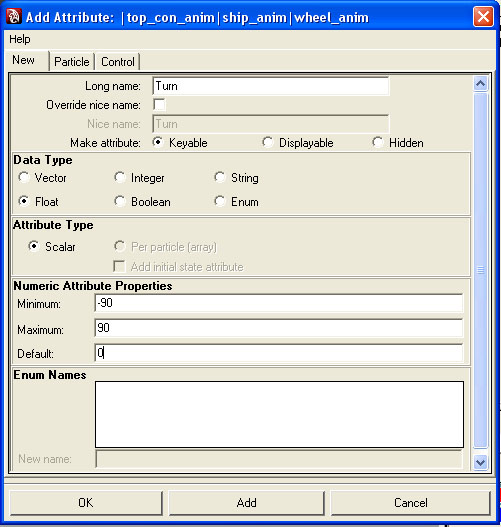
OK. now we should set up the wheel anim. What we are trying to here is set-up an attribute on the wheel anim that will rotate the wheel and the rudder. The effect is that the animator can key this attribte so they can easily rotate the wheel and rudder. To get started we need to add an attribute to the wheel anim. We currently don't have an attribute on the wheel so lets create one. Right click in the channel box -> attributes -> add attribute. A menu will show. Where it says long name type: Turn. Under data type make sure float is selected. Set the minimum to -90, set the maximum to 90 and set the default to 0. Keep the other values at the default. Press the add button. This will create a new attribute on the wheel anim called turn. the maximum value it can have is 90, and the minimum value is -90. any number beyond these ranges will set the value to the closest value in range. We want this data to be a numeric value with a decimal, that is a float. Now we are ready to make the wheel anim functionable.
-
make the wheel anim work
Although we have a new attribute on the wheel_anim, it does nothing :( To change that lets open the hypergraph. Select the wheel_anim, window -> hypergraph connections. You should see some rectangles with names and lines connecting them. these rectangle are nodes. everything in maya is a node or a set of data containing info about that object. so every object we make is represented as one of these nodes. In between some of the nodes are lines. The lines are connections between the nodes. So when an object wants to interact or talk to another object a connection needs to be made. In our case, we want the wheel anim to talk to the wheel and the rudder, so we need to create a connection!!.
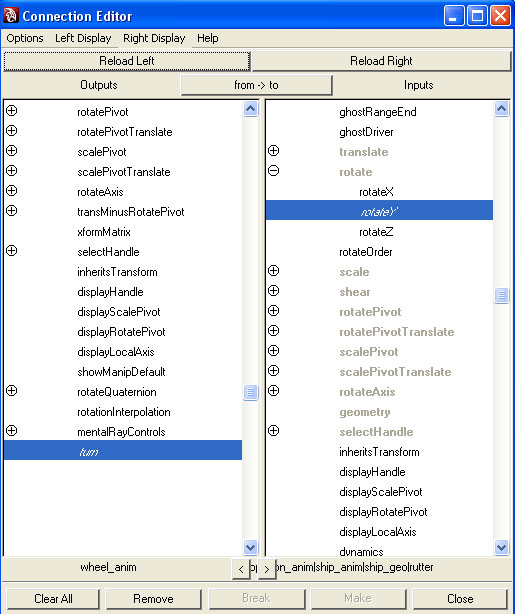
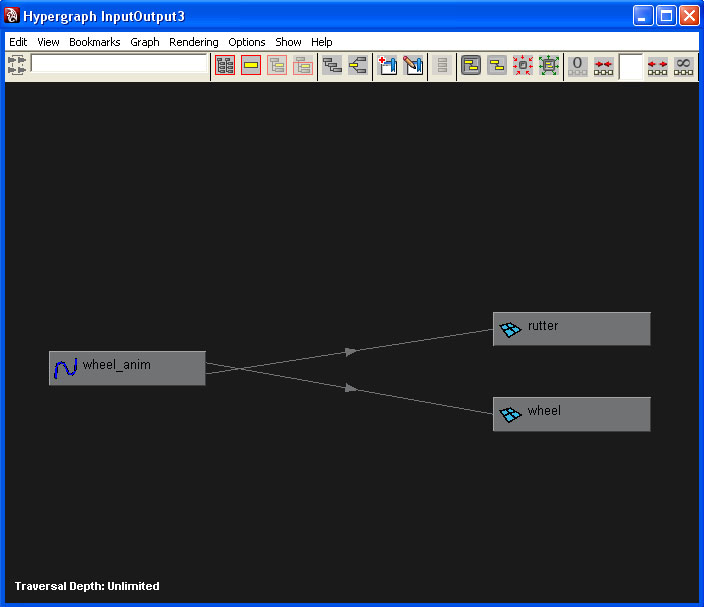
We now have to think of how we want the two nodes to talk. In this case we want the turn attribute to talk to the rotate of the wheel and rudder. So when we change the turn attribute it will change the rotates of the wheel and rudder. Lets do this!. select the wheel_anim, wheel and rudder. In the hypergraph menu, graph -> input and output connections. Now you should see the three nodes highlighted in yellow. We are nowing going to create a connection. middle click and hold over the wheel_anim, drag over the rudder node and release the middle click. from the drop down menu select other.... The connection editor should pop up. In the left is the source, in this case the wheel anim. The source is where the start of the connection. On the right is the destination, the end of the connection. We want the turn attr to connect to the rotateY of the rudder. In the left side of the connection editor select turn at the bottom of the list. On the right expand the rotate selection and highlight rotateY. Now we have the connection. If you select the wheel anim and change the value of turn. The rudder should rotate. Now make another connection from wheel_anim's turn to the wheel's rotateY just like before. Now the wheel and the rudder should rotate when the turn attr is changed.
-
setting up the cannon anims
We need to set up the cannon anims now. On each cannon anim we need to make two attributes, cannons_out and flaps_up. Select the left_cannons_anim and right click in the channelbox. attributes->add attribte. name the anim cannons_out. Set the data type to float, set the minimum to 0 and max to 1. set the default 0. Create another attriute with the name of flaps_up. Set the data type to float, min 0 max 10 default value 0. Do the same for the right_cannons_anim. Now we have attribtes. Now we need to make them work.
-
making the flaps_up attrs work by set driven keys
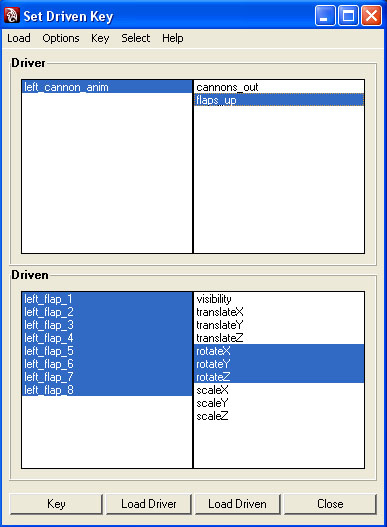
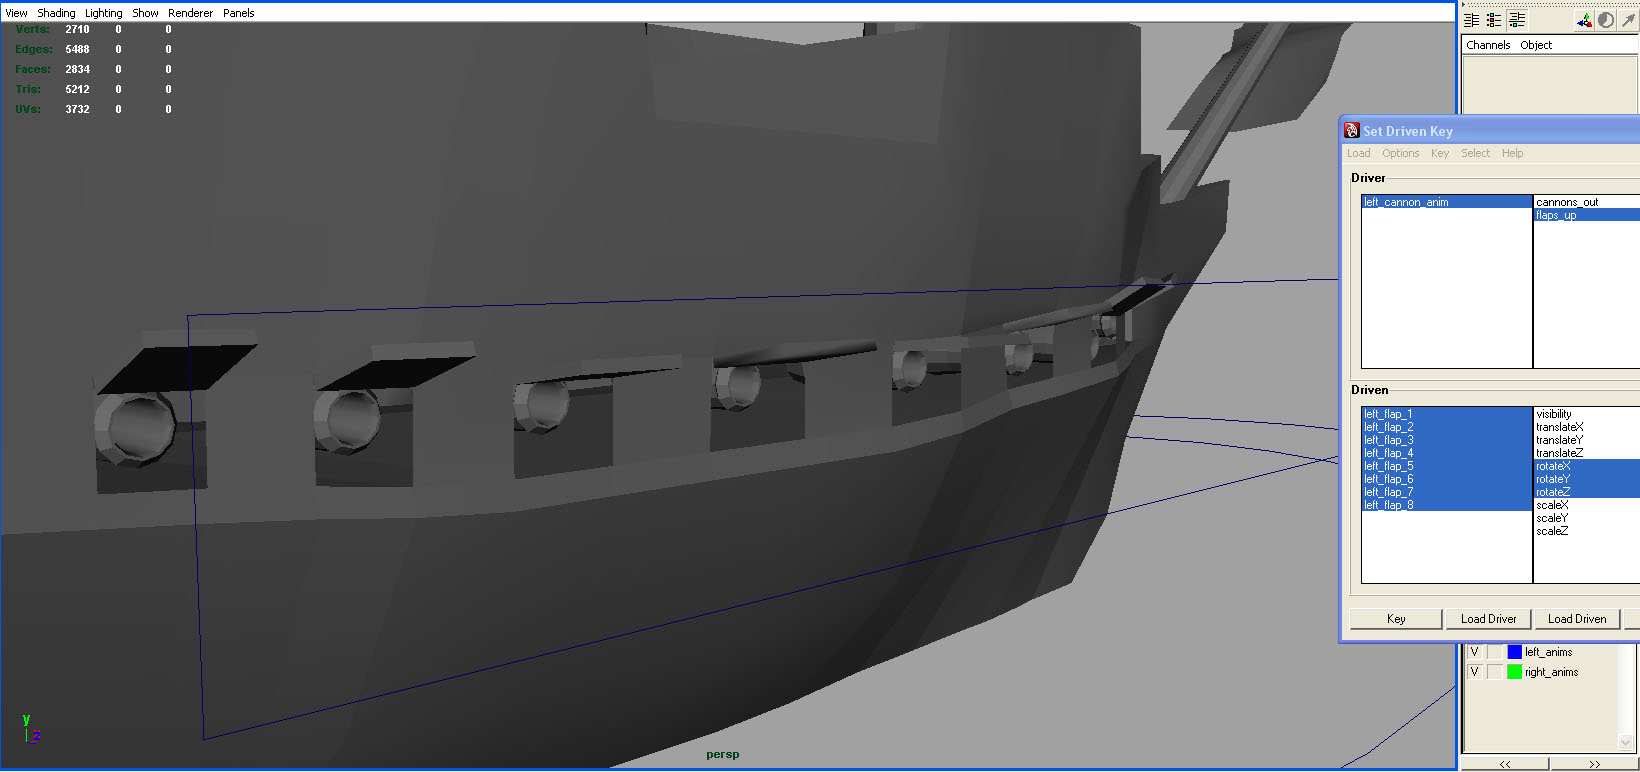
so the first thing we need to do is figure out how this is going to work. When flaps_up has a value of 10 we want the flaps up. When the flaps_up attr is 0 we want them to be in their default position. We can get the actual flaps into their up position by rotation. But the rotation needed for each flap isn't the same. This makes it harder because we can't use a direct connection like the wheel rotation. So when flaps_up=0, all rotations=0. when flaps_up=10, rotaions=(up rotations). We can acheive this exact concept with set driven keys. Select the right_cannons_anim. In the channel box, select the flaps_up right click-> editors-> set driven key.. The set driven key editor should pop-up. Make the flaps_up value in the right_cannons_anim 0. Select the right_cannons_anim and press load driver. Select all the right cannons and press load driven. In the driver left collumn select left_cannons_anim. In the driver right collumn select flaps_up. In the driven left collumn select the all the cannons. In the driven right collumn selcet rotateX, rotateY, rotateZ. Press the key button in the set driven key editor. This will make it so when flaps_up = 0, all rotations = 0. Now we need the flaps_up state. Make the right_cannons_anim flaps_up attr 10. Now rotate each flap rotated up as in the image. Press the key button. Now when the change the value of flaps_up closer to 10. The flaps should rotate up. Do the same for the left side.
-
making the right cannons_out work
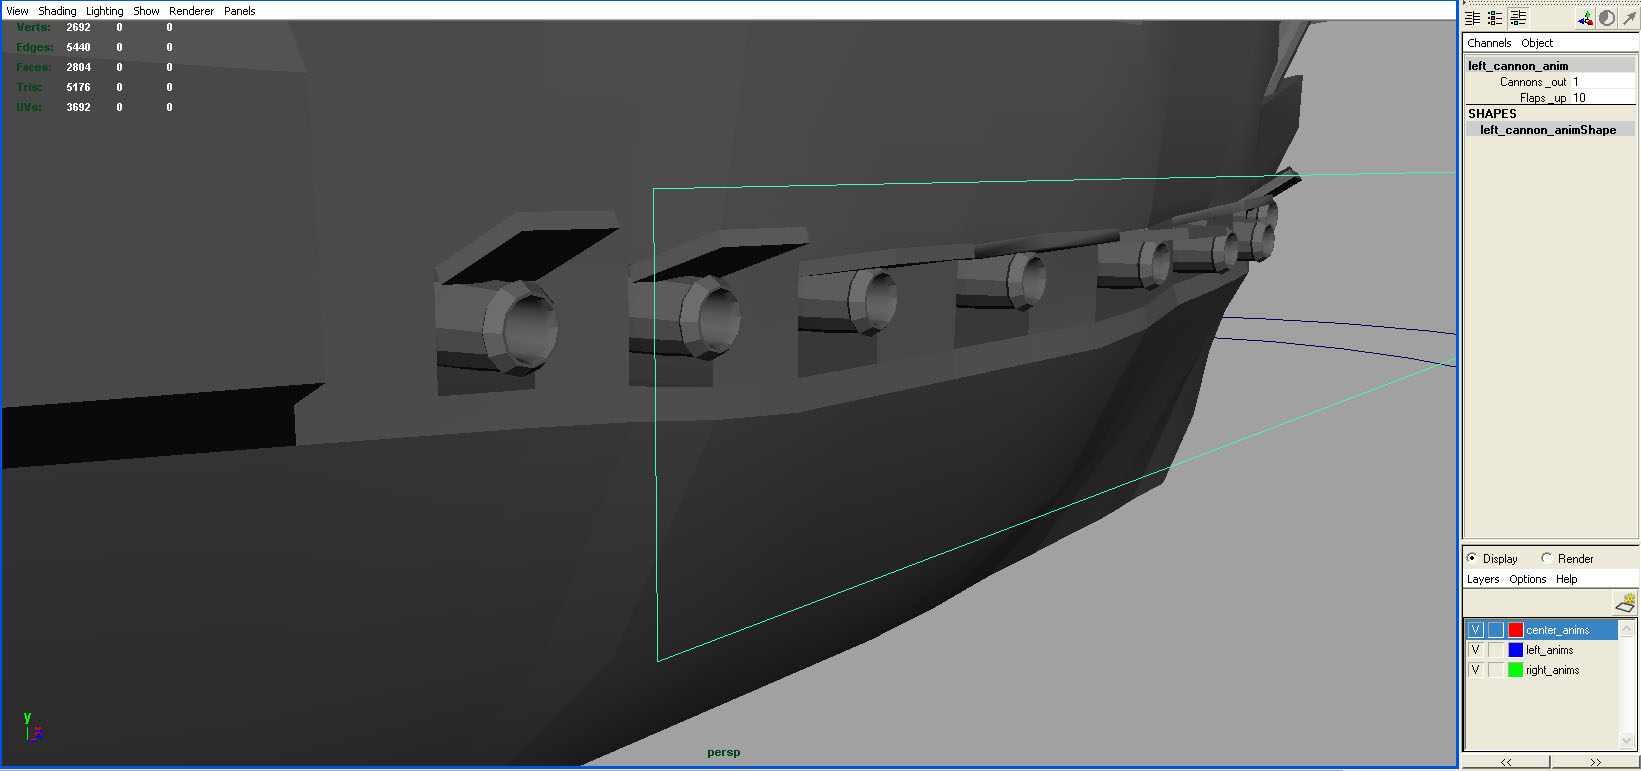
This is the same process as the wheel_anim turn attribute. To make the cannons come out, we need to translate them in the +Z direction by 1. Lucky for us we have a cannons_out attr that goes from 0-1. So we need the cannons-out attribute to talk to the translate Z. of the cannons. Select all the cannons and the right_cannons_anim. Open the hypergraph. middle mouse click and hold over the right_cannons_anim. drag over one of the cannons and let go of the middle mouse. In the drop down menu select other. In the left side of the connection editor select cannons_out. In the right collumn. Select translate X. Do the same for the other right cannons. Now as we move change the value of cannons_out the cannons come out of the boat. Now lets do the other side.
-
making the left cannons_out work
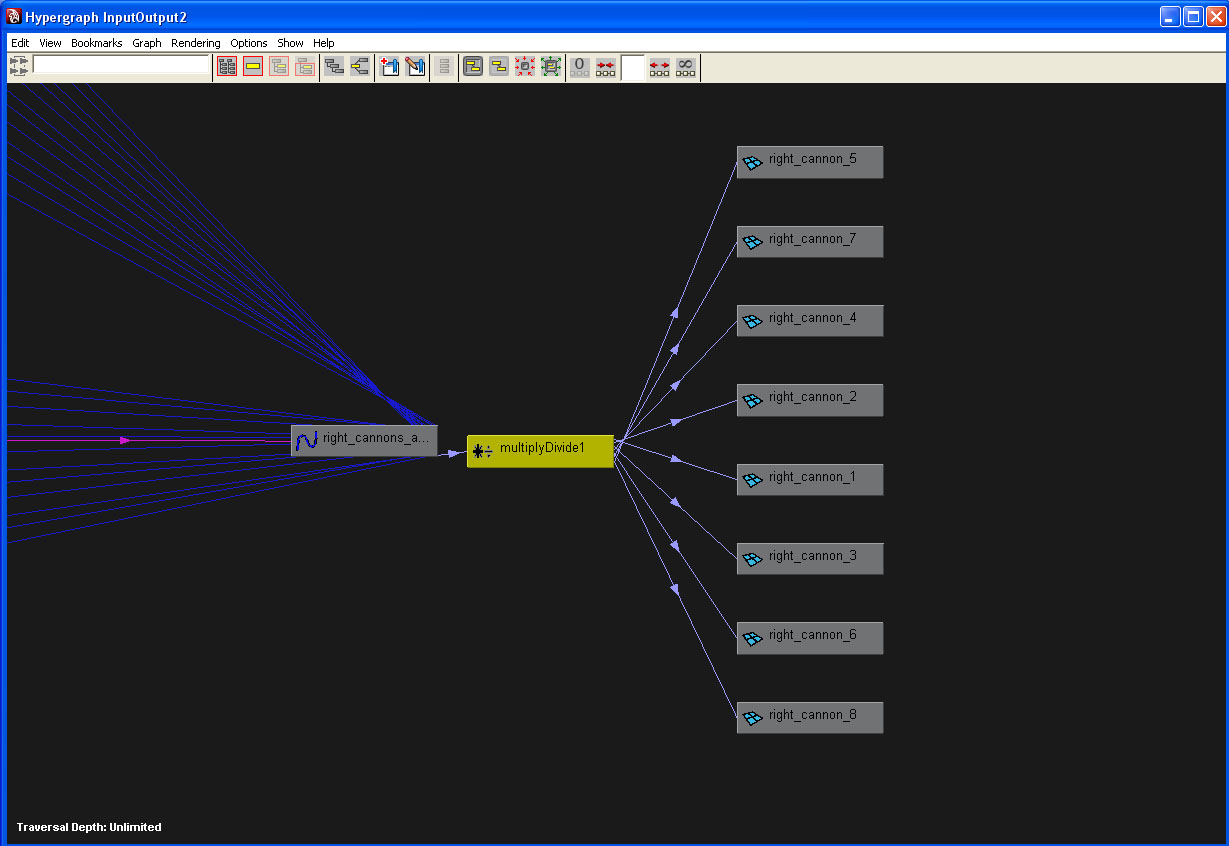
There is another problem, for the left side. To make the cannons come out on the left side we need to translate them along the -Z axis by one. so when cannons_out=0 translateZ = 0. When cannons_out= 1, translateZ = -1. Although we could get this done with set driven keys we are going to use utility nodes instead. We need to multiply the cannons_out value by -1 to get the desired translateZ. We can use the multiply/divide utility to acheive this. Select the left_cannons_out anim and the left cannons. Open the hypergraph. In the hypergraph menu, go to rendering-> create render node... in the utilities tab click the multiply/divide button. A new multiply node should be created in the hypergraph. This node takes a input1 and an input2, multiplies them together and spits out an output value. So if input1 is the cannons_out, input 2 is -1 then the output should be desired. using the connection editor connect the cannons_out value into the input1X. Select the multiply node. In the channel box, make input2X -1. Now in the hypergraph connect the outputX into every translateZ of the left cannons. The cannons should now be pushed out when the value of cannons_out reaches 1.
-
Finishing up with layers
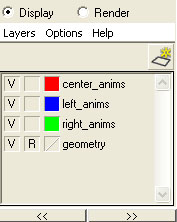
Last thing that we should do is make some layers. Layers will allow you to colorize your anims and organize some more. These layers will help the animator not touch things they shouldn't touch, and give them visual hints of what they are looking at. We are going to make a layer for the geometry. In the channel box make sure the layers section is showing. If it is not select the button in the picture. In the layers tab, layers -> create empty layer. In the layers tab, right click layer1. rename it geometry. select all the geometry, right click over the geometry layer and add selected objects. Each layer has a few options. There are three boxes before the layer name. The first box is visibility. If off the objects in the layer will be hidden. The second box is how it is visible. If blank, then it is normal, if "T" then all objects are templated. if "R" then all objects are referenced. If the objects are referenced then you can see them regularly but they can't be selected. The third box is the layers color. This will allow us to colorize our anims. We want the geometry to be visible, and referenced. We also want three more layers. these will colorize our anims. crete three more empty layers, named center_anims, left_anims and right_anims. You want to give the layers three different colors. add the top_con_anim, the ship_anim and the wheel_anim in the center_anims layer. Add the right_cannons_anim in the right_anims layer, and the left_cannons_anim in the left_anims layer. This should make the anims colorized.
you can edit layers by double clicking on them and the layer editor should pop-up.

-
Finished