 |
Project 3: TraceAssigned: 11/3/2000 Help Sessions: Monday 11/6 @ 3:30pm, Wednesday 11/8 @ 3:30pm Project TA: Jeff Maurer. |
Quick Links
- .zip skeleton code + sample
- .tar.gz skeleton code + sample
- Just the (w2k) sample raytracer, no skeleton
- Help Session
- .ray File Format
- Sample textures for texture mapping
Project Description
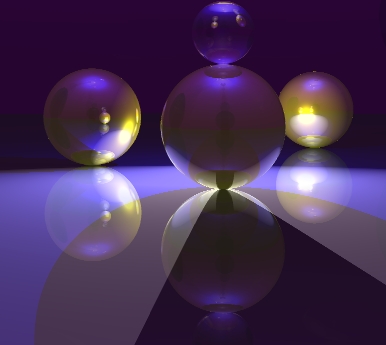
Trace is a program that constructs
recursively ray-traced images of fairly simple scenes.
Getting Started
To install the starting point source code, grab either the .zip or the .tar.gz distribution. The files are the same in both distributions; the only difference is archive format. In the "scenes" subdirectory, you'll find some sample scene files (all the files with the .ray extension). These are text files that describe some geometry and the coloring that should be applied to them. Feel free to take a look at the notes from the help session.
Running the Sample
Before you begin coding, you should run the sample solution; it is included in the skeleton distribution as "sample_ray.exe" for W2K and as "sample_raytracer" for Linux. It has all of the requirements implemented, along with some extra features such as antialiasing, light strength controls and attenuation controls. NOTE: please do NOT run the raytracers on the shared instructional Linux machines (ceylon, fiji, etc...) on a regular basis, for raytracers will eat up enormous amounts of CPU time and slow down file access for other students. We include the Linux version of this project for you to use mainly on your own machines. If you want to try out the raytracer on the instructional machines, go ahead, but please don't do so on a regular basis.
Creating Your Own Scenes
As you get into the project, you'll probably want to use some scenes of your own invention. For this you can either write your own .ray files, or you can use the modeler program from the last project to create them for you.
To use the modeler, run it and open your model like before. Adjust any sliders or widgets to values you like, then select the "Write raytrace file..." option from the file menu.
If you are interested in writing your own files from scratch, a help page on the file format is available. This file also describes the specifications of all the primitives you are required to implement.
Required Extensions
After running the sample solution, you should build the skeleton code and see how it compares. You will probably notice that there is a significant difference in the quality of images rendered with the two versions. This suggests what parts of the raytracer have been written and what parts are left undone.
If you compare the outputs of the skeleton and solution, you will see that most of the basic geometry-handling code is done. The skeleton code is able to cast rays into an image and draw color on the screen, resulting in some flat-shaded polygonal shapes. The skeleton code is doing ray-casting and nothing more. Furthermore, the cone and sphere primitives will not appear. While all the code to cast a ray exists, not all of the object intersections code is there. You need to implement sphere and cone intersections and expand ray-casting into ray-tracing by adding support for reflected and refracted rays. You also must implement the Phong specular-reflection model and include support for transparent objects.
Specifically, each group must implement recursive ray tracing as described in class. This entails making the following extensions to the program:
| Extension | Alan Watt | Foley, et al. | Glassner |
|---|---|---|---|
| Sphere Intersection | pp.18-19 | - | pp.91 |
| Cone Intersection (see lecture notes) |
- | - | - |
| Phong specular-reflection model | 6.2-6.3 | 16.1 and 16.2.5 | - |
| Contribution from: multiple light sources, distance attenuation, and these additional types of lights:
|
- | 16.1 (particularly in 16.1.5 and 16.1.6) | - |
| Shadow Attenuation | 9 | 16.12 and 16.4 | - |
| Reflection | 1.4 | 16.12 | 4.2.1 |
| Refraction | 1.4 | 16.12 | 4.2.3 - 4.2.7 |
Your ray tracer should recursively trace rays to account for these. Recursion should proceed to a maximum depth as set by the user.
Getting Started
The Trace project is a very large collection of files and object-oriented C++ code. Fortunately, you only need to work directly with a small subset of it. However, you will probably want to spend a bit of time getting familiar with the layout and class hierarchy at first, so that when you code you know what classes and methods are available for your use.
The starting point for where ray tracing begins, and where you will be needing to add a lot of functionality, is in the RayTracer.cpp file. This is a good file to start studying and exploring what methods get called and what they do.
Bells and Whistles
In many cases, the material in the Foley, et al. book goes into more depth on a particular subject than the Alan Watt text. In addition, Glassner's book on ray tracing is a very comprehensive exposition of a whole bunch of ways ray tracing can be expanded or optimized (and it's really well written!). If you're planning on implementing any of these bells and whistles, you are encouraged to read the relevant sections in these books as well.
Remember that you'll need to establish to our satisfaction that you've implemented the extension! You should have test cases that clearly demonstrate the effect of the code you've added to the ray tracer. Sometimes different extensions can interact, making it hard to tell how each contributed to the final image, so it's also helpful to add controls to selectively enable and disable your extensions.
![[whistle]](whistle.gif) Implement an adaptive termination
criterion for tracing rays, based on ray contribution. Control the
adaptation threshold with a slider.
Implement an adaptive termination
criterion for tracing rays, based on ray contribution. Control the
adaptation threshold with a slider.
Implement antialiasing by supersampling and averaging down.
You must provide a slider that indicates the number of sub-pixel samples
being used (e.g., something in the range 1-5 indicating 1x1, 2x2, ... 5x5
supersampling). This whistle upgrades to a bell if you implement the first
stage of distribution ray tracing by jittering the sub-pixel
samples. The noise introduced by jittering should be evident when
casting 1 ray per pixel.
![]() Implement spot lights.
Implement spot lights.
![]() Add a menu option that lets you
specify a background image to replace the
environment's ambient color during the rendering. The background
should appear as the backplane of the rendered image with suitable
reflections and refractions to it.
Add a menu option that lets you
specify a background image to replace the
environment's ambient color during the rendering. The background
should appear as the backplane of the rendered image with suitable
reflections and refractions to it.
![]() While the skeleton code handles materials with arbitrary indices of
refraction, it assumes that objects don't intersect one another. It breaks
down when objects intersect or are wholly contained inside other
objects. Add support to the refraction code for detecting this and handling it
in a more realistic fashion. Note, however, that in the real world, objects can't coexist
in the same place at the same time. You will have to make assumptions as to
how to choose the index of refraction in the overlapping space. Make
those assumptions clear when demonstrating the results.
While the skeleton code handles materials with arbitrary indices of
refraction, it assumes that objects don't intersect one another. It breaks
down when objects intersect or are wholly contained inside other
objects. Add support to the refraction code for detecting this and handling it
in a more realistic fashion. Note, however, that in the real world, objects can't coexist
in the same place at the same time. You will have to make assumptions as to
how to choose the index of refraction in the overlapping space. Make
those assumptions clear when demonstrating the results.
![]() Implement antialiasing
by adaptive supersampling, as described in Foley, et al.,
15.10.4. For full credit, you must show a visualization of the
sampling pattern that results. For example, you could create another
image where each pixel is given an intensity proportional to the number of
rays used to calculate the color of the corresponding pixel in the ray
traced image. Implementing this bell/whistle is a big win -- nice
antialiasing at low cost.
Implement antialiasing
by adaptive supersampling, as described in Foley, et al.,
15.10.4. For full credit, you must show a visualization of the
sampling pattern that results. For example, you could create another
image where each pixel is given an intensity proportional to the number of
rays used to calculate the color of the corresponding pixel in the ray
traced image. Implementing this bell/whistle is a big win -- nice
antialiasing at low cost.
![]() Implement
more versatile lighting controls, such as the Warn model
described in Foley 16.1.5. This allows you to do things like
control the shape of the projected light.
Implement
more versatile lighting controls, such as the Warn model
described in Foley 16.1.5. This allows you to do things like
control the shape of the projected light.
![]()
![]() Implement bump
mapping (Watt 8.4; Foley, et al. 16.3.3).
Implement bump
mapping (Watt 8.4; Foley, et al. 16.3.3).
![]()
![]() Implement solid
textures or some other form of procedural texture
mapping, as described in Foley, et al., 20.1.2 and
20.8.3. Solid textures are a way to easily generate a
semi-random texture like wood grain or marble.
Implement solid
textures or some other form of procedural texture
mapping, as described in Foley, et al., 20.1.2 and
20.8.3. Solid textures are a way to easily generate a
semi-random texture like wood grain or marble.
![]()
![]() Add some new
types of geometry to the ray tracer. Consider implementing
torii or general quadrics. Many other objects are possible
here.
Add some new
types of geometry to the ray tracer. Consider implementing
torii or general quadrics. Many other objects are possible
here.
![]()
![]() Add support
for height-fields. Click
here for a discussion on what they are and how they can
be generated.
Add support
for height-fields. Click
here for a discussion on what they are and how they can
be generated.
![]()
![]() for
first,
for
first, ![]() for each additional
for each additional
Implement distribution ray tracing to produce
one or more or the following effects: depth of field, soft
shadows, motion blur, or glossy reflection
(See Watt 10.6, Glassner, chapter 5, or Foley, et al., 16.12.4).
![]()
![]()
![]() Add texture mapping support to
the program. The most basic kind of texture mapping is to
apply the map to the diffuse color of a surface. But many
other parameters can be mapped. Reflected color can be
mapped to create the sense of a surrounding environment.
Transparency can be mapped to create holes in objects.
Additional (variable) extra credit will be given for such
additional mappings.
Add texture mapping support to
the program. The most basic kind of texture mapping is to
apply the map to the diffuse color of a surface. But many
other parameters can be mapped. Reflected color can be
mapped to create the sense of a surrounding environment.
Transparency can be mapped to create holes in objects.
Additional (variable) extra credit will be given for such
additional mappings.
![]()
![]()
![]() Add some higher-level geometry to the
ray tracer, such as surfaces of revolution, extrusions,
metaballs or blend surfaces.
Add some higher-level geometry to the
ray tracer, such as surfaces of revolution, extrusions,
metaballs or blend surfaces.
![]()
![]()
![]() Implement ray-intersection
optimization by either significantly extending the BSP Tree
implemented in the skeleton or by implementing a different
optimization method, such as hierarchical bounding volumes
(See Glassner 6.4 and 6.5, Foley, et
al., 15.10.2).
Implement ray-intersection
optimization by either significantly extending the BSP Tree
implemented in the skeleton or by implementing a different
optimization method, such as hierarchical bounding volumes
(See Glassner 6.4 and 6.5, Foley, et
al., 15.10.2).
![]()
![]()
![]()
![]() Implement a
more realistic shading model. Credit will vary depending on
the sophistication of the model. A simple model factors in
the Fresnel term to compute the amount of light reflected and
transmitted at a perfect dielectric (e.g., glass). A more
complex model incorporates the notion of a microfacet
distribution to broaden the specular highlight. Accounting
for the color dependence in the Fresnel term permits a more
metalic appearance. Even better, include anisotropic
reflections for a plane with parallel grains or a sphere with
grains that follow the lines of latitude or longitude.
Sources: Watt, Chapter 7, Foley et al, Section 16.7; Glassner, Chapter 4,
Section 4; Ward's SIGGRAPH '92 paper; Schlick's Eurographics
Rendering Workshop '93 paper.
Implement a
more realistic shading model. Credit will vary depending on
the sophistication of the model. A simple model factors in
the Fresnel term to compute the amount of light reflected and
transmitted at a perfect dielectric (e.g., glass). A more
complex model incorporates the notion of a microfacet
distribution to broaden the specular highlight. Accounting
for the color dependence in the Fresnel term permits a more
metalic appearance. Even better, include anisotropic
reflections for a plane with parallel grains or a sphere with
grains that follow the lines of latitude or longitude.
Sources: Watt, Chapter 7, Foley et al, Section 16.7; Glassner, Chapter 4,
Section 4; Ward's SIGGRAPH '92 paper; Schlick's Eurographics
Rendering Workshop '93 paper.
This all sounds kind of complex, and the physics behind it is. But the coding doesn't have to be. It can be worthwhile to look up one of these alternate models, since they do a much better job at surface shading. Be sure to demo the results in a way that makes the value added clear.
Theoretically, you could also invent new shading models. For instance, I'm really interested in trying to implement a less realistic model! Could you implement a shading model that produces something that looks like cel animation? Variable extra credit will be given for these "alternate" shading models.
Note that you must still implement the Phong model.
![]()
![]()
![]()
![]() Implement CSG,
constructive solid geometry. This extension allows you to
create very interesting models. See page 108 of Glassner for
some implementation suggestions. An excellent
example of CSG was built by a grad student here in the grad graphics course.
Implement CSG,
constructive solid geometry. This extension allows you to
create very interesting models. See page 108 of Glassner for
some implementation suggestions. An excellent
example of CSG was built by a grad student here in the grad graphics course.
![]()
![]()
![]()
![]() Add a particle
systems simulation and renderer (Foley 20.5, Watt 17.7, or see
instructor for more pointers).
Add a particle
systems simulation and renderer (Foley 20.5, Watt 17.7, or see
instructor for more pointers).
There are innumerable ways to extend a ray tracer. Think about all the visual phenomena in the real world. The look and shape of cloth. The texture of hair. The look of frost on a window. Dappled sunlight seen through the leaves of a tree. Fire. Rain. The look of things underwater. Prisms. Do you have an idea of how to simulate this phenomenon? Better yet, how can you fake it but get something that looks just as good? You are encouraged to dream up other features you'd like to add to the base ray tracer. Obviously, any such extensions will receive variable extra credit depending on merit. Feel free to discuss ideas with the course staff before proceeding!