as2: Layout
Last revised: 4 April, 2023- Part 1-5 Wed 5-Apr
- Part 1-2 Checkpoint 10:00 pm, Wed 12-Apr
- Part 3-4 (Code) & Part 5 (Reflection) 10:00pm, Thur 20-Apr
HCI Goals:
- Use interactor hierarchies for application design and implementation
- Create concise and efficient constraints to build responsive layouts
- Apply the theory of layout design to build complex layouts
- Design, develop, and implement reusable layouts
- Apply understanding of scrolling and how varying layout sizes can influence screen display
Android Goals:
- Develop a generalizable and reusable layout for any number of images
- Use Android layout GUI, XML, and Android programmatic layout API appropriately
- Apply Android constraints implementation
- Proficiently and accurately handle portrait vs. landscape orientation and fixed vs. variable sized container views
- Successfully use layout Inflators, and analyze which inflation method is appropriate for the given situation.
- Turn-in links
- Assignment Description
- Part 1
- Part 2
- Part 3
- Part 4
- Part 5 (Reflection)
- Testing
- Development Strategies
- Debugging tips and tricks
- Turn in
- Grading (50pts)
Turn-in links
- Part 1-2 Code: Upload the code in the Layout 1-2 Gradescope assignment
- Part 3-4 Code: Upload the code in the Layout 3-4 Gradescope assignment
- Part 5 Reflection: Write your reflection and turn it into Gradescope
Assignment Description
For this assignment, you will be exploring multiple ways to build layouts in Android, in particular
creating subclasses of ViewGroup that can be reused across an app.
Scroll down to the development strategies sections for some tips curated from past students!
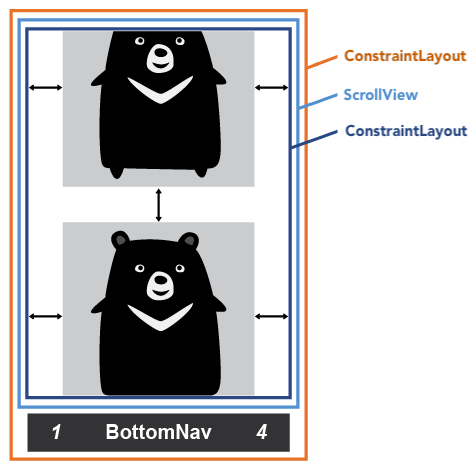
App Overview
The final app for this assignment has five tabs, roughly corresponding to the four parts of the assignment with an additional prebuilt “testbench” tab.
-
 : Tests for custom views you’ll implement in Parts 2 and 3
 -
 : Part 1, a vertically scrolling list of images
 -
 : Part 2, a vertically scrolling list of images with captions
 -
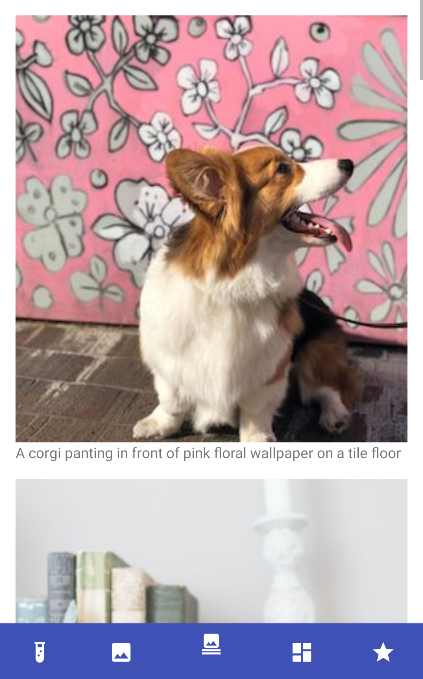
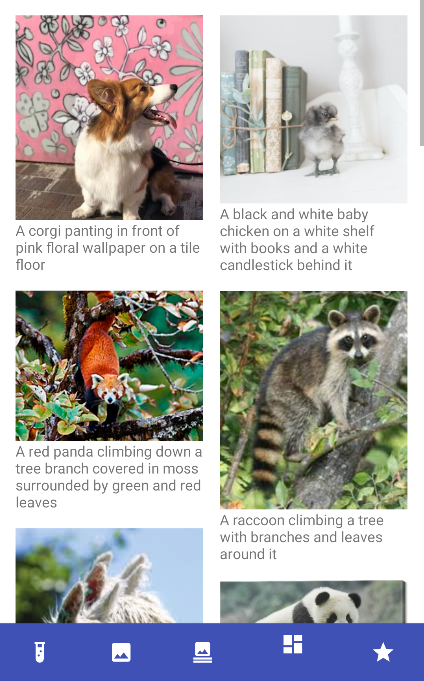
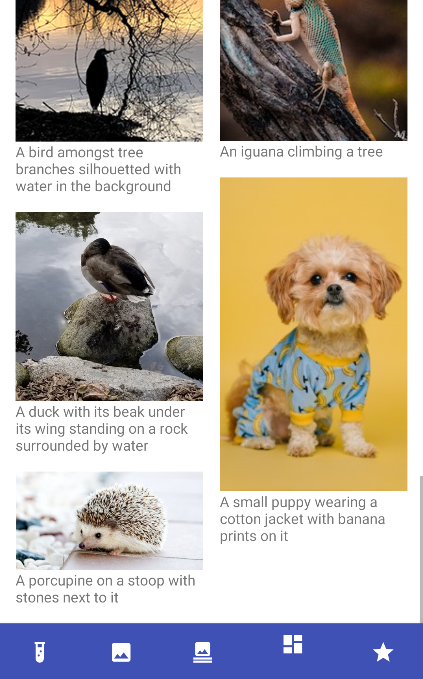
 : Part 3, Pinterest-like two-column list of captioned images
 -
 : Part 4, a recreation of another app’s interface
Inheritance Hierarchy
Like Doodle, our app is divided into multiple tabs using a BottomNavigationView.
However instead of switching between Activity objects, we’re switching between View objects.
CaptionedImageView, ImageListView, and TwoColumnLayout each inherit from various subclasses
of ViewGroup.
CustomInterfaceView inherits from a ConstraintLayout
to allow for the most flexibility in your creative portion of this assignment.
In this class diagram, classes in blue are part of the Android SDK.
Part 1
Tasks:
- Use the tools provided by Android Studio to build a layout that vertically stacks images.
For Part 1 you will be building a scrollable list of images with XML.
Your layout must look equally nice horizontally and vertically.
You will use constraints to achieve this, using the ConstraintLayout we provide in part1.xml.
part1.xml can be found in the res/layout directory in Android Studio once the layout project
has been opened.
The result should look like this:
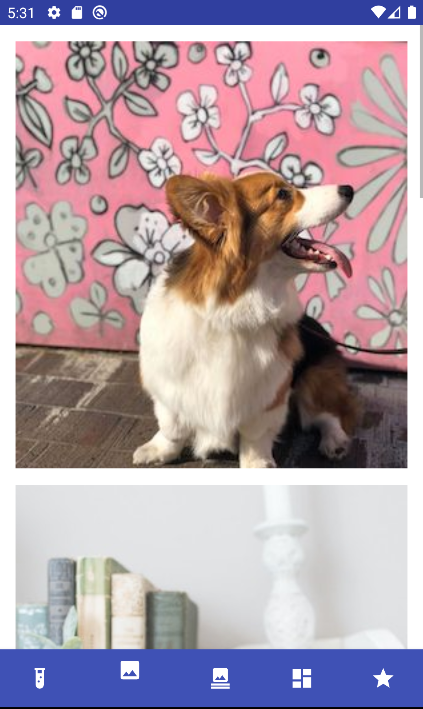
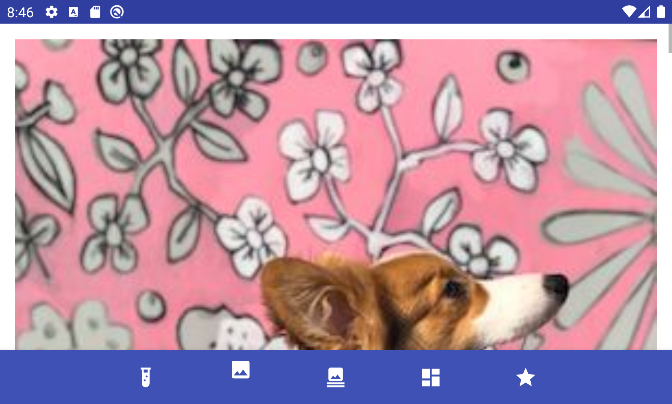
When it comes to layout, working directly with XML can be a pain, especially when there are several attributes to keep track of on each element. Luckily, Android Studio provides a visual editor that you can use to build your app layout. You may find it helpful to switch back and forth between the visual editor and the XML.
In part1.xml you will accomplish the following:
- Familiarize yourself with how to reference images in res/drawable.
- Use the Visual and XML editor to construct a single, scrollable column of images.
- You must place an
image_margingap between images and their container, as well as between consecutive images. You must also ensure that the bottom image has animage_marginspace between it and its parent’s bottom.image_marginis defined inres/values/dimens.xml - Your layout must have enough images that you need to scroll (use
animal_0throughanimal_4) - Each image must be scaled so it fits horizontally and is centered while maintaining its aspect
ratio. This requires you to set some attributes specific to
ImageViewwhich are mentioned in the ImageView Documentation. - You must use constraints to ensure that each image is adjacent to the previous image
(eg.
Top_toBottomOf) and that its left and right sides are constrained to the parent container.
This video shows Part 1 in action:
A (slightly simplified) view of the interactor hierarchy for Part 1 is shown below.
Two notes about the interactor diagrams in this specification:
- Though the important parts are shown, there are some levels in the tree we have omitted for brevity.
- The interactors colored in green have been provided for you, you are only to implement the interactors colored blue.
We can represent this same interactor hierarchy visually in a Layout Wireframe. An
example of a Layout Wireframe for Part 1 is shown below which details the visual
nesting of the interactors, and margin spacing between the interactors. Layout Wireframe
diagrams are a design tool to help you visualize how your app will function
programatically. For instance, in this sample, we can see that you will only be
adding images inside the ConstraintLayout. (Note: this layout diagram should
be more detailed and also include labels for the ImageView and other objects).
This Layout Wireframe highlights that you will only be configuring the ImageViews
as they relate to the ConstraintLayout(shown in blue). Note that this Layout Wireframe
is simplified representation of what you would see in the Layout Inspector.
You will be drawing Layout Wireframes for Part 4 of assginment as well
in other parts of this course. The Layout Wireframes you produced must be more
complex than what you see here. You will be expected to explicitly label each
View, layout container, spacing,
etc, and as well as specify any relevant information about orientation (such as
Vertical vs Horizontal LinearLayout).
Related Info
- ConstraintLayout
- ImageView
- ViewGroup.LayoutParams#MATCH_PARENT
- ViewGroup.LayoutParams#WRAP_CONTENT
- A guide for Android ImageView ScaleType and adjustViewBounds
- “Building a Responsive UI with Constraint Layout”
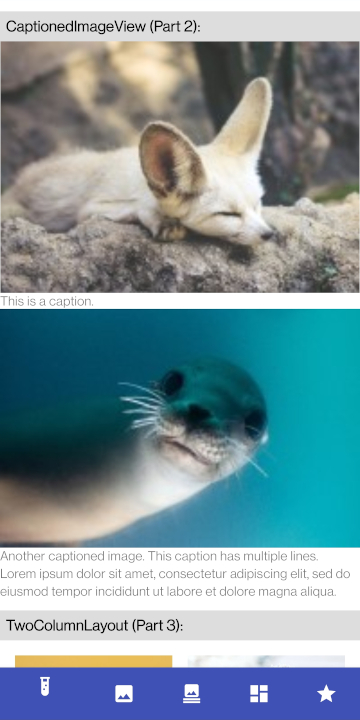
Part 2
In Part 2 you will create two custom layout classes (subclasses of ViewGroup):
-
CaptionedImageViewcombines an image and a caption into a single View. -
ImageListViewbuilds a scrollable list ofCaptionedImageViews programmatically. This is similar to the layout you constructed by hand in Part 1, except allowing any arbitrary list of images to be specified.
In this way you will demonstrate two ways to make generalizable layout classes that can be reused across an app.
The CaptionedImageView and ImageListView starter code can be found in the cse340.layout
directory in Android Studio.
CaptionedImageView
CaptionedImageView will build its layout by inflating from an XML file (captioned_image.xml).
Inflating is the process of converting view hierarchies specified in an XML file into Java objects
that can be displayed and interacted with.
This is exactly what was done by MainActivity to display your part1.xml.
By doing the inflation within a View class, you can reuse the same layout simply by creating
instances of that class.
CaptionedImageView inherits from FrameLayout.
captioned_image.xml should use a ConstraintLayout to arrange the image and text. The resulting
interactor hierarchy will look like this:
Tasks:
- Start by looking at the
CaptionedImageclass. This contains all the data needed to display aCaptionedImageView: a resource ID for the image, and Strings for the image caption and its content description (alt text). You will not be modifying this file, but it’s important to understand its purpose and function. - Build the captioned image layout in
captioned_image.xml. Add an image with text below it using constraints. Similar to Part 1, this can be done with a combination of the visual editor and the XML editor. Like Part 1, the image should fill its container horizontally, and preserve its aspect ratio vertically. There should be no space between the image and text or along the sides. It may help to use a placeholder image and text to help visualize the result in the design editor, but you should remove these once the layout is complete. - In
CaptionedImageViewcompletesetupCaptionedImageView().- You will need to
inflate
your XML file and add the resulting
ConstraintLayoutas a child of theCaptionedImageView. - All properties of the
CaptionedImageobject should be applied somewhere within your layout.
- You will need to
inflate
your XML file and add the resulting
- Test your
CaptionedImageViewusing the first tab of the app (demo.xml). Make sure it matches the solution screenshot (below).
ImageListView
ImageListView will build its layout by creating View objects programmatically in Java code.
This allows you to add any arbitrary number of images, not limited by what has been defined in
XML.
ImageListView inherits from ScrollView.
For Part 2, it should create create a child LinearLayout programmatically, and add
CaptionedImageViews to that LinearLayout. The resulting interactor hierarchy will look like this:
Tasks:
- Look in
MainActivityto see how we are creating theImageListView. You’ll see we’re calling thegetCaptionedImagesmethod to supply a list of images. You are not to change anything in this file or method (in fact we won’t accept it if you do), but it is helpful to read through the code to see what is being programatically set on eachCaptionedImagethat is created. - Complete the
ImageListViewconstructor. To add margins you will need to use a subclass ofLayoutParams, which has the same effect as theandroid:layout_*XML attributes you used in Part 1. The subclass ofLayoutParamsshould match the layout is contained within – in this case, you should use aLinearLayout.LayoutParams, since you are adding theCaptionedImageViewsto aLinearLayout. - Make sure the third tab of the app matches the solution (below).
Reminder: Turn in your completed Part 1 and 2 to the appropriate Gradescope assignment for your check point. The course staff will give quick feedback about the correctness of part 1-2 while you are completing the balance of your assignment.
Related Info
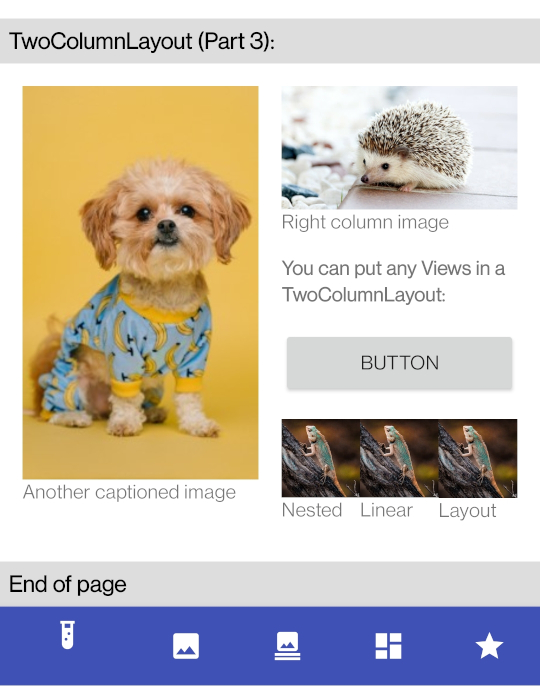
Part 3
In Part 3 we will create a custom Layout class in that can organize an arbitrary series of Views into a
Pinterest-like arrangement. Pinterest is a great example of a high-profile app that can be built with
relatively simple layout instructions. Your implementation, TwoColumnLayout, will be a custom
ViewGroup that can be used similarly to other layout classes like LinearLayout: you assign child
views either with XML or programmatically, and the View arranges those children according to rules
which you will define.
The TwoColumnLayout starter code can be found in the cse340.layout directory in Android Studio.
Child Views are organized into one of two columns of equal width. To determine which column a child View should go in, we use “pinterest” ordering. You must track the height of the Views in each column and add the next View to the shorter column (or the left column if equal).
Note that the aspect ratio of child Views may vary (they may have an arbitrary width and height). For this reason, you will need to measure the Views’s height once it is scaled to fit within the width of its column.
Since the TwoColumnLayout determines both the sizes and positions of its child Views, you must
implement both the measure and layout stages of the
measure-layout-draw sequence. You will
do this by overriding the
onMeasure() and
onLayout()
methods, which should call measure() and layout() on the View’s children recursively.
By implementing both of these methods, your View can respond to both its container’s size, as well
as its children’s calculated sizes (for example, images whose heights scale proportionally to their
widths).
Keep in mind that similar to Parts 1 and 2, your TwoColumnLayout should be responsive to
device orientation. When rotated your layout should maintain the proper positioning
(margins, spacing, and aspect ratios should remain the same while Views scale to fill the extra space.)
Demo: Two-Column Layout
Tasks:
It can be very frustrating to write a ton of code only to have the result be a blank screen.
Since both onMeasure() and onLayout() must work correctly for any images to appear, you may run
into this problem in Part 3.
With this in mind, we recommend starting out by trying to display all children in the left column
only, then once that’s working moving on to the second column. This will reduce the amount of code
you have to write before you get some kind of visual feedback.
- Read the documentation for
onMeasure(),measure(),onLayout(), andlayout()to understand how they interact and how they should be implemented. - In
TwoColumnLayout, completecalculateColumnWidth(). This method is used in bothonMeasureandonLayoutto determine the width of each column. - In
onMeasure(), figure out how tomeasure()each child View so they each have a fixed width (the width of the column) but are able to determine their own height.- For now, don’t worry about calculating the column heights, just add all children to the left column. You can come back to this later.
- In
onLayout(), figure out how tolayout()each View in the left column so they are arranged in a vertical stack. You will need to think about what coordinate systemlayout()is expecting. - At this point you should see something appear in the Part 3 section of the first “testing” tab.
Go back to
onMeasure()and update it to evenly distribute the child Views between two columns, based on their measured heights. Also make sure to complete thesetMeasuredDimension()call. - Update
onLayout()to layout all children in the left column. - Check the margins. There must be an
mMargingap between the left column and the left side of the screen, between the right column and the right side of the screen, and between the two columns. There must also be anmMargingap between each child View vertically, as well as at the top and bottom of the layout. All images must be horizontally scaled to to be wide enough to meet these margins exactly. - Make sure the testing tab matches the solution screenshot (below)
- In
ImageListView, complete the remaining TODOs to allow you to passnumColumns=2and add theCaptionedImageViews to aTwoColumnLayout. At this point the fourth tab of the app should be working.
Related Info
Part 4
For Part 4 you are to re-create an interface from another popular app such as Twitter, Facebook, Instagram, etc. Most commercial products, however, are very complicated, so this is your chance to be creative in the design and implement your own version of the app. The goal is for you to synthesize what you have learned in class as well as explore other features (such as other types of Common Layouts) that we have not covered in class.
Your layout must meet the following requirements:
- Your creative part 4 MUST be more complicated than the simple linear layouts in part 1 and 2, and must be substantively different from the Pinterest layout in Part 3, and the image that is given as part of our reflection in Part 5.
- Your layout must have a scrollable section and contain more items than can fit on one screen.
- You must both use inflation as well as programatic methods (i.e. creating
and adding views) to add your
Viewobjects into your interactor hierarchy.- Images should not contain text in lieu of creating
ImageViewandTextViewobjects separately. For instance, if you have an image with a caption, the image and the caption text should be two separate interactors, the caption should not be part of the image file.
- Images should not contain text in lieu of creating
- You must implement a custom reusable
ViewGroupcomponent of some kind. This could inflate a static layout similar toCaptionedImageView, or implement a custom layout algorithm similar toTwoColumnLayout. - Your layout must be responsive to device orientation. If the user rotates their device, then your application must adjust to fit the new orientation. If the app you are emulating does not have a landscape mode, you must make an educated guess as to what a landscape mode version of this app might look like.
- Your version of the known interface may be simplified:
- You do not need to implement all screens of the interface, one screen that demonstrates an interface that includes an interesting layout of text an images should suffice.
- Your version of the interface should be sufficiently similar to the one you’re emulating. Don’t leave out things like icons & text.
The CustomInterfaceView starter code can be found in the cse340.layout directory.
It extends from ConstraintLayout to give you maximum flexibility to allow
you to add anything you need to achieve your desired design.
You may use the same images that are used in Part 3. If you wish to do so, you
should simply call the appropriate method in MainActivity.java. There is a
note on how to do this in the CustomInterfaceView constuctor.
And finally, recall that there are four methods for inflating an XML file - research which one is appropriate for your creative layout implementation.
Tasks:
- Before you start, sketch the interface you’ve chosen to mock up as a Layout Wireframe on a
piece of paper or using a tablet pen. This sketch will be turned in as part of your reflection
in Part 5.
- Your Layout Wireframe should be fairly detailed in describing what interactors you plan to use. For instance, specify where you are using spacers, or whether a Layout is horizontal or vertical.
- Also draw out the Interactor Hierarchy for the interface. Your Interactor Hierarchy may be drawn with a computer program.
- Using XML and programatic means, create your version of this interface.
- Make sure that you create a
part4.xmlfile and add/commit/push it to your GitLab repository. - Also make sure to push to your repository any additional layouts, images, CSV files, etc. that you create for Part 4.
Helpful Links
Past students have found the following links helpful in designing and implementing Part 4:
- Miro or Figma are good tools for creating wireframes and interactor hierarchies.
- Material Design Icons is a resource images to work with.
Part 5 (Reflection)
For this part, you will submit your reflection on this assignment to Gradescope. Create a MS Word, Google or other type of document and copy the following questions (in italics below) into that document. Add your responses below each question. You can have more than one answer per page, but if you can, please try to avoid page breaks in the middle of a question. Insert page breaks between questions as needed.
-
Diagrams and images
- The Layout Wireframe you drew for Part 4.
- The interactor hierarchy you drew for Part 4. (Do not turn in a screen shot of the layout inspector for this).
- A screenshot of the interface you are emulating, in both portrait and landscape mode. You must explicitly specify if the app you are emulating does not have a landscape mode.
- A screen shot of your final interface in both portrait and landscape mode.
- For every interface there are generally multiple ways of laying it out, particularly if
the interface is a complicated one. Reflect on your design and implementation of Part 4. What
other ways you could emulate the same interface using different
ViewGroups/Layouts. What would be the benefits or drawbacks to using these other Layouts? -
Many people have migrated away from Twitter to Mastodon, so it seems a good time to analyze it!
Perhaps this will give you some good ideas for your (eventual) final project screens.
The images below are from three screens from the Mastodon app. Choose one and do the following
- Specify which screen you chose to analyze and briefly say why you chose that screen.
- Draw a Layout Wireframe for the portion of the screen you chose. Your Wireframe should contain a minimum of four layouts. It may help to check out the Common Layouts. Briefly justify the reason why you chose those particular layouts.
- Draw the interactor hierarchy for the portion of the screen you chose. You may indicate repeating patterns of interactors (or groups of interactors) as long as it is clear you defined the first of the repeating set clearly.
The Mastodon news screen The Mastodon posts screen The Mastodon hashtag screen 

- Responsive design is when you create an application that “responds” to dynamic changes in the screen size or orientation of the device. Why are responsive designs important in user interfaces, software development and software engineering, as well as real life applications? Think beyond just an app on a screen…
- This class is part theory, part implementation. As such, lecture and section may not have provided you all of the information necessary to complete the layout program. How did you approach the independent learning required to complete this assignment? List at least one resource you used in your learning that would recommend to a friend taking this class in the future.
- Acknowledgements: Cite anything (website or other resource) or anyone that assisted you in creating your solution to this assignment. Remember to include all online resources (other than information learned in lecture or section and android documentation) such as Stack Overflow, other blogs, students in this class, or TAs and instructors who helped you during OH.
Testing
Just like in Doodle, we have included screenshot tests which compare all 5 screens of the app with our solution. Again we highly recommend running these tests continuously as you work on each part of the assignment.
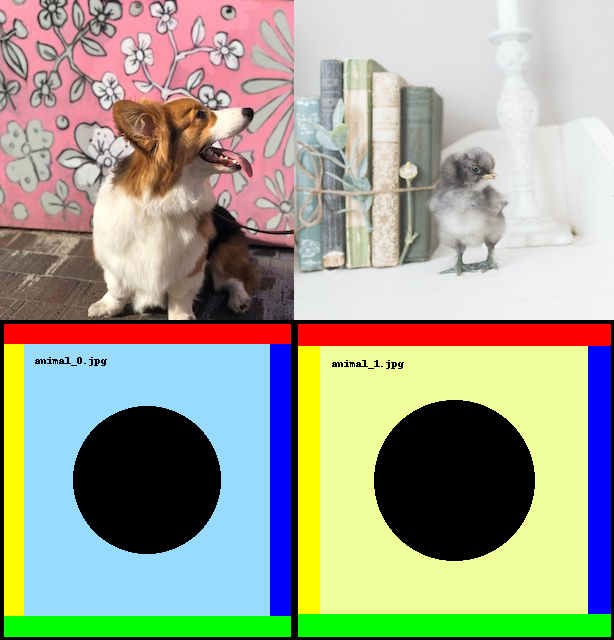
Note that the images used for the tests are different than the images you see when you run the app. Instead of animals, you will see abstract rectangles and circles. The purpose of these placeholder images is to reduce noise if your images are placed in slightly different positions than the solution. The replacement images all have the same size as the animal pictures, so the resulting layouts should be identical
Development Strategies
- You may run into issues when rotating the device. Note, when rotating the emulated device or your personal Android device, that the layout must adjust accordingly. You do not need to readjust the layout of your images when rotating the device, as this must remain the same.
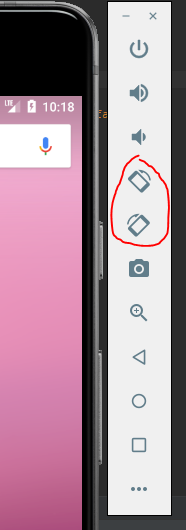
These buttons will allow you to rotate the emulated device clockwise/counter-clockwise.
- Read through the starter code! Particularly make sure you’re reading through
MainActivity.javaas that will help you to understand how theViews are being created AND how the images are being loaded into memory inMainActivity#getCaptionedImages - When dealing with the Android documentation: ask as many questions as necessary!
The android documentation can be painful to read through, as there are many potential
options to choose from. If you need any help parsing it, feel free to ask anyone on the
course staff for advice. Additionally, we suggest that you read through the following
resources as you develop your apps, to better understand the tools you are utilizing
(these are referenced in their respective parts as well):
- An explanation of the ImageView ScaleType attribute (Part 1)
- Building a Responsive UI with Constraint Layout (Part 3) Note the “Set Size as a ratio” section here
- What’s new in Constraint Layout 1.1.0 (Part 4)
- Adjusting the view size
- A guide for Android ImageView ScaleType and adjustViewBounds
Code quality and commenting your code
We expect that you will maintain the same Code Quality and Commenting standards as you did with our Doodle assignment. For details please see those sections.
Debugging tips and tricks
- Recall that you can use the Layout Inspector to see where your views are placed in the parent.
The Layout Inspector is can be found under
View -> Tool Windows -> Layout Inspector. - If your application stops running (the device displays an alert that says
“
has stopped"), you likely have a serious runtime error. Make sure to look at the _Run_ tab at the bottom of the screen. More information on runtime crashes is available through [developer.android.com](https://developer.android.com/topic/performance/vitals/crash) . - Your application may crash while inflating if there is a problem with your
.xmlfile. - Logging output is especially useful for testing the functionality of sections of code such as
Layout#MainActivity#onCreateand other methods. Much likeSystem.out.printin Java, Android provides its own class for producing output:Log. We suggest that you useLog.iand create your own custom tag so that you can filter the output for the information you want. Below is an example of how to use theLog.ifunction.
private static final String TAG = "Layout";

Log.i(TAG, "Hello world!");
To make full use of Logcat, make sure to configure the priority level (in this case, “Info”) and use the correct tag (in this case, “Layout”). It’s also good to check that you have the correct device/emulator selected.
Note: Remember to take your Log.i debugging calls out of your code before turning it in.
Related Info
Turn in
Code Submission Instructions
We will test layout on emulators with different screen sizes. Please use constraints correctly. Don’t just try to match pixels in our sample screenshots.
You will turn in your source code files to the appropriate Gradescope assignments for Part 1-2 and then for Part 3-4.
We are allowing you to turn in Part 1-2 early for a checkpoint to see how closely you match our tests. You will get 1 point for turning in code that compiles and passes up to half of the tests. If you pass more than half the tests, we will award you 2 points.
Make sure you only edited the following files/directories for submission:
- CaptionedImageView.java
- CustomInterfaceView.java
- ImageListView.java
- TwoColumnLayout.java
- any additional View classes you created
- res/drawable/*
- res/layout/captioned_image.xml
- res/layout/part1.xml
- any additional layouts
- res/values/strings.xml
- res/values/dimens.xml
- any additional CSV files
Note: While you can edit the above files, please do not remove any of the existing drawables, Strings, or dimensions from them.
Do not edit any of the other files that we have given you, do not delete any of the images in the
res/drawable folder, and do not delete any existing strings in res/values/strings.xml
(you may add bitmaps and strings of course.)
If you add your own images or other files for Part 4, please make sure to add, commit, and push them to your repository in the appropriate directories before turning in your assignment. If your images are not there, your custom layout will not work for others and you will NOT get credit for the work you did.
Note: Large images can be problematic both for running your app and for committing to your gitlab repository (there are size limit imposed on both Gradescope and Allen School resources). If you choose to add your own images, add at most 10MB of data (you will not be able to turn in your assignment in if it is larger than that). One solution is to resize your high resolution images before using them in your creative application.
Reflection submission
The reflection will be turned in to Gradescope.
Grading (50pts)
The Layout assignment will be out of 50 points and will roughly (subject to small adjustments) be distributed as:
Part 1-2 checkpoint (2 pts) Note: this MUST be turned in on time to receive points. No late assignment for part 1-2 will be accepted.
- Turned in and compiles: 1 pt
- Passed >1/2 of tests: 1 pt
Final checkpoint (48 pts)
- Part 3-4 code (28 pts)
- Part 1 (5 pts) has correct layout (checking parameters margins and so on); and works in landscape mode; doesn’t overuse constraints (i.e. not too many)
- Part 2 (6 pts) has correct layout (as above); works in landscape mode; and can handle multiple images
- Part 3 (9 pts) has correct layout (checking parameters margins and so on); has correct Pinterest ordering; properly uses inflation
- Part 4 (6 pts) including:
- Is sufficiently different from Part 1-3 (and at least as complex)
- Works in portrait and landscape
- Code uses both XML and programmatic methods for creating View
- Overall code quality (2 pts)
- Reflection (20 pts)
- Layout Wireframe, Interactor Hierarchy, and screenshots of part 4 (4 pts total)
- Reflection questions 2, 4, 5 will be worth 3 points each (9 pts total)
- Reflection question 3 (6 pts)
- Acknowledgements (1pt)
IDE Errors/Warnings you can ignore
Note: DO NOT assume that because an error/warning can be ignored for this assignment, it can be ignored for all assignments. ALWAYS check the spec for each assignment before deciding what is OK to ignore.
-
Button- Hardcoded Strings
-
TextView- Hardcoded Strings