This handout describes how to perform common Java development tasks in Eclipse.
Contents:
If you are working on your own computer, you should have installed Eclipse. Else, it is installed on the department machines (and virtual machine).
Type this at the prompt to start Eclipse on Linux:
eclipse &
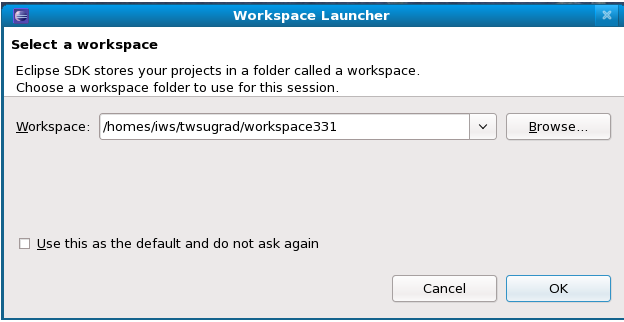
Eclipse will start up, display a splash screen, and then show a workplace selection dialog:

Eclipse is asking you which workspace folder to use for this session. In response, if in the department labs, type:
/homes/iws/YourUserName/workspace331
where YourUserName is your UW CSE
username. (Note: Do not enter "~/workspace331" for
this step. Eclipse does not recognize the '~' character.) On your own machine,
you can choose where to put your workspace.
If Eclipse shows the welcome screen, containing only the text "Welcome to the
Eclipse IDE for Java Developers" on a pretty background, switch to the code
editor by going to Window > Open Perspective > Other... and selecting
Java (default).
From the start menu, goto: All Programs » DEV TOOLS & LANGUAGES » Eclipse » eclipse.
Eclipse will start up, display a splash screen, and then show a workplace selection dialog:
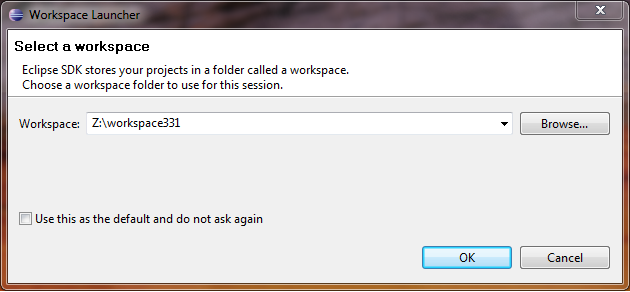
Eclipse is asking you which workspace folder to use for this session. In response, type:
Z:\workspace331
This directory will work on the lab Windows computers; adjust it as needed if you are working on your personal computer.
Go to Window(or Eclipse in OS X)->Preferences->Java->Code Style->Formatter. Then hit Edit. In the Comments tab, unselect the "enable block comment formatting" checkbox.
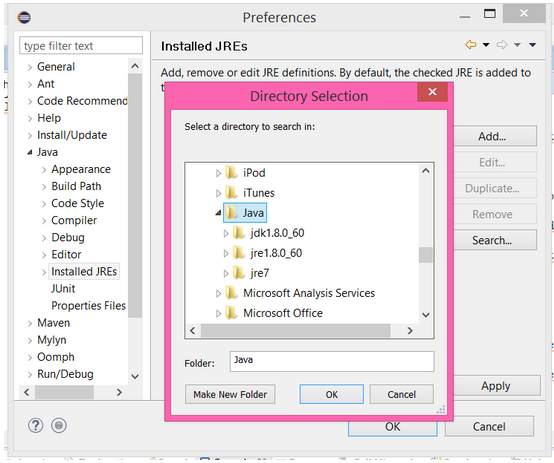
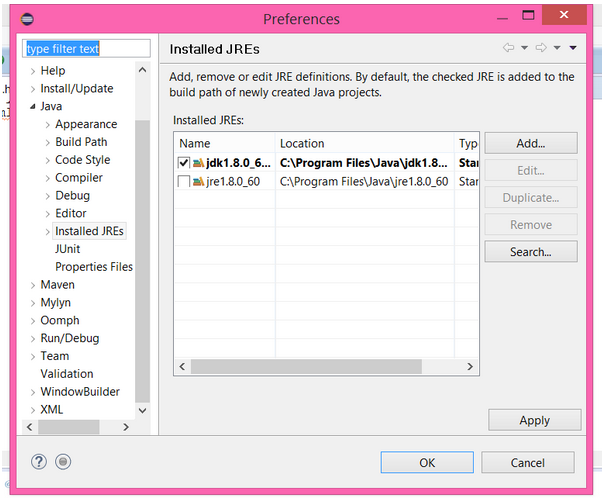
To use the our build tools, you may need to tell Eclipse to use the Java JDK (development kit) instead of the JRE (runtime environment). You should try to use ant before fiddling with any of these settings, but if it doesn't work properly you may need to do this.
Java (default).We expect your code to not have any generics-related problems. For example, the following code is unacceptable:
List myList = new ArrayList();
myList.add("foo");
The generic type List of myList should be
parametrized, for instance, to String by replacing the first line
with List<String> myList = new ArrayList<String>();
Note that List<String> myList = new ArrayList(); is also
incorrect.
By default, Eclipse shows generics problems as warnings (indicated by yellow lines and markers). You can configure Eclipse to instead issue errors (indicated by red lines and markers) for these problems. Doing so will help you remember to write acceptable generics code.
To make this configuration, go to Windows » Preferences and select Java » Compiler » Errors/Warnings. Under Generic types, change the value of Unchecked generic type operation to Error.
(Note that there is another setting named Usage of a raw type that is
set to Ignore by default. We recommend leaving this option disabled
or set simply to Warn because it is specific to the Eclipse compiler
and checks for more stringent requirements than required by the Java
language specification. Thus, "Usage of raw type" may complain about
issues, that while providing insight about your code, is not checked by
Oracle's javac, which is our official standard for compilation
errors and warnings in this class.)
You always edit your own personal copy of files that are under git
control. Before you can make such edits, you must “clone”
your own copy of the repository's master files. This means that you are
copying code from the master branch from another source (GitLab in our case)
into your own local, personal copy. You need to do this step only once
at the beginning of the quarter. If you are tempted to use this command
at other times, you most likely want git's “pull” command, which incorporates changes from the repository into your existing local copy.
In the case that you plan to work at both UW CSE and home, you will need
to do these setup steps both while logged into a department machines
and from your home computer so you have a local copy on both machines.
The following instructions assume you wish to clone your personal Gitlab
repository that is located at
https://gitlab.cs.washington.edu/cse331-19wi-students/cse331-19wi-YourCSENetID.
Make sure this URL takes you to your own project!
The following instructions will show you how to use Eclipse to check out git
projects. In particular, we will discribe how to clone your personal repository
on Gitlab, which is called cse331-19wi-YourCSENetID. When you
check out cse331-19wi-YourCSENetID, Eclipse will automatically
set up an Eclipse project named
cse331-19wi-YourCSENetID for you.
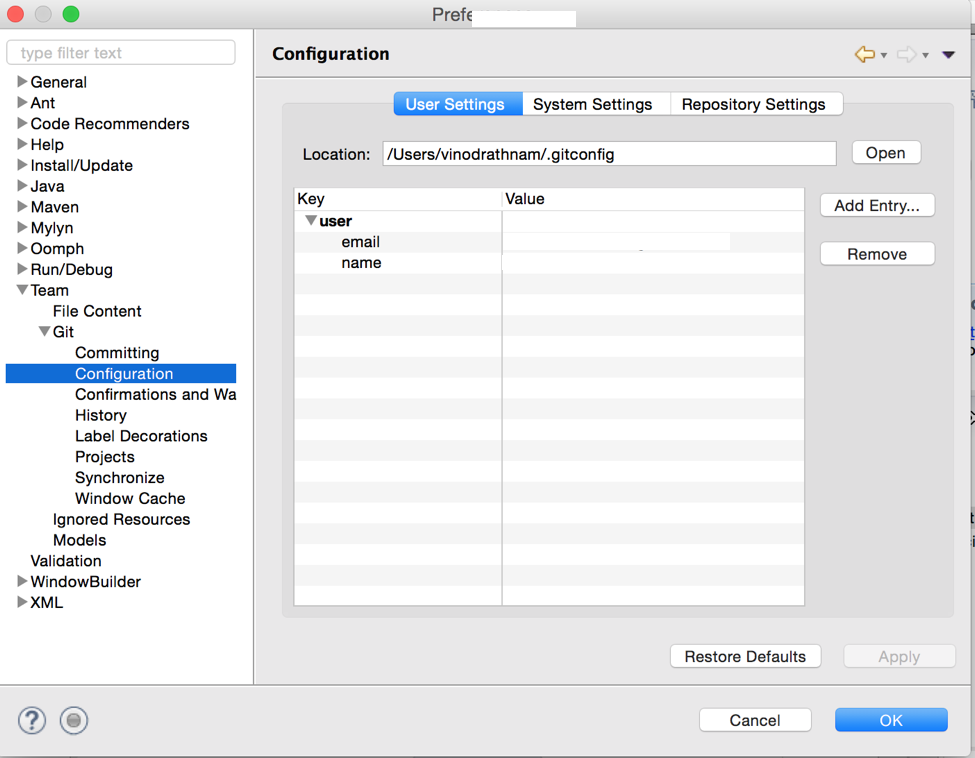
ssh-rsa and paste this key to your
Gitlab SSH Keys
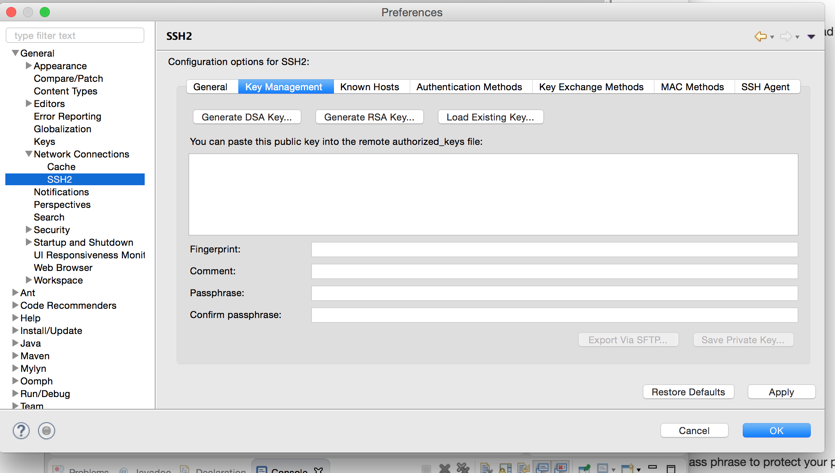
The next dialog will ask you to enter the source of your git Repository. Ignore the URI field, and fill in the following fields:
Do not forget the .git at the end!
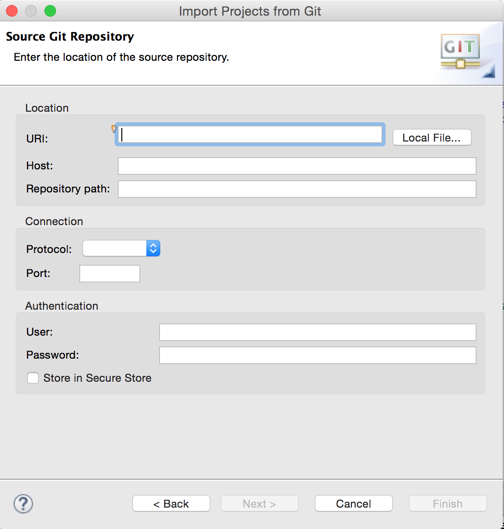
To tell Eclipse about the files in your repository, we need to create an Eclipse project. We can tell Eclipse to pull the information about the project files from the Gradle build file. Do that by navigating to File -> Import... and select "Existing Gradle Project". (Note that your project is already imported via git, so you do not need to import the project again.)
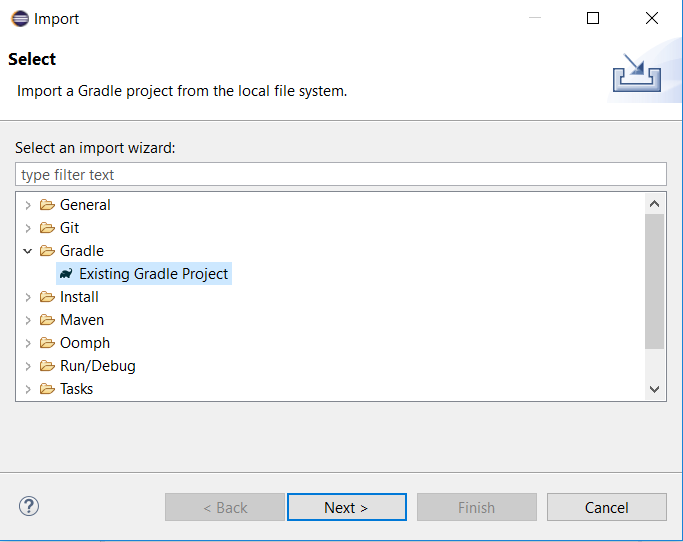
Next, select the Java project containing the Gradle files. Then, to set up the project to perform Gradle builds, navigate to Run -> External Tools -> External Tools Configurations...
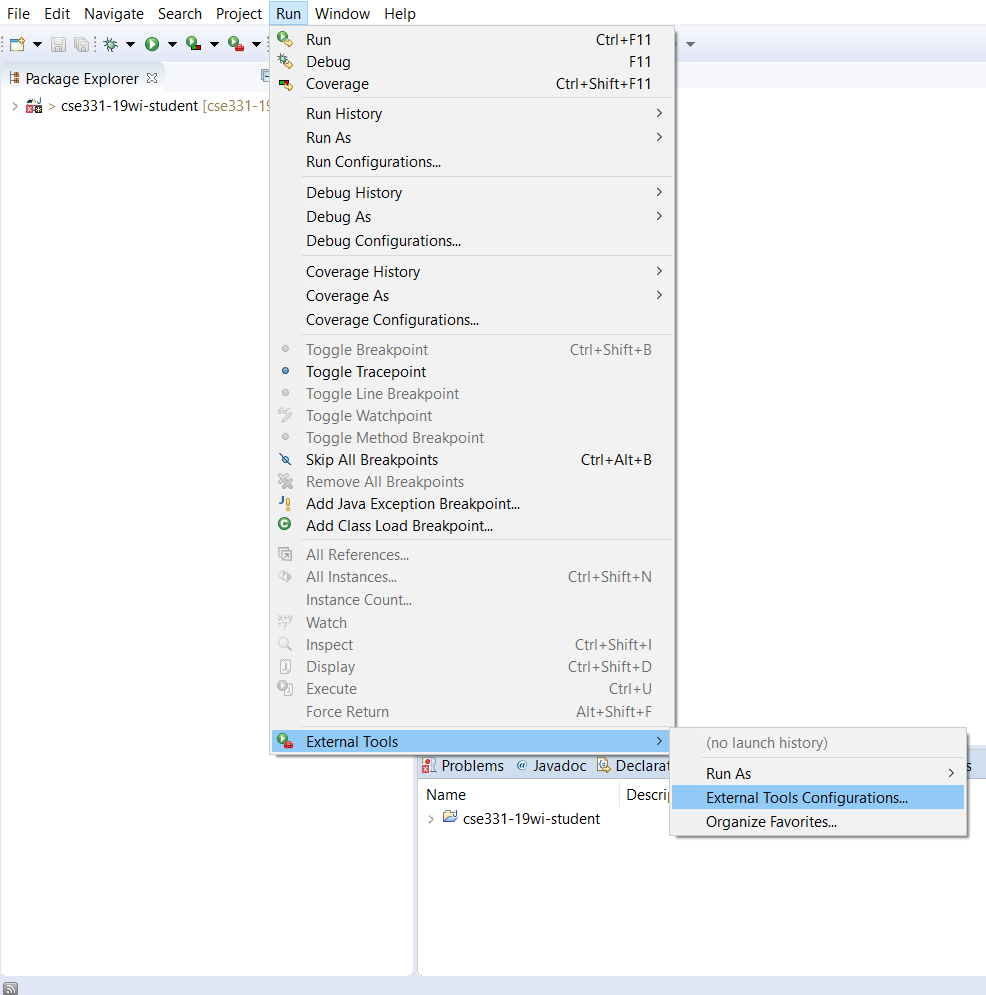
From here, double-click on "Program" in the left side bar and create a new configuration named Gradle. For the Location, choose "Browse File System..." and select the gradlew.bat file in your Java project if you're using a Windows machine. If you're using Linux or MacOS, use the gradlew executable file in your Java project. For the Working Directory, press "Browse Workspace..." and select your Java project folder containing the gradlew.bat file.
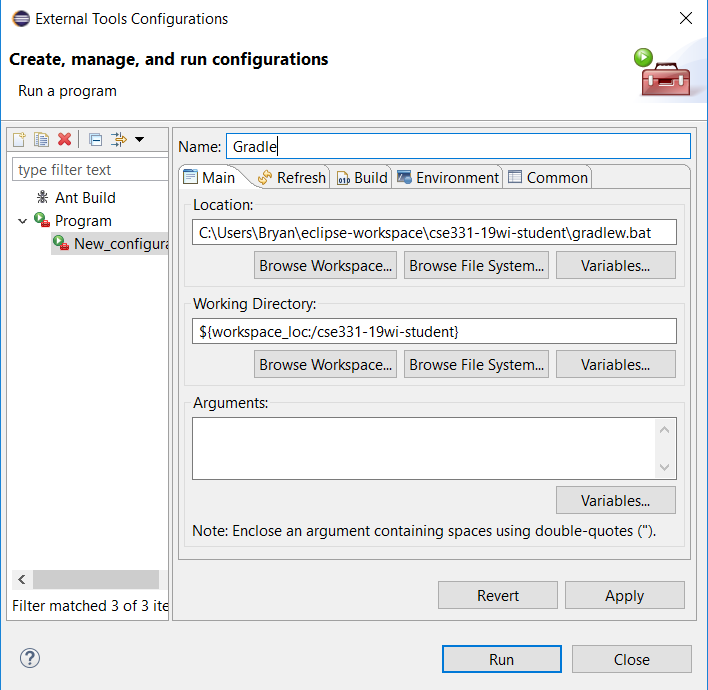
Click Apply and Run to finish the Gradle configuration. You should see the Gradle build start and complete (successfully) in the console output window. To run future Gradle builds, simply click the ![]() button choosing Gradle as your run configuration.
button choosing Gradle as your run configuration.
Switch to the "Java" perspective in Eclipse if you're not already in it (Window » Open Perspective » Other... » Java).
You can open multiple files in Eclipse by double-clicking each of them from the Package Explorer pane. Once you have multiple files open, you can switch between them quickly by holding down Ctrl and hitting F6 to bring up a dropdown box of open files, and then using the arrow keys to select the file whose editor you wish to bring into focus. You can also navigate through different files using the tabs on top of the editor pane.
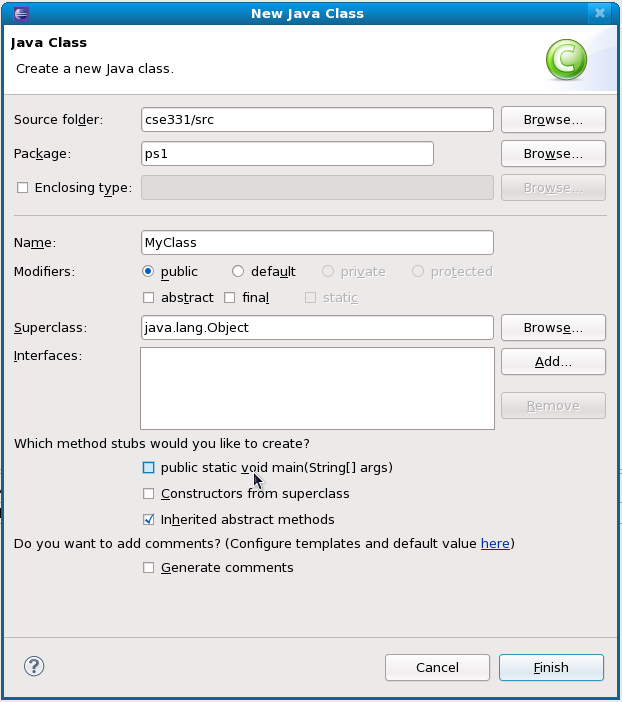
To create a new Java source file (with the .java extension),
select from the top menu File »
New » Class. A window will pop up, asking you details about
the class. Leave the source folder as cse331/src, and select a package
(e.g. hw1). Choose a name for your class
(e.g. MyClass) Type this name in the "Name" field and
click Finish.
(If you want your new class to be executable, it will need a
main method. Eclipse can generate that automatically for you if
you check the appropriate checkbox in the New Java Class screen.)
There is a similar procedure for creating new non-Java files such as text
files. Select File » New » File. In the resulting dialog
box, choose the parent directory of your new file and type the desired
filename. If you want to create a new directory, you can do so by appending
the directory name in front of your desired filename. For example, if you want
to create a file problem0.txt in the directory
hw1/answers, but the answers directory does not yet
exist, you can choose hw1 as the parent directory, and then type
answers/problem0.txt as the file name, and Eclipse will create the
new directory and file for you.
Here are some useful actions that you can perform when editing Java code:
Autocompletion is the ability of an editor to guess what you are typing after you type out only part of a word. Using autocompletion will reduce the amount of typing that you have to do as well as the number of spelling mistakes, thereby increasing your efficiency.
Eclipse continuously parses your Java files as you are editing, so it is aware of the names of variables, methods, etc... that you have declared thus far.
CTRL+Space can be used to autocomplete most
things inside the Eclipse Java editor. For example, if you have declared
a variable named spanishGreeting in the current class,
and have typed the letters spanishGree in a subsequent line,
Eclipse can infer that you mean to type spanishGreeting. To use
this feature, press CTRL+Space while your cursor is at the right of the
incomplete name. You should see spanishGree expand to
spanishGreeting.
Eclipse can also help you autocomplete method names. Suppose you have a
variable myList of type List, and you want to call
the method clear. Begin typing "myList." — at
this point, a pop-up dialog will display a list of available methods for the
type List, and you can select the appropriate method with the
arrow keys. You can force the popup to appear with CTRL+Space.
You can press CTRL+SHIFT+o to organize your imports in
a Java file. Eclipse will remove extraneous import statements and
try to infer correct ones for types that you refer to in your code but have not
yet been imported. (If the name of the class that needs to be imported is
ambiguous – for example, there is a java.util.List as well
as a java.awt.List – then Eclipse will prompt you to choose
which one to import.)
Although you can directly browse the Java 11 API and other documentation at the Oracle website, it is often useful to be able to cross-reference parts of your code with the appropriate documentation from within your editor.
To view the documentation of a class that is referred to in your code, place your cursor over the class's name, and press SHIFT+F2. A web browser window will be opened to the class's documentation page. If the class is provided by Java, the documentation page will be on Oracle's website.
For your own classes, you will need to tell Eclipse
where to find their documentation. To do so,
right click on the project name (e.g. cse331)
in the Package Explorer pane and click
"Properties". Select "Javadoc
Location" in the left pane. Select the location, e.g.
"file:/homes/iws/YourUserName/workspace331/cse331/doc/". (Note: the
"file:" portion is important, since the location is
expected to be recognizable by a web browser.) After setting
the Javadoc location path, click OK. (If on your own machine, modify the path above appropriately.)
You must compile your source code before running it. The javac
compiler is used to transform Java programs into bytecode form, contained
in a class file. Class files are recognized by their .class
extension. The bytecode in class files can be executed by the java
interpreter.
Eclipse is set up by default to automatically recompile your code every time you save. Classes with compile errors are marked in the Package Explorer with red cross marks. The compile errors, as well as compile warnings, also appear in the Problems view (usually situated at the bottom panel of Eclipse).
If your file is saved and Eclipse says that it does not compile but you believe that it should, make sure that all of the files on which your file depends are saved and compiled. If that does not work, try refreshing your project or using Project » Rebuild Project to force Eclipse to recognize the latest versions of everything.
Once you have compiled your source code into class files, you can execute it with the Java interpreter.
To run a program, right click on the Java source file containing the
main() method and choose Run As... » Java Application.
There is also a button near the left-hand side of the Eclipse
toolbar that looks like ![]() which will re-run the
last application (or JUnit test, see below) that you ran.
which will re-run the
last application (or JUnit test, see below) that you ran.
JUnit is the testing framework that you will use for writing and running tests.
For more information, visit:
JUnit is integrated with Eclipse, so you can run the test suite from within the IDE.
If you are not working at UW CSE, you might have to explicitly add
the junit-4.11.jar library using Project » Properties
» Java Build Path » Libraries » Add External
JARs and then telling Eclipse where your copy of
junit-4.11.jar is located.
Git's "pull" command updates your local copy of files to reflect changes made to the repository by other people (or by you when working on a different computer system). The only changes made by people other than you will be made by the CSE 331 staff when we are adding new homeworks to your repositories. If you work at home and at UW CSE, you will need to commit and push on each machine when you are done on one machine and then pull when you start on another machine. That will propogate your changes to local machine.
Git usually does a good job of merging changes made to multiple copies
(say, the copy on your home computer and the copy on attu) even if
those changes are to different parts of the same file. However, if both people
change the same line of a file, then git cannot decide which version should
take precedence. In this case, git will signal a conflict during git pull, and
you must resolve the conflict manually. This can be an
unpleasant task.
To minimize the possibility of conflicting changes being made simultaneously, you should pull frequently and commit/push frequently.
To do the former in Eclipse, in the Package Explorer window, right-click on a file or directory, and select Team » Pull. If the selected item is not a directory, just that file will be updated; otherwise, everything inside the directory will be updated.
After making changes to, adding, or removing files, you must “commit” your changes to git. This step will cause git to record your changes to the repository, so that your changes are backed-up and available to other people working on the repository, or to you when working on a different computer system.
Be aware that in git, committing changes does not change the remote copy of your repository on GitLab. To do this, you must “push“ a single (or series) or commits to the remote repository
In general, you should “pull” any new files or changes before committing your latest code. (And, if the pull results in any conflicts, you should resolve them before committing.) If you forget to pull, git will abort and remind you to pull first.
It is a good idea to commit your changes frequently. It backs up your work, thus enabling you to revert to an earlier version of your code if you find yourself going down a wrong path. Also, when you are working with others, it minimizes conflicts.
To commit and push files in Eclipse:
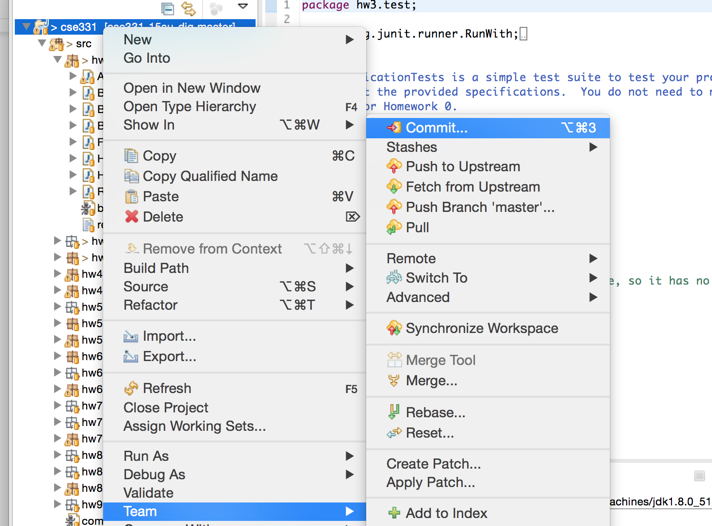
Remember to tick the checkboxes by any new files you may have added in your repository, as this is not done automatically.
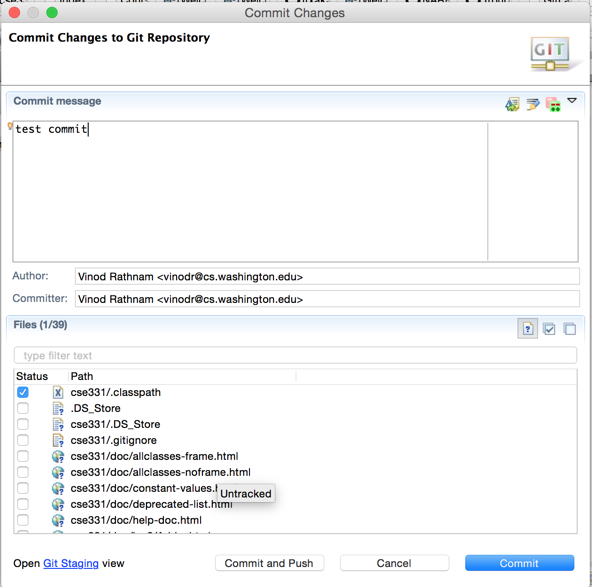

(Note that if you create a file or folder in an Eclipse project but via the command line (or any mechanism outside Eclipse), then you might need to “refresh” the package explorer for Eclipse to recognize the change. To do this, right click on the project name in the package explorer and select the “refresh” item.)
Git commits exist only in your local copy of your Gitlab Repository. Pushing your changes will update your master repository on Gitlab. Make sure to do this! Grading your homework assignments requires the work you have to done to exist in the original repository. If it does not, when the TAs check out your repo for grading, they will be unable to see the work you have done.
When commiting your changes, if you chose to do the Commit and Push option, then no other work is needed. But if you just hit Commit, then follow these steps to push your commits to your original repo:
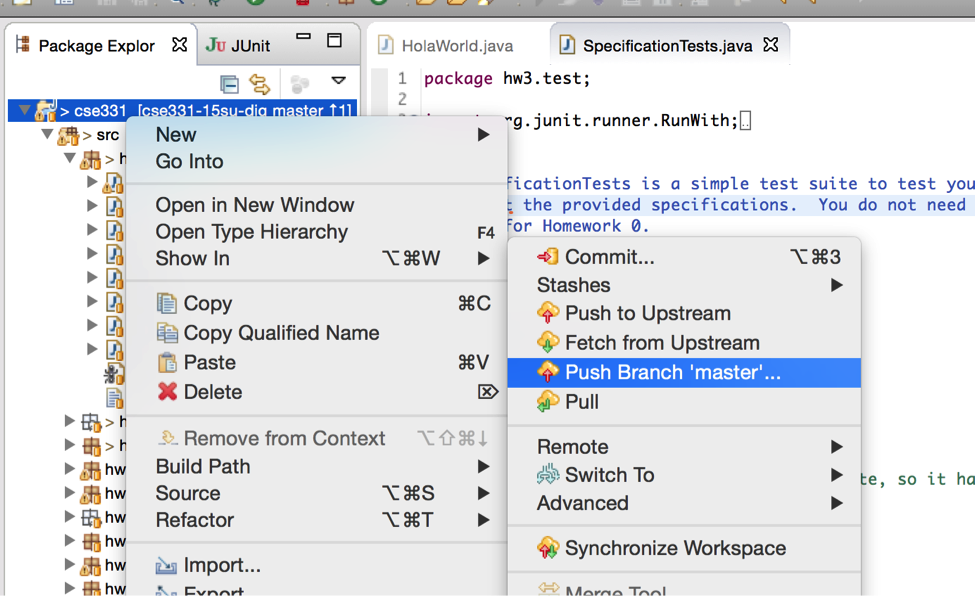
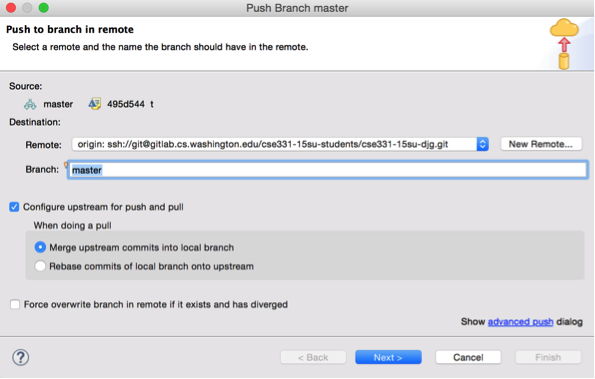
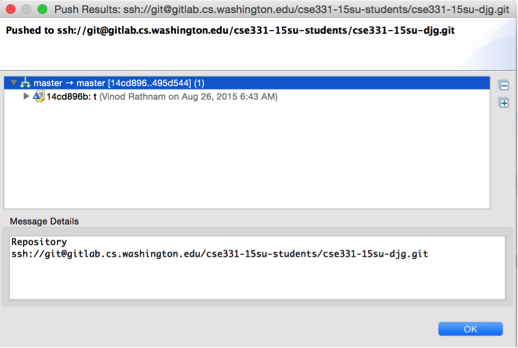
In git, commits can be “tagged“ with a short phrase without
spaces. This can be used to mark important versions of the repository, like an
alpha-1.0 or release-version. For CSE 331, tags are
required to mark final versions of assignments that are ready to be
turned in. The correct tag to use for a final version of an assignment in your
repository is hwN-final, where N is the homework
number (e.g., hw3-final).
To create a tag in Eclipse:
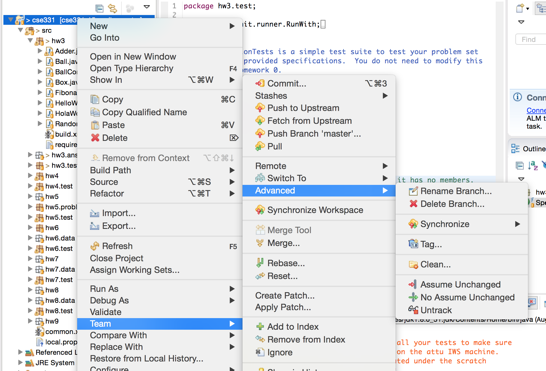
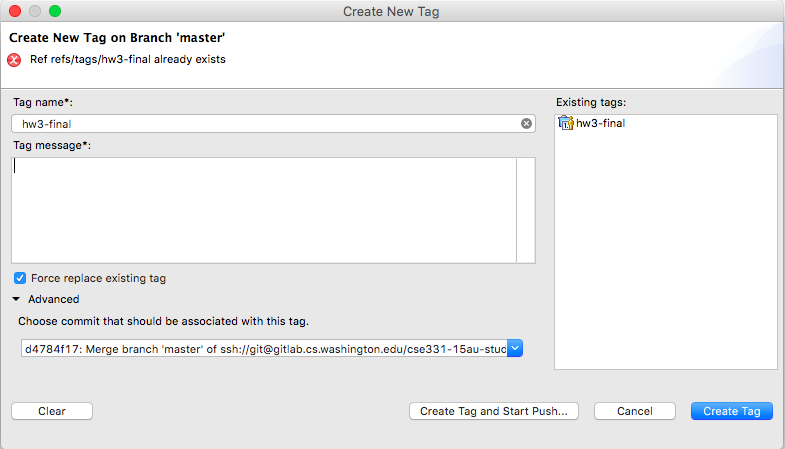
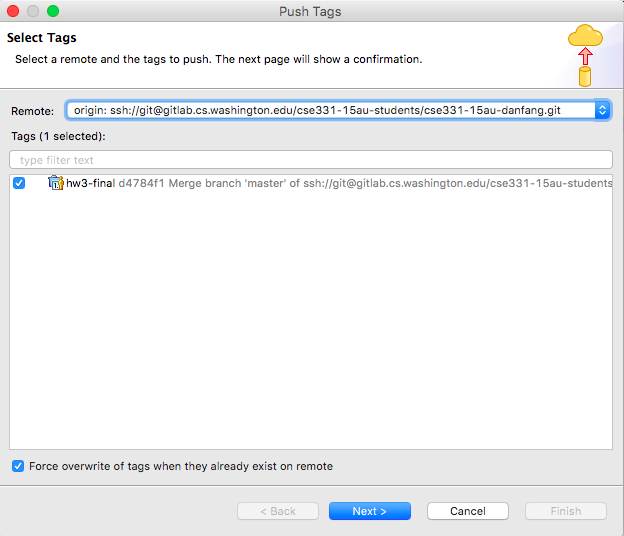
Normally you will only create a tag when you are done with an assignment to mark the final commit associated with that assignment, and, assuming no bugs, you will not have to remove or replace a tag. You will need to change or replace a tag if you discover problems with the tagged version and need to fix those problems and "turn in" an assignment again.
Verify that a tag has been created on Gitlab by visiting
https://gitlab.cs.washington.edu/cse331-19wi-students/cse331-19wi-YourCSENetID/tags
That's it! If you change your mind and want to re-submit, just delete the tag and re-create it on a different commit.
When you pull changes into your local repository and you have local changes that have not yet been pushed, git tries to merge the changes together. Usually, it succeeds.
The most common case of this is when the staff pushes out new sets of starter files for each homework. After this happens, you may be unable to pull any changes until your local copy is all up to date with the new starter files. This is especially likely if you have made commits that you haven't pushed to GitLab yet. If you see an error that mentions '[rejected - non-fast-forward]', don't fret! In Eclipse, simply pull as you normally would. Now you should see an automatic merge happen as follows:
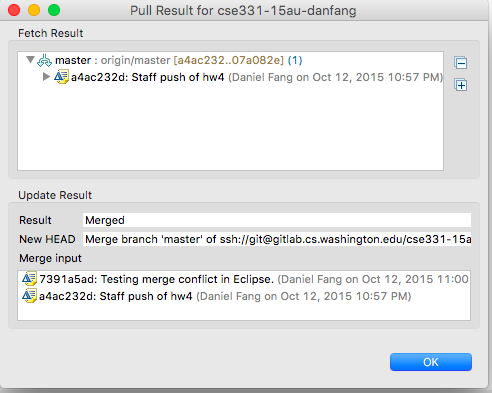
Click “OK“ to accept the automatic merge, then push (not commit) your changes again.
However, sometimes git is unable to merge the files together when there are
two different changes to the same line of a file.
In this case, git will signal a conflict during the pull such as
Automatic merge failed; fix conflicts or you may see the notice
that You have unmerged paths.
Git conflicts are rare — most students will never encounter one — but if you do get a git conflict, you need to resolve it. This is a very brief primer about resolving conflicts; you can read the git documentation to get the full story. Also, it's better to prevent a merge conflict than to have to resolve it later on.
In Eclipse, the best way to tell if you currently have a conflict is to look for the red diamond icon in the list of files.
You can resolve conflicts within Eclipse with its built-in merge tool. The merge tool allows you to see your changes (on the left) and other peoples' changes (on the right). Your job is to make the file on the left the result you actually want. Once you've done this, drag it to the staged changes panel like usual. You will notice that there is an auto-filled Commit Message about a “merge“. Go ahead and “Commit and Push“. Now, you've pushed your commits and other people can see them.
Eclipse conveniently marks files and directories that have changed since the last git pull by adding an asterisk to the file's icon the Package Explorer. In addition, there are two features that allow you to track changes between your working copy and the repository's latest copy: Compare and Synchronize.
To compare a file with its latest version, right-click it in the Package Explorer and select Compare With » HEAD revision. If the files are different, a window will appear showing a side-by-side comparison of the two files.
To see a summary of differences between the local copy and the repository, right-click a file or directory in the Package Explorer and select Team » Synchronize with Repository. A window will appear that summarizes which files (if you selected a directory) have outgoing changes (changes you've made after updating), which have incoming changes (new revisions committed by others to git), and which have conflicts. Double-clicking one of these summarized items will bring up a Compare window for that file.
To view git commit logs and previous revisions to a file, right click it in the Package Explorer and select Team » Show in History. You will see a History window in the bottom panel. Double-clicking a row will allow you to read the corresponding revision.