CSE 154
Week 3 Section: Introduction to JavaScript
Today's Agenda
Experience common JavaScript bugs
Review helpful debugging strategies
Learn how to write a JavaScript function
Learn how to update page content/style with JavaScript (if time)
Section Goals
By the end of this section, you should be able to:
- Develop a basic JavaScript debugging strategy
- Identify and fix common JavaScript bugs with debugging strategies
- Be able to write a JavaScript file and link it to HTML
- Be able to write JavaScript functions which update a page's content/style
Debugging
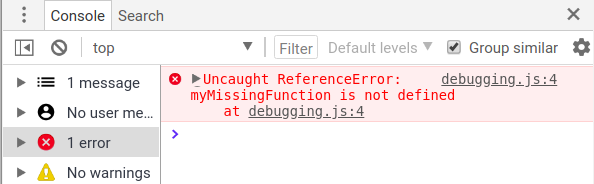
JavaScript is notoriously difficult to debug due to its lack of error messages. We will go over some strategies in today's lab, but more debugging strategies can be found below. We strongly recommend you read through these, for easier debugging in future assignments.
Useful Debugging Tools
There are several tools that are available to help debug JavaScript programs. For Firefox, the built-in Web Inspector is a popular in-browser debugging tool. For Chrome, Chrome Dev Tools are a popular choice (the Chrome Inspector tool is included with Chrome, and can be opened using Ctrl+I on Windows/Linux).
Validator tools are also useful for debugging JavaScript, and can detect common syntax errors that would otherwise be hard to find manually. You may find the W3C HTML Validator or JSLint helpful for finding errors in your HTML or JavaScript code.
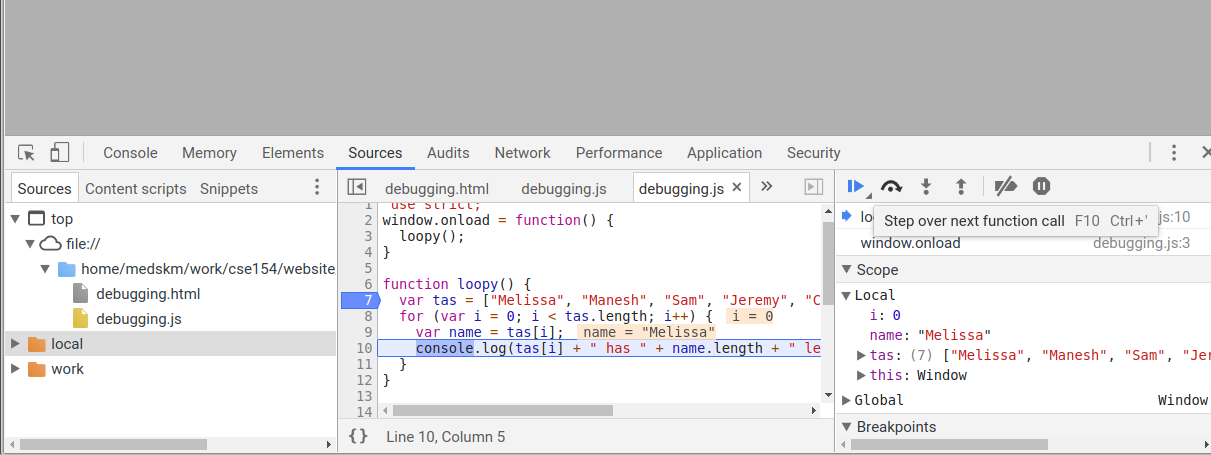
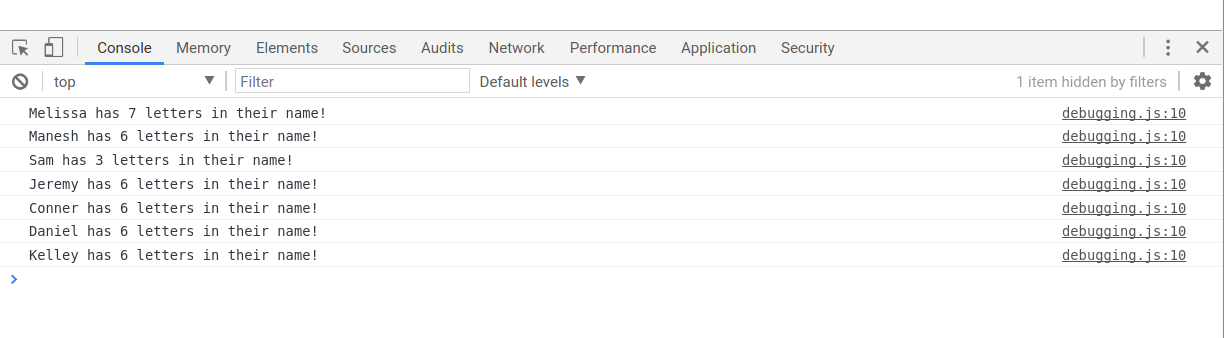
Debugging JS code in Chrome
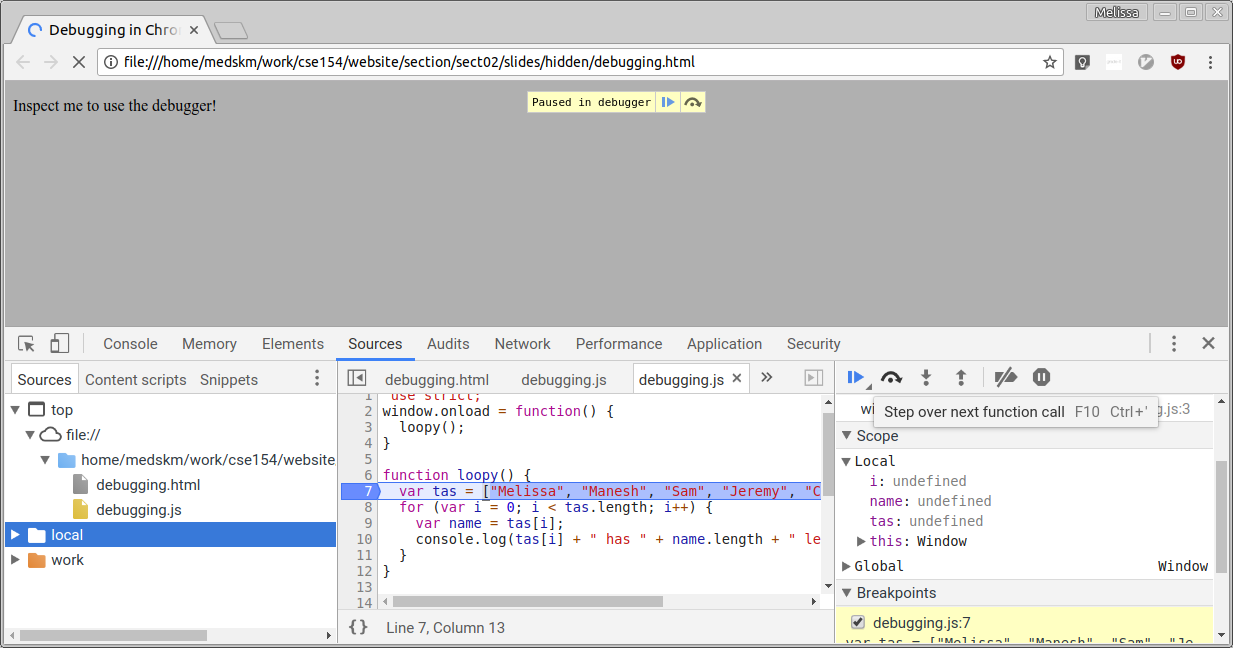
Chrome's Web Inspector debugger can set breakpoints, step through code, examine values (Sources tab)
The interaction pane for typing in arbitrary JS expressions (Console tab; Sources tab with code and variable views [see screenshot])
Try it on your own with this example (from the screenshots)!
Debugging in Progress
Debugging Finished
JSLint
JSLint: an analyzer that checks your JS code, much like a compiler, and points out common errors.
Link to CSE154 JSLint: https://oxford.cs.washington.edu/cse154/jslint/
When your JS code doesn't work, paste it into JSLint first to find many common problems!
JavaScript "strict" mode
                "use strict";

                your code...
Writing "use strict"; at the very top of your JS file turns on syntax checking:
- Shows an error if you try to assign an undeclared variable
- Stops you from overwriting key JS system libraries
- Forbids some unsafe or error-prone language features
You should always turn on strict mode for your code in this class
Other Debugging Strategies
alert() and console.log() are useful to include in functions that you are trying to debug, and are probably going to be most helpful when debugging JavaScript in this class.
A good strategy is to start with one of these functions in the top of your .js file as a sanity check that your script was correctly linked to the HTML page. Then, add it to the first function that is called to check that the function was called correctly, and continue the process until you reach the line(s) of code that are not working as expected.
You may find it useful to pass in variable values throughout this process so that
you can check whether your variables (e.g., text in an HTML tag or value
in a <input> tag have the correct values.
Debugging Checklist
-
Are you sure the browser is even loading your JS file at all?
Put analertat the top of it and make sure it appears. - When you change your code, do a full browser refresh (Shift-Ctrl-R)
-
 Check bottom-right corner of Chrome console panel for syntax errors
->
Check bottom-right corner of Chrome console panel for syntax errors
->
- Paste your code into our JSLint tool to find problems.
- Type some test code into Chrome's console or use a breakpoint.
General Good Coding Practices
ALWAYS code with Firefox / Chrome console open
Incremental development: code a little, test a little
Follow good general coding principles:
- Remove redundant code
- Make each line short and simple
Use lines and variables liberally:
- It's good to save parts of a complex computation as variables
- Helps to see what part of a long expression was bad/undefined/etc.
Don't fear the Firefox/Chrome debugger
Event-Driven Programming
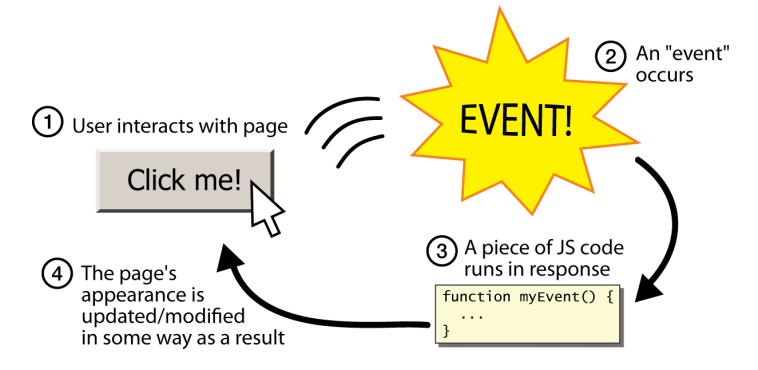
Unlike Java programs, JS programs have no main; they respond to user actions
called events
Event-Driven Programming: writing programs driven by user events
Handling Events
// attaching a named function
element.addEventListener("click", handleFunction);

function handleFunction() { // attaching onclick function
  // event handler code
}
JS (template)
JavaScript functions can be set as event handlers
When you interact with the element, the function will execute
click is just one of many event types we'll use
Accessing an Element: document.getElementById
let name = document.getElementById("id");
JS
document.getElementById returns the DOM object for an element with a given id (note that you omit the # when giving an id)
click Event Handler: an Example
<img id="pokeball" src="images/pokeball.jpg" alt="a pokeball" />
<button id="demo-btn">Click me!</button>
HTML
let demoButton = document.getElementById("demo-btn");
demoButton.addEventListener("click", changeImage);

function changeImage() {
  let pokeballImg = document.getElementById("pokeball");
  pokeballImg.src = "images/mystery.gif";
}
JS
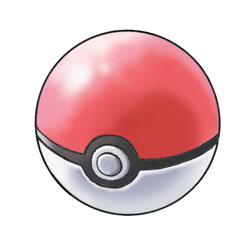
output
Putting it all Together: Module Pattern
We've seen an example of adding a "listener" to a HTML element (a button) to
attach a function (changeImage) to respond to an event ("click").
We will now introduce a pattern, known as the module pattern, to "wrap" this code in our JavaScript file to execute when the page is loaded.
Module Pattern Template
(function(){
  "use strict";

  window.addEventListener("load", main);

  function main() {
    // First function called when page is loaded
  }

  // other functions you may define
})();
JS
For now, we'll just copy-paste this module function to start our JS files so we can focus on practice with event handlers. Tomorrow, we'll take a focus more on what this pattern actually means and why we need it (you can find the previous example using the module pattern here).
Putting it All Together: Example
When the page is loaded, everything in the
attached function (in our example, we call this function main but
this isn't a required name), is executed, including any the assignment of
any other click event listeners!
(function() {
  "use strict";

  window.addEventListener("load", main);

  function main() {
    // this code is "unlocked" after page is loaded!
    let demoButton = document.getElementById("demo-btn");
    demoButton.addEventListener("click", changeImage);
  }

  function changeImage() {
    let pokeballImg = document.getElementById("pokeball");
    pokeballImg.src = "images/mystery.gif";
  }
})();
JS (example)
Exercise 1: Buggy JavaScript
The following webpages have errors that cause their JavaScript not to execute properly. Look at the pages, find the mistakes, and correct the problems. Note: We don't expect you to understand the module pattern, so you can assume the first and last lines of each file (the lines which open/close the "module") are correct!
- Buggy Page #1: HTML | JavaScript
- Buggy Page #2: HTML | JavaScript
Exercise 1: Solution
You can find the bugs in the comments of each (fixed) HTML/JS file:
- Buggy Page #1: HTML | JavaScript
- Buggy Page #2: HTML | JavaScript
Exercise 2: cRaZyCaPs
With the Chrome or Firefox console open, write a function named crazyCaps that accepts a string as a parameter and returns a new string with its capitalization altered such that the characters at even indexes are all in lowercase and odd indexes are all in uppercase.
For example, if a variable str stores "Hey!! THERE!", the call of crazyCaps(str) should return "hEy!! tHeRe!".
Exercise 2: Solution
function crazyCaps(str) {
  let result = "";
  for (let i = 0; i < s.length; i++) {
    if (i % 2 == 0) {
      result += s[i].toLowerCase();
    } else {
      result += s[i].toUpperCase();
    }
  }
  return result;
}
JS
Exercise 3: Mystery Box

We've provided starter HTML, CSS, and JS, and images in mystery-box.zip
Download and unzip the folder fill in the "TODO" comments of
mystery-box.js so that when the box is clicked, the box image is
randomly changed to one of the images in the POWER_UPS array
defined in the JS.
Exercise 4: What's Your Color?
We've provided an HTML file colorifyme.html and a start to a
JavaScript file colorify.js that
it links to. Download both files and fill in the "TODO" comments of colorify.js so that when the
web page's "colorify" button
is clicked, it randomly decides the color of the page background. That is, it should
choose a random hex value for the background between #000000 and
#FFFFFF. In addition, it should replace any text in the heading tag that
has the ID "my-color" with the text, "Your color is RANDOMCOLOR",
(where RANDOMCOLOR is the hex value randomly-generated for the background).
A runnable solution is located here (don't peek at the solution code!)
Exercise 4: Solution
(function() {
  "use strict";
  window.addEventListener("load", main);

  function main() {
    document.getElementById("colorify").onclick = changeBackgroundColor;
  }

  function changeBackgroundColor() {
    // Remember that colors can be defined in hexidecimal notation, e.g. #F1204A
    const HEX_DIGITS = ["0", "1", "2", "3", "4", "5", "6", "7",
                        "8", "9", "A", "B", "C", "D", "E", "F"];
    let randomColor = "#";
    for (let i = 0; i < 6; i++) {
      randomColor += HEX_DIGITS[Math.floor(Math.random() * 16)];
    }
    document.body.style.backgroundColor = randomColor;
    document.getElementById("my-color").innerText = "Your color is " + randomColor + "!";
  }
})();
JS