Web Portfolio
Setting Up Your UW Website (Due January 23)
Step 1: Activate your UW shared web hosting
- Visit uwnetid.washington.edu.
- Click on "Computing Services" on the left sidebar.
- If under "Inactive Services", check the box next to "Dante/Vergil Account".
- If under "Inactive Services", check the box next to "Student Web Publishing".
- Click "Subscribe"
Step 2: Browse to your website
- Open a browser and visit
http://students.washington.edu/<UWNetID>/, replacing<UWNetID>with your own UWNetID. - You should see a page with some text and an under construction icon.
Step 3: Change Cyberduck Preferences
- Open Cyberduck.
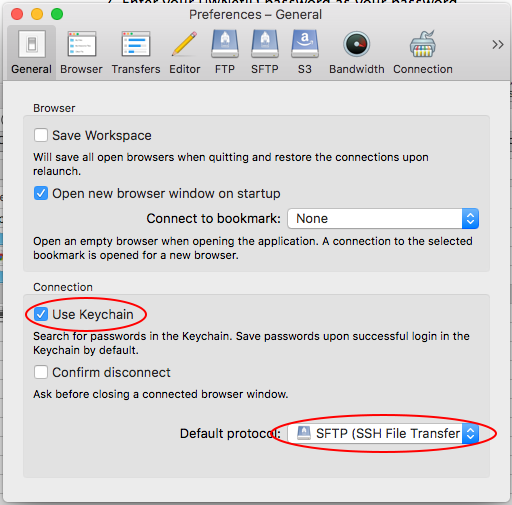
- In the top-left corner of your screen, open the Cyberduck menu and select "Preferences".
- In the "General" tab, make sure that the "Use Keychain" box is selected and your Default protocol is
"SFTP (SSH File Transfer Protocol)".
- Switch over to the "Editor" tab, make sure that the "Always use this application" box is checked,
and then use the drop-down menu to select "Choose..." and find Visual Studio Code in your
Applications folder.

Step 4: Create a server connection using SFTP
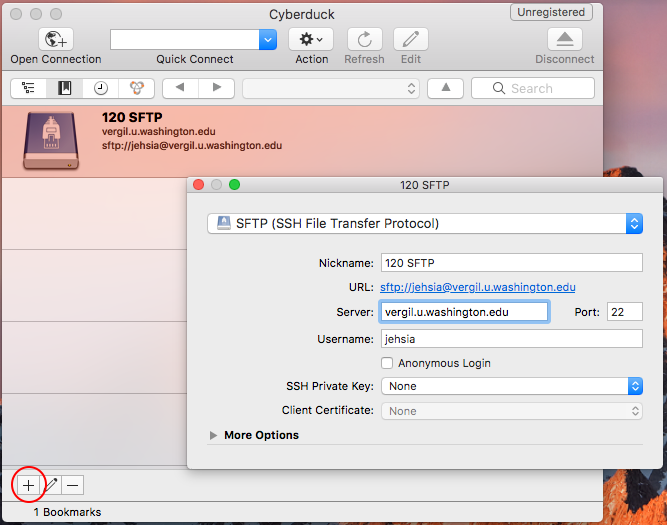
- In Cyberduck, click the plus symbol (+) in the lower-left corner (circled in image below).
- Make sure "SFTP (SSH File Transfer Protocol)" is selected in the drop-down menu at the top.
- [optional] Change the Nickname field.
- Type
vergil.u.washington.eduinto the Server field. - Enter 22 into the Port field.
- Enter your UWNetID into the Username field.
- You should see your new "bookmark" show up in a row in the original Cyberduck window.
- Exit the dialog box by clicking the red circle and then double-click your new bookmark.
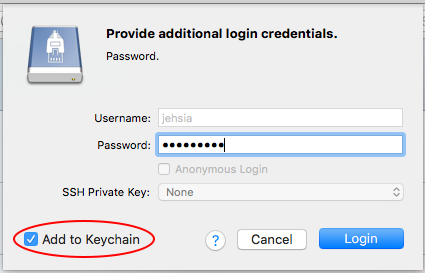
- When asked for your password, make sure that the "Add to Keychain" button is selected so that it
will save your password.
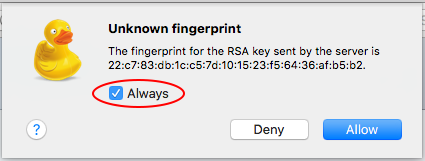
- If you get an unknown fingerprint popup, check the "Always" box before clicking "Allow" so that it
won't prompt you for this in the future.
Step 5: Organize your remote filesystem
- Your Cyberduck window should now show a
public_htmlfolder: double-click it to enter. - Click the Action icon (⚙ ) in the top-middle of the Cyberduck window and select "New
Folder..."; name it
img, which is short for "image". - Create a second new folder called
js, which is short for "javascript". - Double-click the
imgfolder and create a folder calledproject-images. - Click the triangle pointing up (▲) to go up a folder.
- Double-click the
jsfolder and then create a folder calledprojects. - Right-click here and choose "Save link as..." to download p5.js to your Desktop.
- Drag the
p5.jsfile from your Desktop into the Cyberduck window to upload it to yourjsfolder. - Go back to the
public_htmlfolder and it should look like the following (minusjustin.jpg).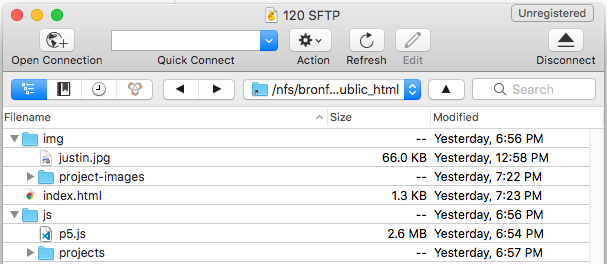
-
Right-click here and choose "Save link as..." to download
index.htmlto your Desktop. - Drag the
index.htmlfile from your Desktop into the Cyberduck window to upload it to yourpublic_htmlfolder. It will ask you if you want to overwrite the existing file; click Continue. -
Right-click here and choose "Save link as..." to download
style.cssto your Desktop. - Drag the
style.cssfile from your Desktop into the Cyberduck window to upload it to yourpublic_htmlfolder.
Step 6: Upload an image of yourself
- Find an image of yourself that you would like to add to your portfolio (
justin.jpgin the example above). - Drag this image into the Cyberduck window to upload it to the
imgfolder.- Option 1: double-click into the
imgfolder first and drop the image anywhere. - Option 2: drop the image directly to the right of the
imgfolder name, making sure that the folder is highlighted when you release your mouse.
- Option 1: double-click into the
Step 7: Edit your index.html file
- Right-click on
index.htmland choose "Edit with > Code" - Look through the
index.htmlfile — we've left some comments (text inside of comments<!-- looks like this -->) to help you find your way around. - Change one of the images on your site to be the picture of yourself:
- You will need to change the
srcfield within the firstimgtag in the HTML to beimg/<image name>, where <image name> is the name of the image file you just uploaded (e.g.<img src="img/justin.jpg">). - Your TA will better explain how to do this — ask for help if you need it!
- You will need to change the
- Change the text on the page, sharing details about yourself or why you are taking
this class.
- For an example, see the Example section.
Note: your web page will look a little strange right now, since you haven't added any projects yet (e.g., there will be some images that don't load). Don't worry about this for now — we'll fix it soon!
Step 8: Submit your website URL
- Copy your portfolio URL and submit it to the following two Canvas assignments, which we will use when we grade your portfolio during the quarter:
Note: More resources can be found at: https://itconnect.uw.edu/connect/web-publishing/shared-hosting/
Checkoff
- Show your website to a TA.
- It must display a picture of you that is stored on your UW server space.
- It must contain information about yourself and why you are taking CSE120.
- Show your server space directory tree in Cyberduck to a TA.
- Must contain the
img,project-images,js, andprojectsfolders in the correct places.
- Must contain the
- Show your
index.htmlfile to a TA.- Must be styled correctly with
html,head,body,title, and paragraph (p) tags.
- Must be styled correctly with
- Your website URL is submitted to the TWO Canvas assignments linked above in Step 8.
Adding a Processing Project
Step 1: Connect to your website in Cyberduck
You can refer to the previous section if you don't remember how to do this :)
Step 2: Create a new javascript file for your project
- Navigate into the
projectsfolder (inside ofjs) - Click the Action icon (⚙ ) in the top-middle of the Cyberduck window and select "New File..."
- Name the file
<proj name>.js, where <proj name> is the name of your project (e.g.taijitu.js)
Step 3: Edit your project javascript file
- Right-click on your new file and choose "Edit with > Code"
- Convert your Processing code to p5.js code using this online converter and paste the output into your
javascript file.
- The converter may leave you additional comments in the code about further changes that you will need to check for or make before the converted code works correctly. Do not hesitate to ask a staff member about these when you encounter them!
- If the converter reports messages in the error log, please let a staff member know so that we can help you troubleshoot! If you make a post on Piazza, please include the full error message as well as the code that you attempted to convert (and please make your post private).
- Save your javascript file
- IMPORTANT: Any time you edit your js file on your website, you will need to hard refresh your browser (Cmd+Shift+R on Mac; Ctrl-F5 on Windows) to see the changes.
Step 4: Create a new HTML file for your project
- Navigate back out to your
public_htmlfolder - Right-click here and choose "Save link as..." to download
project.htmlto your Desktop. This file will act as a template all of your project pages. - Drag the
project.htmlfile from your Desktop into the Cyberduck window to upload it to yourpublic_htmlfolder. - Rename
project.htmlso that it has the same name as the project you're uploading (e.g.taijitu.html). - Open your new html file in VS Code.
- Change
taijitu.jsin the secondscripttag to import the correct javascript file for your project - Update the body with your actual project name, description, and experience
- Part of your portfolio grade will be based on including sufficient details in your description and experience sections
- Save your html file.
Step 5: Add a screenshot of your project to index.html
- Run your project in Processing.
- Take an interesting partial screenshot of the running project:
- Save your screenshot to your desktop with your project name and using
.jpgor.pngas the file extension - Drag the image file into the
project-imagesfolder (inside ofimg) in Cyberduck to upload it - Now edit your
index.htmland change the following line of code:
with the correct file names for your project.<a href="[NAME OF THE PROJECT].html"> <img src="img/project-images/[NAME OF THE PROJECT PICTURE].png" alt="image of [NAME OF THE PROJECT] project" /></a>- If you've already uploaded a project and want to add another one, you can copy and paste the above line of code in the same place within
index.html, and edit it from there.
- If you've already uploaded a project and want to add another one, you can copy and paste the above line of code in the same place within
- [optional] Adjust the layout of your images and text in
index.htmlusing HTML and CSS (instyle.css.)- We will not be covering more HTML in this course, so you will have to teach yourself.
- There are many online resources for HTML, such as this one.
Checklist
- Your website displays a (non-broken) picture of your newly-added Processing project.
- Clicking on that picture takes you to a separate html page for that project.
- The project page has your working Processing project along with a project description
and details.
- If your project is not displaying, see the Debugging section down below for tips. Don't hesitate to ask a staff member, either!
Portfolio Deadlines
Make sure your portfolio is properly updated: we will be checking three times during the quarter.
You are encouraged to include as many assignments in your portfolio as you wish, but we will be
specifically checking for the ones listed below.
Please be aware that many of the later assignments can be quite difficult to convert to p5.js
so ask for assistance early!
We strongly recommend updating your portfolio as you complete assignments so that you don't forget the process and don't have to scramble to do it all at once just before the Updates.
Creating Your Porfolio (January 23)
Minimum project set:
- None, just need info, a photo of yourself, and the correct website organization.
Portfolio Update 1 (February 5)
Minimum project set:
- Taijitu
- Logo Design
- Lego Family
- Animal Functions
Portfolio Update 2 (February 26)
Minimum project set:
- Taijitu
- Logo Design
- Lego Family
- Animal Functions
- Jumping Monster
- Creativity Assignment
- Controlling Elli
- Word Guessing
Checklist
- Your website displays a (non-broken) picture of each Processing project.
- Clicking each picture takes you to a separate html page for that project.
- Each project page has your working Processing project along with a project description and details.
Example (Incomplete) Portfolio
The following webpage is an example you may choose to follow: http://students.washington.edu/wolfson/
Notes:
- The main page (
index.html) contains an image of me along with details about myself and why I teach CSE 120.- You can "View Source" to peek at the HTML.
- This portfolio contains one project (Taijitu) that runs properly in the browser and includes a sufficient description and experience report.
p5.js Debugging
Unfortunately, the Processing → p5.js transition is messy because the two languages are very different. Inevitably, your p5.js code will break and your project in your portfolio will not display (i.e. the drawing canvas will not appear on the HTML page). Oh no! What can you do?
 In the Processing IDE, we had the Message Area, which is the normally-grey bar just below your code.
This Message Area turns red if it finds an error in the line of code that your cursor is currently on
(see example to the right).
If an error occurs during the execution of your program, then the error message(s) are printed to the Console, which is the black area below the Message Area. There is a similar Console in your browsers that will let you see your error messages in your p5.js projects, too!
Finding the Developer's Console
Google Chrome:
- Option 1: Right-click anywhere on the page and select "Inspect". A side panel will open up. On the top bar of this side panel, click the "Console" tab.
- Option 2: Press Cmd+Opt+J (Mac) or Ctrl+Shift+J (Windows)
Mozilla Firefox:
- Option 1: Right-click anywhere on the page and select "Inspect Element (Q)". A bottom panel will appear. On the top bar of this panel, click the "Console" tab.
- Option 2: Press Cmd+Opt+K (Mac) or Ctrl+Shift+K (Windows)
Apple Safari (Mac only):
- Note: You must first go to the "Safari > Preferences" menu, click on the "Advanced" tab, and then check the "Show Develop menu in menu bar" button.
- Option 1: Right-click anywhere on the page and select "Inspect Element". A bottom panel will appear. On the top bar of this panel, click the "Console" tab.
- Option 2: Press Cmd+Opt+C
Reading Error Messages
Error messages show up in red in the Console.
Learning to read the error messages is difficult, as there is often extraneous information contained in
the message.
Focus on the messages that show your p5.js file (e.g. taijitu.js:1) indicated on the right
-- the number after the colon indicates which line number the error occurred on.
Some common errors:
- size() is not a valid p5 function: Change the
size()function for creating your drawing canvas tocreateCanvas(). - Unexpected identifier: Unconverted datatype.
Look for a leftover
int,float,boolean,char, orcolorin a variable declaration and change it tovar. - Unexpected token {:
- You have an extra set of curly braces somewhere in your code, OR
- Unconverted function return type.
Change your function return type (
void,int, etc.) to the keywordfunction.
- Unexpected end of input: Likely you have an
unmatched
{somewhere in your code.
General Workflow
- Open your portfolio in your web browser and click on the image of the project you are debugging.
- Open the javascript file (
.js) in VS Code through Cyberduck (right-click, "Edit with > Code"). - Open the Console in your browser and look for error messages.
- Make changes to your code in VS Code and then save the file. Cyberduck should automatically upload your modified file to your website.
- Hard refresh your browser (Cmd+Shift+R on Mac; Ctrl-F5 on Windows) to view your changes.
- If your project shows up now, then you're done! If it still does not show up, then go back to Step 3.