INFO/CSE 100, Winter 2006 - Lab 1 - UW Network Resources
Objectives
This is a first lab assignment for the course Fluency with Information Technology (aka: CSE 100, INFO 100). This lab is especially important if you are new to the UW system and have not used the computer resources provided by the university before. Even if you have used computers at the UW in previous quarters, we suggest that you work through the tasks given here to make sure you are familiar with what is available. For the the rest of this course, we will assume that you have the skills covered in this assignment.
This lab will not be graded and you do not need to submit anything when you
have completed this assignment.
Activate Your Student Web Publishing Area
By activating your Student Web Publishing area, you will be able to publish
web pages through your UW computer account.
You should already have a UW NetID, since you
needed it to register for FIT 100. Your UW NetID is used to identify you when
you access information on the UW web pages and when you wish to activate other
UW network resources. You can read more about the UW NetID at http://www.washington.edu/computing/uwnetid/.
- Start a web browser such as Firefox or Internet Explorer. Go to MyUW
(http://myuw.washington.edu/) and
login with your UW NetID. Look around your UW Main Page to become familiar
with it.
- Look for the text Manage Your UW NetID
Resources. If you have trouble finding it, use the find
function in your web browser. This text acts as a hyperlink, which can take
you to a particular web page, image or other file on the web. Click on the
link so that you go to the
Manage Your UW NetID Resources web page.
- On this page, you can see information about your UW NetID, UW Email
account, home page URL (if activated), and disk usage.
- On the menu to the left, you will find the text Turn Services Off/ON. Click on it.
- On this new page, make sure that all of your Basic Services are
activated by checking each box with the Basic Services phrase next to it. Also
make sure to activate Student Web Publishing if it is displayed under
Services that are off. Click on the Continue button when you
are done.
- You should now be shown the URL of your home
page.
http://students.washington.edu/yourUWNetID/
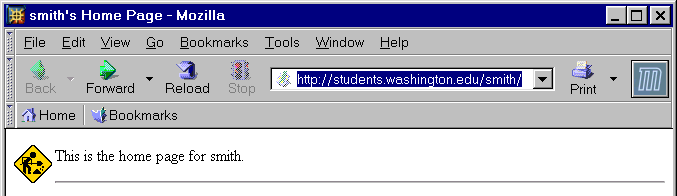
For example, if your UW NetID was smith, the URL for your home
page would be:
http://students.washington.edu/smith/
- Check that your home page exists by entering the URL in your web browser's
address field (located at the top of the window). Your web page will probably
look similar to this:
For additional information about creating and publishing web pages, read the
Creating and
Publishing Web Pages document created by Computing and Communications
(C&C): http://www.washington.edu/computing/web/publishing/.
Read Email with WebPine
You can access your UW email through a web browser using WebPine. WebPine was
developed as a graphical interface for Pine, which is discussed in the following
section.
- If you do not already have one running, start a web browser such as Firefox or Internet Explorer.
- You can either go to WebPine from MyUW (http://myuw.washington.edu/) or by
going directly to http://webpine.washington.edu/. You
will need to enter your UW NetID and password.
- Click on the Open inbox Now button.
- Compose an email.
On the menu to your left, you will find
Compose. Use Compose when you wish to to write an email to someone. For
now, write an email to yourself.
- Click on the Compose link.
- Enter the entire email address of who you wish to send your email to. In
this case, it should be your UW NetID followed by
@u.washington.edu, e.g., smith@u.washington.edu.
- Enter a subject, for example, test email.
- Write something in the body.
- On the menu to the left, you will see three actions: send, postpone, and
cancel. Click on the circle beside Send and then click on the
OK button. You have now sent an email to yourself.
- After a few seconds, your email should arrive in your inbox or, if you
forward your email to another account, in that account's inbox. To check for
new messages in your UW inbox with WebPine, click on the word INBOX
on the menu to your left. The contents of your inbox will then become
updated.
- Sometimes it can take a long time for email to be sent so if you do not
see your email right away, check again later.
- Read email.
You read email by clicking on its subject. The
subject should be a blue, underlined link.
- Create a folder/directory.
You can create folders and
directories to help organize your email.
- On the menu to your left, you will find Folder List. Click on the
link to view all of your folders/directories in WebPine.
- Beside Deskmail Folders, you will see a Create New
button. Click on the button to create a new folder.
- On the following page, you will be given the option to either create a
new folder or directory. Read the description for each to learn the
difference between the two.
- For this lab, you will create a new folder. Give your new folder a name,
for example, personal. Click on the Create New Folder button
to create the folder.
- You should have automatically returned to your Folder List page and
should see your newly created folder in the list.
- Return to your inbox by clicking on INBOX in the menu to your left.
- Move email to a folder/directory.
Move email from your inbox to
appropriate folders/directories to help organize your email.
For this lab, you will move the email you mailed to yourself to the newly
created folder. Click on the little box to the left of the email you mailed to
yourself. If you forwarded your email to another email address, then you will
not have any email to move into a folder and will either need to turn off mail
forwarding to do the following steps, or skip them.
- At the top of your message, you will see a boxed off area with a Save button and drop-down menu. To save your email to one of your folders, choose "folder in my folder list" from the dropdown menu. Depending on your browser, you may need to click Save. Alternatively, you can write
the name of the folder in the box. (Your email has not been saved
to the folder yet.)
- A new screen should appear displaying a list of your folders. To save your email in the personal folder, click on the name of the folder. When you have done this, the subject of your email will be crossed
over. You will also see a D on the left side of the date for your email.
This means that the email is marked to be deleted (from the old folder) but has not been erased
yet.
- To check that your email is in your personal folder, click on Folder
List on the menu to your left, and then click on personal in the
list of folders/directories. You should now see your email.
- To erase the email from your inbox, go back to your inbox, make sure the
box to the left of your email is checked, and click on the Expuge
button on the top right of the page. The email should now disappear from
your inbox and should only be located in the personal folder.
Note: Email that has been deleted will be crossed out but not actually
erased. To erase the email, you must expunge it.
WebPine has several other functions that you can explore on your own. Please
check the WebPine FAQ (frequently asked questions) first if you have questions
about WebPine: http://www.washington.edu/computing/faqs/webpine.html
Read Email with Thunderbird
Note: The computer labs used in this course have recently been updated to include your Thunderbird account informationn automatically. This means that you may read your e-mail by simply opening Thunderbird and entering your password.
The instructions are included here in case you want to practice setting up Thunderbird, or if you want to set up Thunderbird on your home computer. You might also want to practice setting up accounts by creating a new test account (using a different username) on the lab computers.
You can also access your UW email using a stand alone email client such as Mozilla Thunderbird, which can be especially useful when you want to check multiple email accounts at once and use advanced email features such as adaptive spam filtering, searching over the text of your email, and reading news feeds. You are probably familiar with other such stand alone clients like Mac OS X Mail or Microsoft Outlook Express that can also be used to check your UW email.
Instrctions for configuring Thunderbird or many other stand alone email clients are provided by the Department of Computing and Communications (C&C) at the UW.
- Start Thunderbird
Click on the "start" button at the lower left corner of your screen and point to the list item titled "All Programs," it has an arrow to the left of the text. From this list, point the cursor to the list item "Mozilla Thunderbird" and click the left mouse button. Thunderbird should load - it may take a few seconds.
- Configure Thunderbird
Thunderbird should automatically bring up the "add account" wizard, but, if not, click on menu item "Tools -> Account Settings..." Once you have opened Account Settings, click on the "Add Account..." button in the lower left corner of the window. This will launch the Account Wizard shown below.
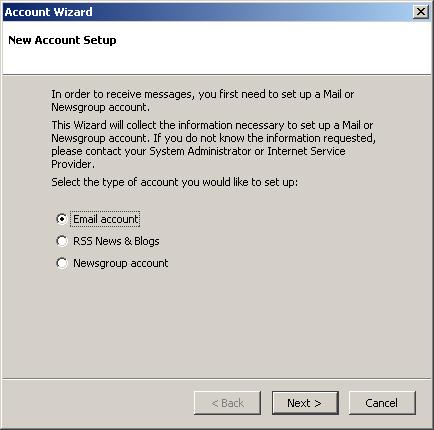
- Click on the button next to "Email account", then the right arrow (at the bottom) to continue to the next page, pictured below.
- For Full Name, enter your full name.
- For Email Address, enter your "@u.washington.edu" email address. (that is, YOUR UW NetID plus "@u.washington.edu" )
- Click the right arrow (at the bottom) to continue to the next page, pictured below.
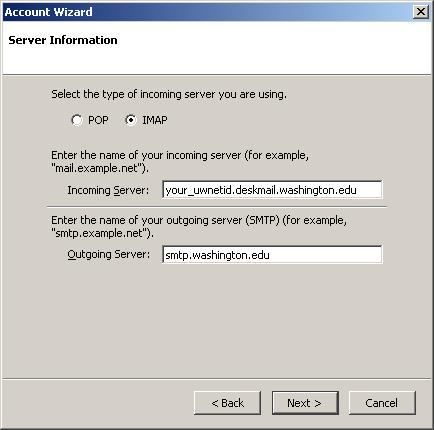
- Select "IMAP." IMAP stands for
Internet Message Access Protocol
and requres an account set-up that is different from the more familiar POP or web based email protocals.. You will learn more about email and other protocals later in the quarter.
- For Incoming Server, enter your IMAP server as your_uwnetid.deskmail.washington.edu where your_uwnetid is replaced by YOUR real UW NetID.
- Click the right arrow (at the bottom) to continue to the next page.
- For User name, enter your UW NetID.
- Click the right arrow (at the bottom) to continue to the next page.
- This page asks only for a local "Account Name" (what Thunderbird will use to label the account WITHIN Thunderbird), you can use anything you like (e.g., "My UW email").
- Click the right arrow (at the bottom) to continue to the last pag
- Click Finish. Thunderbird will try to check your UW email now but will be unable to and will complain - ignore it and do part 3.
- From the "Tools" menu, select "Account Settings...".
- Enable SSL Encryption
All email communication between the UW email servers and email clients is required to use secure communication (Webpine did it for you automatically) so that no one else can steal your email login and password and so that the contents of your email cannot be read by someone else. SSL stands for Secure Socket Layers which is all you need to know for now...
- The new account wizard will have set most of this up correctly for you, if this is the only email account then it is already the "default" (if not, you may want to make it the default by clicking "Set As Default"). You probably also want to turn OFF the option to "Compose messages in HTML format" (you shouldn't send messages in HTML until and unless you have agreed with the recipient that this format is preferred).
- Click "Server Settings" under your account to bring up a page similar to the one pictured below.
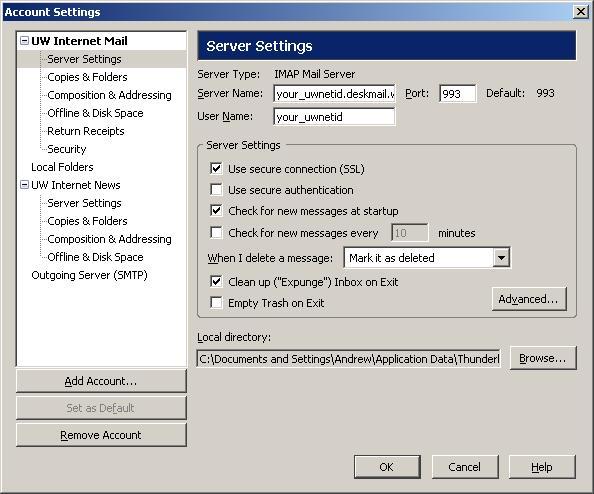
- Turn ON the option to "Use secure connection (SSL)".
- To have Thunderbird use the same Delete/Expunge behavior as Pine, select "Mark It as deleted" from the pop-up list next to "When I delete a message" AND turn on the option to "Clean up ("Expunge") Inbox on Exit".
- Click "Advanced...".
- For the "IMAP server directory", enter "mail".
- Turn OFF the option to show only subscribed folders (at least for now, after you've "subscribed" to some you may want it back on).
- Leave the boxes next to ALL the "namespaces" empty (blank) and turn OFF the option to "Allow server to override these namespaces".
- Click OK to close this window (you return to the Server Settings).
- Click "Outgoing Server (SMTP)" under your account to bring up a page similar to the one pictured below.
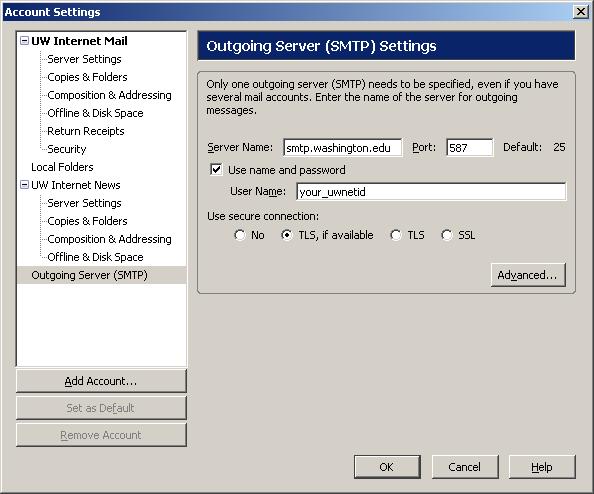
- For "Server name", enter "smtp.washington.edu".
- For "Port", enter 587.
- Turn ON the option to "Use name and password"
- For "User name", enter your UW NetID.
- Turn on the option to use "TLS, if available".
- Click OK to close the account settings window
- Reading Email.
Click on "Inbox" under your UW email account in the left column of the Thunderbird Mail window. At this point enough of the configuration should be done to let Thunderbird find your Inbox and folders (if any) on the UW email server. When you've closed the account configuration panel you should see a new "UW" account in the column to the left of the messages window. Click on the INBOX under that to open your UW email inbox (you should be prompted for a password). Your UW email folders will appear. This may take some time, especially if you have a large inbox, lots of folders and/or a slow connection.
For detailed information about configuring UW email on your computer, other email clients, viruses, spam, and etc.. see the Introduction to Email at the UW page.
Check List
| ______ |
My UW student web publishing area is activated. |
| ______ |
My UW email account is activated. |
| ______ |
I know the URL of my home page. |
| ______ |
I know how to use Webpine to read email. |
| ______ |
I know how to use Thunderbird to read email. |
Help & Resources
The University of Washington Department of Computing and
Communication (C&C) has created a series of help pages for the various
network services available to you.