In the projects, we try to have all the UI features done for you in the skeleton code, so that you can concentrate on the graphics issues. This document gives some examples of how to add some simple user interface elements to MFC based programs. It is by no means comprehensive; I only wrote my first MFC app about four weeks ago. I'm open to suggestions about things to add or improve. If you're looking for a book on this stuff, I have Inside Visual C++, fourth edition, by David J. Kruglinski, and it seems quite good.
All these examples will extend GLTemplate, the simple OpenGL application. Start by opening GLTemplate.dsw, this will start the Visual Studio environment.
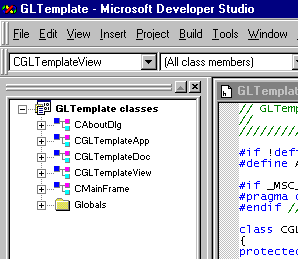
On the left side of the screen is the workspace window, which should list the classes of the application:

If it's listing something other than the application classes, click the ClassView tab at the bottom of the window. These classes are generated by the AppWizard that set up the application for us. The two ones we'll be changing the most are CGLTemplateDoc (an instance of which represents a single document in our application) and CGLTemplateView (an instance of which represents a single window view onto some document).
At the bottom of the workspace window are tabs which switch the window between showing classes (the default), resources (such as menus and dialogs), files, and documentation.
Double-clicking a class name will bring up an editor window on the corresponding header file for that class. Opening a class by clicking the button to its left will display all the members of the class.
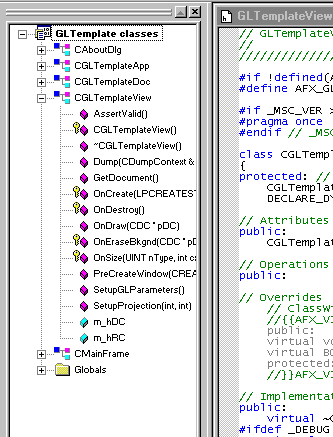
You can double-click any method to do to the definition of that method.
The first two are the constructor and destructor, as usual in C++.
The PreCreateWindow method is called just before the window is created to set the window features. You shouldn't need to change this method.
The OnDraw method is called whenever the window needs to be repainted. In the GLTemplate application, this first calls wglMakeCurrent to prepare OpenGL to receive commands for this window. It issues OpenGL commands to clear the window and draw a colored triangle, then flushes these commands to ensure they complete.
The next two methods, AssertValid and Dump are diagnostics. The GetDocument method returns a pointer to the document associated with this view (remember that a view object is just a window into an underlying document object). For this application, there is only one document and one view, but more complicated applications could have several documents, each with several different types of view.
The OnEraseBkgnd method is called whenever the window needs to be erased in preparation for drawing. Since we use OpenGL commands to clear the window before drawing, we simply return TRUE here to indicate that nothing more needs to be done.
OnCreate is called when the window associated with the view is created. We use it to create an OpenGL rendering context and bind it to the Windows device context representing the window.
SetupGLParameters is a method we added (not an MFC method) that initializes the OpenGL state.
OnDestroy is an MFC method called when the window is destroyed. We use it to delete the rendering context and release the Windows device context.
OnSize is called when the size of the window is set: when it is created, and when it is resized by the user. We call SetupProjection with the new size of the window to adjust the OpenGL projection matrix to correspond to the new aspect ratio.
SetupProjection initializes the OpenGL projection matrix to a perspective view, and sets the initial modelview matrix so the camera appears to point at the origin.
The first thing to do is tell MFC which messages we want to receive. Press Ctrl-W to bring up the ClassWizard dialog (or right-click and select ClassWizard from the menu).
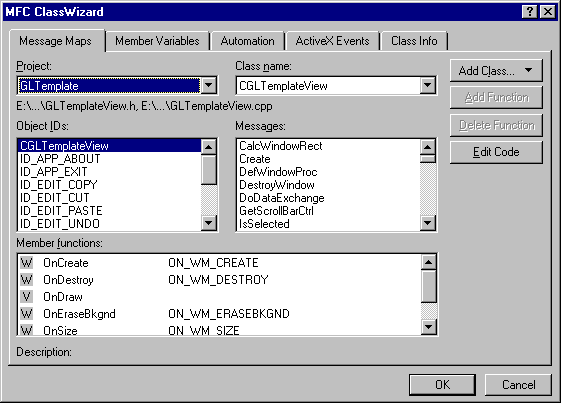
Make sure that CGLTemplateView is selected in the "Class name:" dropdown, since that is the class we want to receive mouse click messages. Select WM_LBUTTONDOWN from the "Messages:" list, then click "Add Function". This will create a method called "OnLButtonDown" within the class and arrange for it to be called when the left mouse button is pushed. Now click "Edit Code". You'll be returned to the edit window, with the newly created OnLButtonDown method ready to be edited. Change the body to look like this:

The TRACE macro works just like printf, but sends the results to the debugging window at the bottom of the screen when you debug the program within Visual Studio.
Other messages you can map in this way include: WM_KEYDOWN and WM_KEYUP to capture keystrokes, WM_LBUTTONDBLCLK and WM_LBUTTONUP for other left-mouse-button events (plus the corresponding "WM_RBUTTON..." events for the right button), and WM_MOUSEMOVE to capture movements of the mouse cursor. See the Visual Studio online document for a complete listing and explanations.

You can close the Properties dialog by hitting enter, then close the menu editor. We've now added the menu item, but we need to add code to process it.
When trying to handle a menu item, MFC will first look in the current view for a handler, then in the current document, then in the main frame, then in the application. Let's add a handler to the document class for this item.
Open up the ClassWizard again (Ctrl-W or use the context menu). Select CGLTemplateDoc for "Class name:". Next, under "Object IDs", select ID_FILE_FOO (or whatever ID you used for the menu item). Under "Messages", you can then select COMMAND.
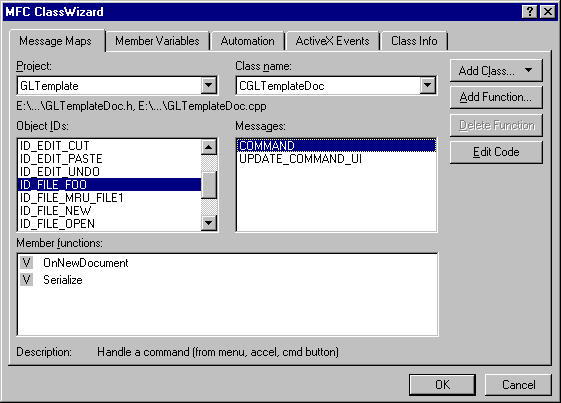
You can now click "Add Function", then "Edit Code" to create the handler method and take you to it in the editor. Add some debugging code to the handler:

Now, when you run the program and select the menu item, you'll get a message in the debug output window.
You'll now the dialog box editor, with a fresh dialog box, and a palette of controls that you can drag into the box.
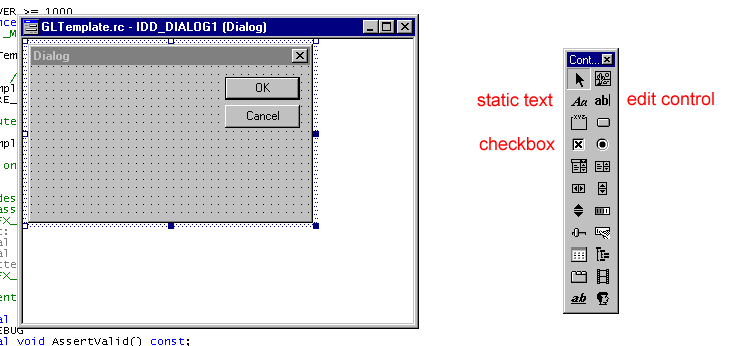
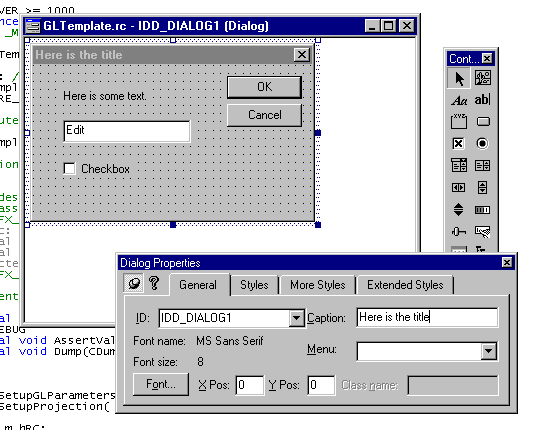
Drag some controls off the palette and onto the dialog to place them. Use the Properties dialog to set the IDs and options for each control. I'll place a static text item with ID IDC_STATIC, an edit box with ID IDC_EDIT1, and a checkbox with ID IDC_CHECK1. Select the whole dialog, then use Properties to set the ID and the caption (title) for the whole dialog box. I'll use the default ID IDD_DIALOG1.
Now we'll add code to control the dialog. With the dialog editor open, open the ClassWizard. You'll get a message about "IDD_DIALOG1 is a new resource.". Select "Create a new class" and click OK. You'll be asked to name the new class. Call it "CFooDialog", and click OK. Now you're in the ClassWizard box that we've seen before, but we're going to do something new. Click the "Member Variables" tab at the top. You'll get something that looks like this:
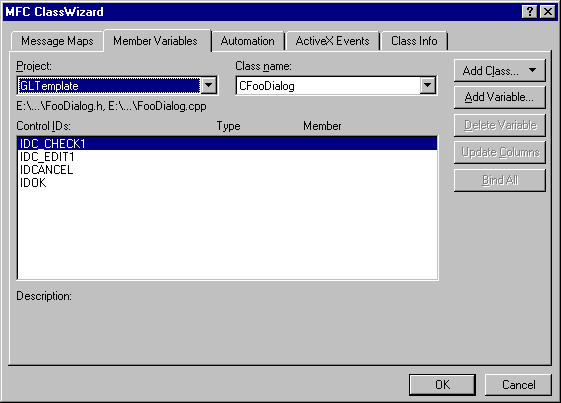
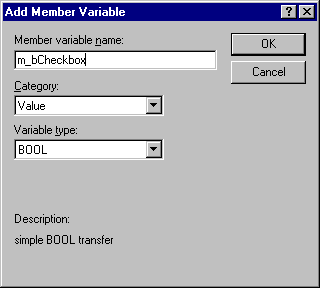
We're going to add variables to the class, tying them to the checkbox and edit controls that we placed in the dialog box. First, select the IDC_CHECK1 item and click "Add Variable...". Set the variable name to "m_bCheckbox" and click OK. Then, select IDC_EDIT1 and add a variable for it. Name it "m_dValue", but change the type to "double".
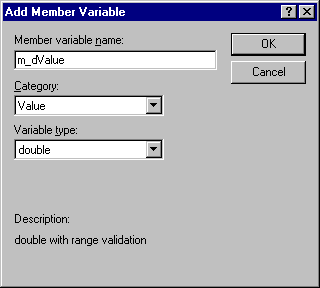
Now click OK to close the ClassWizard. The last thing we need to do is add code to open the dialog box. Let's set it up so the "Foo" menu item we created above opens the new dialog. Go to the OnFileFoo method of CGLTemplateDoc, and edit it to look like this:
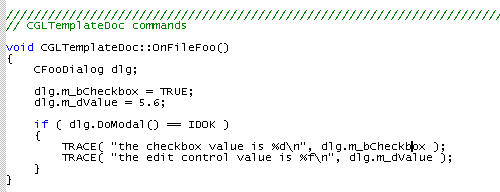
You'll also need to #include FooDialog.h at the top of CGLTemplateDoc.cpp. Now when you run the program and select Foo from the File menu, you'll get the dialog box. If you click OK, the updated values will appear in the debug output window.