 [1]
[1]Program Anywhere: Never Need a Desktop Again
Kevin Deus, Jennifer Romelfanger, Chaoyu Yang, Davor Bonaci
Right now there is no good way to program from a tablet. It’s possible by turning a tablet into a workstation, adding a keyboard, and essentially using the tablet as a small screen, but this doesn’t take advantage of the tablet’s strengths, and it ignores its weaknesses. We propose an interface that would allow you to create useful programs, working directly with the tablet without a keyboard. The interface would focus on relatively small applications with just a few events and actions. This makes it possible to automate common tasks that would otherwise take far too long to do by hand. We’ve designed a visual programming application that takes advantage of the tablet’s touch interface, uses familiar tablet interactions (tapping, dragging, long presses), and minimizes typing.
The first stage in the process was to interview people who could give us insights about what goes into creating a tablet app. While there are a few tools available to develop apps from a tablet, finding developers who use them is very difficult. We felt the next closest thing was finding developers who are creating apps for mobile devices. They have similar considerations, as far as what their app needs to focus on and what the tradeoffs are.
Zeke is an iOS developer, working on an app that ships new versions fairly regularly. He’s been on the project for about a year, so he’s had time to get to know a lot of the app and find good development flows. Kevin observed him at work, where Zeke has a desktop and a selection of different iOS devices to test on. This is the normal environment where Zeke would get work done, so it was suitable for contextual inquiry. As his apprentice, Kevin observed him fix a couple of bugs and test them on the device, asking detailed questions about how Zeke was interacting with his editor and tools.
Ron is a Senior Software Engineer on the Mobile team at Tableau, where his main focus is on Android development, but he also works on iOS development when needed. Ron has been developing mobile applications for 10 years. Jennifer observed Ron at work, where he has both a Windows desktop and an iMac, plus an assortment of Android and iOS devices. Jennifer followed Ron through debugging an issue on a specific Android device. Ron also gave a tour of the many tools he uses during development.
Rupeng is a Mobile Game Developer at 4399.com, focused on developing mobile games on the Cocos2d platform. He has a lot open source experience in mobile development, and he has been working on an online mobile game for about a year, so he knows the workflow of mobile development well. Chaoyu observed him working at the office, developing a module for a client side application and testing it on a physical Android device. Rupeng also discussed the mobile development toolchain that his team is using.
Bob is a software engineer on the Windows Phone team. He has seven years of programming experience, five of which are on mobile applications. In his day job, he works on a mobile application platform. Separately, he maintains a number of his own smartphone apps. Davor observed Bob at the office investigating an issue in his own application. Additionally, Davor asked Bob to build a calculator application from scratch, as that type of action approximates our scenarios best.
There are a number of high level tasks which most participants share. First, all participants use a desktop for their mobile application development. The desktop is necessary because apps that create mobile applications using a mobile device aren’t usable enough, and they aren’t commonly used in application development.
Second, all participants use an Integrated Development Environment (IDE) which manages their project, provides a text editor, and supplies a number of tools for effectively navigating and producing code. One participant uses IntelliJ and Xcode, another uses just Xcode, and the last two use Visual Studio. However, the goal of each IDE is the same: make developing code faster by providing accelerators and allow developers to quickly write code without having to recall specific function or class names. IDEs also help prevent user error by providing real-time information about compilation issues, allowing the user to see issues immediately and providing information about possible solutions.
Another task that most participants do is use the web to look up details about other tools they are using, such as third-party APIs. This is useful so that developers don’t need to recall the exact specifics of an API. However, this has a major flaw: if the user does not have an internet connection available, they must either wait for one or try to recall the needed information.
Source control is another common tool. Two of the developers we interviewed use Perforce, while a third uses SVN. Source control provides an external repository to which code can be committed. This allows the user to track previous revisions so that they may look back on their previous changes or easily revert to a previous version in case of an error. Another benefit of source control is that it makes collaboration smoother. Multiple people can check out from and check into the same repository, allowing them to share their changes with each other.
There are also a few common themes in application debugging and testing. The IDEs that the developers use provide advanced debugging features such as breaking, stepping through code, watching variables, and sometimes runtime modification of memory. Most participants debug on the actual device rather than on an emulator, in part because the tools make it simple to load the application on the device through a USB connection. All of the participants have a number of devices for testing, allowing them to verify and debug in a variety of situations.
The most distinct difference between all interviews was the method of UI creation. Android and Windows Phone applications use an XML defined UI, which can be created through a design editor in an IDE or in a text editor. iOS applications use a UI layout tool in Xcode, and the resulting layout files are not intended to be modified manually. One studio had a UI that was too complex for the standard UI definitions, so they have a complex process that uses Photoshop to create a PSD file and then generates Lua code based on the contents of that file. These differences come mainly from what platform was targeted, as well as the complexity of the application.
In all cases, the participants have fairly similar goals, but in every case that participant uses a different set of tools. Whether it is an IDE, source control, or debugging, each participant has a different set of tools they use. At a high-level the tasks and flows are fairly similar, but once you got to the finer details each person’s actions are affected by the tools they use. These tools are often defined by the platform they are targeting, but they are also defined by existing standards on their teams, as well as personal preference.
These results clarify what key elements need to be handled beyond the programming itself. These key elements are:
UI design tools and advanced debugging features, while important, are outside of the scope of this project.
Every tablet owner is a potential user of our system. We, however, focus on two classes of tablet users: experienced programmers interested in building mobile applications and students trying to learn programming concepts.
Our focus groups have a few things in common. They are interested in tinkering with their tablets and making them do something new. They have plenty of experience and skill using tablets or other similar systems. They are power users. They differ, however, in the amount of previous programming experience, from beginners to experts.
Experienced programmers typically use platform-specific languages and tools, from Objective C and Xcode to Java and Eclipse. Using these tools, they write code for a wide variety of different applications, deploy it, and debug the results.
Students trying to learn programming concepts use a workstation or a laptop and one of the mainstream programming languages. They follow lessons and exercises to learn about branching, loops, modular programming, calling built-in functions, and more.
Our system must to be able to build and execute mobile applications. It won’t be able to build complex applications which desktop-based tools can. Instead, we focus on simple script-like tasks, such as these:
The fact that some of our contextual inquiry participants create similar apps on their own, in their own free time, is confirmation that these tasks are interesting to our target users. Moreover, there are thousands of similarly-capable applications in each platform-specific app store. Our system will allow users to build and customize such applications quickly.
We aren’t focusing on reusing existing scripts or extending an existing application. We recognize these types of tasks are useful, but our contextual inquiry suggests that these tasks appeal to a smaller segment of our target group.
We expect our target users to be reasonably well educated, and they have the initiative to explore a new interface and discover things on their own. To help them ramp up quickly, our application will offer a tutorial, help screens, and sample applications, but our initial versions won’t provide the kind of guidance that someone new to a tablet would require.
Tasks are currently performed sitting at a desk, working on a laptop or desktop computer, either at home or at work. Our system enables programming on the go. In this case, environmental factors don’t affect the tasks much.
Data in this project is the source code, which is written by the customer. Source code is managed by a source control tool, which normally allows remote and concurrent access. Conflicts and merges need to be resolved often. Runtime data, including telemetry, is also important, but this is outside of the scope of our project.
In our case, source code will be stored in local memory of the tablet and potentially synced to a server. For the type of applications our system is focused on, advanced source control or collaborative access is not critical.
Customers use a wide variety of tools:
Allowing our application to interface with some of these tools would be nice, but it’s not a significant factor in our design.
During the development process, customers communicate verbally, through email, a bug tracking system, on whiteboards, through documentation, and through source control systems. In our case, however, applications are mostly built by the user for his own consumption. Thus, direct customer communication is not critical. As with any programming tool, it would certainly be useful to have an online community where users can communicate about issues and help each other.
Experienced programmers usually code every workday, during most of the day. Our system, however, won’t likely be used on a daily basis by our target customers. Hence, we should recognize that customers may, from time to time, forget how to use the system, and consider that in the design.
Experienced programmers usually organize time by milestones, release cycles, or iterations on the product. There are also stabilization deadlines, certification processes, and dependencies with other programmers. These considerations don’t really apply to our system, mostly because we’re focused on smaller applications that can be built in a short amount of time.
Programmers experience issues and debug problems on a daily basis. If something goes wrong with the application, they spend time investigating the problem. The solution may require pushing a new release or a hotfix to the market. Contextual inquiry revealed that many urgent issues are discovered through some sort of instrumentation or telemetry from end users.
Since the apps developed with our system are much smaller scale, most of the infrastructure mentioned above won’t be necessary. The user will just notice and fix the problem on the spot.
You just got a job working on this great new app called Pannda, and you want to tell your family. Some of your contacts filter emails sent to large numbers of people, so you want to email each person separately. Send an email individually to everyone in the contact list who matches a given family name.
Currently, most tablet users would do this manually using their existing Mail application to compose an email to each individual separately, copying the content of the email between messages. However, a user could also create a mobile app to do this. To create an Android app, a mobile developer normally would use their favorite IDE and other tools for development. They would check the Android system API for how to retrieve their contact list, define the UI elements using XML, and search for an email library on the Internet. After all this, the developer could start writing the application in Java. When complete, they would build the project on the computer and test it on an emulator before deploying to a physical device.
Our design allows users to create this kind of program easily. Using our visual programming tool, the user can access the contact list, filter the contacts, and send email without needing to take the extensive preparation steps listed above. Many common actions will be available through our app and can be put together into an automated task.
The new iPhone 5S just came out, and you want to pick one up in the store, but they’re currently out of stock. Apple’s website has information about the store’s stock availability, and you want to know when the phone becomes available. You know that the url to the stock data is “http://store.apple.com/availabilitySearch?parts=ipone5s&zip=98105” and the flag you want in the resulting XML file is “stores.iPhone5s.isAvailable”.
The average person would do this by checking the webpage repeatedly to see if the availability has changed. Our targeted users could also create a mobile app to do this. Much like the previous task, there is a lot of setup involved. They would also need to spend time figuring out how to download a webpage and parse an XML response.
Our app provides components to automate this. There will be built-in components to load the webpage, parse XML data, and present a notification on the device. It’ll be easy to hook these components together and have the program notify the user when the flag they’re interested in changes to true.
One Saturday afternoon, you are super bored and decide to watch paint dry (really, it’s a more fascinating process than you might think)[2]. Most importantly, you want to share this experience with all your friends, so you decide to take a photo every 5 seconds, create a timelapse video from those photos, and upload it to YouTube.
Today, most people would do this by downloading an app. However, it’s possible you’d want to customize some parts of the process. To do it manually, you could take the photos on a timer, compile them into a video, then manually upload the video to YouTube. To build a mobile app to do this, a developer would need information about the how to programmatically take pictures, find a tool to compile them into a video, and understand how to use the YouTube API to upload the video.
Using our application the user can automate this fairly quickly. The components to take a picture, compile a video, and upload to YouTube will all be available for the user to add to their program, making program creation fast and simple.
There are a couple of orthogonal design choices that we need to make. The programming model is an important one. We found three different choices: use an existing visual programming language, build a new programming language using the “control flow” methodology, or build a new programming language using the “dataflow” methodology. We’ll elaborate on these models in the upcoming sections. Next, we have to choose the interface and interaction with the application itself. Some basic choices are: a desktop-like interface with an always-on ribbon, a tablet-style interface with hideable menu bar on the left side, or contextual menus on the programming surface.
We present 4 storyboards that investigate how effective individual design choices are:
The idea in this design is to have a minimal interface, and everything you need pops up in
context menus. This provides more space to work, it hides details so you can better see the overall flow, and it makes relevant information available when you need it.
In dataflow programs, the program is built by connecting the flow of data from one component to the next. Each component has inputs and outputs, and the component may transform the data in some way. Here is a completed program, to give an idea how to visualize dataflow in an application.
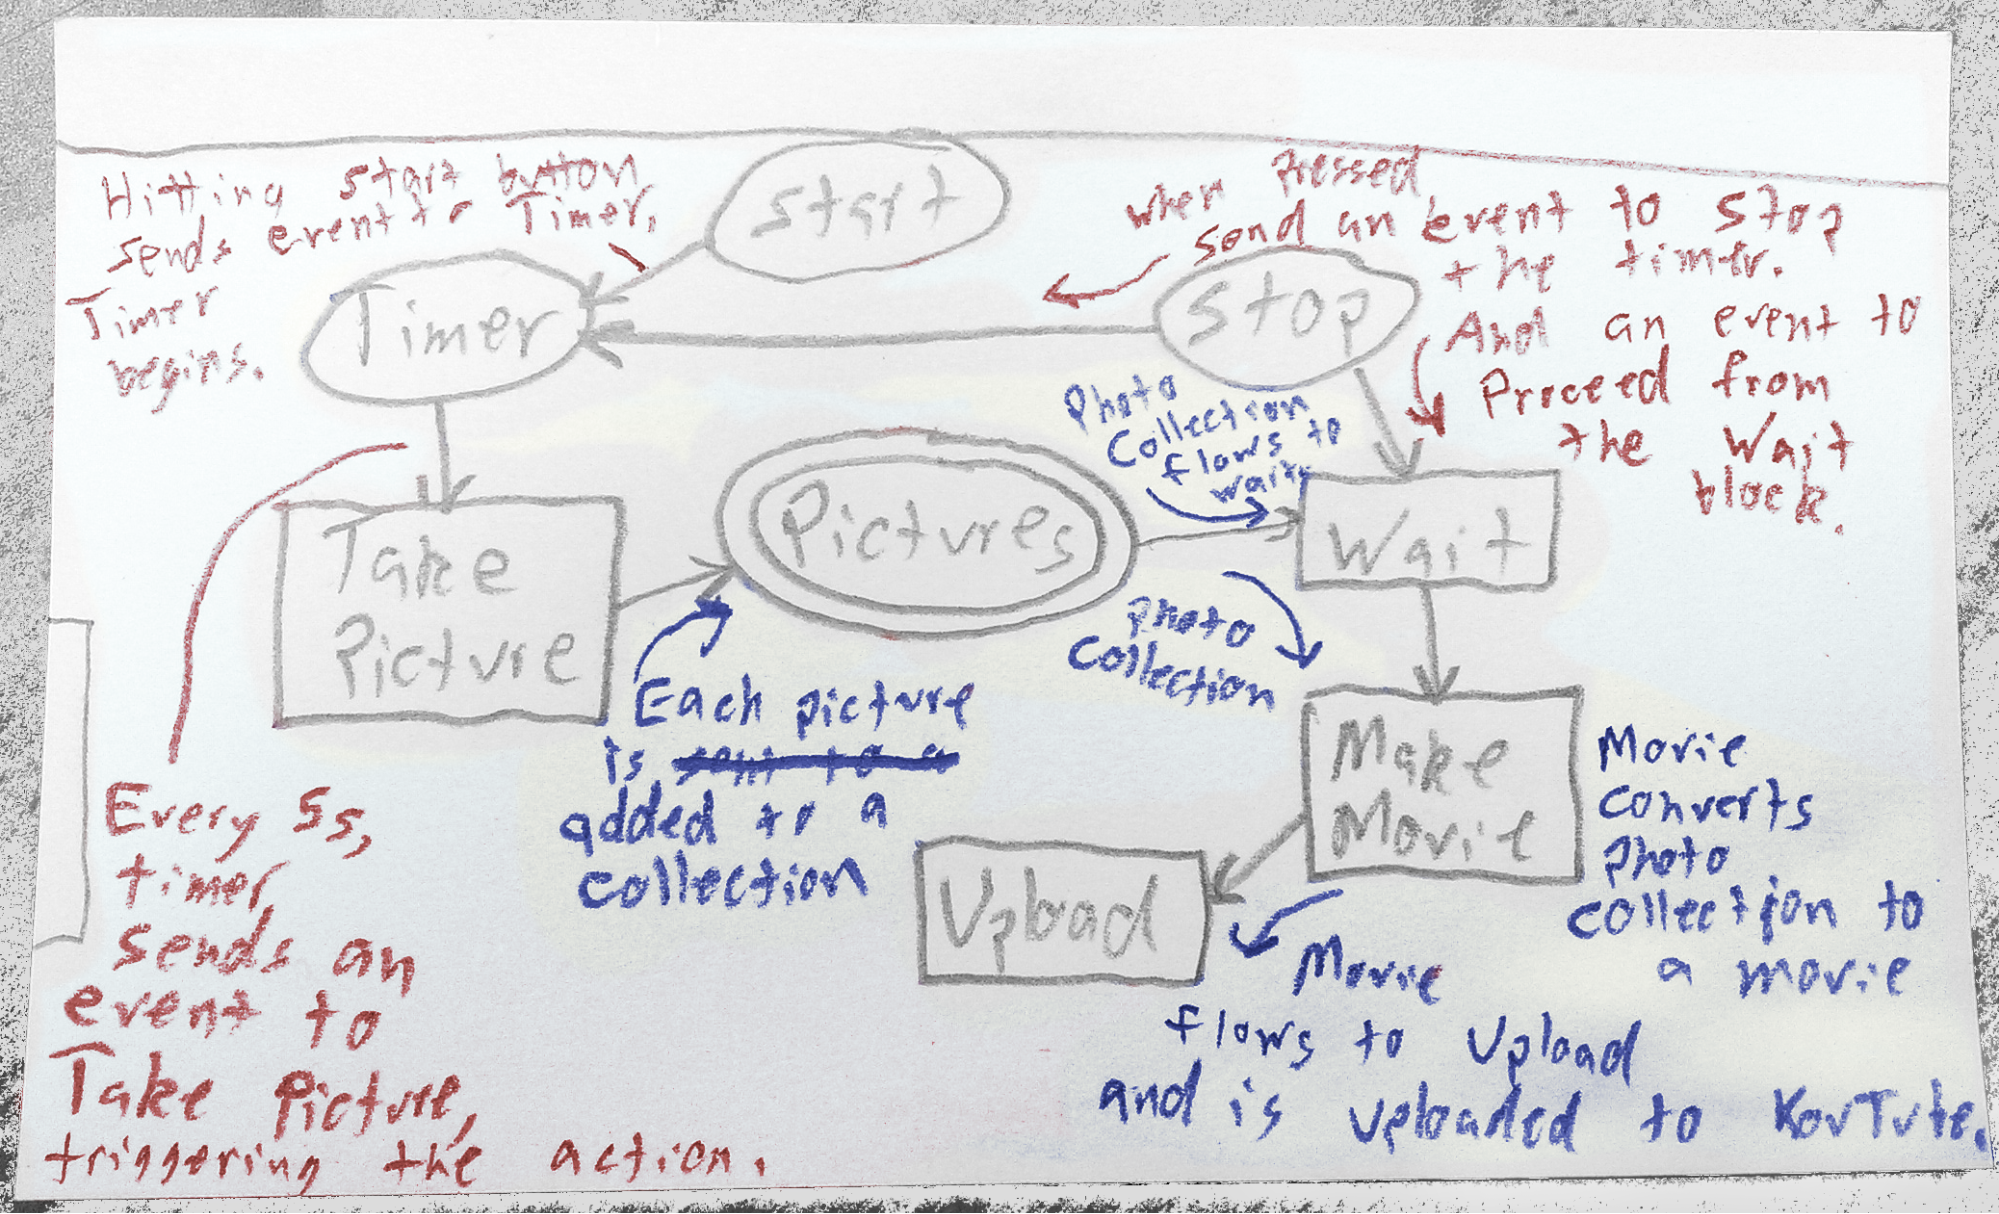
Figure 1 The dataflow in a completed program, details hidden
In this design, after starting a new project, you’ll see an empty workspace. Pressing a blank area of the screen brings up bubble menus. Each of those brings up a larger menu with more items. Selecting an item drops it onto the canvas where the original touch occurred.

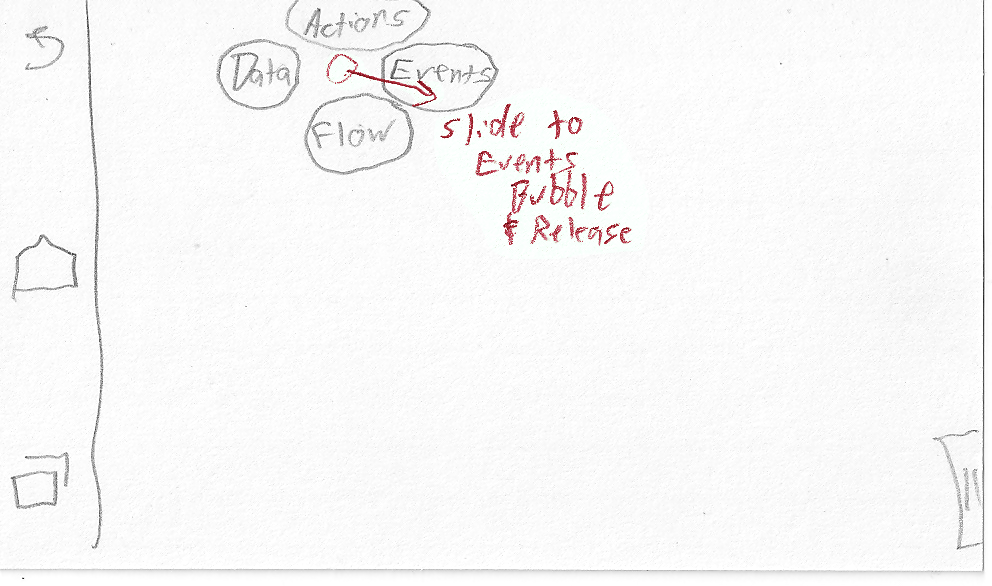
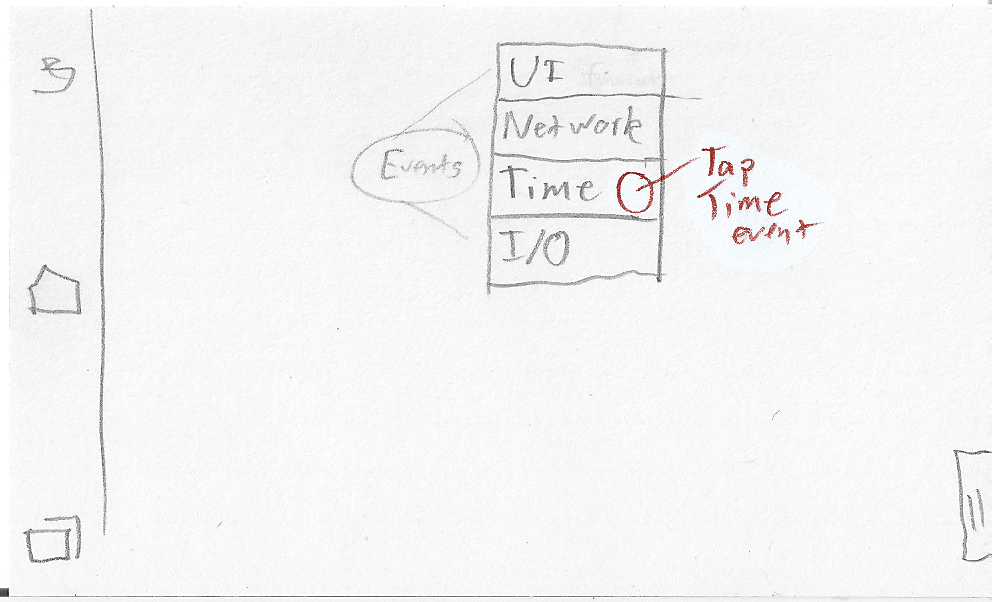

Figure 2 Adding a timer event
Dragging between items connects them with an arrow and brings up settings. The settings fade away once the user creates something else (but they could be brought back by tapping the arrow again):
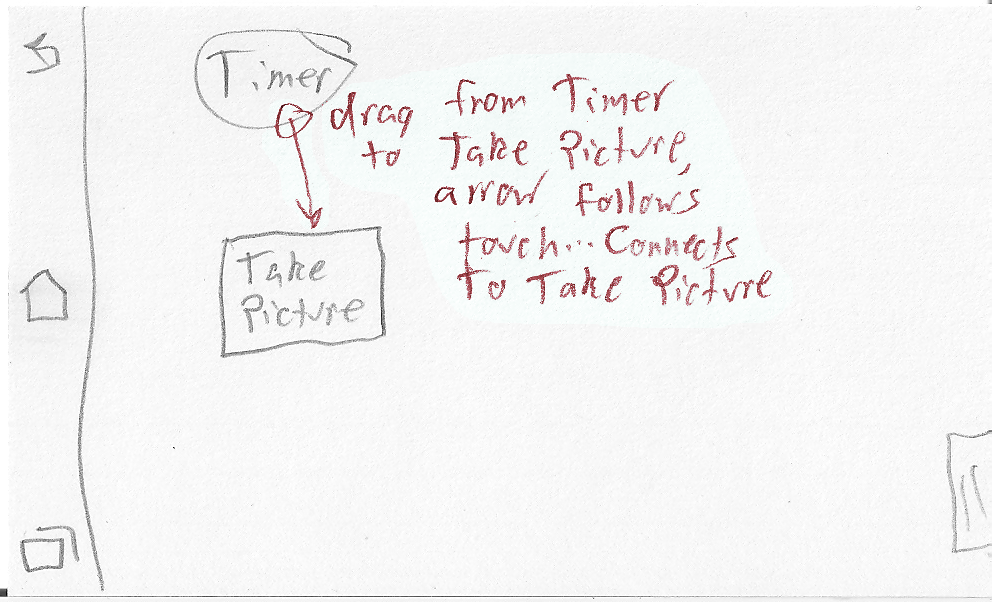

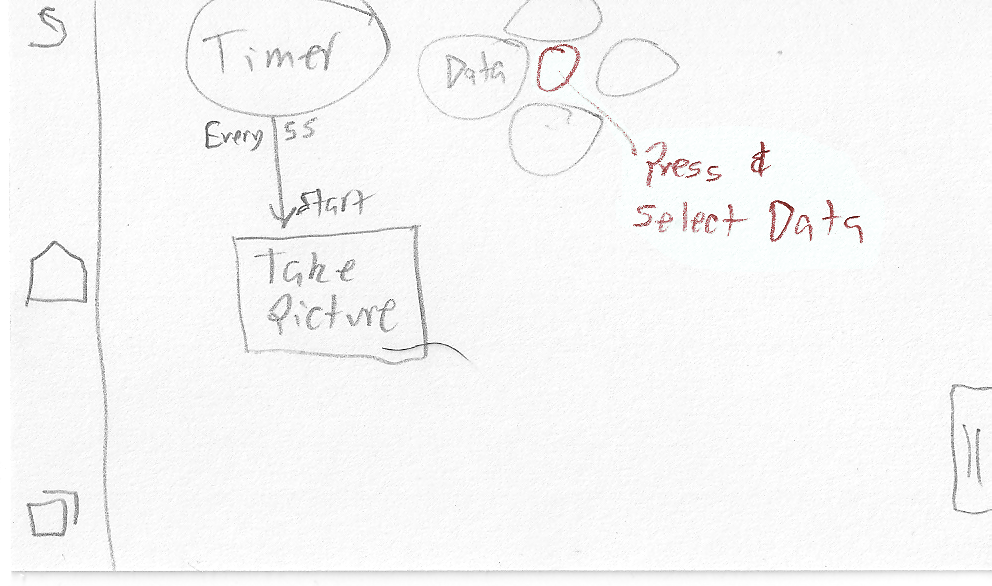

Figure 3 Connecting two components
When the program is complete, tap or drag the tab on the right to bring in a menu. One of the menu options runs the program. This brings up the application, with some UI buttons that were created in the UI editor (not covered):


Figure 4 Running the final program
Control flow programming is what most modern programming languages use. The program describes how the flow of action goes from one statement to the next, while data is stored in variables and referenced in various scopes. It’s easier to see the order of actions, but harder to follow what happens to each piece of data.
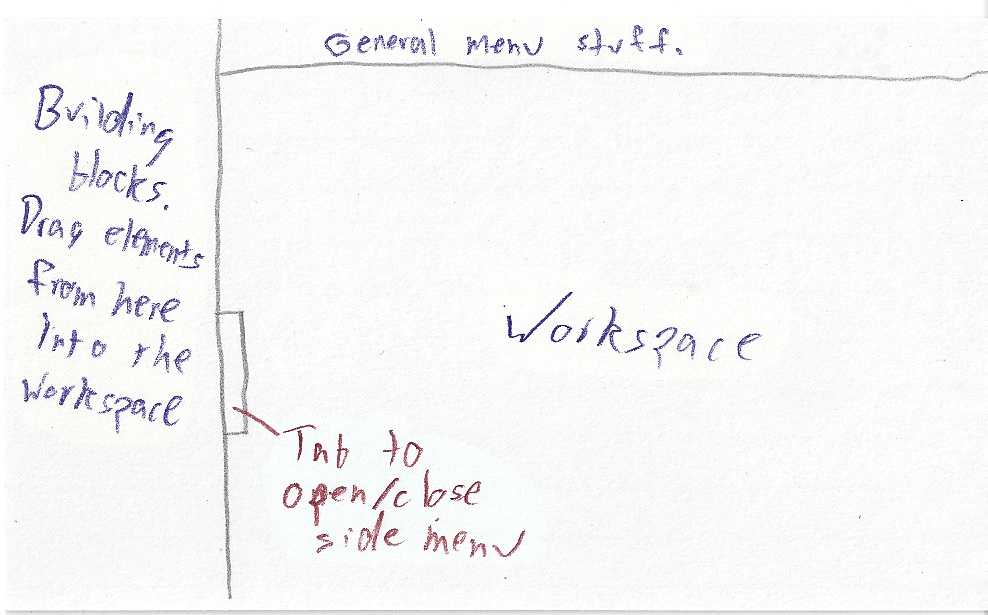
This is the basic screen layout. All following sketches take place within this screen. The menu on the left contains the components which can be dragged into the workspace. The top bar contains the name of the application, as well as buttons to access the menu, help, save, undo, redo, and play.

Figure 5 Basic layout
To build their program, the user finds elements in the left panel and drags them out to the workspace. The left panel has two modes; function and variable, depending on your context. When functions are added to the workspace, input and output slots allow variables to be dragged in from the left, or the user can type a constant in directly. The workspace also allows these interactions:

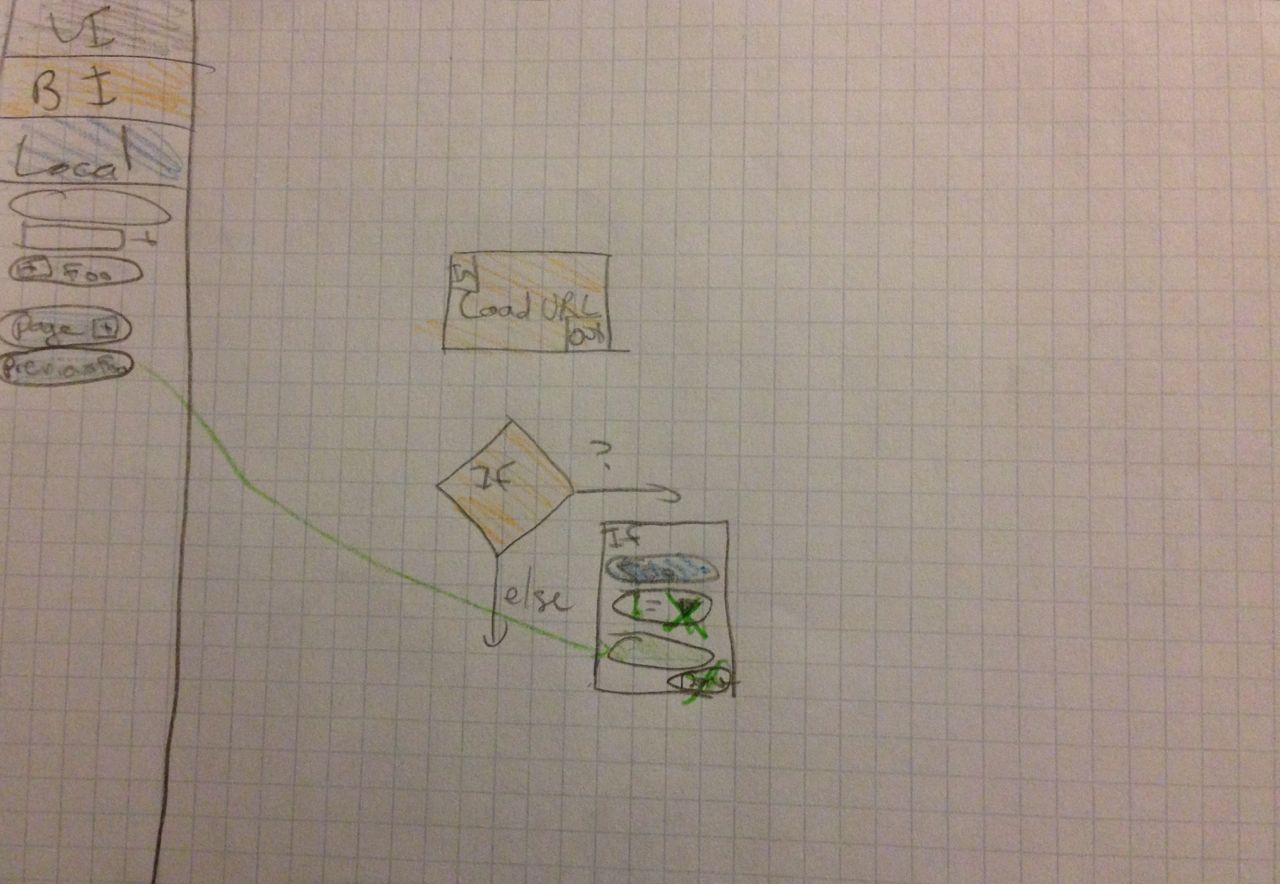
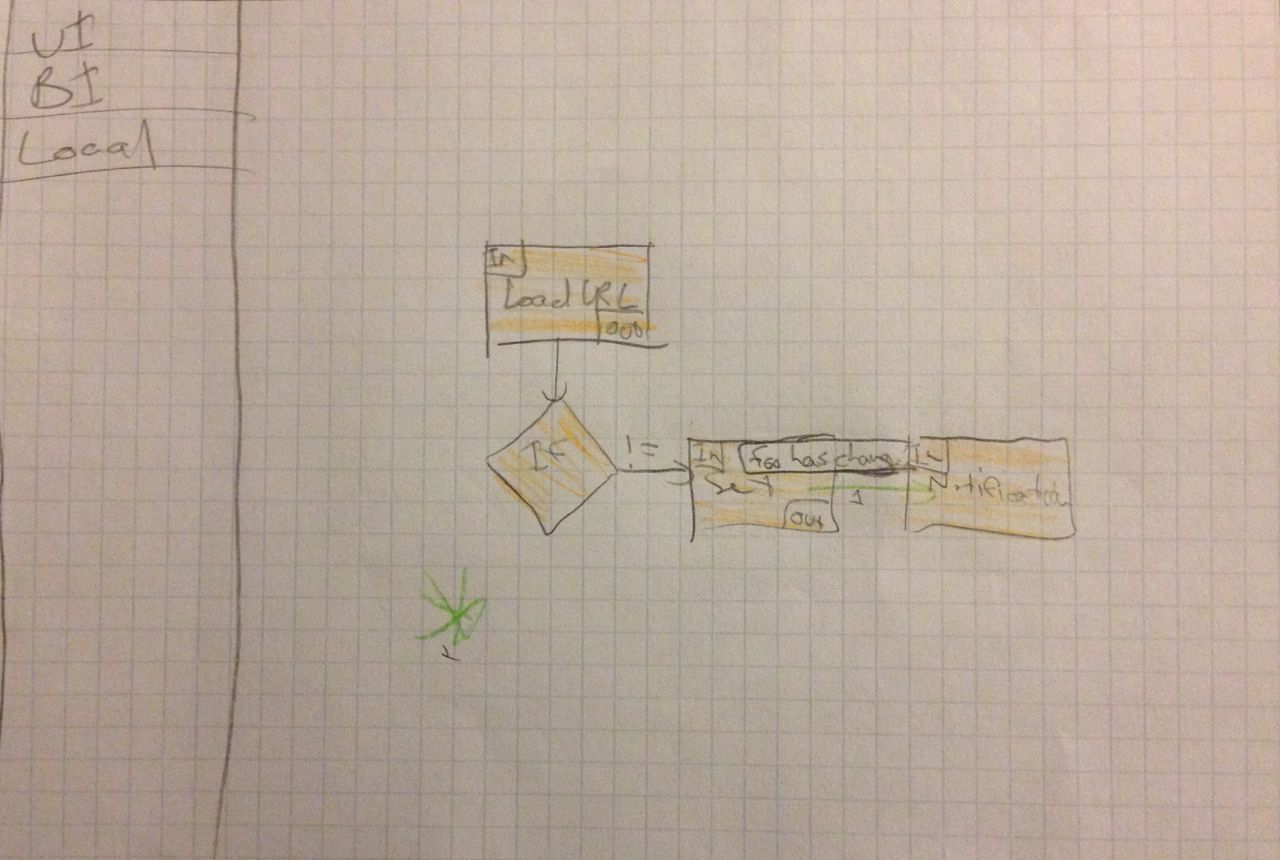
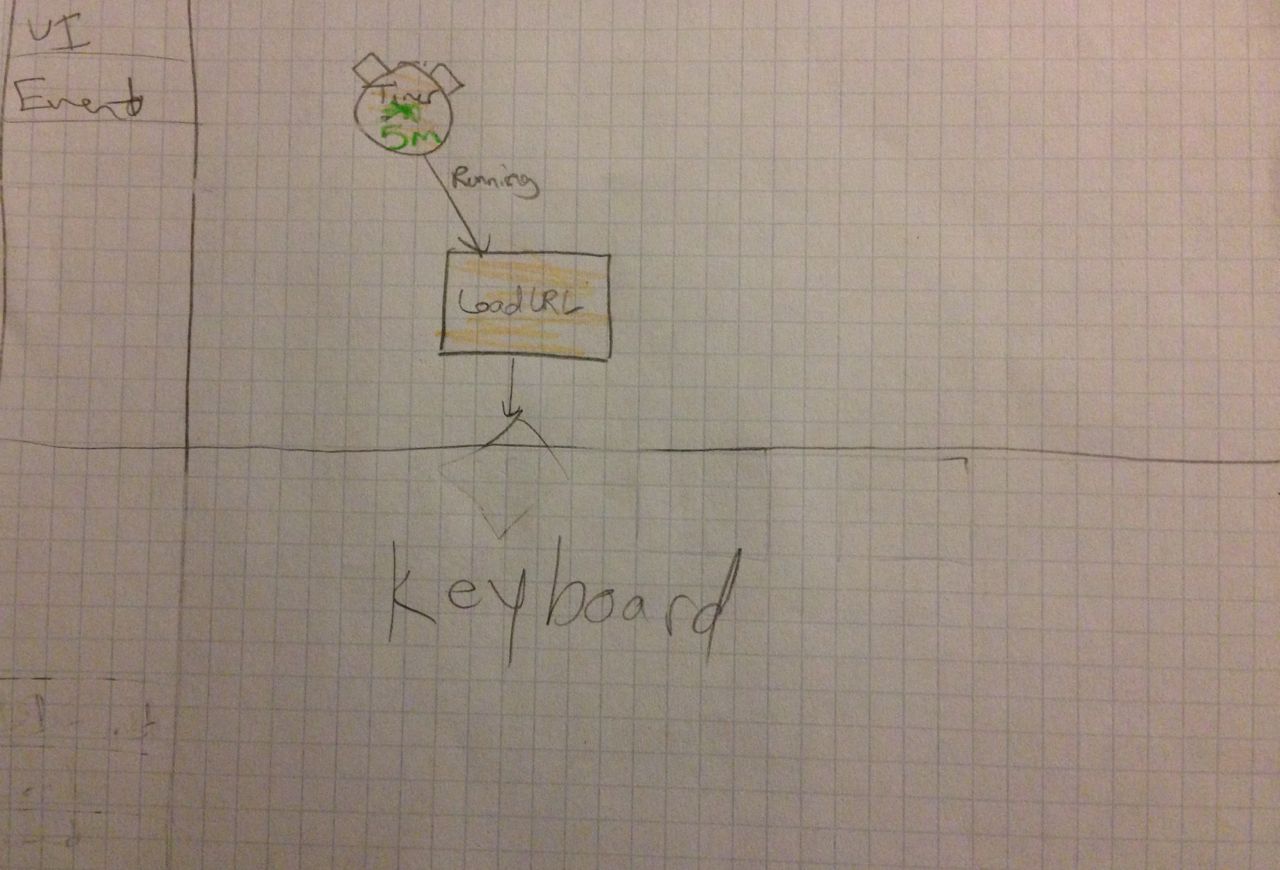
Figure 6 Setting variables in input or output parameters
This is an example of a completed program.

Figure 7 A completed program
The following images show how the interactions work for specific types of elements once they have been dragged into the workspace.
Functions have input an output fields that you can drag variables into to set the values. Tapping the function slides the fields into or out of view. 
Figure 8 Dragging variables into or out of input or output parameters
“If” blocks have a constraint path and an else path. The constraint can be created through a small context menu.
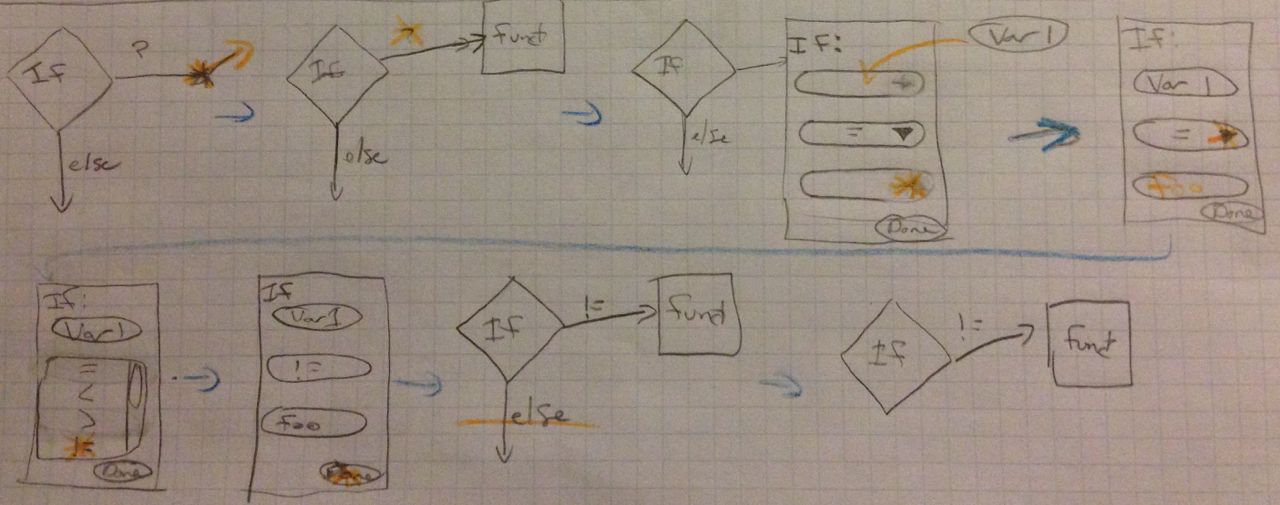
Figure 9 If statements
For loops can be treated as ForEach or as numeric incrementation. If a collection is placed in the input slot, a new variable pops up to the right of the for loop which can be used in the loop. Alternatively, if the user taps in the input field, they will get a small context menu to create a new variable to be incremented.
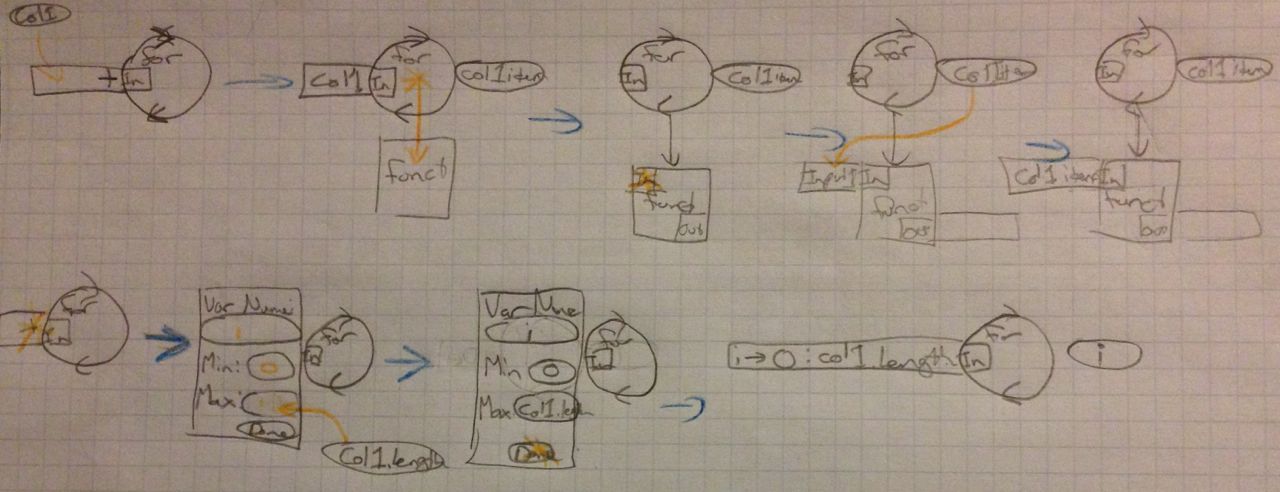
Figure 10 For loops, both with a collection and with an incremented variable
“Blockly” is an existing graphical programming language. In this design, we create a tablet-based interface for this language. Here is an example program showing how to accomplish Task 3 in this design:
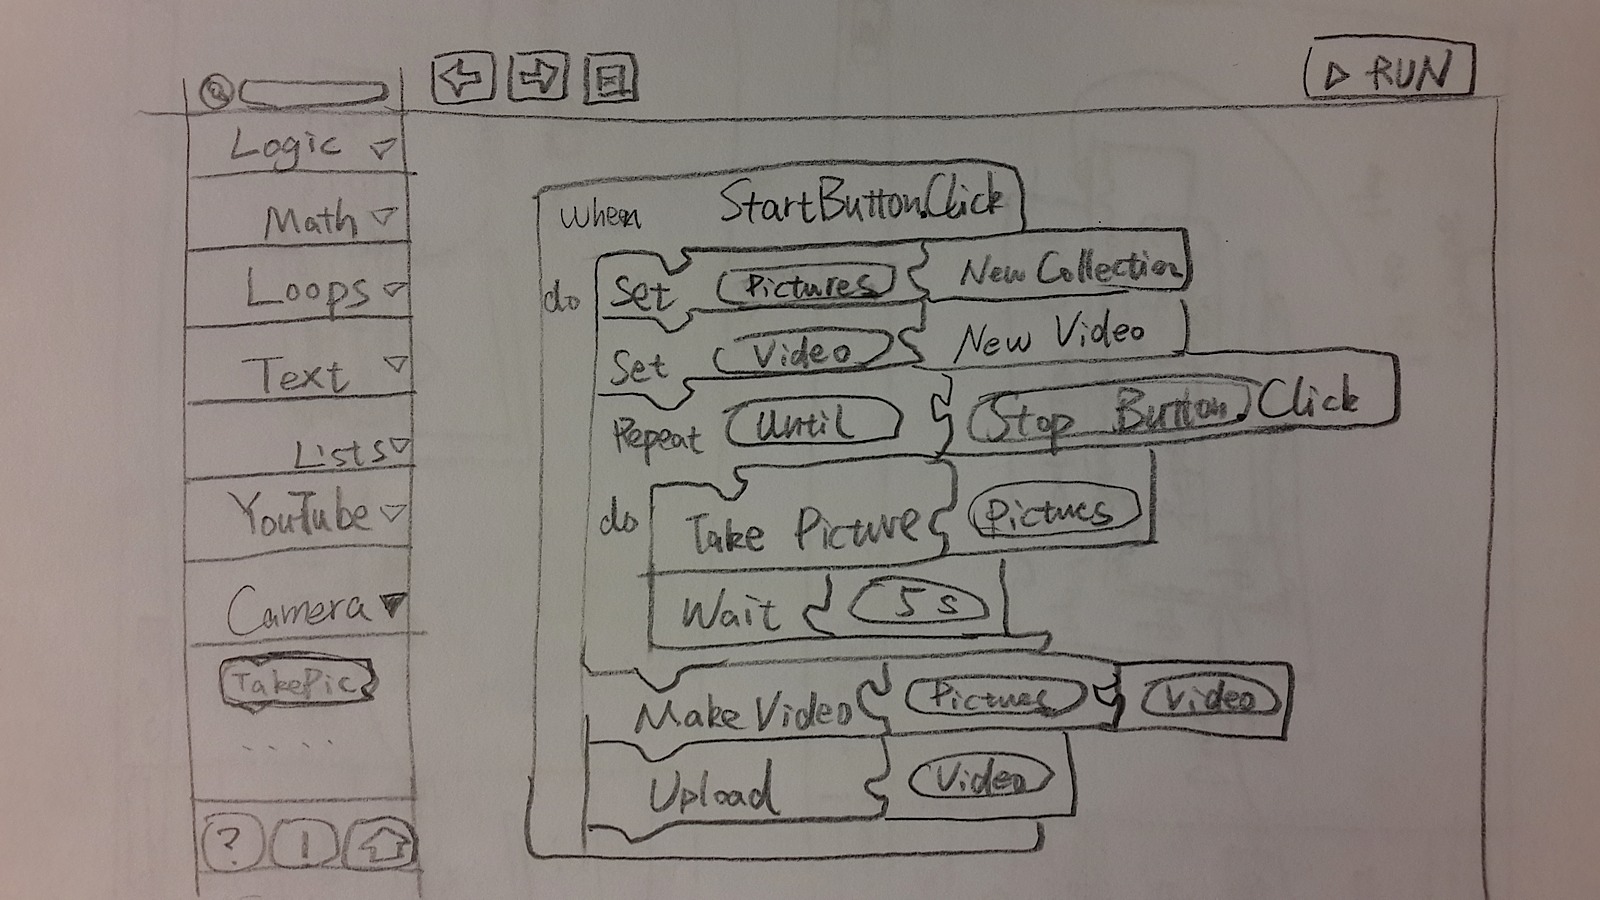
Figure 11 An implementation of Task 3
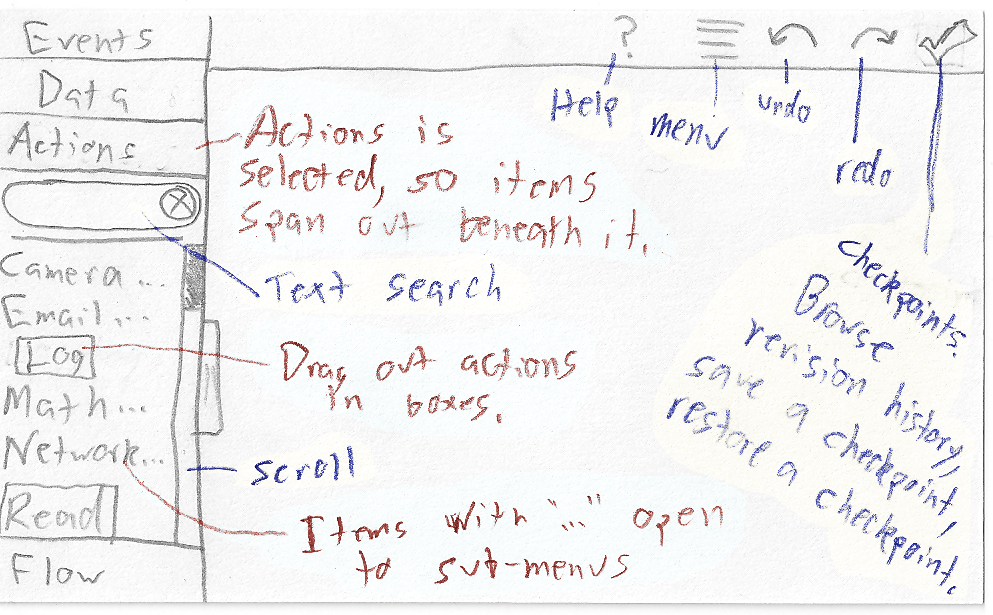
In the edit mode, there is a top bar containing buttons for undo, redo, and run. On the left sidebar, the user picks programming components from a vertical accordion menu. They can drag the component to the working space on the right side.
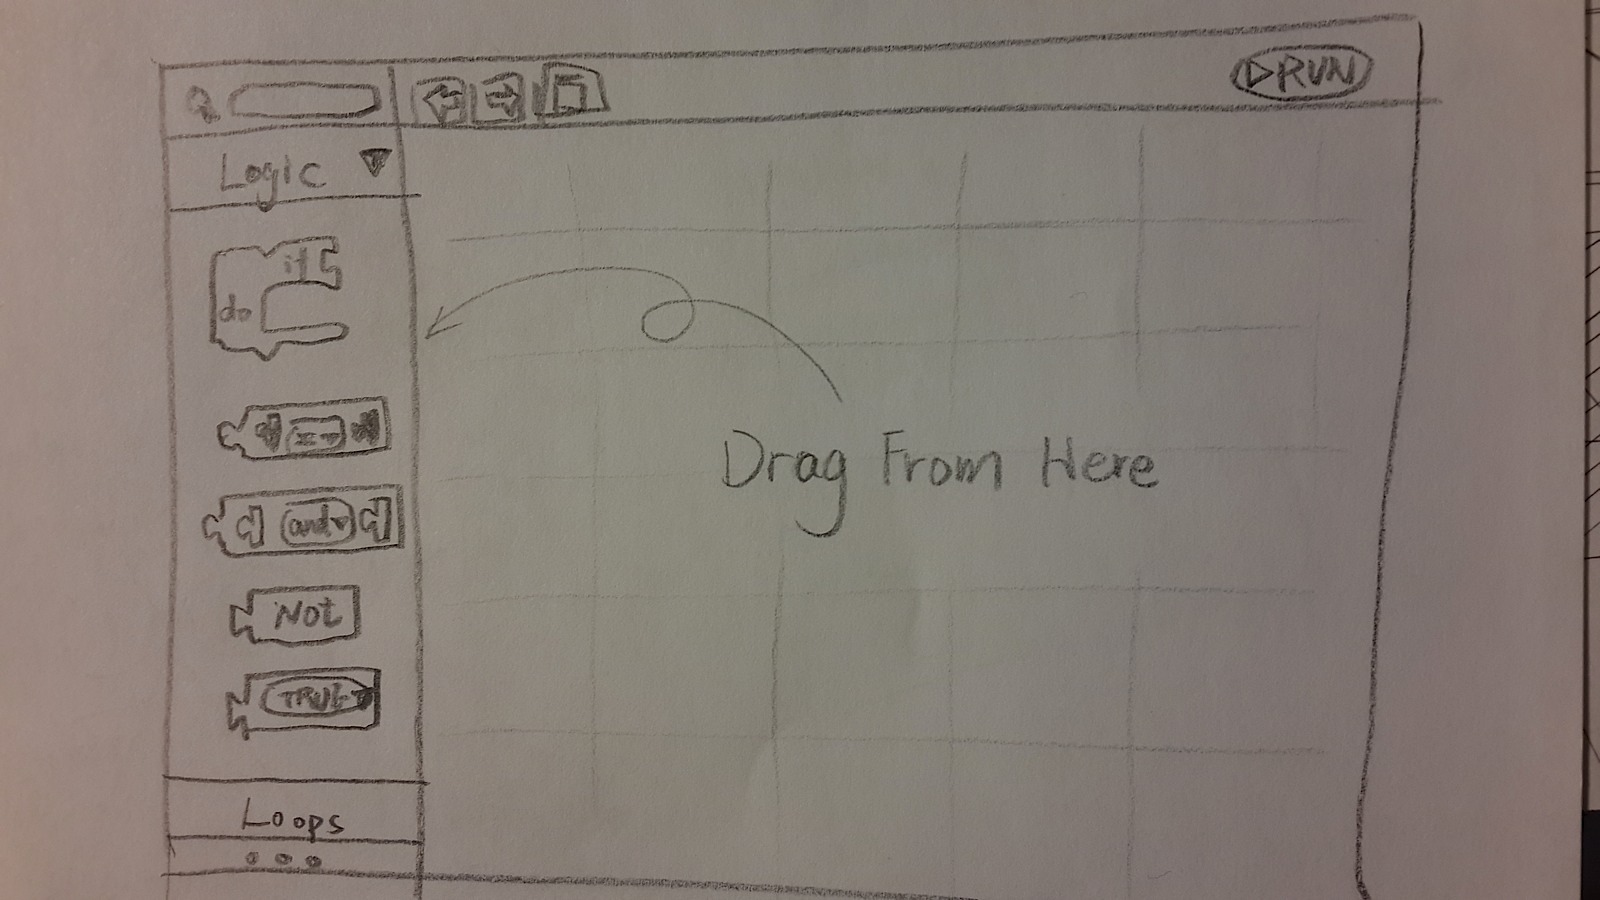
Figure 12 The main workspace
All the components in the left sidebar can be dragged and dropped to the workspace. Configure a component by clicking on the triangle on the right side of each parameter. A popup menu appears, and each parameter can either be typed in or chosen from a dropdown.

Figure 13 Adding and configuring a program component
When dragging different components together, the color of the component’s edge indicates whether that connection is usable or not: red for error, green if the connection is valid.
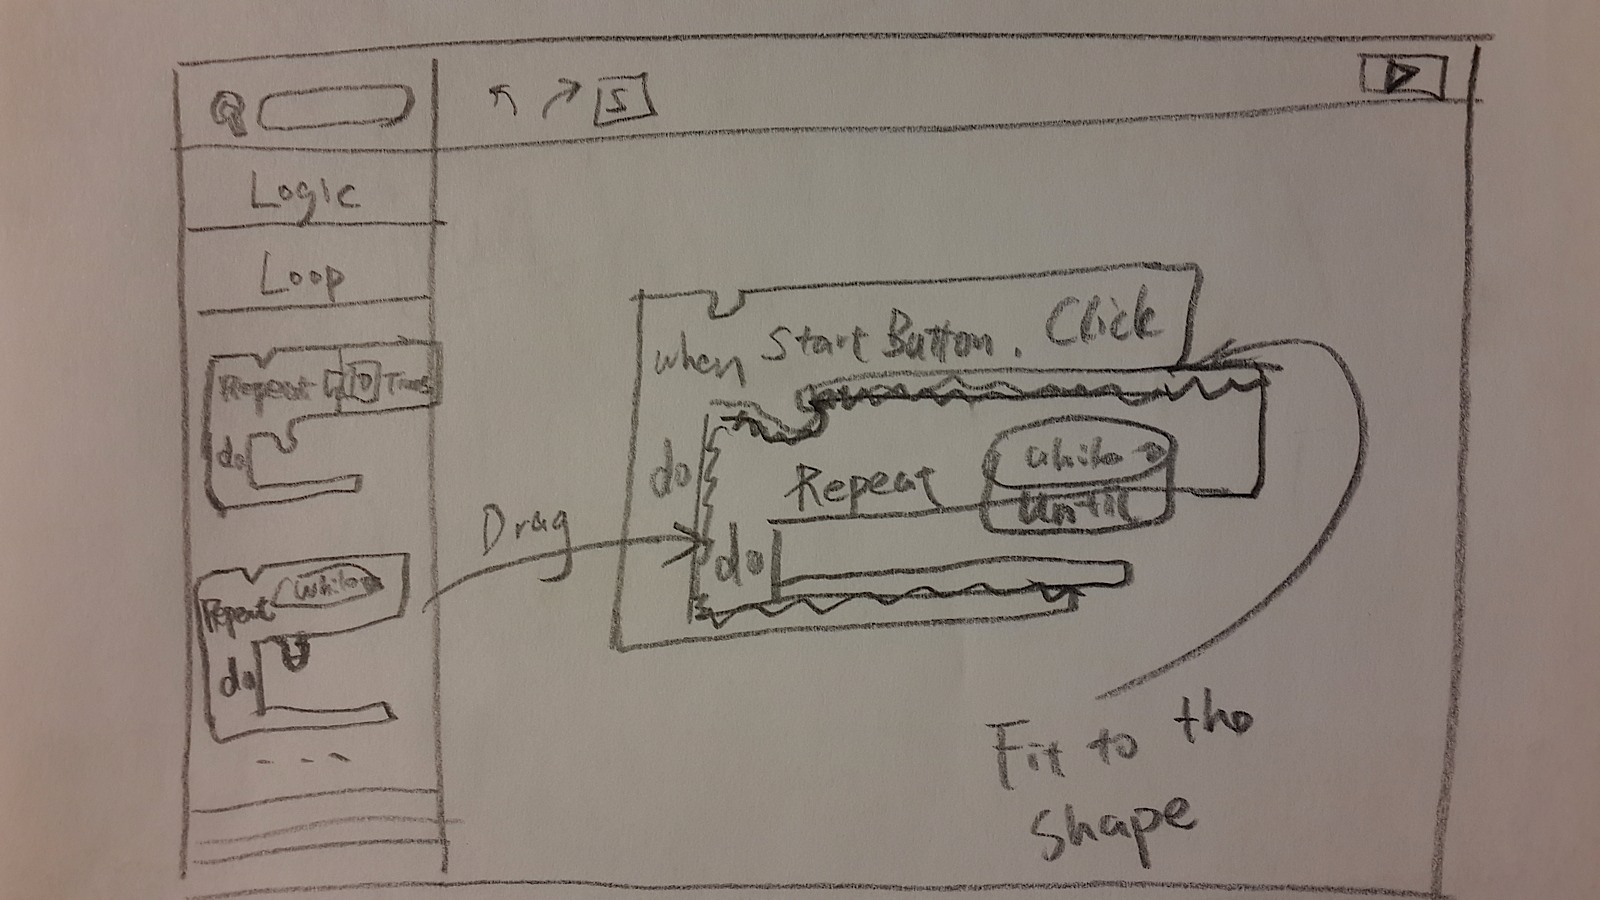
Figure 14 Inserting and connecting two components
Programmers are used to coding on a desktop. In this design, we attempt to leverage concepts that are common on desktops and investigate whether they would be applicable to our system. Hence, this design uses a ribbon on the top of the screen as the main menu. Figure 15 shows an example of this interface. The menu is always visible and is organized into tabs.
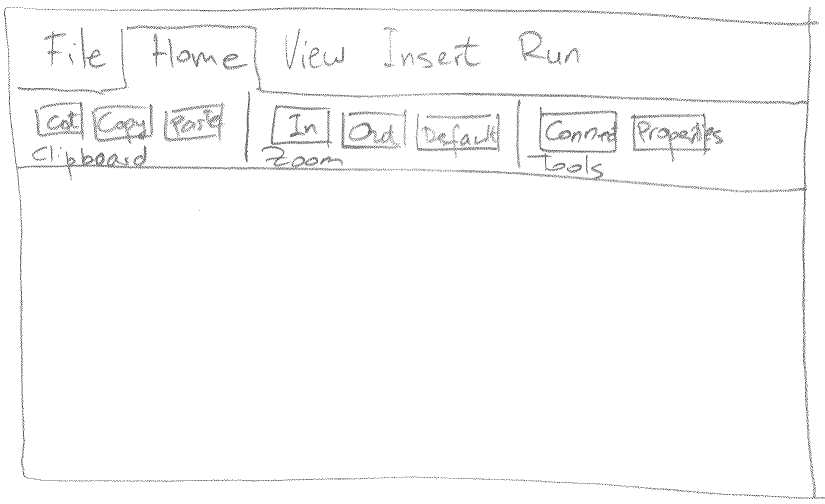
Figure 15 Start screen showing a ribbon menu
This design uses the dataflow programming model, similar to design 1. You create programs by dragging components from the Insert menu, such as variables, timers, and loops.
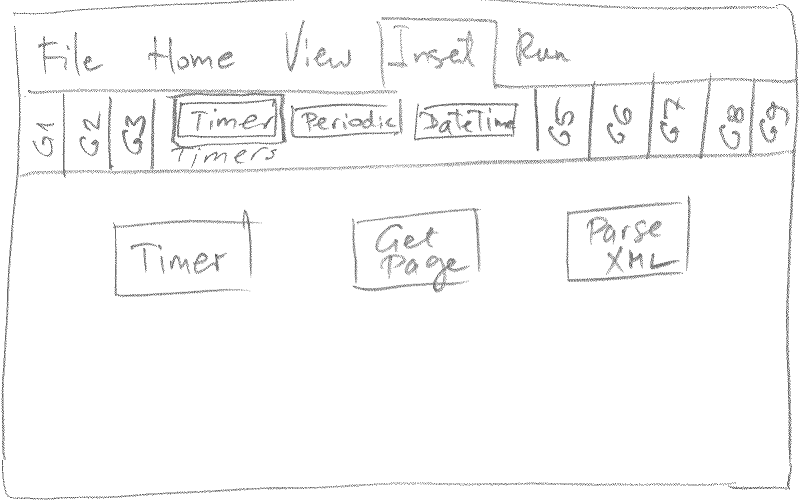
Figure 16 Insert menu with a few instantiated components
To connect components, either use the connectivity tool available under “Home” tab, or simply drag a line between components. Specifically marked terminals on each component show inputs and outputs.

Figure 17 Connecting components
A long press on a component brings up a property page, where you can configure the component.
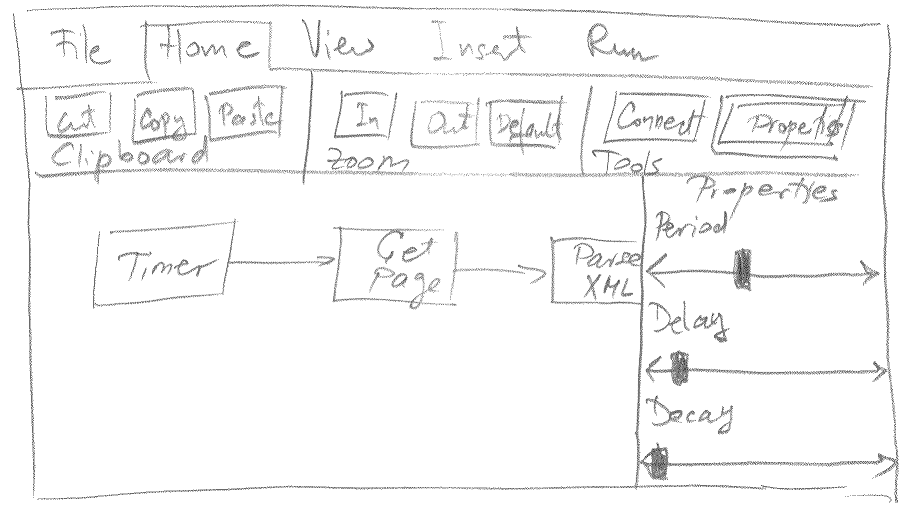
Figure 18 Timer property page
Finally, the Run tab allows starting, pausing, and stopping the application. By default, an application will have a log window which can spew debugging information during simulation of the program.
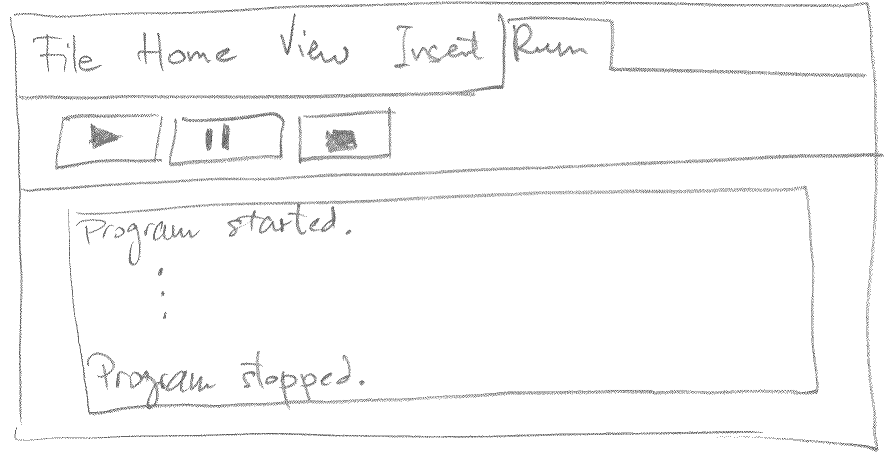
Figure 19 Run window
Rather than choosing one of the interfaces we created, we picked the best pieces of each design and combined them.
Since the main goal of the application is to streamline tablet development, we decided to stick with simple menus and controls as shown in Figure 20. Many of these were taken from Storyboard 2 with minor modifications.
|
Figure 20 Menus and Controls |
The top bar displays the name of the application the user is currently viewing. It also contains the icons for the following actions:
The Components menu is on the left side of the screen. This is a hideable accordion menu containing all of the components that can be added to the program. To add a component to the program, drag it from the menu bar into the workspace. The menu is organized into sections, which are further divided into groups. Each section contains a search bar to assist in finding the desired component. The most commonly used components are located at the top of the list, followed by the remaining ones in the alphabetical order.
The top-level sections are:
The remaining aspects of application design follow Storyboard 2. Connections between components are created using the drag gesture from one component to the other. Hold+drag would move components around the programming surface.
Finally, the application can be started using the Play button on the top bar. The application automatically switches to the view of the UI. If a particular application doesn’t have a UI defined, the app falls back to the ‘default’ UI which displays a program’s log. The log, first described in Storyboard 4, traces a list of events as data travels through the flow.
We decided to use the dataflow paradigm, rather than the control flow one. Traditional control flow systems are very expressive, but they can also be very verbose. Since our focus was on automation of the short tasks, we felt that focusing on dataflow could be a more powerful way to get things done quickly. We also decided to use a simple flowchart interface to represent the dataflow program.
We chose not to use an existing language because none of the existing languages that we looked at lend themselves well to tablet development. Text based systems rely too much on typing. Many visual systems rely on too fine-grained placement control (Blockly, Quartz Composer). Many existing dataflow systems were too specialized, such as systems for creating shaders (Cinema Graphics ShadeTree, Blender’s node editor, SoftImage ICE), modifying sound or music (AudioMulch, OpenMusic), or creating visual effects (The Foundry’s Nuke, VSXU, VVVV). And several systems seemed close, but they were too reliant on a mouse/keyboard interface (Morphic, App Inventor for Android, FlowCode).
Once we decided on the programming model, we began looking at the program elements themselves. Both dataflow examples use double circles to indicate data sources. Most of the designs use boxes to indicate functions. For dataflow, we determined that “If” statements are not necessary, since a Filter function will provide similar functionality in a dataflow program. The constraint builder was taken from Design 2.
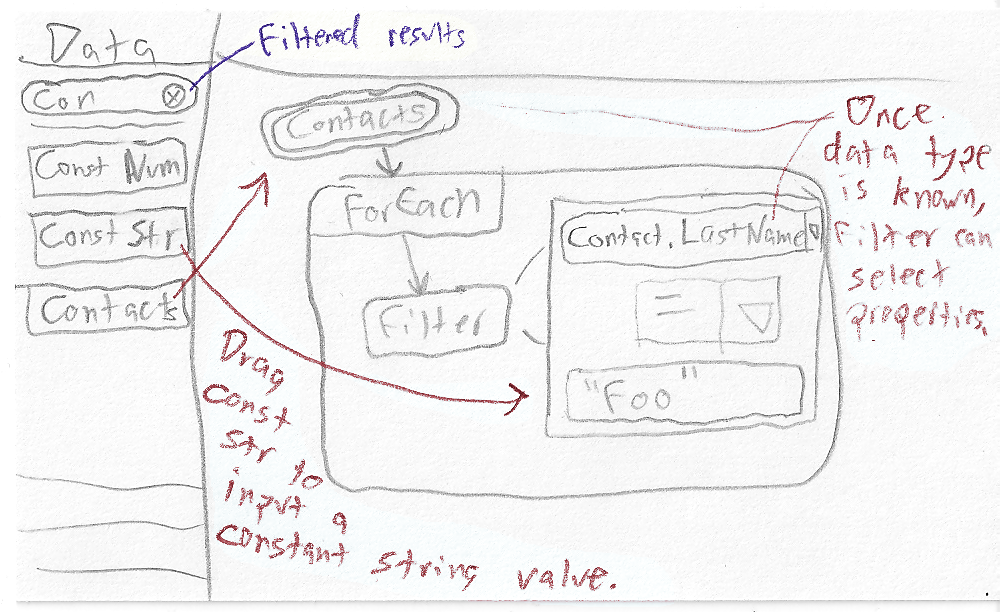
Figure 21 Configuring a Filter using the constraint builder
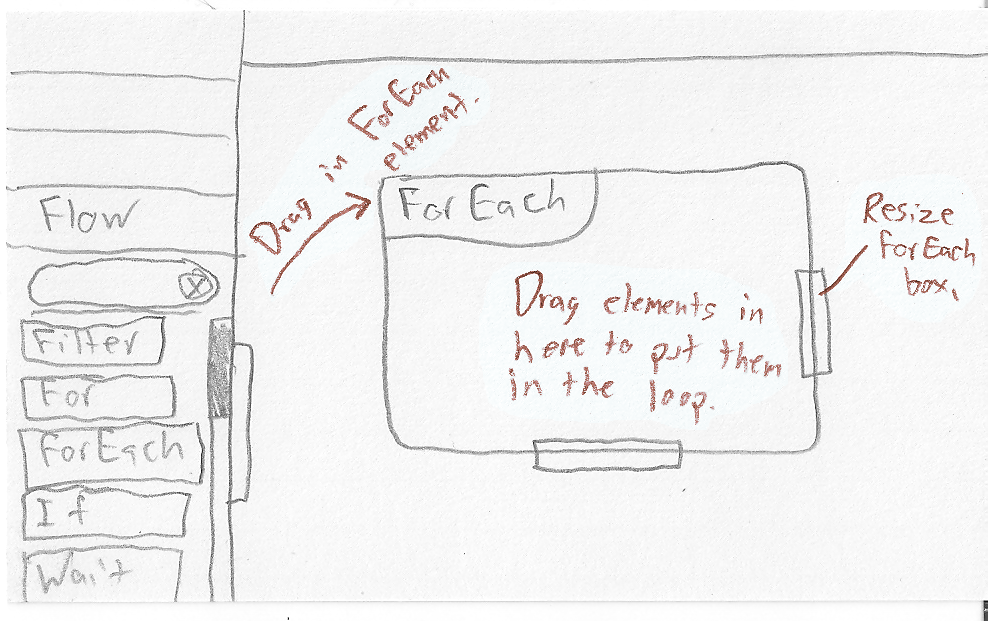
A ForEach block sends each individual element of a collection to a component. The design for a large ForEach box that contains sub-elements was inspired by the Blockly language, used in Design 3. Blockly gives a visual representation of scope by containing all of its sub-parts. We extend this concept to two dimensions: actions inside the box happen for each element in the collection, starting with an arrow from the ForEach label.
|
Figure 22 Working with the ForEach loop |
Many functions have multiple inputs, and identifying which flow matches which input is also important. For this we chose a method similar to the functions in Design 2. As the user drags the arrow to connect one piece to another, a list of inputs slides out of the target component. The user drops the arrow into the region corresponding to the correct input.
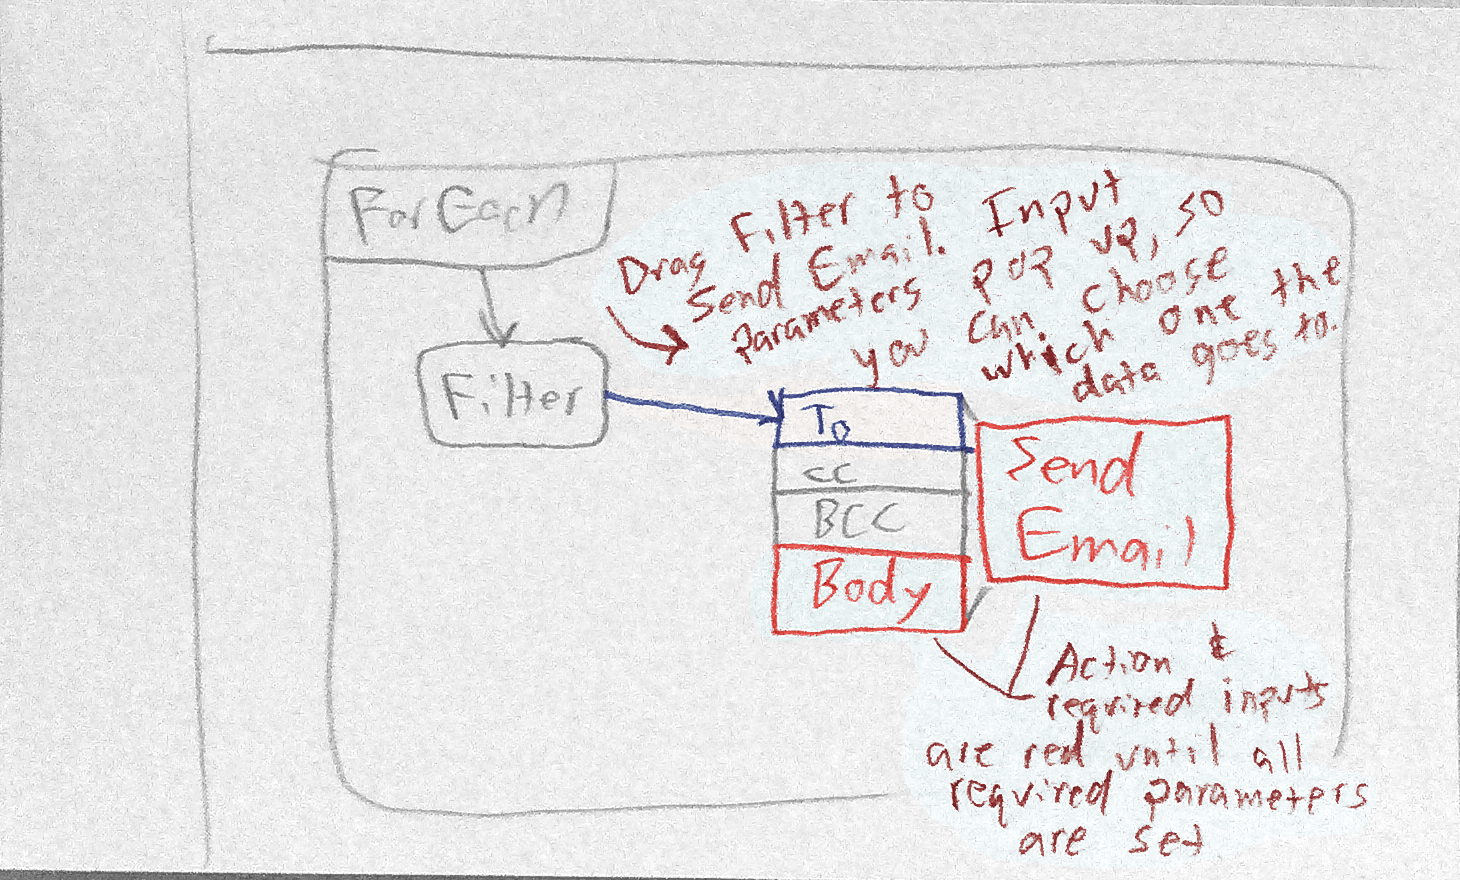
Figure 23 Setting input parameters
When an element is missing required inputs or has mismatched input types, it will turn red. If the user taps the element, the inputs will slide out, and the inputs causing the issue will also be highlighted in red.
Figure 24 shows a full program using this design.

Figure 24 A completed program to send an email to select people in the user’s contact list
In the Contextual Inquiry section, we listed the key features required by the developers we interviewed. Here is the list again, paired with the elements in our UI that satisfy these needs:
A high school student always sends email to a group of people with the same last name from his tablet. So he decides to make a tablet app to make sending such emails easier. He launches the Pannda app and creates a new project.
For this project, he’ll need to cycle through his contacts, filter for the ones he’s interested in, and then send an email to each of them. To keep things simple, he’ll create the body of the email as a constant in the program; if it ever changes, it’ll be easy to modify the program.
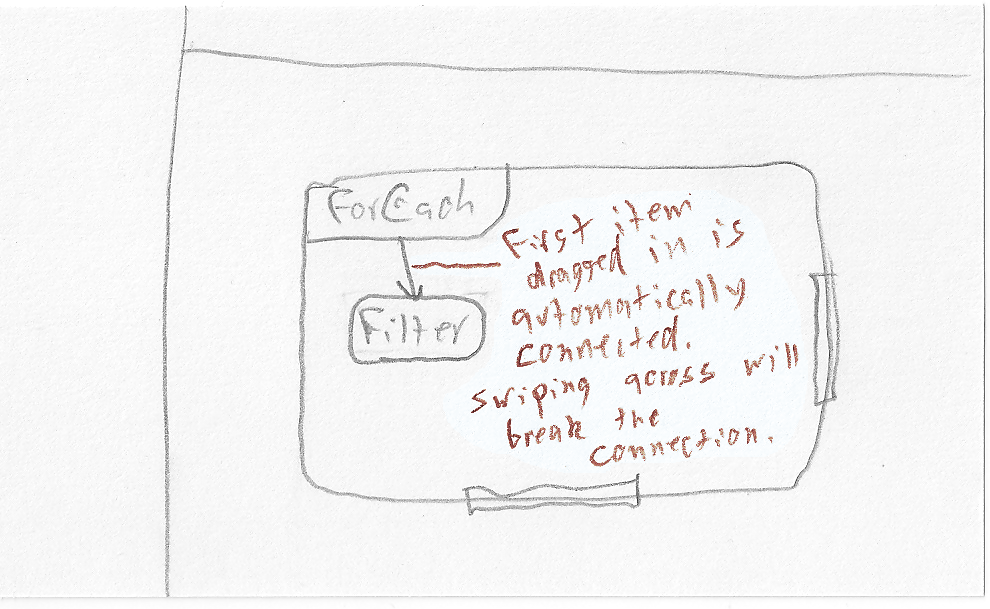
To build this, he drags the Contacts collection from the Components menu on the left sidebar to the workspace. Similarly, the user drags the ForEach function from the Flow section of the Components menu, then connects Contacts to ForEach. The he drags a Filter into the ForEach box, where it is automatically hooked up as the first action in the loop. He configures the Filter to compare the incoming contact’s family name to a constant. Next he adds an Email action, hooks up the results of the Filter to the To parameter, and adds a String data element to hold the email body. After editing the string, he hooks it up to the Email action’s Body parameter, and the program is finished. See figure 24 above for the final layout.
Ginny plans to buy a new iPhone 5S in the retail store near her home. She’s been checking whether the phone is in stock through the store’s webpage, but she’s tired of doing this manually, so she decides to create an app to do this. She opens up Pannda and creates a new project.
She drags the Load Webpage component to the workspace, taps on it to bring up the list of parameters, then enters the URL of the data provider. Then she drags the XML Parser from the Components menu and sets the Field parameter to “stores.iPhone5s.isAvailable,” which matches the field she cares about in the XML. She connects the Load Webpage component to the XML Parser, then adds a Filter component after the parser. This needs to trigger a notification when something makes it through the filter, so she adds a Notification action and connects the Filter to it. Finally, all of this needs to be triggered by a recurring 10 minute timer, so she drags in a Timer element, sets it to trigger every 10 minutes, then connects it to the Load Webpage component.

Figure 25 Completed program for Scenario 2
Devin wants his tablet to take a photo every 5 seconds, create a video from those photos, and upload the video to YouTube when he decides it’s recorded long enough. He decides to use Pannda to write the program, and he starts piecing it together.
He wants the UI to contain two buttons: start and stop. Start will kick off a timer, and stop will stop the timer and process the video. The timer will trigger the camera to take a picture every 5 seconds, and the pictures will be stored in a temporary collection. Once he hits the stop button, all the pictures in the collection will be forwarded to a Make Movie action, which will then send it to the YouTube API to upload.

Figure 26 The completed program for Scenario 3
Devin knows these components are readily available in Pannda, so he drags them into place as shown in figure 26 above. Once this is finished, he runs the program, hits the start button, and sets his tablet in a good place to take pictures. Several hours later, he hits the stop button and watches the video on YouTube. Off in the background, he’s recorded Elvis landing in a UFO and digging up the body of Jimmy Hoffa. He’ll be rich!

Figure 27 Sample photo taken from Scenario 3
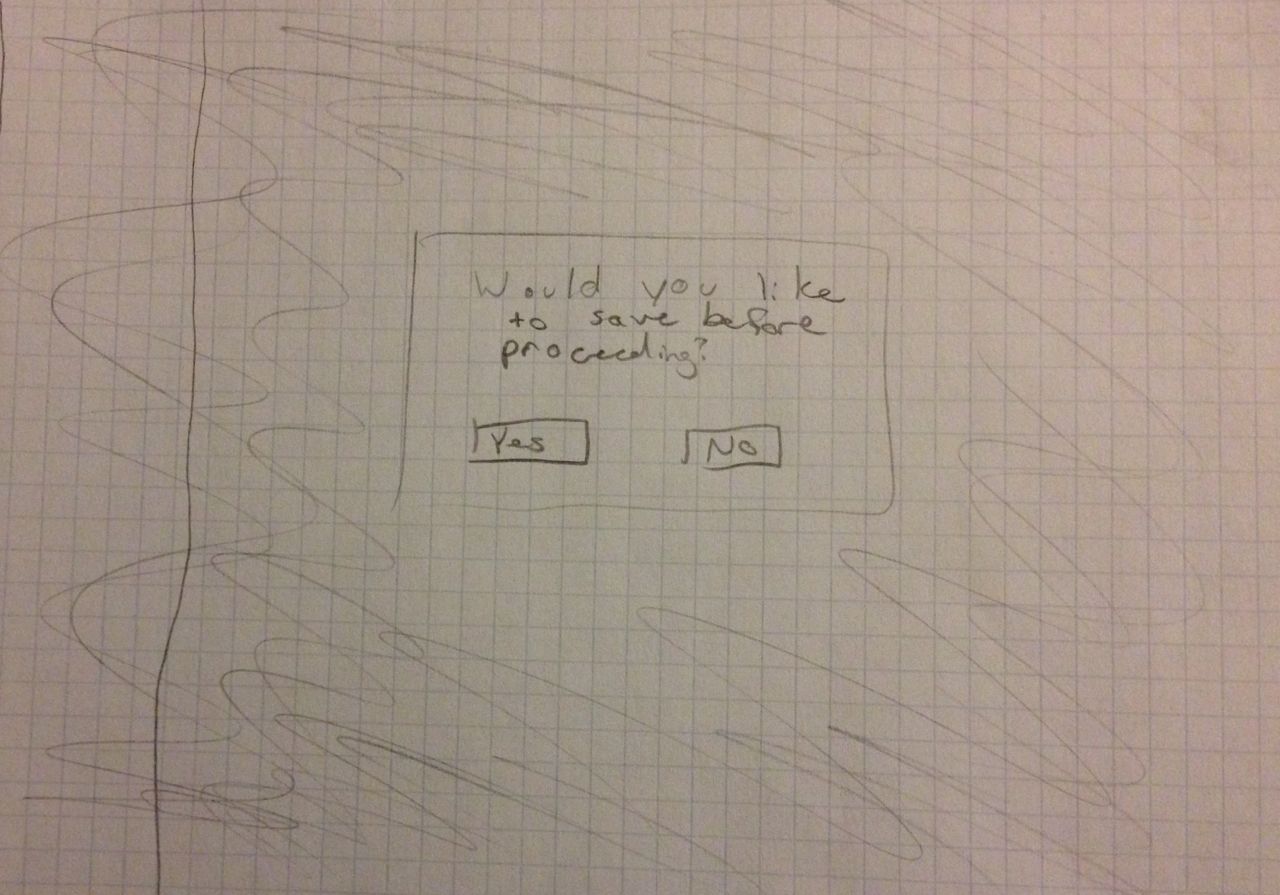
Upon tapping the ≡ icon, the user can create a new project or load an existing one. Either option prompts the user to save if they have unsaved changes. New simply asks for a name before taking you to the above screen.

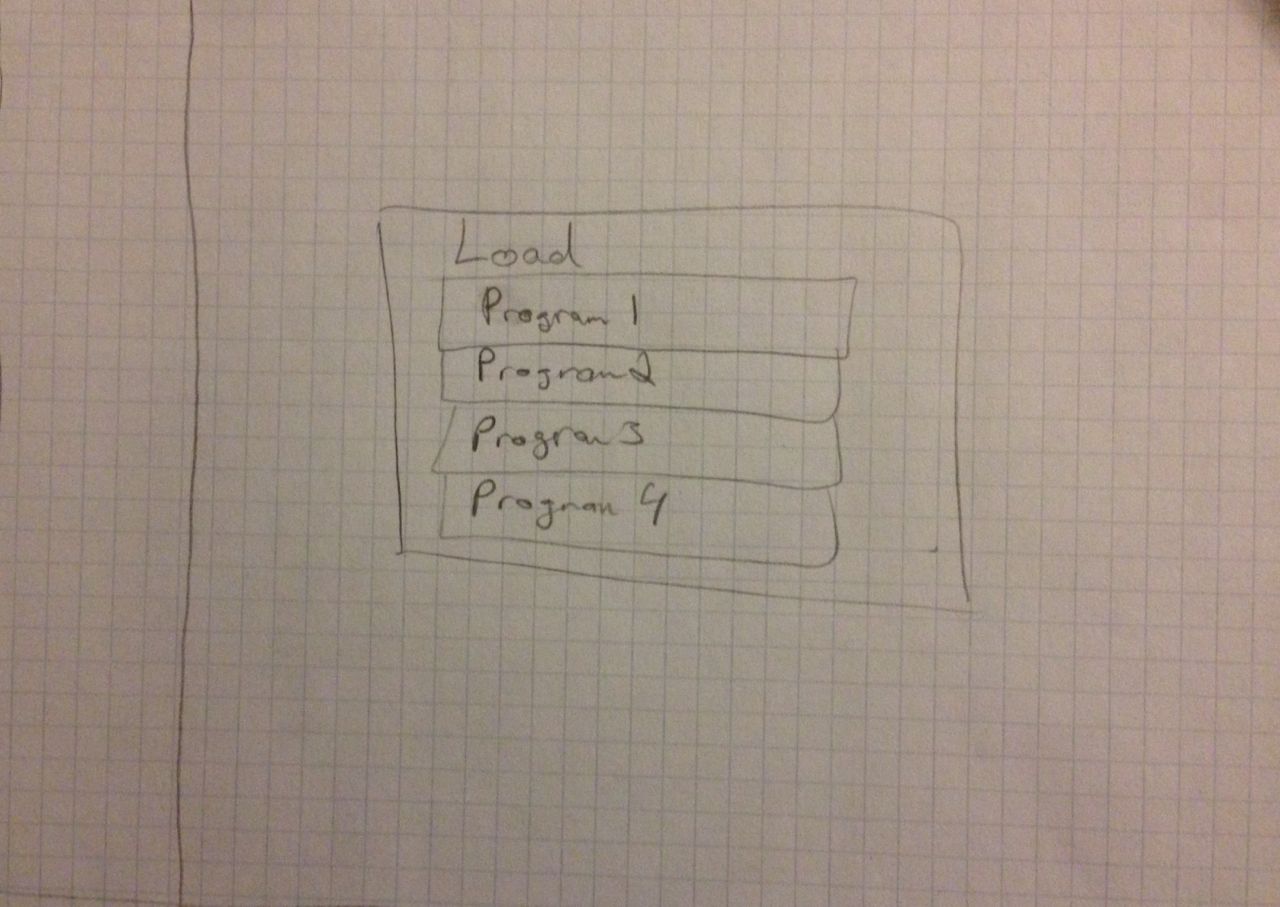

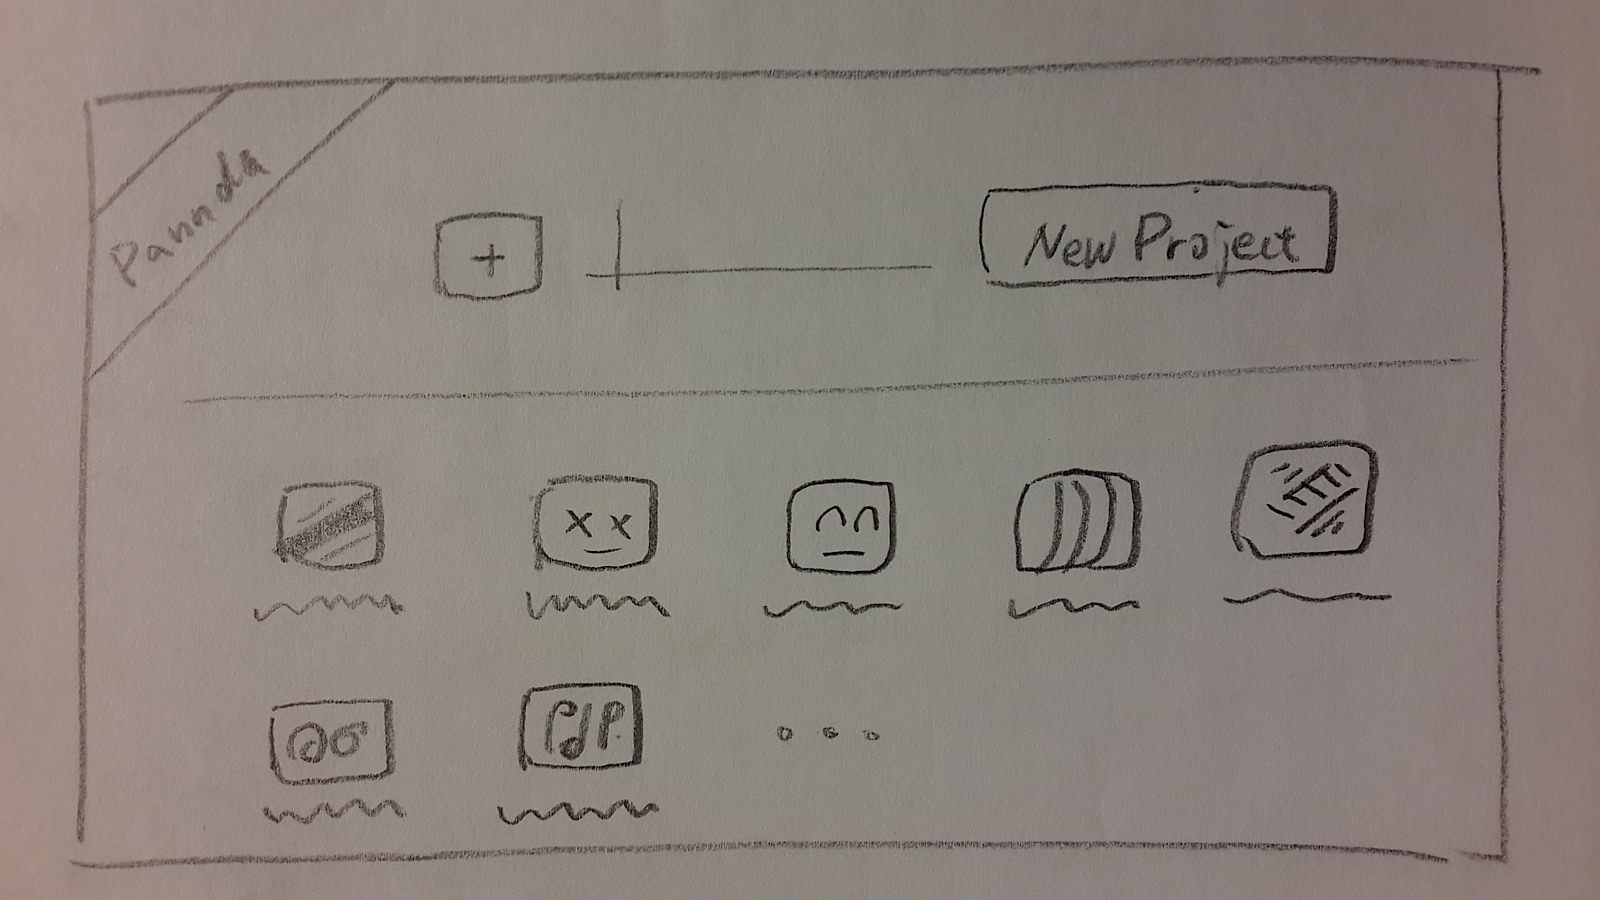
In the welcome page, the users can choose an icon and enter a name for creating a new project. Or they can load existing projects by clicking on the corresponding icon that is listed below.
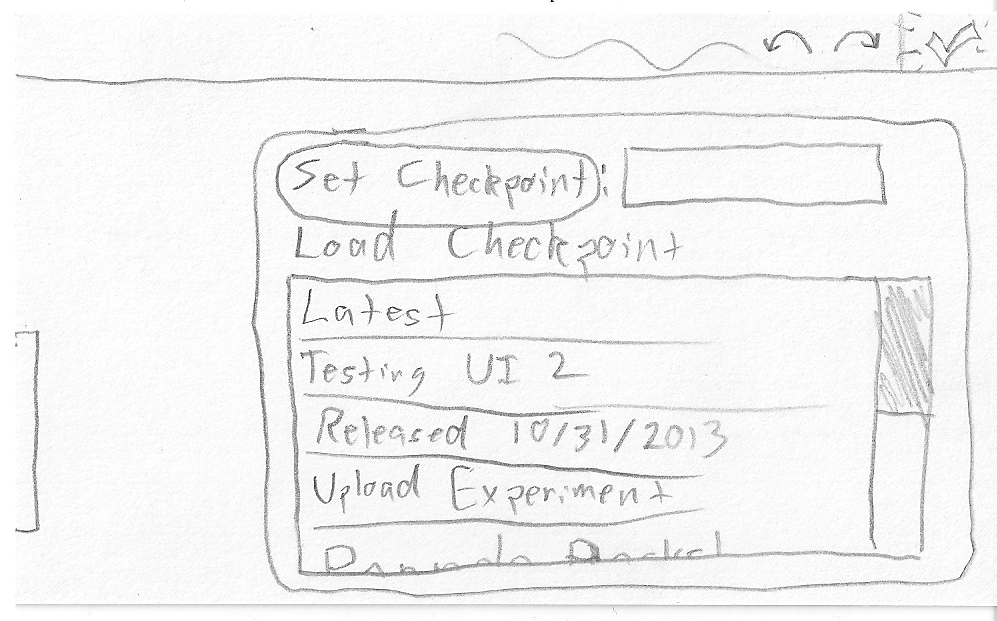
This shows the checkpoint system for the final design. Developers can easily set new checkpoints and restore old ones. This is in addition to Undo/Redo functionality, and it provides a very simple form of source control.
[2] While this may not be a realistic setting, the intent to create a time lapse video from a set of photos is believable enough. That being said, it’s been done: http://www.youtube.com/watch?v=d2Xqx51xQzc.