Assignment #2: Block Model and Pose Testing
In this assignment we will add fingers to the skeleton created in assignment 1, and then we will set up bone orientations for animation. Next, we will build a block model for our character based on the orthographic sketches. Finally, we will test our block model proportions by creating poses.
Installing the Character Design Shelf
In order to use the CharacterDesign shelf, first download this zip package:
Character Design Shelf and extract to a local folder. Copy the contents to your Documents/Maya folders:
On Windows: C:\Users\<username>\Documents
On Mac:
<username>/Library/Preferences/Autodesk/Maya
- Files in shelves → Documents/maya/2017/prefs/shelves/
- Files in icons → Documents/maya/2017/prefs/icons/
- Files in scripts → Documents/maya/2017/scripts/
Restart Maya and you should now see the CharacterDesign shelf tab:

These new tools are now available to you, and will be used in the class assignments:

The transparency fader is a convenient way to control the transparency of your reference image planes.
Part 1.1, Adding fingers to the skeleton
Students may optionally choose to build their own fingers skeleton using the instructions here: finger skeleton instructions
Otherwise, proceed with the following instructions to import a pre-made hand.
(Note: this choice does not affect how the assignment is graded)
1. Download the pre-made hand skeleton: assignment_2_hand.ma
2. Import the assignment_2_hand.ma into your Maya scene.
(this is starting from the finished Assignment 1 scene - remember to save as a new copy)
- File > Import [options]

- Set the import option Use namespaces to true
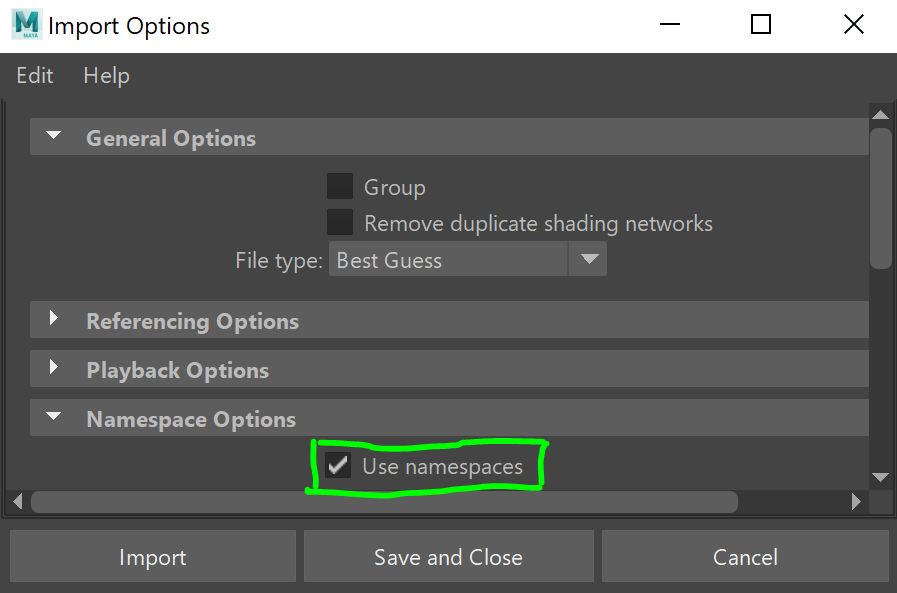
- Press Import and browse for the assignment_2_hand.ma file that was downloaded
- Note that the imported scene objects have namespaces. (The filename is prefixed to all imported nodes to prevent name clashes)

- Remove the namespace using the Namespace Editor - Windows > General Editors > Namespace Editor
- Delete the "assignment_2_hand" namespace
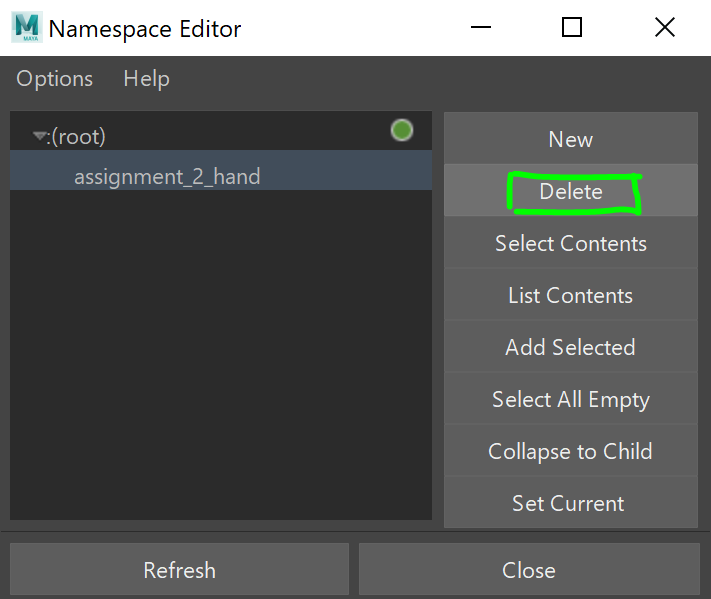
- In the pop-up dialog, press Merge with Root

3. Scale the hand to match your character's size
- Select the imported hand group called right_hand_grp
- Press "r" on the keyboard to activate the scale tool
- Drag the scale manipulator to resize the hands
- Freeze transformations (this will lock in your new size as scale value [1, 1, 1])
- With the right_hand_grp selected press Modify > Freeze Transformations
4. Parent the imported hand to the hand on your character skeleton
- Select the imported hand joint - right_hand_bind_joint
- Multi-select the same-named hand joint on your character skeleton
- Note: in the Outliner, holding down "ctrl" allows you to multi-select individual objects
- Press "p" to parent
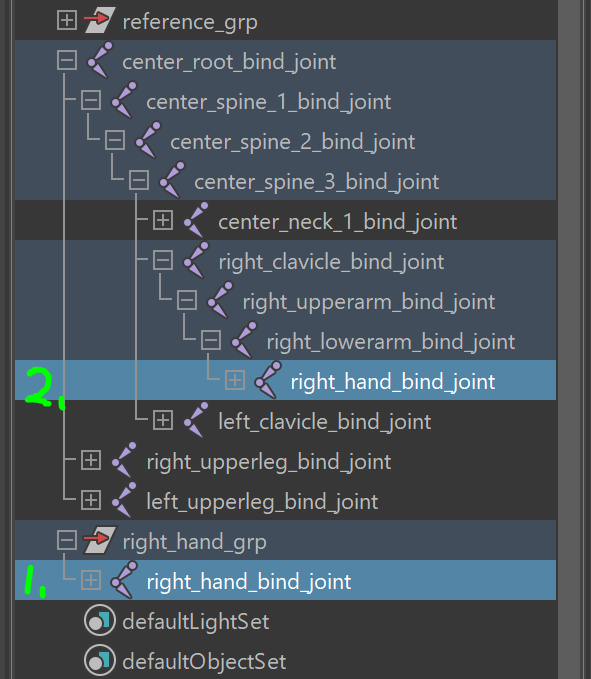
- Align the imported hand to the character's hand
- With the right_hand_bind_joint selected, press ctrl-a to open the Attribute Editor
- Set Translate and JointOrient to 0, 0, 0
- Parent the imported fingers to your character's hand and delete the imported hand
- Shift-select the base finger joints in the Outliner
- Middle-click drag them onto your character's hand joint
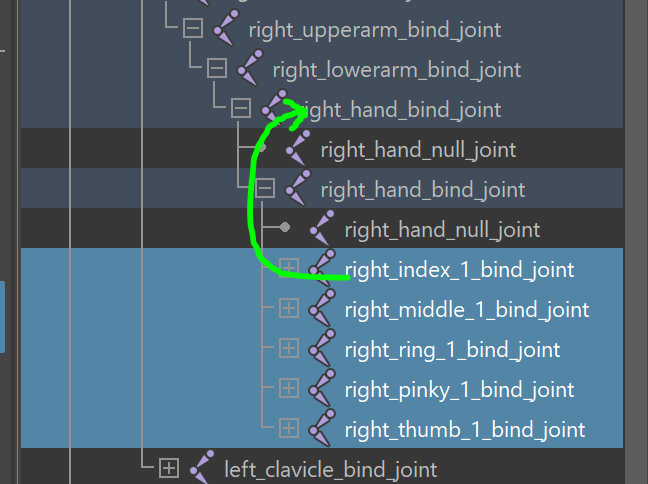
- Select the imported right_hand_bind_joint and press Delete on the keyboard
- You can now delete the empty group: right_hand_grp
Part 1.2, Orienting the skeleton for animation
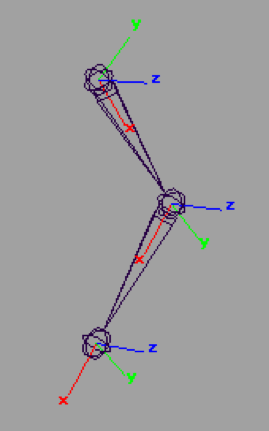
Conventions for joint orientation
 |
Axis |
Orientation |
Description |
X |
Points down toward the child |
Maya auto-orients joints this way as a convention. This minimizes gimbal lock problems when using the default rotate order. However, there are a few special cases where joints in character rigs should be oriented differently. |
Z |
Primary axis of rotation |
Using Z as the primary axis of rotation further reduces risk of gimbal lock. This helps IK work more reliably. |
Y |
|
Rotating the Y axis 90 degrees causes gimbal lock. We try to minimize gimbal lock by orienting Y as the least used axis. |
- Orient the pelvis orthogonal to world space.
- Select center_root_bind_joint and press "shift-p" to unparent it. Also unparent all of its children joints.
- With the joint still selected, press "ctrl-a" to bring up the Attribute Editor.
- In the Joint Orient field, round off all values to multiples of 90.
- Re-parent the children joints to the root (spine and legs)
- Orient the chest orthogonal to world space.
- Select center_spine_3_bind_joint and press "shift-p" to unparent it. Also unparent all of its children joints.
- With the joint still selected, press "ctrl-a" to bring up the Attribute Editor.
- In the Joint Orient field, round off all values to multiples of 90.
- Parent the joint back into the hierarchy
- Select center_spine_3_bind_joint, and then shift-click center_spine_2_bind_joint and press "p" to parent
- Orient the clavicle relative to the chest
- Select right_clavicle_bind_joint
- Unparent the shoulder from the clavicle
- Select right_upperarm_bind_joint and press shift-p to unparent
- Press “ctrl-a” to bring up the Attribute Editor
- Zero out all joint orient values
- Re-parent the shoulder to the clavicle
- Select right_upperarm_bind_joint, and then shift-select right_clavicle_bind_joint and press p to parent
- Orient the head orthogonal to world space.
- Select center_head_1_bind_joint and press "shift-p" to unparent it.
- With the joint still selected, press "ctrl-a" to bring up the Attribute Editor.
- In the Joint Orient field, round off all values to multiples of 90.
- Parent the joint back into the hierarchy.
- Select center_head_1_bind_joint and then shift-click center_neck_2_bind_joint and press "p" to parent
Here is a review guide for joint orientation on character skeletons:
| |
Joint |
Orientation |
Directions |
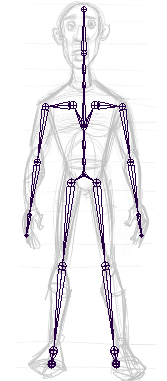 |
Pelvis joint
center_root_bind_joint |
Orthogonal to world space |
Unparent the root joint from the skeleton and unparent its children. In the Attribute Editor: Rotate should be 0, 0, 0 and Joint Orient should be zero or multiples of 90. When finished, parent the joint back into the skeleton |
Chest joint
center_spine_3_bind_joint |
Orthogonal to world space |
[the same as above] |
Head joint
center_head_1_bind_joint |
Orthogonal to world space |
[the same as above] |
Elbows and Knees
right_lowerarm_bind_joint, right_lowerleg_bind_joint |
Coplanar to shoulder, wrist
Coplanar to hip, ankle |
In the Attribute Editor: Translate should be 0 on Y and Z, but X can be non-zero. Rotate and Joint Orient should be 0 on X and Y, but Z can be non-zero. |
Hand joints
right_hand_bind_joint |
Inline with lower arm |
In the Attribute Editor: Translate should be 0 on Y and Z, but X can be non-zero. Rotate and Joint Orient should be all zeros. |
Feet joints
right_foot_bind_joint |
World space |
After unparenting the foot, all Rotate and Joint Orient channels should be 0. |
- Finalize the skeleton
- Mirror the skeleton
- Skeleton menu -> Mirror Joints [options] YZ, Behavior
- Freeze Transformations
- Modify menu -> Freeze Transformations
Save your scene as assignment_2_skeleton.ma - this will be turned in along with the rest of your assignment.
Part 2: Block Modeling
Save as "assignment_2_block_model"; file type .ma.
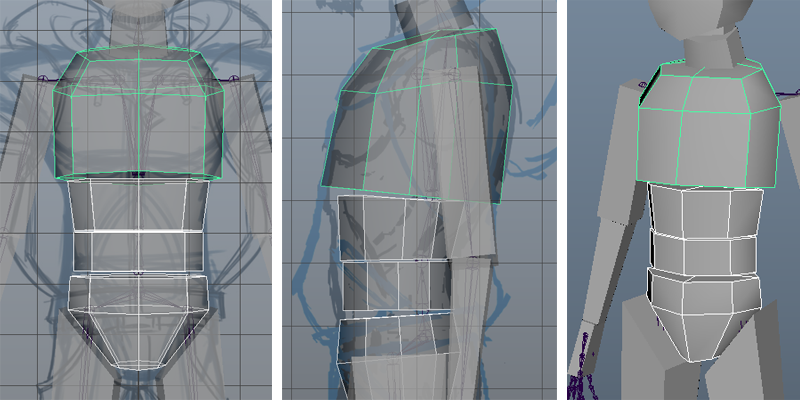
1. Block modeling the body
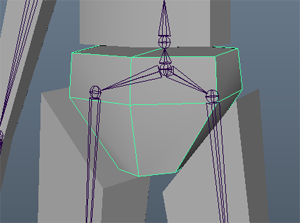
- Add block models to the spine joints
- Select center_root_bind_joint
- Shift select spine 1 through spine 3
- Press the block model button on the Character Design shelf:

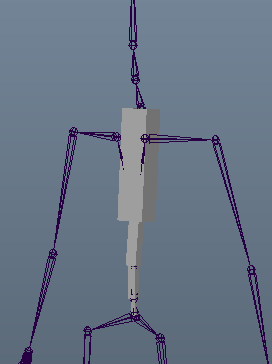
- Model the blocks to match the silhouette of the body
- Switch to side camera view
- Select the chest block
- It might help to turn off joint selection so that the skeleton doesn't keep getting in the way of selecting the polygon block models.
- To do that, press the joint selection mask button on the toolbar at the top:

- Remember to turn joint selection masking back off when finished.
- Right-click the chest block and choose "Vertex".
- Select the vertices and move them out to match the chest in the side view drawing.
- It might help to switch to "world" move axis in the Move Tool settings.
- To do that, double-click the Move Tool in the Toolbox on the left:

- Click "World" in the "Move Axis" settings:

- Repeat steps 2 through 4 on the rest of the block in the body.
- It might help to use the scale tool when moving vertices so that the left and right sides can stay symmetrical.
- Select both left and right side vertices.
- Activate the Scale Tool by pressing the "r" hotkey or the button in the Toolbar:

- It will help keep the edge loops staright by setting the scale tool to "World" mode in the Scale Tool options (double-click the scale button in the Toolbar).
- Switch to front view and repeat steps 2 through 5 for the front of the body.
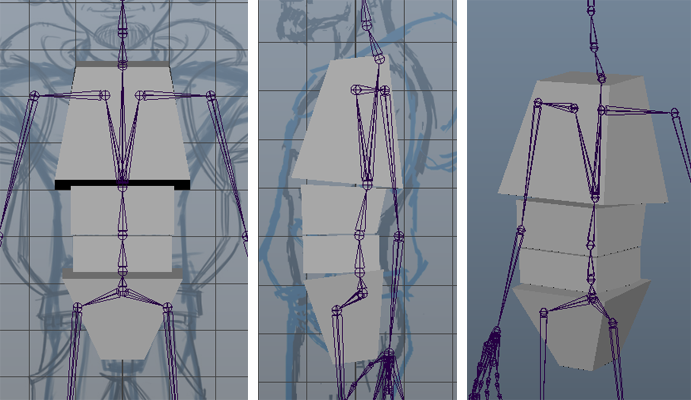
Your block model should now look something like this:
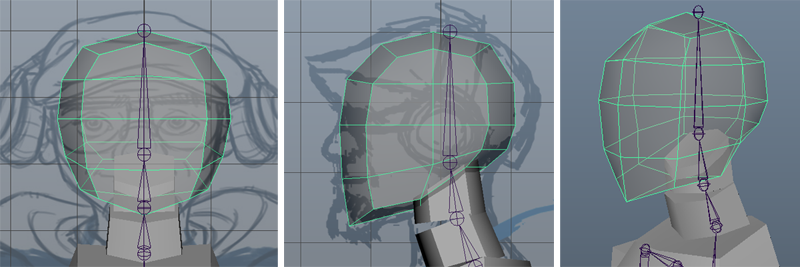
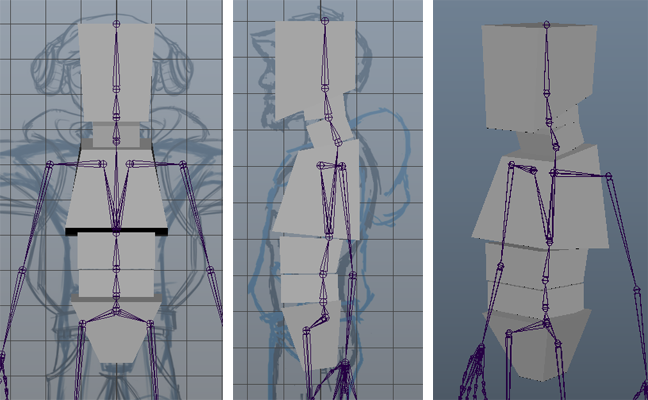
2. Block modeling the neck and head
Repeat steps 1A and 1B for the neck joint chain.
Your model should now look something like this:
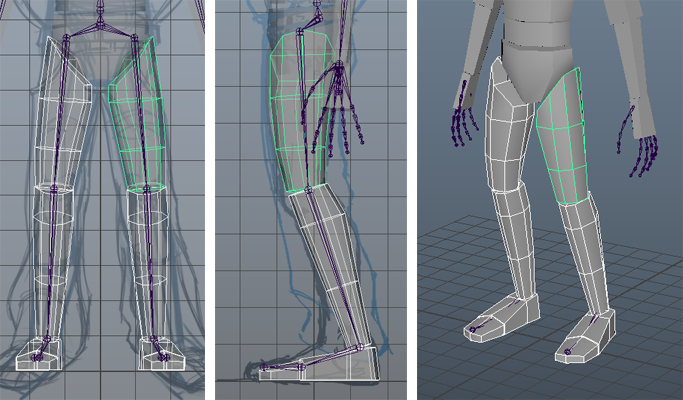
3. Block modeling the legs
- Repeat steps 1A and 1B for the right leg joint chains.
- Mirror the right leg to the left side
- Select all of the blocks for the leg and foot
- Press "Shift-p" to unparent them from the skeleton
- Press "Ctrl-g" to group the blocks
- Press "Ctrl-d" to duplicate the group
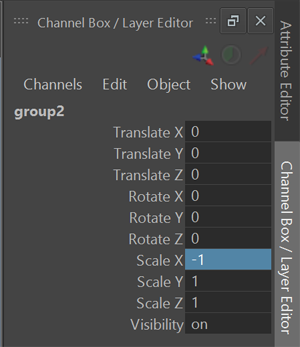
- In the Channel Box set Scale X to -1 on the duplicate group
- Parent the right and left leg block models to the skeleton
- Select a block
- Shift-select the corresponding bone
- Press "p" to parent the block to the bone
- Repeat this step for all blocks on the legs and feet
- It might help when selecting the bones to turn on x-ray joints on the panel toolbar:

- Delete the temporary group nodes (These can be found in the Outliner)
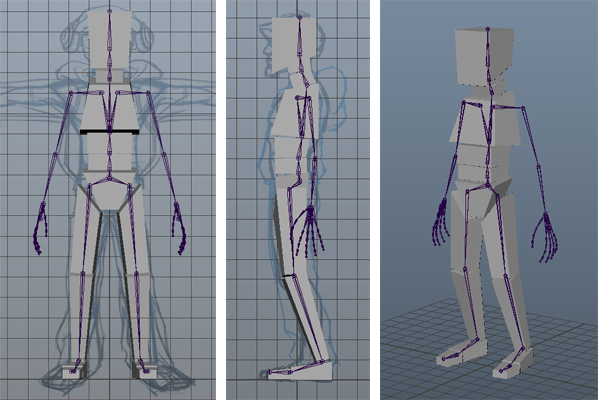
Your model should now look something like this:
4. Block modeling the arms and hands
Repeat steps 1A and 1B for the right arm joint chain. When you get to the hand only add a block to the right_hand_bind_joint for now. We will be skipping the right_palm_bind_joint completely and adding blocks to the fingers later.
Repeat step 3B to mirror the right arm to the left side.
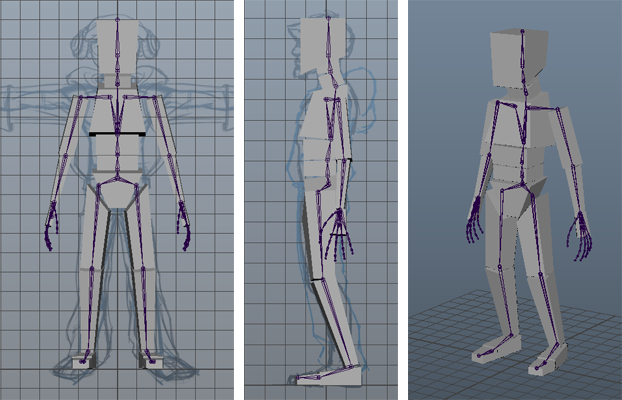
Your model should now look like this:
Save an iteration by clicking the  button on the character design shelf. If you 've been doing this already then that's fine, too! The more often you save the better. button on the character design shelf. If you 've been doing this already then that's fine, too! The more often you save the better.
Additionally, save out a separate file with your progress up to this point as assignment3_checkpoint.ma and be sure to check in with one of the TAs during lab hours.
5. Refining the block model silhouette
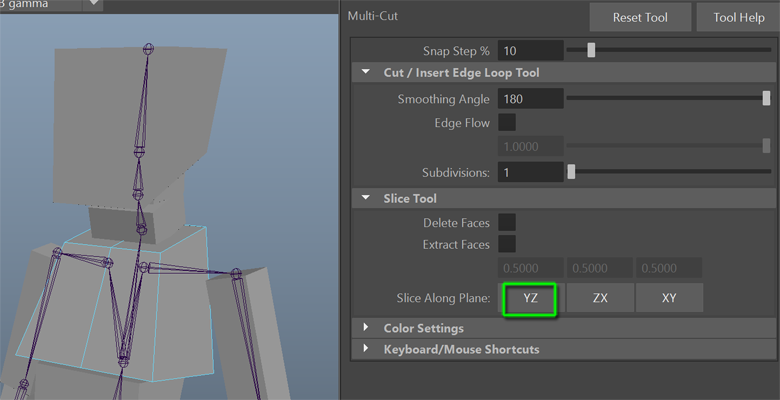
- Add a vertical center edge loop to the chest
- Shift-right-click the chest block to bring up the polygon modeling marking menu, choose "Multi Cut Tool" option window.
- Press Slice Along Plane, YZ

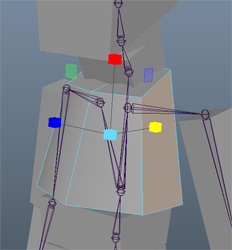
- Select the faces on the sides of the chest and scale them down on the Z axis.

- Repeat this step for the rest of the blocks in the body, neck and head
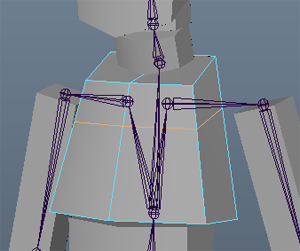
- Refine the silhouette of the chest
- Shift right-click the geometry in object mode (right-click and select "Object Mode"). Choose "Insert Edge Loop Tool".
- Click on the center edge loop about one third of the way down from the top

- Scale and move the edge loop to match the silhouette of the drawing. You can also select and move vertices individually. Look through front and side camera views to make sure it lines up from all angles.

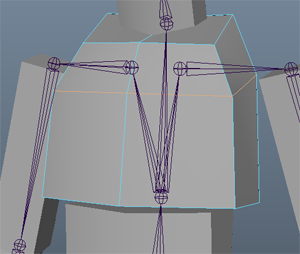
- Refine the silhouette of the pelvis
- Add a horizontal edge loop to the pelvis block
- Model it to match front and side views

- Refine the silhouette of the head
- Add two horizontal edge loops to the head
- Model the new edge loops to match the front and side views
- It might help to use the Fader tool so you can see the drawing through the transparent block model.
- Select the block model and press the Fader button on the custom shelf
- From the side view, add a vertical edge loop to the center
- Model all vertices on the head to look good from front, side and perspective views.

- Add vertical center edge loops to the side of the body and neck
- From the side view add vertical edge loops to the blocks on the body and neck
- Model the vertices to a rounded shape in the perspective view

- Refine the silhouette of the legs
- Delete the leg and foot block models on the left side
- Add two horizontal edge loops to the right upper and lower leg blocks
- Model the vertices to match the silhouette of the drawings
- From the side view add vertical edge loops to the upper and lower leg blocks
- From the front view add vertical edge loops to the upper and lower leg blocks
- Model the vertices of the right upper and lower legs to look rounded in perspective view
- Add edge loops to the foot and toe as shown in the screenshot below
- Repeat step 3B to mirror the right leg to the left

- Refine the silhouette of the arms
- Delete the arm and hand block models on the left side
- Add two horizontal edge loops to the right upper and lower arm blocks
- Model the vertices to match the silhouette of the drawings
- From the side view add vertical edge loops to the upper and lower arm blocks
- From the front view add vertical edge loops to the upper and lower arm blocks
- Model the vertices of the right upper and lower arms to look rounded in perspective view
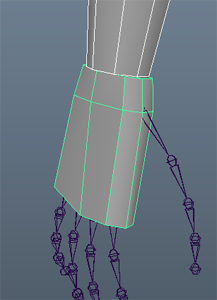
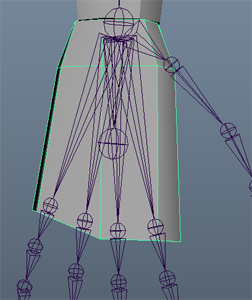
- Add edge loops to the hand block as shown in the screenshot below

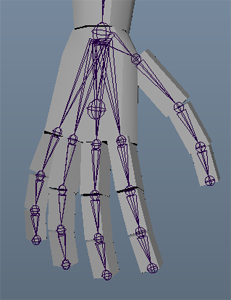
- Sculpt the hand block so that it follows the curve of the knuckles. Additionally, the hand block should slightly overlap the knuckles as pictured below.

- Select the finger joints and repeat steps 1A and 1B to create block models on them. The faces at the base of the finger blocks will need to be pushed down slightly since the hand block overlaps the knuckles.

- Repeat step 3B to mirror the right arm to the left side.

Remember to save your scene!
Part 3: Pose Testing
The next phase of block modeling is pose testing. This enables you to see if the proportions of your character work in 3D or not.
- Save a new copy of your block model file out as "assignment3_pose_testing"; file type .ma.
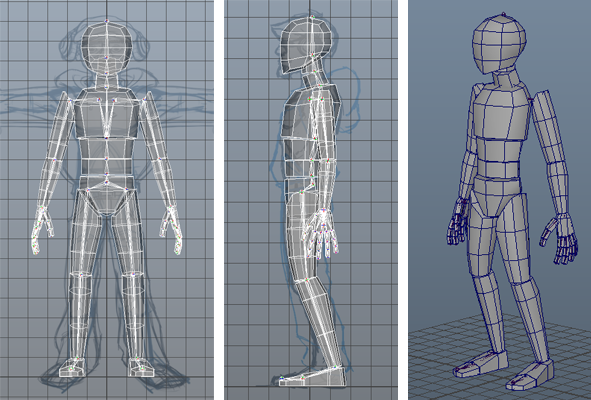
- Keyframe the skeleton in the model pose (The model pose is the pose that lines up with the front and side concept art, same as the above screenshots)
.
- Select center_root_bind_joint
- Press the Select Skeleton button on the custom shelf.

- Hit the "s" hotkey to set a keyframe.
- Create poses for each of the following poses and keyframe the skeleton on every tenth frame: 0 (set a key for the initial model pose), 10, 20, 30, etc. Be sure to move the time slider forward to the next time value before posing the skeleton.
Poses to create and filenames:
- Model Pose
- p01_model_pose.png
- Relaxed/Idle Pose
- p02_relaxed.png
- Crouch Pose
- p03_crouch.png
- Character personality pose of your own chosing #1
- p04_character1.png
- Character personality pose of your own chosing #2
- p05_character2.png
Grading Rubric
For this assignment we will be checking to make sure that the following elements of the assignment are present in your Canvas submission:
NOTE: 2 points will be subtracted for incorrect file names and formats
Criteria
|
Achievement Level
|
| |
Achievement Level 1 |
Achievement Level 2 |
Achievement Level 3 |
Achievement Level 4 |
Skeleton
format: Maya file
file name:
assignment_2_skeleton.ma |
25 points: (0-1 incorrect)
Joints are named, parented and oriented correctly. Skeleton aligns with reference images (mostly). |
23 points: (2-4 incorrect)
Joints are named, parented and oriented correctly. Skeleton aligns with reference images (mostly). |
20 points: (5+ incorrect)
Joints are named, parented and oriented correctly. Skeleton aligns with reference images (mostly). |
0 points:
files were missing |
Block Model
format: Maya file
file name:
assignment_2_block_model.ma |
25 points: (0-1 incorrect)
Block model is complete, is subdivided as instructed, has correct parenting and aligns with reference images (mostly). |
23 points: (2-4 incorrect)
Block model is complete, is subdivided as instructed, has correct parenting and aligns with reference images (mostly). |
20 points: (5+ incorrect)
Block model is complete, is subdivided as instructed, has correct parenting and aligns with reference images (mostly). |
0 points:
files were missing |
Poses (Maya file)
format: maya file
file name:
assignment_2_pose_testing.ma |
25 points: (0-1 incorrect)
Poses are keyframed correctly and the block model moves with the skeleton as expected. |
23 points:(2-4 incorrect)
Poses are keyframed correctly and the block model moves with the skeleton as expected. |
20 points: (5+ incorrect)
Poses are keyframed correctly and the block model moves with the skeleton as expected. |
0 points:
files were missing |
Poses (screenshots)
format: Image file
(.jpg, .png, .bmp, .tif)
file names:
p01_model_pose.png
p02_relaxed.png
p03_crouch.png
p04_character1.png
p05_character2.png
|
25 points: (0-1 incorrect)
Screenshots show the correct pose and all poses are included. |
23 points: (2-4 incorrect)
Screenshots show the correct pose and all poses are included. |
20 points: (5+ incorrect)
Screenshots show the correct pose and all poses are included. |
0 points:
ALL files were missing |
Turning in your files
For turn-in we will be using Collect-It on Canvas. You can find it here. You will need to log in with your UWNetID. Each week you will be submitting your files to the appropriate assignment. For this assignment, you will be turning in the following:
- Finished skeleton with fingers and bone orientations
- assignment_2_skeleton.ma
- Finished block model from Part 2, no keyframes
- assignment_2_block_model.ma
- Pose file from Part 3 with keyframes
- assignment_2_pose_testing.ma
- One screenshot for each pose
- p01_model_pose.png
- p02_relaxed.png
- p03_crouch.png
- p04_character1.png
- p05_character2.png
Your files are due in by Thursday July 26th, 2019 at 11:00 AM.
You will be required to check in with the TAs during office hours at least once.
|


 button on the character design shelf. If you 've been doing this already then that's fine, too! The more often you save the better.