Oscilloscope Basics
Intro
An oscilloscope's primary function is to provide a graph of a
signal's voltage over time. This is useful for measuring such things as
clock frequencies, duty cycles of pulse-width-modulated signals,
propagation delay, or signal rise and fall times. It can also alert you
to the presence of glitches in your logic or bouncing switches.
This tutorial is meant as a simple, interactive tutorial to get you to the
point where you can use the basic features of an oscilloscope. More details
are available in the manual. In particular,
you should look at the "Application Examples" section and the "Front-Panel
Menus and Controls" sub-section of the "Getting Started" section. But if
you're reading this tutorial, that probably means you'd rather not read the
manual, so let's get started.
Build a circuit to test and hook up the probes
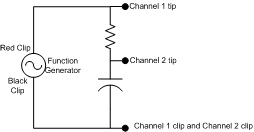
An oscilloscope is for looking at the behavior of a circuit, so the first
step is to build a circuit and hook up probes. You'll be building the
circuit on the right. Some things to know:
- Good values for the resistor and capacitor are 430K Ohm and 0.002uF,
respectively
- On the function generator cable, the red clip is the generated signal,
and the black clip is ground
- If your function generator has multiple outputs, use channel 1
- The oscilloscope probes have a clip coming off the side, this should
always be connected to ground
- The tip of the oscilloscope should be connected to the signal you want
to look at. If you would rather use a pin tip instead of the hook tip, you
can pull the hook tip sheath off. Do not unscrew the tip or attempt
to unscrew the sheath!
Power on the Function Generator
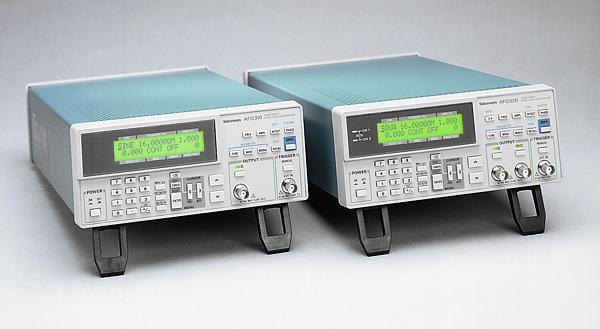
The function generators in the lab are Tektronix AFG310 and AFG320
function generators. The AFG310 has a single signal output, and the
AFG320 has two. We'll only be using one of the outputs, so either one
is fine. They look like the ones in this picture taken from Tektronix's
website:
At this point, you can power on your function generator. It should come up
in a reset state, so simply follow the following steps to make it produce a
1kHz square wave that goes from +1 to -1 volts:
- Hit the "FUNC" button to select a function
- Hit the up arrow so that the function type is "SQUA"
- Hit Enter
- Hit the "FREQ" button to select the frequency
- Hit 1
- Hit "kHz/ms/mV"
- Hit Enter
- Hit the Channel 1 button
At this point, the function generator should be producing the desired
square wave out its channel 1 output.
The Basic Oscilloscope Controls
The oscillocopes we have are Tektronix TDS3032 and TDS3034B
oscilloscopes. The TDS3032 has two input channels; the rightmost bnc
plug is for an external trigger that we won't be using in this tutorial.
The TDS3034B has 4 input channels. They both have very similar controls
that can be grouped into 6 basic groups:
- VERTICAL - Controls the vertical alignment of the traces as well
as which traces are shown, their scale, which one is the selected
one, etc. Note that only the currently selected trace will be
affected by the controls in this group.
- HORIZONTAL - Controls the time scale and position. Note that
all traces are affected simultaneously by these controls.
- TRIGGER - Controls the triggering. This is useful for
horizontally aligning a repeating signal with itself.
- ACQUIRE - Controls the method of aquiring samples. It also has
the autoset button that will cause the oscilloscope to autmatically
choose settings for all the other controls that it thinks will best
display the current waveforms. This is a very useful button, but I
have found it chooses good values about 80% of the time.
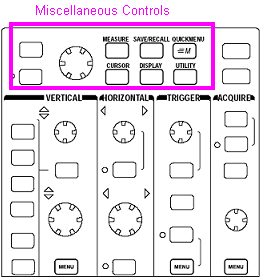
- Miscellaneous - This section is the unlabled set of controls
that is at the top of the control panel. The controls in this
section are mostly high level functions that are not specific to a
given waveform. It is in this section that you find the "General
Purpose Knob" referred to later.
- Selector buttons along the right and bottom of the screen (not
shown in picutre) -
These are used to select from menus that appear on the bottom and
right of the screen, just like you would do with an ATM machine at
the bank.
|
|
Resetting the default settings
The oscilloscopes remember their last state before they were turned off, so
you'll want to reset it to the factory defaults before continuing. The
following steps will reset the oscilloscope to the default state:
- Hit the "Save/Recall" button
- Select "Recall Factory Setup" from the items at the bottom of the
screen
- Select "OK Confirm Factory Init" from the items at the right of the
screen
- Hit the "Menu Off" button
At this point, you should see a yellow square wave in the middle of the
screen. This is the signal coming in on channel 1.
Displaying Traces
You've also got a signal coming in on channel 2, so you'll want to make it
display. Do this by hitting the "Ch 2" button. Now, channel 2 is also
displayed, but it's aligned on top of the channel 1 data. Fix this by hitting
the "Autoset" button. At this point, you should have a screen that looks
something like this:
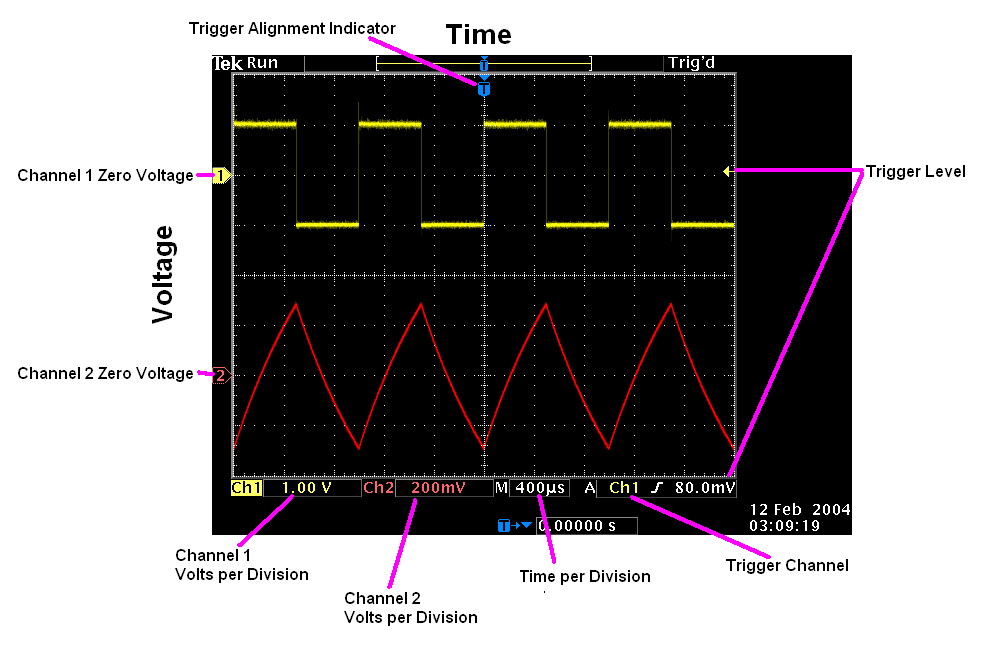
The display on an oscilloscope plots voltage in the Y direction and time in
the X direction. There are 10 horizontal divisions and 8 vertical divisions
that each represent arbitrary amounts of time and voltage respectively. The
amount of time represented by each horizontal division is indicated at the
bottom of the screen and is the same for all traces on the graph. The amount
of voltage represented by the vertical divisions varies from trace to trace and
is also indicated at the bottom of the screen.
In the above screen, we see that there is a square wave on channel 1 that is
varying from +1 to -1 volts with a period of 1000 us or 1 ms. Channel 2 has a
signal that looks triangular that ranges from about +0.3 to -0.3 volts. The
corners (peaks) of this wave happen at exactly the same time as the edges in
the square wave, so it has the same period as the square wave.
Built-in Measurements
You can use the built in measurement functions to confirm these values:
- Hit the MEASURE button up in the miscellaneous section of the control
panel
- Hit the CH1 button to make sure that channel 1 is the currently active
trace.
- On the menu on the right side of the screen, select Period by hitting the
unlabeled button right next to the item in the menu. This is just like ATM
machines at banks.
- Select the More menu item to see other options. Keep hitting the More
button until the High and Low menu items appear. Select these.
At this point, hit the MENU OFF button to reclaim the screen space used by
the menus. You should see measurements on the right side of the screen giving
you the period, high voltage and low voltage for the square wave. Now, pull up
the same information for channel 2. First you need to remove the measurements
and then add the measurements for channel two:
- Hit the MEASURE button.
- From the menu at the bottom of the screen, select Remove Measrmnt.
- From the menu at the right of the screen, select all the displayed
measurements.
- From the bottom of the screen, select "Select Measurement for ..."
- Hit the CH2 button to make channel 2 the active channel
- Follow the instructions above to add the measurement items
- Hit the MENU OFF button to reclaim screen space.
At this point, you should see the measurements for channel two.
Triggering
Often, when looking at signals with an oscilloscope, you're looking at a
repeating signal. Triggering allows you to horizontally align repetitions of
this signal. When the oscilloscope sees a trigger event, it knows to put a
trace onto the screen horizontally aligned with the Trigger Alignment
Indicator. A trigger event happens when the voltage goes past the
Trigger Level. This allows a repeating wave to be overlaid on top of
itself in such a way that it reinforces previous traces and makes the trace
brighter.
You can best appreciate the trigger by moving the trigger level to a
voltage that the trace never reaches. For example, move the trigger level to
-2 volts and you should see the trace dance across the screen. Now, move the
trigger level back to 0 volts for channel 1 and the trace should stabilize.
Freezing a Single Sequence
Sometimes, you would like to look at a signal that doesn't happen often, so
you would like to capture the event when it does happen and then be able to
view the waveform on the screen. Up until this point, you've only been using
the free running mode (Run/Stop) in the ACQUIRE section. In this mode, the
oscilloscope continuously tries to capture data and display it on the screen.
Instead, we'd like to have just a single sequence of data on the screen. Do
the following:
On the function generator:
- Hit the MODE button
- Use the up and down arrow buttons to scroll the mode to BRST (burst)
- Hit Enter
- The traces on the oscilloscope should have gone flat
- Hit the MANUAL button in the TRIGGER section of the function generator
You should see your wave pop up on the oscilloscope for a short time, and then
go away. What you'd like is for the wave to stay on the screen so you can
examine it. To do this, do the following on the oscilloscope:
- Clear any measurements from your screen using the steps above.
- Hit the CH2 button to make sure that channel 2 is the currently active one
- Adjust the Time per Division to be 2ms per division by using the
SCALE knob in the HORIZONTAL section of the control panel.
- Move the Channel 2 Zero Voltage up with the POSITION knob just
until you can start to see the channel 2 trace at the bottom of the screen
- Move the Trigger Alignment to near the left side of the screen by
using the POSITION knob in the HORIZONTAL section of the control panel.
Now, hit the manual trigger button on the function generator a few times to see
your wave pop up briefly again.
Now, hit the SINGLE SEQ button in the ACQUIRE section of the oscilloscope
control panel. The LED next to the button should come on to indicate that it
is just waiting to get triggered. Hit the manual trigger button on the
function generator. You should see the wave frozen on your screen. It might
be a little faint, so adjust the intensity with the WAVEFORM INTENSITY knob in
the ACQUIRE section of the control panel.
Cursors
You can use the same measurement techniques as before for measuring
properties of the wave, or you can use the cursors. The cursors allow you to
get very accurate readings of either time or voltage differences between
different parts of a wave, or take measurements on things that aren't built-in
such as the length of the burst seen in the last section. You should see the
channel two trace go from -1 volts, to a triangle wave of amplitude about 300mV
centered around 0 and then back down to -1 volts. Say you want to find out the
amount of time that the channel 2 voltage is above -0.9 volts. Do the
following:
- Hit the CURSOR button up in the miscellaneous section of the control
panel
- Select V Bars from the menu at the right of the screen.
- Hit the CH2 button to make sure that channel 2 is the action channel
- Hit the MENU OFF button to clear up some of the clutter
- Move the cursor to the point where the channel two trace begins to change
from -1 using the General Purpose Knob
- Hit the SELECT button to toggle to switch to the other cursor
- Move this cursor to where the trace returns to nearly -1. The top @ sign
tells you the voltage at the current cursor, so move the cursor until it reads
about -900 mV.
- Read the value after the second triangle. That is the time between where
the cursors are.
At this point, you should have a screen that looks something like this:
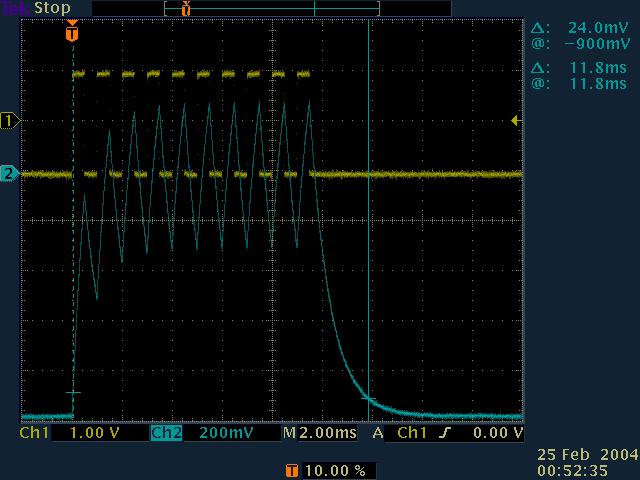
It shows that the voltage difference (delta) between the points on the trace
where the cursors are is 24mV. The difference in time between the cursors is
11.8ms. The second @ reading is the same as the second delta reading since the
first cursor is at the Trigger alignment, which is 0 in time.
Aliasing
One thing you'll want to watch out for with digital oscilloscopes is an
artifact called aliasing. Since the oscilloscope is digital, that means
that it takes discrete samples. When the sample rate is lower than
double the frequency you're looking at, the apparent frequency will be
lower than the actual frequency. A more detailed explanation can be
found in this pdf from Rice University.
To see this effect do the following:
- Remove the channel 2 display by hitting the CH2 button, then the OFF
button in the VERTICAL section of the control panel
- Move the trigger level to 0 volts
- Change the time scale to 10ms per division
- On the function generator, set the mode back to CONT (continuous)
and hit ENTER
- On the function generator, set the frequency to 16MHz by hitting the FREQ
button, typing 16 and hitting the MHz button, and then the ENTER button.
- At this point, you should have a wave that looks like it's untriggered
on the screen.
- Hit the SINGLE SEQ button on the oscilloscope to take a single sequence
At this point, you should see what looks like a squarish wave ranging from
+1 to -1 volts with a period of about 23ms. Your first instinct might be to
think that the function generator and the triggering mechanism are
malfunctioning. In fact, you're seeing aliasing of the signal. Hit the
RUN/STOP button to go back into continuous running mode, and then change the
time scale to 20ns per division, and you'll see that in fact, there is a
square wave running at 16MHz, or a period of 62.5ns. This is just something
that you need to watch out for when using a digital oscilloscope.


