CSE 466 Lab 4:
SimpliciTI networks
Objectives
In this lab, you will use the Amber Wireless AM8423 module to communicate with your watch and PC in a network. You will also experiment with controlling a tri-color led from your watch.
Suggested Reading and Resources
Part 1: To begin
Note: the project in C:\Texas Instruments\eZ430-RF2500-SEH_Sensor_Monitor-v1.5\CCE_Source\Projects\Examples\peer_applications\eZ430RF\SEH Sensor Monitor from last week's workspace works with the AM8423. You should look through this code and become familiar with the configuration of the project. You may try to run the two nodes if you wish, although you'll have to download the demo application which is not installed. The application installer is here: eZ430-RF2500-SEH Demo. Flash one AM8423 with the end-point binary, and the other with the Access Point code. Run the demo and connect to the Access Point, then power up the End Point.
Question: Why is the temperature reading off? How would you fix it?
Part 2: Implementing a simple peer-to-peer network
IF YOU ARE HAVING ISSUES WITH CODE COMPOSER NOT FINDING FILES AFTER IMPORTING A PROJECT, MAKE SURE YOU HAVE YOUR "DEV_ROOT" SET AS IN THE SIMPLICITI SAMPLE APPLICATION USER'S GUIDE
(linked below, starting on page 12)
In the SimpliciTI Sample Application User's Guide Section 3.1 Sample Applications, page 23, are instructions for implementing a simple peer-to-peer network. You'll need to create a new project and import the source from C:\Texas Instruments\SimpliciTI-CCS-1.1.1\
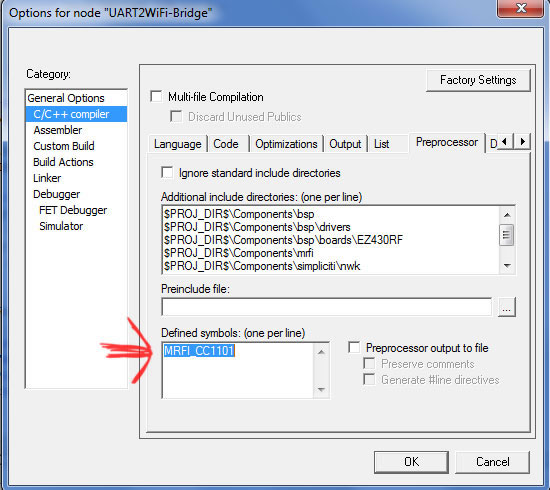
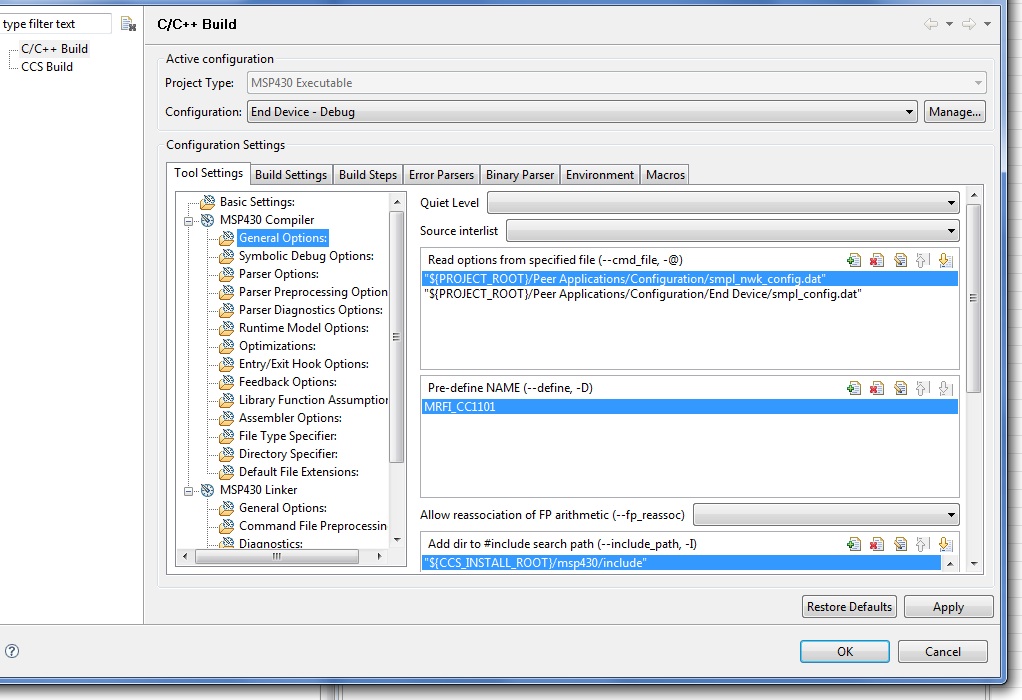
Note: In order for the code to work,you must change the preprocessor defined symbol "MRFI_CC2500" in "MRFI_CC1101" like this:

That change is made in Build Properties->General Options of the active project.

Use two computers if needed, and two of the AM8423 modules, and see if you can get a peer-to-peer network working. There is no defined platform for the AM8423, so we'll have to find a way to convince the compiler to work for us.
Part 3: Chronos to Amber module
In this part of the lab, we'll wire our AM8423 to a power module and a tri-color LED. We'll program the module to drive the RGB LED with pulse-width modulation, so that we can make any color. Then we'll program our watch to send accelerometer data to the module to control the color of the LED. Here is the data sheet for the Tri-Color LED. (note that we are using common anode LEDs.) Here is the Amber Wireless AM8423 datasheet.
- Add the RGB LED to your breadboard. Connect the common anode to Vcc (3 v), the red segment to an available pin via a 560Ω current-limiting resistor, the blue segment to another pin via a 300Ω current-limiting resistor, and the green LED to a third pin via a 300Ω current-limiting resistor. It is okay to substitute the resistors for nearby values if the exact ones are not available, but err on the side of less current through the LED instead of more.
- Adapt your PWM code from the MSP430F2013 (Look out: the timer may be different! This is a different processor!) and verify that one of the LEDs changes brightness. Be aware that you'll need to adapt software that includes the radio code because you'll need to talk to the watch later.
- Implement pulse-width modulation control for the other color segments of the LED as well.
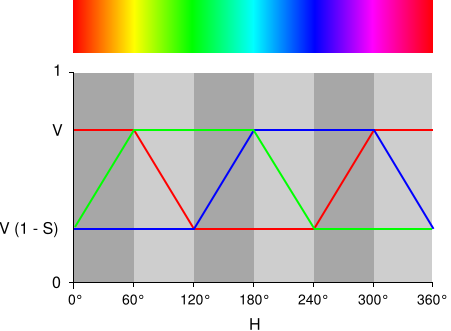
- Now, modify your code so that the brightness and saturation of the LED are held at 100%, and software ramp adjusts the hue. Figure 1 shows the relationship between the hue and the red, green, and blue values. For this part of the lab, you may hold saturation and brightness (value) fixed at 100%. Your software ramp should produce the color sequence in figure 1. This corresponds to circumnavigating the perimiter of the color wheel.
- The MSP430 does not have floating point hardware. Do not use floating point arithmetic in your code.
- The MSP430 has a hardware multiply unit, but no divider. Division by powers of two is fast, since it can be implemented as a bitwise shift to the right. Division by other values will be done iteratively and takes more time. Keep this in mind when writing your colorspace conversion code.

fig. 1. Relationship between hue angle and RGB values with saturation and value at 100% (source: Wikipedia)
- Finally, make your watch control hue as you move your hand in a circle!
Lab 4 Deliverables
- Demonstrate your working system to a TA during the first 30 minutes of next week's lab.
- Turn in the main.c code for each part of the lab.
- All deliverables should be e-mailed to cse466-tas@cs during or before the first 30 minutes of next week's lab.


