|
CSE 464 - Character Pre-Production for 3D Animation |
||||||
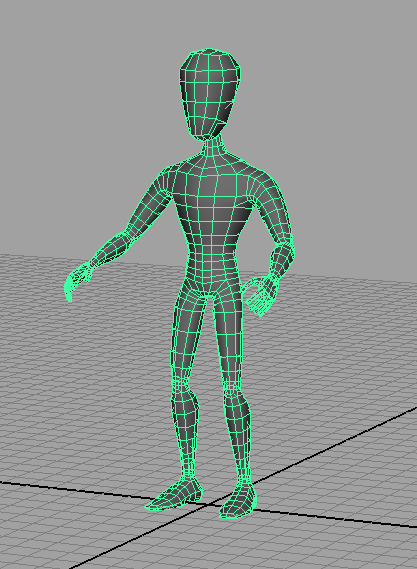
Assignment #5: Animation TestingStart from the finished gray model scene from the last assignment.
|
||||||

 Before |
 After |
Repeat this step for the rest of the body until the model looks good when the skeleton is animated.
- Move the time slider back to the first frame with the model in the bind pose
- Edit → Delete All by Type → Channels
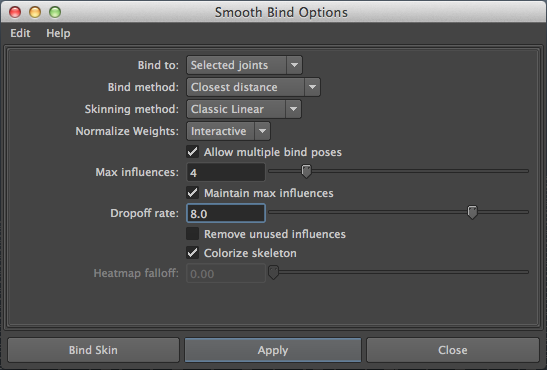
- Skin → Edit Smooth Skin → Mirror Skin Weights
- [Mirror across =YZ, If you worked on the right side of the character uncheck "Postive to negative"]
- DO NOT DELETE HISTORY!
It will remove the skinCluster node added to your gray model and thus all of the weights. - assignment5_skinning.ma
Part 2: Applying the Control Rig
Save your file as "assignment5_control_rig" file type .ma
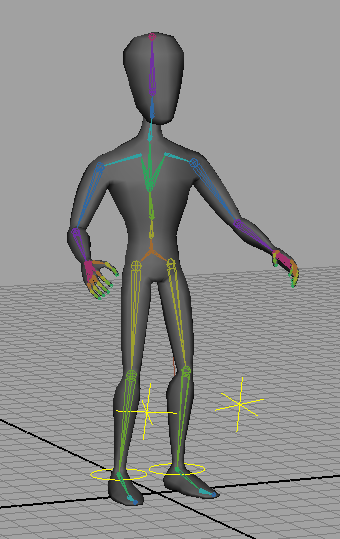
- Add IK to the right leg
- Activate the IK Handle tool
- (Animation Submenu) Skeleton → IK Handle Tool [options]
- In the option window for the IK Handle tool, set Current Solver to "ikRPsolver"
- Click on right_upperleg_bind_joint
- Then, click on right_foot_bind_joint
- Notice that the IK handle is now created
- Name the IK handle "right_foot_ik"
- You can select and translate the IK handle to test it out
- Activate the IK Handle tool
- Create the right knee pole vector control
- Create a locator, Create → Locator
- Name the locator "right_knee_pv_ctrl"
- In the Channel Box, set Local Scale X, ,Y and Z to 10
- Position the locator in front of the right knee
- Parent the locator to the knee
- Select right_knee_pv_ctrl, shift-select right_lowerleg_bind_joint, press "p"
- Set translate and rotate on the locator to zero in the Channel Box
- Move the locator forward in local space
- Double-click the Move Tool button in the toolbox to bring up the Move Tool options
- Set Move Axis to "Local"
- Move the locator out to match the position in the screenshot
- Unparent the knee pole vector control. Select right_knee_pv_ctrl, press "shift-p"
- Parent the locator to the knee
- Create the pole vector constraint
- Select right_knee_pv_ctrl
- Shift-select the right_foot_ik
- (Animation submenu) Constrain → Pole Vector
- Create the right foot control
- Create a NURBS circle, Create → NURBS Primitives → Circle
- Name it "right_foot_ctrl"
- Align it to the foot joint
- Parent it to the foot joint: select right_foot_ctrl, shift-select right_foot_bind_joint, press "p"
- Zero out translate and rotate in the Channel Box
- Unparent the foot control: select right_foot_ctrl, press "shift-p"
- Scale the foot control up so it can be easily selected
- Freeze Transformations on the foot control
- Select right_foot_ctrl
- Modify → Freeze Transformations
- Add a point constraint from the foot control to the IK handle
- Select right_foot_ctrl
- Shift-select right_foot_ik
- Constrain → Point Constraint
- Add an orient constraint from the foot control to the foot joint
- Select right_foot_ctrl
- Shift-select right_foot_bind_joint
- Constrain → Orient Constraint (Options)
- In the Orient Constraint options box make sure "Maintain offset" is checked, then hit apply.
- Lock rotate channels on the right foot joint
- Select right_foot_bind_joint
- In the Channel Box, highlight the names of the attributes, Rotate X, Y, and Z
- Right-click the highlighted attribute names
- Click "Lock Selected"
- Repeat steps 1-3 for the left leg
- Add the rig controls to a layer
- Select right and left foot and knee controls
- In the Layer Editor, go to Layers → Create Layer from Selected
- Double-click the new layer to open the Layer Editor window
- Name the layer "rig_ctrls_lyr"
- Choose yellow for the layer color
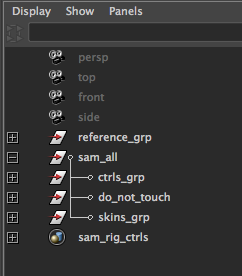
- Group the rig controls in the Outliner
- Create the top level rig group
- With nothing selected, press “Ctrl-g” to create an empty group null node
- Name the empty group “<character_name>_all” (for example, “sam_all”)
- Create the rig controls group
- Select right and left foot and knee controls and the skeleton root joint
- Press "Ctrl-g"
- Name the group "ctrls_grp"
- Parent ctrls_grp to the all group
- Select ctrls_grp
- Shift-select the all group
- Press “p”
- Create the “do not touch” group
- Select right_foot_ik
- Shift-select left_leg_ik
- Press “Ctrl-g”
- Name the group “do_not_touch”
- Parent do_not_touch to the all group
- Select do_not_touch
- Shift-select the all group
- Press “p”
- Create the skins group
- Select the gray model mesh (make sure the mesh has a name like “gray_model”)
- Press “Ctrl-g”
- Name the group “skins_grp”
- Parent skins_grp to the all group
- Select skins_grp
- Shift-select the all group
- Press “p”
- Create a Quick Select Set for your rig controls
- Select center_root_bind_joint
- Select Hierarchy, Edit → Select Hierarchy
- Shift-select the foot and knee controls (Note: If you're doing this through the Outliner, Ctrl-select instead. Shift-select will just select all of the garbage inbetween.)
- Create a Quick Select Set, Create → Sets → Quick Select Set
- In the pop-up dialog box, enter the name <character_name>_rig_controls. (for example, “sam_rig_controls”)
- Tip: You can click "Add To Shelf" to create a button on the shelf to select everything in the quick select set.
- Clean up the control rig scene
- Delete any unused nodes from the scene hierarchy in the Outliner.
- At this point, your Outliner should look similar to this.
- Note, DAG sibling order is not important. This is the order in which nodes appear relative to their parent. As long as the parent is correct, that’s all we care about.
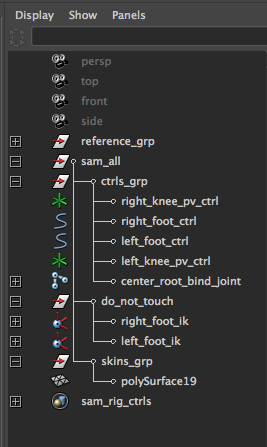
Collapsed Outliner Expanded Outliner
- Note, DAG sibling order is not important. This is the order in which nodes appear relative to their parent. As long as the parent is correct, that’s all we care about.
- Save your file
- assignment5_control_rig.ma
Part 3: Animation Testing
Save as "assignment5_animation_test" file type .ma
In this section we will be testing out the grey model by creating a simple jump animation. There are 5 poses needed plus a neutral poses as seen in the following planning sheets.
Example planning sheets for jump animation:

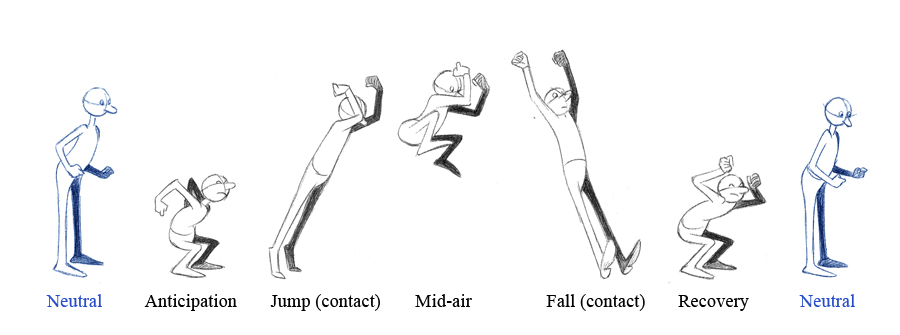
- Create the neutral pose
- Move the time slider to the first frame
- Move the foot and knee rig controls into position
- Translate the center_root_bind_joint into position
- Rotate joints in the skeleton into position
- When the pose is finished, set a keyframe:
- Right-click the Quick Select Set in the Outliner, choose Select Set Members
- Press “s” on the keyboard to set a keyframe
- Create the anticipation pose
- Move the time slider to frame 10
- Repeat the steps above to pose and keyframe the rig
- Create the rest of the jump poses
- Repeat the steps above and set a keyframe on every tenth frame
- Repeat the steps above and set a keyframe on every tenth frame
- Save your file
- assignment5_animation_test.ma
Turning in your files
Like last time you will be turning your files into Collect-It on catalyst. For this assignment, turn in the following:
- assignment5_skinning.ma (Part 1)
- assignment5_control_rig.ma (Part 2)
- assignment5_animation_test.ma (Part 3)
Your assignment is due tomorrow, Friday 8/21 at 5:00 PM. Note that this is the FINAL cut-off time. No late work will be accepted after this. It is highly recommended that you finish your work tonight if possible.