Assignment #4: Walk Cycle
Assigned: Thursday, Jan 26th, 2012
Due: Thursday, Feb 2nd at 4:30pm
Resources:
Part 1: Video Reference
Reality is always the foundation on which to start when approaching any sort of animated movement.
Starting this week, video reference will become a critical tool that helps you plan and execute more believable motion.
What to do:
-
Take reference of yourself doing a normal walk from both a front and side view.
Keep in mind that for this particular walk you are trying to understand
the mechanics of a walk itself, so try not to get too creative. Just
walk as you would normally.
Study this reference exhaustively. Pay attention to things like the
rotation of your hips versus the rotation of your shoulders, how your
hips shift and orient depending on where the weight is (from both the
front and the side), and how your arms swing.
Part 2: Animating a Walk Cycle
Walk cycles are very important in animation. They are important not
just because they are a common type of motion, but because they
reinforce many of the motion principles you learned.
Squash and stretch, arcs, overlapping action, follow-through, timing,
and weight all play big roles. Walks are also a particularly
complicated motion with a vast amount of different styles - many with
only the subtlest of differences.
Luckily walk cycles have been done so often and are so important that
there are already a few established ways of approaching them. Read the
section on walks in the Animator's Survival Kit. You will be using what
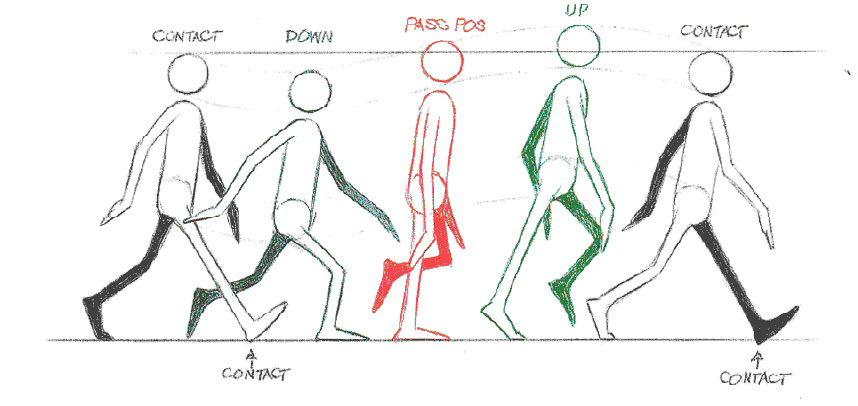
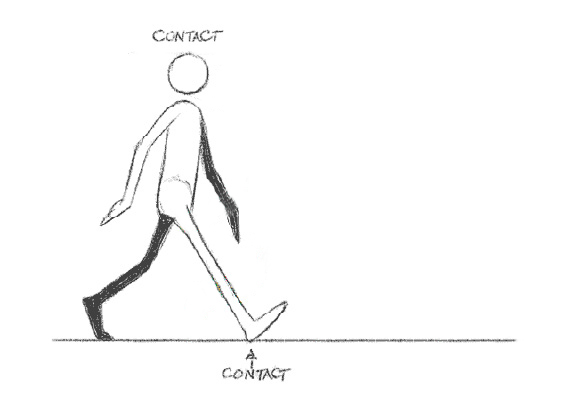
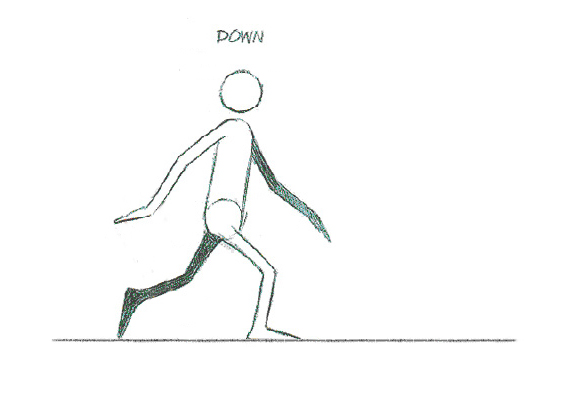
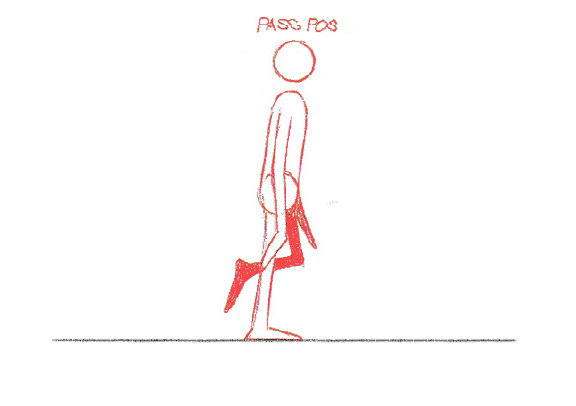
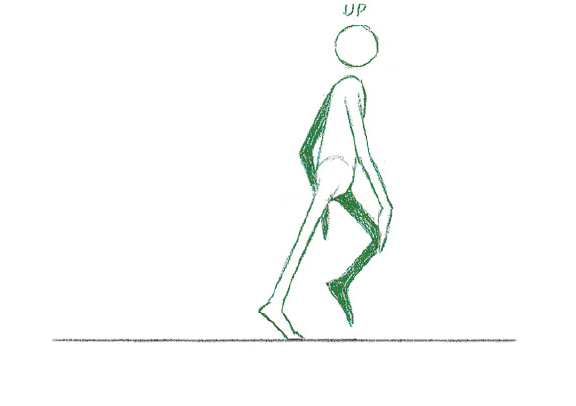
Richard Williams calls the "contact method". A walk cycle has four
basic poses:
contact, down, passing, and up. Each given step
in the contact method starts and ends with the contact pose, coming out to a total of eight poses in one cycle.
It is important to keep in mind that the preceding poses are only a
guideline. They should give you a general idea about weight and motion
arcs, but what you do within and in-between these poses will determine
the
style of walk. The reference you took is a version of your "normal"
walk, but everybody walks differently.
What to do:
- Start by blocking in the contact poses. As with
the previous assignment you will being using either the Melvin or Annie
rig. Use the video reference of your normal walk as a guideline.
- This involves completing two full steps, after which the animation will repeat. There will be eight
unique poses. The final ninth pose should be identical to the first
contact pose only with shifted Z translate - this will be essential in
eventually getting the cycle to loop.
- Your character must walk across the screen and not in place. This way you won't have to worry about sliding feet.
- As far as the workflow, you may find it useful to have the video
reference paused in one monitor while you pose the character in the
other. Exaggerate details where necessary; don't just do a one-to-one
translation (due to differing proportions this would be impossible
anyway).
- Don't neglect the weight shifts and leg positions in the front view!
Pay special attention to how the hips are moving and rotating at all
times.
- When you are finished, save out a copy of your Maya file with just these poses.
- Add breakdowns and polish your animation. Make sure
the motion looks good from all angles (side, front, perspective).
Insert breakdowns when needed to help define motion arcs and overlap as
you did for the forward jump. Use clamped tangents on the feet so they
don't overshoot their animation curves and go through the ground. When
you are finished, look at this mini-tutorial on how to make your animation loop.
Part 3: Production Shot Extremes and Breakdowns
In addition to the walk you will be furthering the work on your assigned
production shots. This is a process that will happen in three steps:
-
Revise your key poses based on the the feedback you recieved in 464 on Thursday.
-
Pose the extremes. Have these ready for your motion check-in on
Monday/Tuesday so you can recieve feedback on them before moving
forward. Do not move forward before getting this feedback.
If you move forward prematurely it may result in more potentially wasted
work, since the broader sections of your animation that do not work
will have to be redone.
-
Add breakdown poses. There should be enough inbetweens such that the
we can get a sense of the motion arcs, timing, and overlapping action.
Turn-in Checklist:
- MOTION CHECK-IN:
- Production Shot extremes ready for review
- Walk cycle contact poses (optional)
- Please name your files lastname_firstname_assignmentnumber_partnumber_filename.*
(example: doe_john_a1_p2_character_ball.ma)
- Part 1: Reference videos of you walking (at least a front and side view).
- Part 2: One maya file of your walk cycle with just the contact poses.
- Part 2: One maya file of your completed walk cycle.
- Part 2: Three playblasts of your walk: side, front, and perspective.
- Part 3: Motion Check-in with extreme poses for production shots.
- Part 3: Playblast of your production shots.