Assigned: Tuesday, Jan 23th, 2012
Due: Thursday, Jan 26th at 4:30 PM
Read the materials linked in the resources above!
Last week you set the key poses in Maya for a forward jump. This week you will be furthering your animation by inserting breakdown poses. Breakdowns, also referred to as "inbetweens", are poses added in between the key/extreme poses to further define movement. The goal is to add enough poses such that your animation flows fairly well when played at real-time, and things like motion arcs and overlap read.
In addition to defining motion arcs, timing will be an important factor. Time out your key poses before adding breakdowns. Then, as new poses fill in the gaps, make sure the timing still works. If at any time you find your motion doesn't flow as well as it could, retime as needed (using either the Timeline or the Dope Sheet). Remember: this is an art, not a science! It is also perfectly fine if there are places where several breakdowns are right next to each other, such as around the Jump and Fall contact poses.
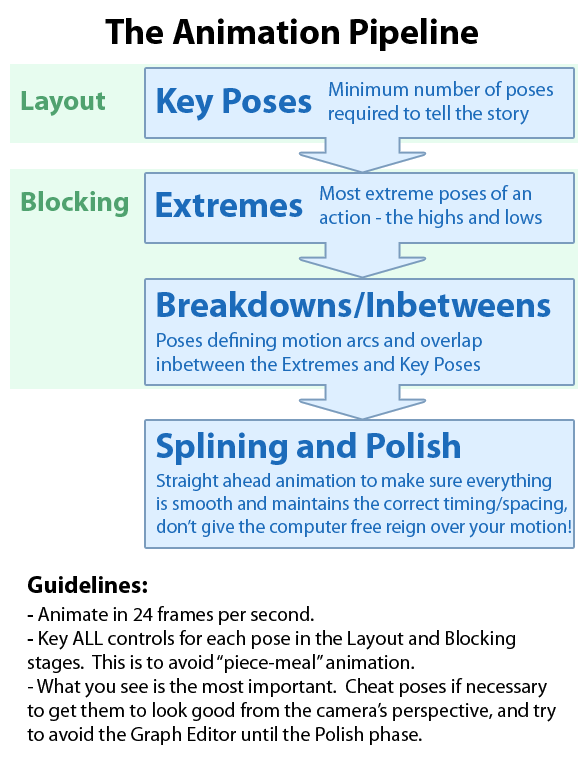
Last week you were assigned shots from your film and were tasked to make planning sheets for those shots. This week you will using your planning sheets as reference as you begin the process of animation. Check out this overview of the animation pipeline. Note that it is divided into four major sections: Key Poses ("Layout"), Extremes and Breakdowns ("Blocking"), and Polish. You will only being doing animation layout this week.
Set up your shot in the main production hierarchy. Navigate through capstone3/production/shots and find your shot file. This is basically a blank Maya file referencing in the animatic version of the shot and a lone render camera. DO NOT import the referenced animatic shot. The connection will eventually need to be severed as assets are created, and it is preferred that junk from the animatic shot does not stay with the scene.
Reference the required characters into the shot. They can be found in capstone3/production/rigs. Note that the file paths must be relative to "//cseexec/cs" and NOT the "O:" drive. This is so things will not break when shots get rendered later down the road. One more important note is that each character MUST use a namespace! Our default convention will be to make the namespace the same name as the rig file.
Position the rig top cons using the animatic characters as reference. Find a location and orientation that is best suited for the particular animation you will be doing. Note that unlike the animatic characters the top con should stay fixed, and only moved when the animation as a whole needs to be repositioned.
Once all of the characters are referenced and placed, create a group called "characters" in the Outliner then parent all of the characters' top cons to it.
Begin blocking out your key poses. As stated by the animation pipeline overview, these poses are the minimum amount to tell your story. This does not necessarily mean all of the poses from your planning sheet. They are simply the major beats of the shot. The main idea is to fill out the broad strokes so we can make sure the shot still reads and see if there are any major layout problems.
Use the animatic characters as reference for timing, approximate screen location, and even the number of key poses that should be layed out. If the animatic characters and set get in the way feel free to hide them. Just be sure not to key anything in the animatic group! It may also be helpful to select the animatic assets group and hit '1' to unsmooth everything, as the character geometry is in smooth mode by default and will slow down your scene.
The timing is already set in each shot file with 24 frames of padding on either side, so make sure to stick your layout poses in the main part of the shot.
Use the save iteration script when saving your shot and the playblast button to view your progress. Your turn-in will be the shot folder itself. Note that the name of your latest playblast should never change from what the playblast script outputs! NEVER add version numbers, as this will break the file references used for the motionmatic Premiere file.