Graph Editor Exercise
After learning the basics of using the timeline and keyframing in Maya, the next step is to learn how to "spline". Splining is basically modifying the way in which keyframes transition between each other. Maya's primary splining tool is the Graph Editor.
Before moving on, download and open ball_animation.ma. It contains the same ball from the Simple Animation Exercise, however with a set of basic mid-air and ground keyframes. The goal of this exercise is to use the Graph Editor on these existing keys to produce a smooth bouncing ball animation.
Navigating the Graph Editor
To access the Graph Editor, go to Window → Animation Editors → Graph Editor. Now select the ball to bring up its information. The Graph Editor should look something like this:
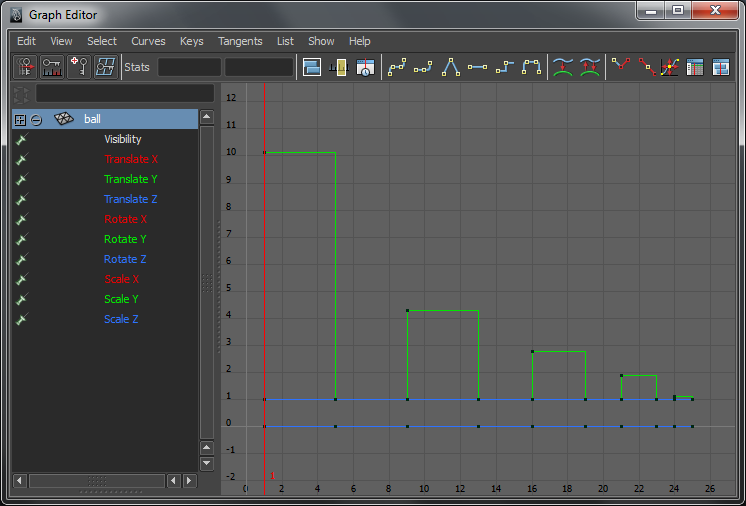
If not, click on ![]() or use the f key.
As the editor's name implies, the main window displays the ball's keyframe information in the form of a graph.
The x-axis corresponds to frames and the y-axis corresponds to attribute values.
The red vertical bar represents the current frame, similar to the time slider in the timeline.
The black dots represent attribute keyframes and the lines connecting them, also known as "animation curves",
define how the keys interpolate.
or use the f key.
As the editor's name implies, the main window displays the ball's keyframe information in the form of a graph.
The x-axis corresponds to frames and the y-axis corresponds to attribute values.
The red vertical bar represents the current frame, similar to the time slider in the timeline.
The black dots represent attribute keyframes and the lines connecting them, also known as "animation curves",
define how the keys interpolate.
Graph Editor navigation works exactly like camera navigation. Hold down Alt and drag the mouse while using either the center mouse button to pan or the right mouse button to zoom. Also as with the camera, rolling the scroll wheel will zoom. You can select attribute keys by clicking on them or using marquee selection, and delete them using Delete. Just like vertices, edges, and polygons, keys also have a helpful pre-selection option. It is disabled by default, but can be enabled by going to Select → Pre-Select Highlight.
As you may have done previously, clicking on ![]() will
frame the window around all of the currently
displayed animation curves. If no keys are selected in the graph, you can also hit f to do this. If there are
keys selected, f will frame the selected keys.
will
frame the window around all of the currently
displayed animation curves. If no keys are selected in the graph, you can also hit f to do this. If there are
keys selected, f will frame the selected keys. ![]() frames the window based on the timeline's range, and
frames the window based on the timeline's range, and ![]() centers the existing framing on the current time.
centers the existing framing on the current time.
To move selected keys, hit w to choose the move tool then middle click and drag. You can also hold down Shift before moving to lock the move either horizontally or vertically, allowing you to edit only the key's frame or edit only its attribute value. To scale selected keys, hit r to choose the scale tool then middle click drag in the direction you want to scale. Note that the keys will scale relative to where the mouse pointer was when the scale operation was initiated. Scaling can be useful for quickly changing the extremity of an animation, such as altering how high a ball bounces.
The animation curves are colored based on the attribute list to the left for quicker identification. In general, red identifies x based attributes, green identifies y based attributes, blue identifies z based attributes, and white is used for miscellaneous single attributes such as Visibility. By default the graph displays all of a selected object's curves. To isolate a single curve click on one of the attributes in the list. To figure out which attribute a given curve belongs to, select at least one of its keys and a small box will appear next to the appropriate attribute in the list.
Tangents
Tangents are the core subject of splining. They dictate the shape of animation curves and thus how keyframes transition between each other. Each keyframe has an in-tangent and an out-tangent, and these can be both determined by preset tangent types or edited manually in the Graph Editor.
Stepped Mode
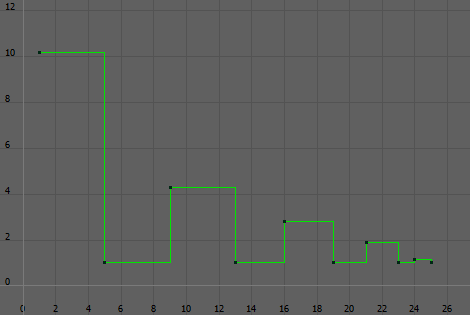
Currently the tangents are set to "stepped" mode and cannot be edited conventionally.
To change this we will convert them to "linear" mode, another preset tangent type. First isolate and frame
the Translate Y curve. When changing tangent types, the keys of all displayed animation curves will
receive tangent changes. However, if there are keys selected only those will have their tangents changed.
For now we want to affect the entire curve so make sure no key is selected. Now click the
![]() button. The graph should look something like this:
button. The graph should look something like this:
To view the tangents simply select the keys. You can also make the tangents always visible by going to View → Tangents → Always. Unfortunately they can be a bit hard to see against the Graph Editor's default background. To remedy this, in Maya's main menu set navigate to Window → Settings/Preferences → Color Settings. In the General tab, click on Animation Editors and adjust the color bar for "Graph Editor Background" as needed.
Each tangent is represented by two handles. In linear mode, the handles are aligned such that keyframe values transition linearly from one to the other. To see the effect this has on the ball's animation, go ahead and play it back in Maya.
Notice that right now the ball is moving up and down at a constant speed. While this has its uses, it is not optimal for
our bouncing ball. It would be better if the curves were more parabolic, so the ball slows down as it reaches the peak of
its bounces, then gradually speeds back up again as it falls. To achieve a more parabolic curve,
click the ![]() button to set the tangents to the more commonly used "spline" mode:
button to set the tangents to the more commonly used "spline" mode:
Spline mode approximates a smooth animation curve, aligning the handles accordingly. Play back the ball's animation again to get a sense of how this differs from linear mode.
While splined tangents work well most of the time, they can also have some potentially undesired side effects. The most common is that Maya will overshoot attribute values in order to make a smooth curve. In this example, the lowest key values represent the bouncing ball hitting the ground. The spline causes the ball to go through the ground - an effect most noticeable after the second keyframe.
A quick way to fix the curve overshooting in this case is to "flatten" the tangents. Click the
![]() button. The curve is still smooth
but all tangents are forced to horizontally align:
button. The curve is still smooth
but all tangents are forced to horizontally align:
This is getting closer to what we want, but the ball needs to speed up as it approaches the ground and carry that same speed immediately after it bounces. Basically, the tangents of each key where the ball touches the ground need to form a V shape. For this you will have to manually edit the tangents.
To change the direction of a tangent, first select a single handle by clicking on it or using marquee select (it will probably be easier to just use marquee select), hit w for the move tool, and then middle click drag to rotate the tangent.
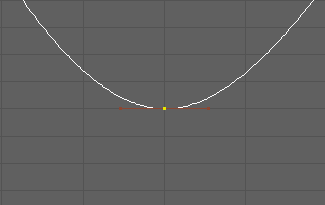

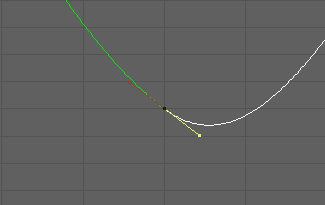
By default the tangent handles are "unified", which means that when you move one the other will automatically align with it.
Unified tangents are usually what you want, but they will not help in forming a V shape. To break the tangents (de-unify them) click on
the ![]() button. You can now edit each handle independently.
Note that on broken tangents one handle will be red and the other blue.
button. You can now edit each handle independently.
Note that on broken tangents one handle will be red and the other blue.
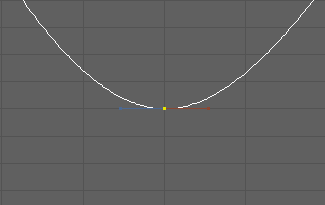

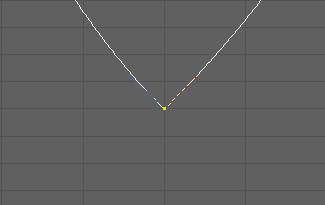
To reunify broken tangents, use the ![]() button.
The tangents will move as one again, but will keep the same shape they had when they were broken. You can straighten out a particular
set of tangents by selecting their key and clicking the spline button again. For now, go ahead and give all the bouncing ball's
low points V shaped tangents.
button.
The tangents will move as one again, but will keep the same shape they had when they were broken. You can straighten out a particular
set of tangents by selecting their key and clicking the spline button again. For now, go ahead and give all the bouncing ball's
low points V shaped tangents.
So far you have been able to change the direction of tangent handles but not their size. To modify their size, you must first go to
Curves → Weighted Tangents, then click on ![]() to free
tangent weights. The handles will now be open squares instead of solid ones, indicating that you can use the move tool to edit their
size in addition to their direction.
to free
tangent weights. The handles will now be open squares instead of solid ones, indicating that you can use the move tool to edit their
size in addition to their direction.
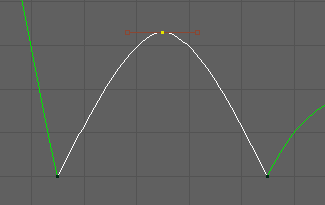

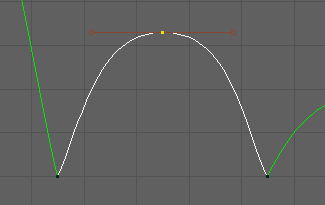
Stretch out the tangent handles of the bouncing ball's high points. This will result in the ball having slightly
longer air time, exaggerating the effect of gravity in overtaking the ball. When finished, you can re-lock
the tangent weights by clicking the
![]() button.
button.
Your final graph should look something like this:
Though you have done all you need to for this exercise, if this were your own bouncing ball animation
this would just be a first pass. You would want to preview your animation by playblasting,
go back to the timeline and add keys where necessary, come back to the Graph Editor and tweak the tangents, and repeat the process
until your motion was sufficiently refined.