Rendering Pipeline/Using the Renderfarm
Important Terms
Render: Creates an image of a single frame of your scene by calculating and determining the interaction between all the mesh, lights, and other objects in a scene.
Batch Render: Uses your computer to render your frames. This can slow down your computer significantly and prevent you from doing other work while you wait for it to finish, so rendering using the farm is generally much more efficient for bigger projects.
Render farm: A group of machines located outside the lab that can be accessed remotely and are used to render your frames for you. There are multiple machines, meaning they can all work on your renders at once, instead of batching where only a single computer is doing all the work.
Render layer: Different sets of objects in your scene that can be rendered separately to reduce render time and make it easier to achieve a desired aesthetic look.
Tractor: A Pixar render manager that allows you to monitor the progress of your renders after they've been sent to the farm.
Occlusion: In rendering this will generate small shadows where objects are very close together or touching.
Black Hole Shader: This is what we call a completely black surface shader. The concept behind this is to mask certain things in layers so that once a shot is composited, objects aren't passing through other objects. For example, if a character walks behind a desk, we don't want the character's legs showing through the desk.
NIMBY: Stands for "Not In My BackYard." This restricts a certain render node if it's been dropping frames or erroring out in any way, so that when you send out new renders, they will not be sent to this problem node. NOTE: If you ever do this, email support explaining the problem and CC Barbara. NIMBYing a node restricts it for everyone using the farm, not just you, and not just our class.
Preparing to Render
Creating Render Layers
NOTE: We are using the Legacy Render Layers in Maya 2017. They are not accessible by default. To enable them, go to Windows → Settings/Preferences → Preferences, and under Rendering change Preferred Render Setup System to Legacy Render Layers. You will need to restart Maya for the change to take effect.
It is dependent upon the needs of the specific shot which layers are created, but there are generally 3 basic layers:
(Load render layers if they are not there - Windows, Settings/Preferences, Preferences, Rendering, Render Setup: Legacy Render Layers)
Character Beauty: (contains just character meshes, any props or objects that the characters will be interacting with, and any lights used to light the characters)
Background Beauty: (contains just background objects, and any lights used to light the background)
Occlusion Layer : (contains all objects in the scene)
To create a layer, select all the objects you want in the layer, then press the "create new layer and assign selected objects" button in the render layers tab of the Channel Box. OR, create an empty render layer, and add the objects you want by selecting them, right-clicking on the render layer, and clicking Add Selected Objects.
Creating an Occlusion Layer (Earlier tutorial found here).
Add your desired objects, and name your layer "occlusion_layer". Right-click on the layer and click Attributes (this may take a couple tries, Maya often doesn't listen the first time). In the occlusion_layer tab in the Attribute Editor, click the Presets button, and select Occlusion. This automatically assigns an occlusion surface shader to all the objects in your scene. The occlusion settings can be adjusted by going into your Hypershade and going into the occlusion_shader's attributes (called mib_amb_occlusion), and adjusting the values, Samples specifically.
It is important to note that occlusion passes do not always have to be contained within one layer. For example, there could be an separate character occlusion and background occlusion layer. This is especially useful if you have a still background in a shot; you would only have to render one frame of the background occlusion instead of every frame. There are other potential benefits as well. However, it's important to make sure that if you do this, you aren't sacrificing any occlusion shadows between character and background. In other words, if we see a character's foot touching the ground (in the background layer), we would need the character and background to be in the same occlusion layer to get that contact shadow.
Render Layer Overrides
Within the Render Settings, you have the ability to change the image size, format, rendering camera, etc of one specific layer. This can be useful if you want to render a certain layer at a smaller image size, for example. To do this, go into the layer you're adjusting the render settings for, and open up the Render Settings. In this case, let's say we want to render the occlusion at 960x540 instead of 1280x720. Change the image size, and then right-click on the Width and Height and select Create Layer Override.
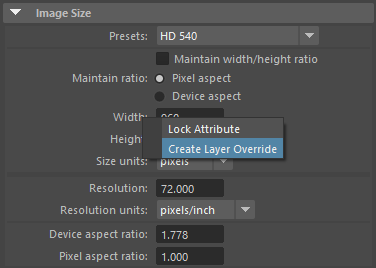
Once you've done this, the text on the overriden attributes will turn orange. These special layer-specific attributes will be remembered by Maya whenever you send out a render.

The render layer's settings button will also turn yellow in the Channel Box when you do this.
Sending out a Render
Once you've created all your layers and made sure everything is working correctly (test each layer before sending it out), it's time to send out a render. Open up your Render Settings and use these settings:
A: Always render using mental ray
B: Make sure your path is set to the correct location. To do this, go to File, Set Project... and then select your destination folder. If you do not already have a renders folder set up, it will tell you, and you can click Create Default Workspace, and Maya will create one for you. Make sure your file path and any textures you use in your shot always start with //csenetid, NOT the O drive (O:\).
Naming conventions for file paths are extremely important, not just in rendering, but throughout the whole pipeline. Some important conventions to remember when creating folders or file paths:
- Only use underscores, lowercase letters, and numbers
- No spaces
- No special characters
C: Your image format should always be PNG.
D: The Frame/Animation ext is what Maya names each frame of your render as it goes through the job frame by frame. We use this naming convention for consistency.
E: The frame padding adds this number of zeroes to the name of each frame of your render. Again, this is for consistency. Always keep this at 4.
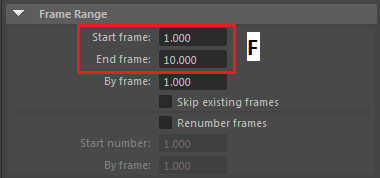
F: The start and end frame are dependent on how long your scene is. Sometimes you may want to render only part of your shot, and in that case your start frame may not be 1.000. If you want to render from the beginning of the shot, always start with frame 1.000, not 0.000.

G: Always render through your render_cam. Make sure you have no other cameras in this section of the render settings. If you do, press the trashcan to the right of the name to delete them.
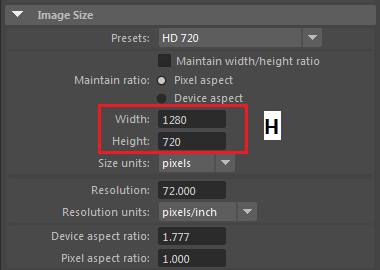
H: You should use 1280x720 for final renders. Keep in mind, the bigger the image, the longer you have to wait for it to render.
Go into the Quality tab:

I: The presets menu is where we load the production or default settings presets. This affects several areas of the quality tab, like raytracing values, but most importantly it changes the quality.
J: With the production preset loaded, the quality is 0.6. Use this preset for your final renders, but if you find that your shots are taking a long time to render, you can lower this value to try and speed things up.
Once all your settings are correct, make sure that everything in your scene is SMOOTHED. Disable/Enable your render layers so you're sending out only your desired layers.
Sending out the character layer and the background layer together is usually a pretty good bet, since they render pretty quickly. NOTE: If your camera is static (the background does not move) then you DO NOT need to render out the background layer. You can just render out a single frame of the background, save it as an image, and use that when you're compositing. This saves a lot of render time. Sending out the occlusion layer by itself is a good idea, since it usually takes the longest to render of all the layers by far
TEST YOUR RENDERS
Always test any layers you're planning on sending out in Maya first, so you don't end up with a folder full of useless renders.
When you have your settings done, your renders are working, everything is smoothed, the file path is correct, and you have your desired layers enabled for rendering, click the Tractor Button.
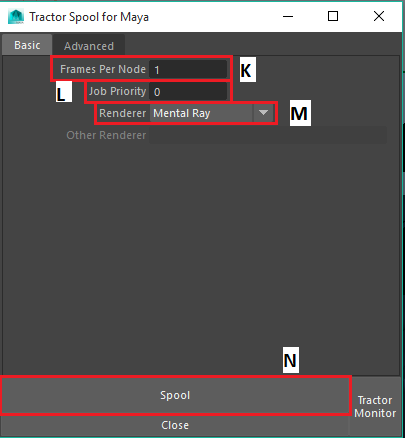
K: Frames Per Node is the amount of frames that one node takes on at a time, we usually set this number to 5. For occlusion, a smaller number is recommended, like 2 or 3, to decrease the chances of machines erroring out.
L: Job Priority is the importance of the job in the farm. Normally we can leave this number at 0, but if your render is very important and needs to get done quickly, increasing the priority will bump it to the top of the list in the render farm if there is a backlog of jobs.
M: Renderer is always mental ray.
N: Spool is just the Tractor's term for sending your job to the farm.
When you're done with all of these settings, click Spool. You can click the Tractor Monitor button at the bottom right corner once you've spooled your job to go to the Tractor render manager to monitor your renders' progress.
Tractor Monitor
This render farm manager makes it super easy for you to monitor the progress of your renders. It can be found here.
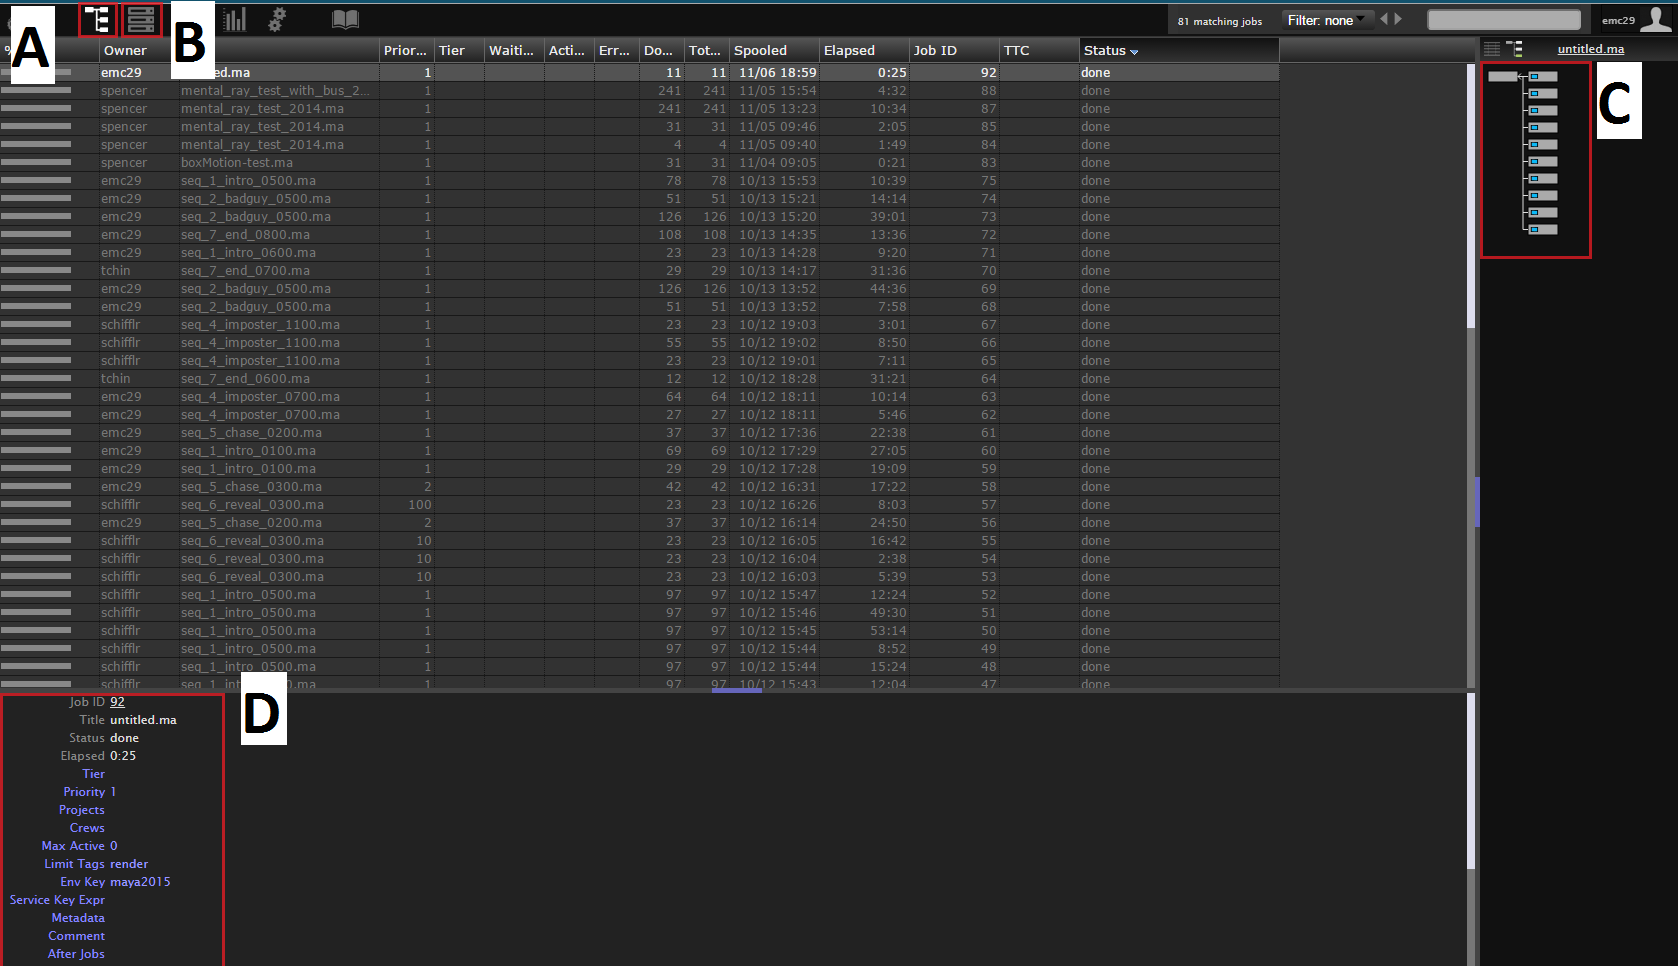
A: This button takes you to the render log. This is a list of all the renders on the farm, and they can be sorted by many different filters. In this image, all the renders on the screen are finished, so they are grey.
B: This button takes you to a list of the render nodes. We will look at this list below.
C: This is an outline of the different render nodes rendering your job. Each box represents a different group of frames being rendered by a different node. Depending on what you set for your Frames Per Node value, each of these boxes represent a different number of frames.
D: This is an outline of the stats for your job. If you need to bump up your render's priority while it is in the farm, you can change the Job Priority here.
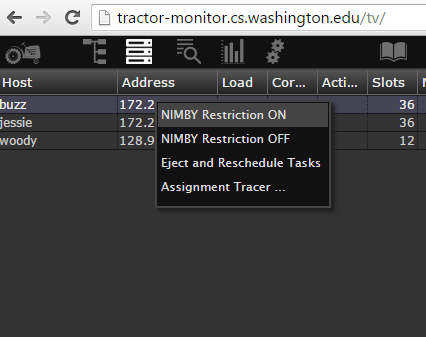
You may find that certain nodes are causing issues for your renders. You can tell which node is rendering which frames by hovering over the node on the right of the screen. We have three main clusters of rendering machines. Their names are buzz, jessie, and woody. Sometimes a certain node can be malfunctioning, and you may not want your render jobs going to that node. You can restrict this node from rendering by turning on NIMBY. By clicking on the button (B) that takes you to the render nodes, you can see a list of all the render nodes.

By right clicking on a node, you can turn NIMBY on, and this will not allow this node to render any job that gets sent to the farm.
Once you've sent a job out, it's also possible to control it within the Tractor Monitor. There are several possible actions to take once your job is on the farm. If you right click on a job on the farm, the following menu will appear:

Pause New Task Launches will stop the render farm from picking up any new nodes within an already active job. This can be useful if you're sending out a large job, and want to force the farm to pace itself by preventing it from starting on new frames until it has finished previous ones.
Restart Job will stop the currently active job, and restart it from the beginning. This is sometimes a good idea to try if you're noticing errors occurring on the farm.
Archive (Delete) Job will delete the job from the farm. Sometimes this is necessary to do if a job is taking too long and using up all the render machines so other jobs can't get through.
You're done! Now the waiting begins. ☺
