Project 1 – MazeGame
Due: Monday, October 6th @ 11:00pm
Overview
In this project, you will build a fun 3D maze game using Unity (a powerful 3D development tool). In this game, the player tilts the board with the goal of guiding the ball around the maze to its destination while picking up some objectives and avoiding obstacles.
This project aims to help you get familiar with the basics of Unity, which we will be using throughout this course. While previous quarters required deployment to a mobile device (Android or iOS), for this quarter it is optional. If you are interested in learning how to deploy to mobile, you can refer to the instructions from a previous quarter, but you do not need to submit a mobile version for grading.
Help Slides Sample Solution (Windows)
Objectives
In this project, your goal is to implement a rolling ball maze game with the purposes of:
- Getting familiar with Unity’s interface
- Understanding some Unity concepts such as Rigidbody, Prefabs, and Collision
- Writing and attaching C# scripts to objects
- Learning how to build a simple user interface in Unity
Getting Started
You need to download and install the following software:
- Unity. You will need to sign up for the student plan and follow their instructions to activate Unity. The course projects use version 6000.0.42f1 LTS.
-
You will need an IDE with Unity support for scripting (More). Choose one and follow their instructions:
- JetBrains Rider (Recommended). Very similar to IntelliJ. You will need to enroll in the student plan to get a copy.
- Visual Studio Code. Requires some setup for code completion but might be what you are looking for.
If you need access to a lab computer to complete your work or more information, you can find more information under Lab Resources.
As a prerequisite to this project, we strongly encourage you to complete the Roll-a-Ball tutorial. You don’t need to turn in the Roll-a-Ball, but it will teach you necessary concepts required in this project. If you do complete the tutorial, make sure to create a brand new Unity project before starting this Maze Game project, otherwise some unwanted project settings may carry over.
Requirements
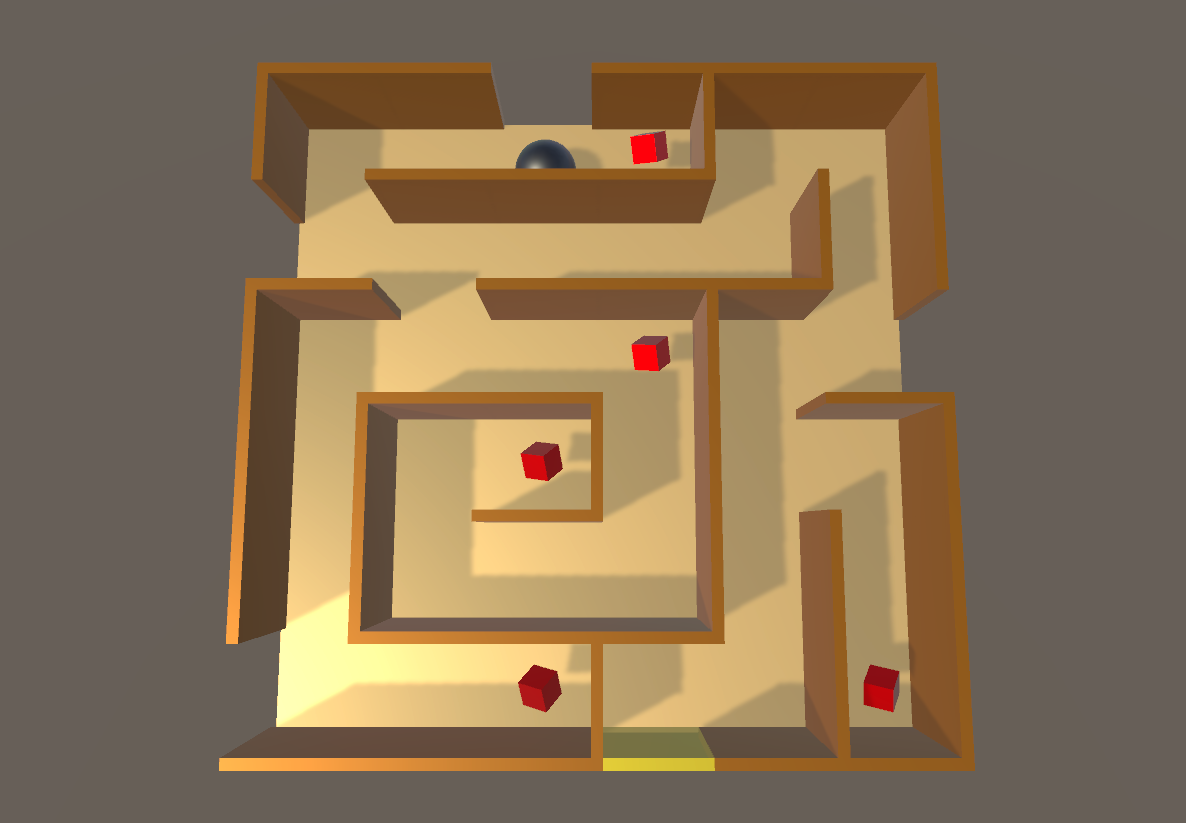
- The maze area should be oriented as a grid of at least 4x4 (the maze in the screenshot above is 6x6) and should have at least 6 inner walls and at least 3 missing walls on the edges.
- Implement two input control modes: using arrow keys and accelerometer.
- At least five collectibles are placed around the maze.
-
Game mechanics:
- A player wins if the ball reaches the destination wall and loses if the sphere rolls off the maze.
- The game automatically restarts when the player loses.
- When the ball collides with a collectible, the collectible disappears and the score is incremented by 1.
- The game must display the current score, and display some text when a player won (e.g. “You win!”) with a button asking the player to play again.
You can add any additional features you would like, but you must meet the minimum requirements.
The Maze Area
Just like the Roll-a-Ball tutorial, you will first create several objects in the scene. Below is an example of the scene hierarchy for this project. We recommend you follow it since some of the code snippets provided in future sections rely on this hierarchy.
-
Maze (Empty Node)
- Floor (Plane)
- Player (Sphere)
- EndWall (Cube)
-
Walls (Empty Node)
- Wall 1 (Cube)
- Wall 2 (Cube)
- …
-
Collectibles (Empty Node)
- Collectible 1 (Cube)
- Collectible 2 (Cube)
- …
- (Main Camera)
- (Light)
- (UI Components)
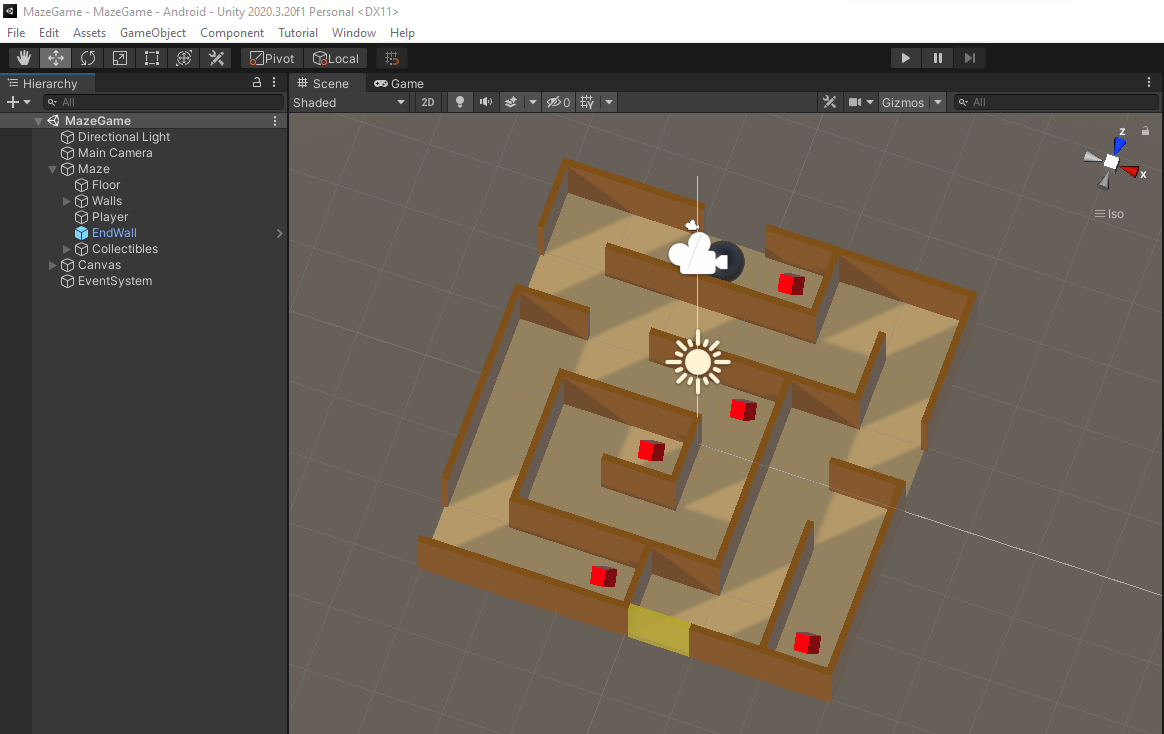
The Hierarchy pane shows all objects in the scene and the parent-child relationships of the objects. In the hierarchy shown above, the Maze is an empty node which acts as the root. The reason we have the root node for our maze board that contains everything else is because we will transform the whole board altogether. Inside the Maze node, we have the Floor (the floor of our maze), Player (the ball that will be rolling around inside the maze), EndWall (the goal of the game), Walls (an empty node containing multiple walls), and Collectibles (an empty node containing multiple collectibles).
It is also advisable to make the walls and collectibles using Prefabs. Recall that a Prefab is a blueprint of an object. You can create multiple instances of a Prefab and they will look exactly the same. One advantage of using Prefabs is that if you want to change something (e.g., the color of the collectibles), all you need to do is edit the Prefab, and the changes will automatically be apply to its instances.
For the collectibles, you will need to set the Tag. This will be used to identify if the colliding object is a collectible. To do this, click one of the collectible in the scene. Inside the Inspector pane on your right, click on the Tag dropdown and select “Add Tag…” where you can name your tag to whatever you like. Select other collectibles in the scene and apply the tag you just created. Similarly, you will need to add a different tag for the EndWall to be able to recognize a player winning the game.
We advise you to follow the file management good practice. Inside the Assets folder, you will create several folders and store files based on their types: Materials, Prefabs, Scenes, and Scripts.
Game Mechanics
Now that you have created the Player (sphere) object and the maze, it is time to think about how the Player should move and behave. The Player needs to be able to roll around on the game area, bump into walls, stay on the ground, not fly off into space, and collide with collectibles to pick them up. These things require physics. To use physics, your sphere needs a Rigidbody component. Refer to the section Moving The Player in the Roll-a-ball tutorial on how to add that component.
To define these behaviors, you will need to write a script. Create a new folder in your Assets folder called Scripts. Right click anywhere in Scripts folder and select Create → C# Script. Name the new scripts TiltControl. Select the Player → Add Component → TiltControl. This will attach the created script to the Player object. (Alternatively, click the Player → Add Component → New Script → TiltControl → Create and Add. This will create a script named TiltControl in your Assets folder. Drag it to the script folders.) Double click the script you just created. This should open up your default editor.
If you are using Visual Studio as the editor and code completion does not show up properly, go to Edit → Preferences → External Tools. Make sure Visual Studio is selected under External Script Editor.
Below is the starting template for our script (feel free to copy and paste).
// TiltControl.cs
using UnityEngine;

public class TiltControl : MonoBehaviour {
    public GameObject maze;     // Maze component

    private Rigidbody playerRb; // Player rigid body

    // Start is called before the first frame update
    private void Start() {
        playerRb = GetComponent<Rigidbody>();
        Reset();
    }

    // FixedUpdate is called at a fixed interval. This is useful for physics
    // simulation and also for the Rigidbody update.
    private void FixedUpdate() {
    }

    // Resets the state. This is called manually.
    public void Reset() {
    }
}
The script contains the class TiltControl which extends MonoBehaviour. In Unity scripting, each object has a type GameObject, which consists of several attributes and components (Transform, Material, Rigidbody, custom scripts, etc.). Since we attach the script to the Player, playerRb = GetComponent<Rigidbody>(); retrieves the Rigidbody component of the Player.
The following are some default functions that are worth knowing:
Startis called before the first frame update.Updateis called once per frame.FixedUpdateis called at a fixed interval.OnCollisionEnteris called when the object collide with another object.
The Reset function is added for convenience in resetting the game state.
Now go back to Unity, you should see TiltControl as a component of the Player inside the Inspector pane. Notice that any public attribute you declare inside the script will appear in the Inspector pane. For Maze property, select the Maze object from the dropdown menu, or drag it from the Hierarchy pane.

Controls
The maze should be controllable from your PC.
- If playing on a PC, the user should be able to rotate the maze using the keyboard (arrow keys or WASD) as input . The sphere can then roll around since it has a RigidBody component attached to it. By default, you can retrieve the keyboard input using
Input.GetAxis("Horizontal")andInput.GetAxis("Vertical").
Here is the script (feel free to change implementation details as you would like).
// TiltControl.cs
...
    public float sensitivity = 9.8;

    private Vector3 rotation;         // current Euler angle of the maze

    private void FixedUpdate()
    {
            Vector3 movement = new Vector3(
                Input.GetAxis("Vertical"), 0f, -Input.GetAxis("Horizontal"));
            rotation += movement;
            maze.transform.rotation = Quaternion.Euler(rotation);
    }

    public void Reset() {
        rotation = Vector3.zero;
    }
...
Losing Condition
We can determine when the Player sphere rolls off the maze by checking the sphere’s position periodically. We can achieve this by adding a condition to the FixedUpdate() function. Once the Player sphere is 5 meters below the ground, the player loses the game and we need to reset the game to its original state. Inside the Reset() function, we will revert the Maze to its original rotation at (0, 0, 0) and revert the Player to its original position. We also reset the its velocity to 0.
// TiltControl.cs
...
    private void FixedUpdate() {
        ...
        if (playerRb.position.y <= 5)
            Reset();
    }

    public void Reset() {
        rotation = Vector3.zero;
        maze.transform.rotation = Quaternion.Euler(rotation);
        playerRb.transform.position = new Vector3(-0.5f, 0.5f, 2.5f);
        playerRb.velocity = Vector3.zero;
        playerRb.angularVelocity = Vector3.zero;
    }
...
Winning Condition
You win when the Player sphere reaches the destination (EndWall). When a player wins, the text “You win” and a button “Play again” will appear to ask the player to play again.
To create text displays, we refer you to the Displaying Score and Text section of the Roll-a-ball tutorial.
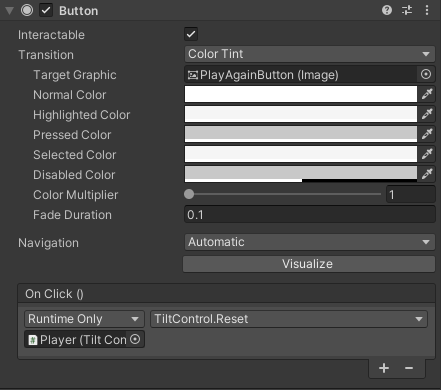
To create a button, select GameObject → UI → Button - TextMeshPro. Name it PlayAgainButton. You will need to bind the click event to the Reset function we implemented. To do that, select the PlayAgainButton and navigate to the On Click () section inside the Inspector pane. Click the plus icon, select the Player object, then choose TiltControl → Reset. Only the public functions are visible to the buttons. You can change the button label by selecting the Text(TMP) object.
We will use the OnCollisionEnter function to check for collision to the EndWall. If it does, we show the text and the button. We will need to add the handle for the text and the button in our class. Again, you will have to drag the corresponding components to the fields in the Inspector pane.
// TiltControl.cs
...
    public GameObject winTextObject;  // text displayed when a player wins
    public GameObject againButton;        // button to play again

    private bool won;

    private void OnTriggerEnter(Collider other) {
        if (other.gameObject.CompareTag("EndWall")) {
            won = true;
            winTextObject.SetActive(true);
            againButton.SetActive(true);
        }
    }

    public void Reset() {
        ...
        winTextObject.SetActive(false);
        againButton.SetActive(false);
        won = false;
    }
...
Collectibles
When the Player collides with a collectible, the collectible disappears and the player’s score is incremented by one. There should also be a text displaying the current score. Again, we will be using the OnTriggerEnter to detect collision. We will need a handle for all the collectibles in the scene to reset their visibility and a handle for the score text to update the score display.
using TMPro;
...
    public TextMeshProUGUI scoreText;

    private int score;
    private GameObject[] collectibles;

    private void Start() {
        ...
        collectibles = GameObject.FindGameObjectsWithTag("Collectible");
    }

    private void OnTriggerEnter(Collider other) {
        ...
        else if (other.gameObject.CompareTag("Collectible")) {
            other.gameObject.SetActive(false);
            score += 1;
            scoreText.text = "Score: " + score.ToString();
        }
    }

    public void Reset() {
        ...
        foreach (GameObject collectible in collectibles) {
            collectible.SetActive(true);
        }
        score = 0;
        scoreText.text = "Score: " + score.ToString();
    }
...
Turn In
You will need to record a short video (less than 2 minutes) of you playing on your computer (a screen recording is okay).
- Move the ball outside the maze; the game should reset itself.
- The “Play again” button should work.
Zip your video and your code TiltControl.cs into a single file and submit it on Canvas by the due date.
The video must be in .mp4 format.
Name the zipped file using your own UW NetID, like this: uwnetid_MazeGame.zip
For example, if your UW NetID is zoran, name your file zoran_MazeGame.zip.