In this project, the goal is to build a hierarchical 3D model with controls for interacting with it. The project skeleton contains a framework that hides the user interface code. Your model will be specified in a separate source file that will be compiled and linked in with the skeleton code.
This document is designed to help you overcome the initial difficulties of getting accustomed to the skeleton code. Hopefully, after reading this, you'll be able to spend more time to working on a cool model and less time trying to figure out how to make sliders, etc. This document is divided into several parts.
Good luck on the project!
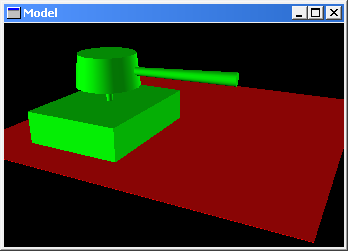
Start by getting a fresh copy of the skeleton code. Extract the files, build the project, and run modeler.exe. Two windows will pop up, the controls window and the model window.
Let's play around with the application a bit. On the left side of the controls window you'll see a list of the available controls: "X Position", "Y Position", "Z Position", and "Height". Select one of these by clicking on it (or more than one by holding down the shift key or control key while you click). For each selected control, a slider will be displayed on the right side of the controls window. Play with the model a bit by scrubbing the controls back and forth.
Now that you've gotten a feel of the controls interface, let's move our attention to the model window. By clicking and dragging on this window, you can actually manipulate the camera position. The camera controls are as follows. (The descriptions below are admittedly pretty crappy; it's probably better if you just played around with the camera a bit).
Alright, that was fun, wasn't it? Let's close the application now. You may notice that the standard Windows close buttons don't work. Blame me for that. If you want to close the Modeler application, choose "Exit" from the "File" menu in the controls window.
Alright, let's open up the modeler.dsw workspace. You'll notice that there are quite a few files in the project. For the purposes of building a model, you will be writing a new file (like the sample.cpp) and linking it in with the existing code. The following are just high level descriptions; we'll be going into more details later.
The modelerapp.* and modelerui.* files handle most of the user interface stuff (sliders, windows, etc). In particular, modelerapp.h defines the ModelerApplication class, which is how you'll be getting and setting control values (such as "X Position" in the sample controls window).
The modelerdraw.* files provide support for drawing primitive shapes like spheres, boxes, cylinders, and triangles. Furthermore, they provide functions for changing material attributes.
The modelerview.h file defines the ModelerView object, which will be the base class of your model. The ModelerView handles the OpenGL drawing and event handling. modelerview.cpp provides some base functionality, such as setting up lighting and handling the camera controls. If you look at sample.cpp, you'll notice that BoxModel is simply a subclass of ModelerView.
The camera.* files are used by modelerview.* to provide the camera functionality. If you're in CSE 457, you'll be modifying this file to implement your own version of gluLookAt.
All the rest of the files are pretty much files that you can ignore. If you're doing some sophisticated math, however, you may find vec.h and mat.h useful. You'll also notice that the model is distributed with modelerui.fl; this is the file that generates the user interface (using FLUID, the FLTK user interface designer). Unless you have a great reason, don't touch this. It'll probably end up being a lot more trouble than it's worth.
Let's learn the process of constructing a model by doing a careful walkthrough of sample.cpp. Open up this file, and go to main.
int main()
{
// Initialize the controls
// Constructor is ModelerControl(name, minimumvalue, maximumvalue,
// stepsize, defaultvalue)
ModelerControl controls[NUMCONTROLS];
controls[XPOS] = ModelerControl("X Position", -5, 5, 0.1f, 0);
controls[YPOS] = ModelerControl("Y Position", 0, 5, 0.1f, 0);
controls[ZPOS] = ModelerControl("Z Position", -5, 5, 0.1f, 0);
controls[HEIGHT] = ModelerControl("Height", 1, 5, 0.1f, 1);
controls[ROTATE] = ModelerControl("ROTATE", -135, 135, 1, 0);
ModelerApplication::Instance()->Init(&createSampleModel, controls, NUMCONTROLS);
return ModelerApplication::Instance()->Run();
}
Each ModelerControl object contains the information necessary to make a control. To create the user interface, we need to first make an array of controls.
ModelerControl controls[NUMCONTROLS];
NUMCONTROLS is actually defined at the top of sample.cpp within an enumeration; this makes it easier to change the number of controls without having to explicitly mess with #defines. We initialize each control as follows.
controls[XPOS] = ModelerControl("X Position", -5, 5, 0.1f, 0);
In the above code snippet, XPOS is defined at in an enumeration at the top of sample.cpp. The constructor for the ModelerControl above basically says the following.
Create a ModelerControl named "X Position" with minumum value -5, maximum value 5, step size 0.1, and default value 0.
We fill the controls array with these values. Afterwards, we initialize the instance of the ModelerApplication with this array. When you call the Init method, ModelerApplication in turn takes this array and creates the appropriate sliders. Then we can simply Run the application.
ModelerApplication::Instance()->Init(&createSampleModel, controls, NUMCONTROLS);
return ModelerApplication::Instance()->Run();
What's this ModelerApplication::Instance() junk, you ask? The short answer is, "don't ask." For you software engineering junkies out there, the slightly longer answer is "since we want to guarantee during the execution of the application that there is only one instance of ModelerApplication, it is implemented using a Singleton design pattern, and thus a ModelerApplication can not be constructed explictly; instead, a static instance is constructed upon the first request for the instance and that same instance is returned on subsequent requests." Got that?
Alright, so what's this &createSampleModel junk, you ask? Well, the ModelerApplication needs to know how to create the sample model, and createSampleModel is simply a function that does just that. We'll get to this part in a bit.
It's time to look at the construction of the actual model.
// To make a SampleModel, we inherit off of ModelerView
class SampleModel : public ModelerView
{
public:
SampleModel(int x, int y, int w, int h, char *label)
: ModelerView(x,y,w,h,label) {}
virtual void draw();
};
As you can see, SampleModel inherits from ModelerView. It overrides the draw method. There are several important parts of the draw method to look at.
void SampleModel::draw() ...
ModelerView::draw(); ...
glTranslated(VAL(XPOS), VAL(YPOS), VAL(ZPOS)); ...
drawBox(1,1,1); ...
ModelerView::draw sets up some default lighting parameters and sets up the projection matrix and camera position. Unless you're playing around with viewpoint controls, you're better off just keeping this call at the top of the draw method of your model.
Notice the call to glTranslated actually uses as the values of VAL(XPOS), VAL(YPOS), and VAL(ZPOS). These are the values of the controls (set by the slider values). VAL(x) is actually just an abbreviated version of (ModelerApplication::Instance()->GetControlValue(x)). All that the GetControlValue method does is return the current value of a control. Note that you can also call the SetControlValue method to set the value of a control (see modelerapp.h for function prototype). You may need to do this if, say, you want a control that controls the values of other controls.
Finally, notice the call to drawBox. If you look at modelerdraw.h, you'll notice that it provides functions that let you set the color and draw primitive shapes, like boxes. You could do this with OpenGL as well; in fact, some OpenGL libraries like GLUT have some pretty ridiculous primitive drawing function, like glutSolidTeapot. There are several reasons why you should stick with the primitives provided in modelerdraw.h.
There are, of course, reasons not to use the primitives in modelerdraw.h.
Finally, let's look at createSampleModel.
ModelerView* createSampleModel(int x, int y, int w, int h, char *label)
{
return new SampleModel(x,y,w,h,label);
}
Don't ask, just cut and paste. If you want to know the gory details, read through the code.
So how do you make your model? Simple. Suppose you're making a model of a dog. Make a new file called dog.cpp or something like that, and basically do everything that sample.cpp did for the SampleModel (including writing main). Add dog.cpp to the project, and remove sample.cpp from the project. If you don't, the compiler won't like that you have two main functions. Compile, run, and turn in. Okay, so it's not quite that simple, but hopefully this careful walkthrough of sample.cpp will make the construction of your model as painless as possible so that you can focus on putting together something really cool instead of messing around with link errors.
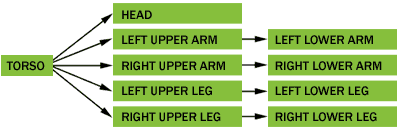
But how exactly do you build an articulated hierarchical model? Take the example of a simple human model. So the "root" of the model might be the torso, and attached to this torso are the head, upper arms, and upper legs, and so on and so forth all the way down to the tips of the fingers. Kinda like that song that you may have learned as a kid. Well, if you think about it, we can build a tree out of these parts, with the torso at the root. For simplicity, let's stick with a simplified version.
So how do you draw this in OpenGL? Well, as you may remember from class, OpenGL maintains a transformation matrix that is applied to everything that is drawn. Any matrix transformation call (such as glRotated, glTranslated, and glScaled) is under the hood implemented as a matrix multiplication with OpenGL's current transformation matrix. Thus, transformations are cumulative; if we just drew the upper arm, we would only need to perform transformations relative to the upper arm to draw the lower arm. This is a lot more efficient and sensible than than recalculating the position of the lower arm from scratch.
This kind of behavior, however, isn't always desirable. One we finished drawing the right arm, for instance, we'd want to draw the left arm relative to the torso, not the right arm. But to do this, we would need the original transformation matrix for the torso, right? This is where OpenGL's matrix stack is really helpful. The two main operations that you'll be using for manipulating the matrix stack are glPushMatrix and glPopMatrix. glPushMatrix makes a copy of the current transformation matrix and pushes it onto the matrix stack, and glPopMatrix pops the matrix on top of the matrix stack and makes it the current transformation matrix.
So, here's what we'd do. First, draw the torso, and push the current transformation matrix onto the stack. Then apply the necessary transformations, and draw the right arm. At this point, the current transformation matrix is in the coordinate space of the right arm. Now let's say we want to draw the left arm. We want to draw it relative to the torso, so all we'd have to do is pop the stack, and we're back in the coordinate frame of the torso. I hope you got that.
In more computer sciency terms, a hierarchical model can be represented as a tree. Each vertex of a tree represents a section of the hierarchy. Furthermore, each vertex has a transformation associated with it, which may actually be a series of rotations, translations and scales. This transformation positions the section of the hierarchy relative to the coordinate frame of its parent. To draw a hierarchical model, we would simply perform a depth first search of the hierarchy, pushing the current transformation onto the matrix stack, applying the transformation of the root, drawing the root, recursively visiting each child, and then popping the transformation off of the matrix stack. Whew ... I hope you remember your 326.
There are certain files that you simply should not touch. All the source code is distributed, partly for educational purposes (it's nice if you can see everything that's going on, especially if something goes wrong and you've got to debug). Keep in mind that you will probably want to use your model for the animator assignment. When we distribute the animator assignment, it will have a modified version of ModelerApp that displays the controls as interpolated curves instead of slider bars. You will be linking in the animator code with your code, and thus changing modelerapp.* will have annoying to disastrous effects. For similar reasons, it's a terrible idea to mess with modelerview.* and modelerui.*. You are free to mess with camera.cpp and sample.cpp as well as any files you add to the project. You can mess with camera.h, but keep in mind that modelerview.* depends on camera.*, so be careful.
If you want to do a simple animation, the simplest way is to update your model every time draw is called. Stick to something relatively simple, maybe a wagging tail or a hokey walk. Don't try and go all out with swing dancing goats; trust us, the animator application is much better suited for this task. Anyway, if you update your model any time draw is called, you can enable animation in the controls window and it will call draw repeatedly.
The sample application we've been using just uses a call to the ModelerView::draw method to set up the projection, lighting, and so on. If you're not satisfied with the default lighting, don't mess with modelerview.cpp; instead, just remove the call to ModelerView::draw from your draw method and take care of all the nasty stuff yourself. Take a look at modelerview.cpp to see how it's done.
If you really want to tinker with user interface interaction (perhaps you want your model to respond to keystrokes?), then you'll have to override the handle method as well. If you go this far, you're on your own, this is deep into the nasty user interface toolkit code. For those of you who implemented custom convolution filter interfaces for Impressionist, you know how nasty FLTK can get.
There are a few demo modeler applications available here for your viewing pleasure.