Assignment #4 Lab
DUE: Friday, 7/12 at 11:59 PM (the Cinematic Sandbox and Premiere sections, the animatic is due with Assignment #4b)
For this lab you will learn how to use the Cinematic Sandbox to create 3D story previsualizations as well as how to use Adobe Premiere to edit together the sandbox's output.
Cinematic Sandbox
To open the program navigate to this location on the network and click the executable:
O:/unix/projects/instr/production1/cinematic_sandbox/cs-0.1.4.00.exe
You must be going through your O: drive for the program to open correctly. The version number may change, but the latest iteration will always reside in this folder as the only .exe file. To begin, set the screen resolution to your current monitor resolution and the graphics quality to "Simple."
Saving Projects
Before doing anything you will want to setup a new project. Saving in the Cinematic Sandbox works slightly differently than in other programs. Instead of a single file, everything is lumped under a project folder. The "Path:" field at the top of the screen specifies the parent folder of the project, with the "Name:" field to the right of it specifying the project folder itself.
The default project path should be fine, which should be this:
O:/unix/projects/instr/production1/cs_projects/
However, for the name of your project type in cslab_[lastname]_[firstname], then click the "Create Project" button on the top left. This will create a folder inside the production1/cs_projects folder named cslab_[lastname]_[firstname] with all of your Cinematic Sandbox files in it and also save the first version of your file.
Once you have done this initial save the "Create Project" button will turn into an iterations counter. Every time you want to save your file, hit the + button next to the version number (or hit Ctrl+s). If you want to go to a previously saved version, use the arrow keys to either side of the iteration counter. If you open Cinematic Sandbox and you want to load a pre-existing project, put the name of your project in the "Name:" box and the program will recognize that a project by that name exists already and will load that file when you hit the "Load Project" button. The "Clean Sandbox" button will set the file back to the default settings (erases all your placed props, gets rid of the shots and sequences, and puts the camera back to the starting position).
Camera Movement and the Viewport
The viewport consists of two views. On the left is the cinematic/render camera. This will be the view that gets output into your final film. On the right is the perspective camera. This allows you to freely move around the scene to set up props and movement without having to modify the cinematic camera. In order to zoom into a particular camera's view, hover over the desired view and hit the spacebar. Hit the spacebar again to return to the original split-screen view.
Camera movement happens by holding down the left Alt key and by click and dragging a particular mouse button. Alt-left-drag rotates the camera, Alt-middle-drag pans the camera, and Alt-right-drag pushes the camera in and out.
Another type of camera movement is focusing on an object. Right now the only object in your scene is the green camera, which also represents the viewpoint of the cinema camera. Go ahead and left click on the green camera to select it. Now hit the f key. (Note that in addition to getting closer to the object, the rotation pivot for Alt-left-dragging has changed.) This is handy for re-centering the camera when it becomes difficult to manipulate.
Help Box
To enable the Help Box push the F1 key. It will appear on the right side above the playback buttons. When you hover over a tool in the Cinematic Sandbox text will appear in the help box to describe the appropriate keystrokes to use for that given tool and what it does. When there is a significant amount of help text, the Page Up and Page Down keys will scroll through it.
Basic Tools
In the upper right corner of the screen are the tool buttons. From left to right they are the Select, Move, Rotate, Scale, Waypoint, Place Prop, and Shot Note buttons. In parentheses are the hotkeys used to activate the tool.
Select (q) - Left-click on an object to select it and left click at a location with no objects to deselect it. Only one object can be selected at a time. When an object is selected, it will be a solid turquoise color. The select tool is also the default go-to tool, so if you simply want to cancel out of any of the other tools it's just a matter of hitting the q key.
Move (w) - Left-click-drag the yellow disk to move the object along the ground plane and the green arrow to move it up and down.
Rotate (e) - Left-click-drag on the axis guides to rotate the object in the indicated direction.
Scale (r) - Left-click-drag left or right to scale the prop down or up. Only uniform scaling is currently available. You also can't scale the camera.
Place Prop (the teapot) (p) - Select a prop by name from the list. For the sake of practice choose the lobster under primitives. Now, click and hold somewhere in the viewport to place and rotate the prop. Release your mouse when done with the initial placement.
When you have a prop selected the Attibute Editor on the right will display its current position, rotation, scale, and other miscellaneous properties. To change any of these values use the tool buttons listed above, or left-click-hold the coordinate boxes and move your mouse left or right to scroll through values. Alternatively, you can click in the boxes, type in a value, and hit enter. You can also delete a selected prop by hitting the Delete key.
Waypoint (t) - This tool is the primary method of animating props within the program. Select the desired prop to animate, in this case the lobster, and then left click on the ground plane to set a waypoint at the current location in the timeline. The Attribute Editor on the right has an option for adding pause time on a waypoint. To do this ctrl+click the time shaded part to adjust the length of the pause time. The right panel also has options for poses while a character is moving and poses while not moving with a virtual slider to go between the options. You'll see more on using this later.
Shot Note Tool (n) – This tool is for if you want to add a note to your shot to help further explain the action. It only works on the cinematic view. Click "+ Add Note +" and left-click drag on your camera viewport to make a textbox. If you want the note to only appear in a certain time range, uncheck "Use Whole Shot" and define your frame range. The note’s duration will be highlighted in green on your timeline.
Undoing (Ctrl+z) - Hit this hotkey to undo a previous action. This isn't a tool per-se, but is highly important. Shift+z will redo. Note that the undo queue will be wiped when switching to other editors (these will show up later).
Timeline
The timeline is divided into frame numbers on top, shots in the middle, sequences on bottom, and playback controls under the Attribute Editor on the right. Shots represent different camera perspectives, while sequences represent a continuous string of shots usin the same set, characters, and props.
The + and - buttons to the right of the timeline bars create and delete a new shot or sequence. The circular arrow is the loop toggle. When enabled, a shot or sequence will loop while playing.
You can add frames to a shot by Ctrl-left-clicking and dragging it on the timeline. You can double click any part of a shot to split one shot into two. To combine shots double click the seam between between them. The combined shot always takes the left shot's camera. Left-click-drag on a shot or sequence to shift it to another location on the timeline.
The time currently appearing in the viewport is indicated by a vertical red line. To change the current time just click the desired frame on the strip of the timeline.
Zoom in and out of the timeline by using the scroll button on your mouse.
Basic Tutorial
Now that you've been introduced to some of the sandbox tool basics you'll be creating a short test film. Go ahead and delete the lobster and any other props you added, and reduce your project back down to one shot and one sequence as a starting point.
- Laying Out Your Shots
First, set up three shots. Click the + button to the right of the shot strip of the timeline twice. Hit c to go to your camera and look under Text and Labeling. Under sequence label write "Annie" and under shot label write "0100" for the first shot, "0200" for the second shot, and "0300" for the third shot. To move between shots by clickin on the timeline such that the red bar rests within the shot you want to edit the attributes for.
Left click and drag the seam between shot 0100 and shot 0200 such that the first shot is 6s/145f. The second and frame values will appear as you do this. Ctrl-right-click on the shot if you need to add more frames to achieve this. Drag the seam between shot 0200 and shot 0300 so that the middle shot is at a length of 4s/97f and the end shot is at a length of 8s/192f.
- Prop Crafting
There are three different editors in the Cinematic Sandbox. Thus far you've just been using the Film Editor. Next you will be using the Prop Crafter create a new prop. You can change to this editor by clicking on the "Prop Crafter" tab on the top right of the screen or by pressing F8.
General Instructions: This tool allows you to create your own simple props using 3D blocks. Left click the starting block to add more, shift left click to remove blocks, and right click to paint blocks in the color selected in the right panel. Hit the "Add Color" button to create different colors for use on your prop using the 0-255 RGB scaled sliders. Click the "Add" button at the top left of the right panel to add your finished prop to the place prop list.
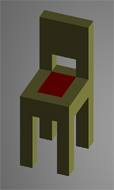
Making a Chair: Scroll in with your mouse so you can easily see the first grey starter block. In the right panel change the sliders for the RGB values for the prop color to R=211, G=211, B=107 to get a yellow brown shade. Begin using left-clicks to add blocks into the shape of a chair like the one imaged above. Click the "Add Color" button and change the sliders to R=255, G=0, B=0 to get red. Change the color of the squares in the middle so it looks like you have a seat cushion by selecting the new red color and right clicking on the blocks you want to turn red. Now rename it under the Prop Attributes header to "Chair" and hit the "Add" button at the top of the panel. Your chair should now be an option in the prop placement tool list under Custom Props.
- Set Building
Next we are going to make a set. Go to the "Set Builder" tab in the upper right corner or by pressing F6.
Name your set Living Room. Next, place two of your chairs and a prop of your choice. Your chair will probably be huge at this point and turquoise in color because it is currently selected. Use the move and scale tools to make the chair smaller and have its feet just touching the ground. Click away from the chair to see its true colors. After that go back to the "Film Editor" by clicking the tab or by pressing F5.
H
it c to select the camer and film attributes. Under "Set Chooser" select your set. Each sequence can have one set, where the set props are not selectable in the Film Editor.
- Making a Path Using Waypoints
Use the Place Prop Tool to add the character called Annie into the scene standing behind the chairs. You may have to go back into the Set Editor and scale them again to make them look like they belong together. You can temporarily put your characters in the set to get the scale right and then remove them.
Next we are going to animate Annie walking around the chairs. Select Annie and go to the Waypoint Tool. You will notice a cyan bar appear near the start of the timeline which is the initial keyed position for Annie. The current key is cyan, a selected key is pastel yellow, and regular keys are green. You can move keys at any time on the timeline by left-clicking on them and dragging them to the new location.
Go ahead and move the cyan bar to the 3 second mark if it is not already there. Now put the red time indicator bar at the 5 second mark. Left click on the ground plane to the left of the chair. Annie should move to the new position and leave a green marker at the old location with a line connecting the two. She will automatically re-orient herself to face in the direction she is walking. Next, move the red time slider to the 8 second mark and click in front of the chair.
Let's have her pause there for 2 seconds. So scroll down in the Attribute Editor on the right to find the Pause Time box. Our film is currently set at 24f/s so put in the number 48 into the box to get 2 seconds worth of pause. The timeline should now show a faded blue rectangle from the 8-10 second marks. Add two more waypoints, one at the right side of the chair at the 13 second mark and a final one back behind the chair at the 17 second mark.
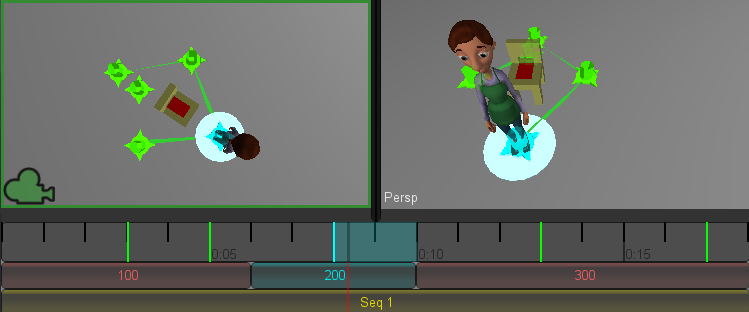
Your chair should be surrounded with a green diamond representing Annie's path. If you want to adjust the position of a waypoint (say Annie doesn't end up perfectly to the right of the chair like you wanted) you can left-click on the waypoint marker in the viewport and then drag it to the new location. Click-drag left and right on the frame number strip of the timeline to quickly move/scrub through your film and make sure Annie moves as expected.
Additional Notes on the Waypoint Tool: If you hold Shift before moving a waypoint you can move all of that character's waypoints at once. When you hold both Ctrl and Shift before moving a waypoint, you can move all waypoints on all props and characters in the sequence at once. Ctrl+shift moving will also move other time based keys as well.
- Shot Camera Angles
Now let's change the camera so that the shots have different angles to them. Put the red time indicator within shot 0100. Hover your mouse over the left viewport and use the Alt-based camera controls to change the cinematic camera angle so that it is looking at the front of the chair from approximately Annie eye-level. If you have difficulty moving the camera in this way you can also just use the basic manipulation tools to move the green camera from the perspective view.
Move the red marker again into shot 0200 and move the camera so that it is directly above the chair and green diamond path Annie makes. Finally, move the marker into shot 0300 and position the camera so that it is viewing the left side of the chair. Now when you scrub through the camera should change per shot.
As a final step, use the (+) button to add a new shot between shot 0200 and 0300, you are going to label this shot 0200 as well and we are going to simulate a zoom (actual camera animation is not supported). With the new camera zoom in on Annie’s head. Instead of pushing in, select the camera and lower the Field Of View found under Shot Attributes on the right. Use the selection tool and click on the ground plane away from Annie and her waypoint trail to hide all the tool attributes in the viewport.
- Exporting Your Film
Now that your test film is done go to the Options tab in the upper left corner and click ">> Enter Fullscreen <<" or press F11.
There are two different types of file output. "Film" does a single file for your entire movie while "Shots" will output a movie file for each shot. Go ahead and select "Shots". This will export all of your shots individually, going by name. So if two shots have the same name they will be counted as one -- as is the case with the simulated camera movement in 0200. The advantage of outtputting individual shots is that it will be easier when sending them to Premiere for further editing.
You should now understand the basics of creating a film using the Cinematic Sandbox.
Premiere
Now you that you have shots it's time to edit them together. Though this is possible to do in After Effects you will be learning how to do this in Premiere, which is more streamlined when it comes to this particular task. Go to Start → All Programs → Adobe Master Collection CS3 → Adobe Premiere CS3.
Click "New Project".
To optimize your project for the Cinematic Sandbox output, click the "Custom Settings" tab and change the following settings under General:
- Editing Mode - "Desktop" -- Note that this will free up the resolution to be changed
- Timebase - "24.00 frames/second"
- Frame size - "640" in horizontal, "360" in vertical
- Pixel Aspect Ratio - "Square Pixels (1.0)"
- Fields - "No Fields (Progressive Scan)"
Now, next to "Location" click "Browse..." and navigate to your folder on the network:
Computer -> cs (\\cseexec.cs.washington.edu)(O:) → unix → projects → instr → production1 → cse456_su13_student_files -> [your student files folder].
Name your project cslab_[lastname]_[firstname].
Hit "OK".
You should now see several control panels. On the top left is the Project Control Panel that will show you the files you have imported and your sequences. To the right is a viewport and editing area for a single selected clip. On the far right is a viewport for how your movie will appear. On the bottom left is basic info, an effects listing, and your history. To the right of that is the Timeline and on the far right some Toolboxes.
To get your files into Premiere go to File → Import... and again navigate to your folder on the network where you have saved your Cinematic Sandbox Project. Go into the “shot_renders” folder.
Select the desired shots (use Ctrl to select multiple files) and hit "Open." They should appear in the Project Control Panel. Alternatively you can drag and drop the video files into the Project Control Panel.
Select the first shot you want in your movie in the Project Control Panel. Then left-click-drag it into the Timeline Panel. You should see the clip appear as a rectangle at the start of the timeline.
If you hover on the top right edge of the clip your cursor will turn into a red bracket with two arrows. This tool will let you adjust the length of your clip. You shouldn’t have to do this if the timing is correct in the Cinematic Sandbox.
Repeat this process with all of your clips, dragging them after the previous one in the timeline. You will notice that Premiere has a nice feature that automatically tries to snap your next clip onto the end of the previous one. If you find that that your clips aren’t snapping to nearby clips hit s to turn snap back on.
Now that you have them all in the timeline, scrub through your film and make sure everything appears the way you want them to in the top right panel. To scrub, click and move the blue marker in the timeline or alternatively hit the play button under the viewport to watch it play at approximately realtime.
The last step is to name your sequence and export it. In the Project Control Panel right click Sequence 01 and select Rename. Name it the same thing as you did, which was cslab_[lastname]_[firstname].
Now go to File -> Export -> Movie... The file name should automatically be that of the sequence you are exporting. Click the "Settings..." button.
In General: Under File Type select "Quicktime". Under Range set it to "Work Area Bar". For now, uncheck the "Export Audio" box and uncheck the "Add to Project When Finished" box.
In Video: Under Compressor select "H.264". All of the other settings should be from when you initially set the project.
Finally, hit "OK", then "Save".
Be sure to save this test film in your student folder using the correct naming conventions! For the official turn-in, also submit a version to the class dropbox on catalyst. This short test film is due into the Assignment 4 Lab by Friday, 7/12, at 11:59 PM.
In the future be sure to save your Premiere file frequently as you go and save iterations. This may not seem as relevant for this lab because it should be pretty quick, but it will become very important the more time you put into your editing later.
Building an Animatic
Now that you've familiarized yourself with the Cinematic Sandbox and Premiere you should be ready to transform your story into a rough 3D previsualization known as an animatic. This part of the lab is more of an extension of Assignment #4b, where you are required to revise your thumbnails from 4a and construct an animatic where each individual thumbnail translates to a shot with placed characters and poses.
In revising your thumbnails and framing your shots, placing your characters, etc, you may find the following resources useful:
Create a new sandbox project for your film with the name animatic_[lastname]_[firstname]. It should still be within the default production1/cs_projects/ folder. This will be where your animatic develops over the rest of the quarter.
Similar to the lab portion above, you will be turning your first iteration of the animatic into the class dropbox. This also goes for the rest of the materials for Assignment #4b (the write-up has also been updated to reflect this).
Below are a few more features of the Cinematic Sandbox that may help you in developing an animatic.
Adding Images
Some props can have images applied to them. If an object has this capability and if you have images in your images folder (explained below), an "+ Add Image +’ option will be available in the right panel.
Inside your cinematic sandbox project folder in production1/cs_projects there should be a folder called "images." Put any images you want to use in the sandbox here. When you click "+ Add Image +" you will be able to flip through them. You can key images by moving to a new spot on your timeline clicking "+ Add Image +" again and selecting a new image, a new key will be added to your timeline. If you add an image to your image folder while your project is open, it will not appear as an option until you click Refresh Images.
Adding images to planes and the Wall object is a good cheap way to add in backgrounds and even simple custom characters. If you use PNG files the transparent pixels will show up as such in the 3D view as well.
Parenting
It is possible to attach one object to another in the sandbox via parenting. Take a prop (for example, a wizard hat), and under the Parent Chooser in the Attribute Editor select one of the other objects in the scene (for example, Annie). In this case, the wizard hat is now attached to Annie.
When first choosing the parent you'll see that the object jumps to a completely different location in the scene. Because of this, it is good practice to select a prop's parent before positioning it, rather than carefully placing it next to its future parent only to have that placement thwarted upon specifying its parent.
Nested parenting is supported; however, for simplicity try to keep it only one level deep.
Adding custom props
In a sandbox project's main folder, create a "models" folder and drag in an OBJ model and all of its associated
material and texture files. Just copy the individual files over, don't bundle them in any sub-folders under
the sandbox project's models folder. You can find a compilation of objs here:
O:/unix/projects/instr/production1/cinematic_sandbox/additional_content_prop_library
Any OBJs copied over in this manner will now appear under the External Props group in the Place Prop Tool. Note that your project will need to be reloaded before new props appear. Also note that overly complicated OBJ files have a habit of breaking, so if you find one you want to use but doesn't work, let the staff know. Try to make sure the polygon count is relatively low.
Capturing control manipulations
One other method of animation in the sandbox is a rough sort of motion capture. On a prop without waypoints, using either the translate or rotate tool while the film is playing, hold down the v key to record any movements you do. Note that this feature isn't fully fleshed out though so it has some limitations. There currently isn't any editing involved other than recording over previous manipulations. Undoing also does not work well.
Like waypoints, hold Shift and left-click-drag the green in the timeline to move all captured motion around for that prop. And also like waypoints, holding both Ctrl and Shift will move around all time based waypoints/images/recordings in that sequence. |