|
CSE 456 - Story for Digital Animation |
||
To demonstrate you understand the three main steps below you will turn in a short Quicktime film into the "lab2" folder on the network prior to next week's tutorial. It should include at least three frames for part one, at least one object with keyed visibility for part two, and a moving hierarchy chain at least three deep (i.e. move the upper arm, lower arm, and hand) for part three. You may use either Premiere or After Effects to do this, but we encourage you to try out these animation methods in both programs. More advanced skills like combining the methods above or trying the puppet pin tool are not required in the films you turn in, but you are more than welcome to include them at the end. 1. Basic Faux Animation (flip-book style) This consists of having drawn images that represent the major actions and scene changes aligned chronologically in your video editing program. You don't do any extra work besides putting them in the program, modifying their length, and then exporting a video. This will be the same process as last week's lab. Have the main character from your story act out a very small moment of your film. Say I have three scanned images (or ones I drew in Photoshop) that are showing a creature getting an idea: 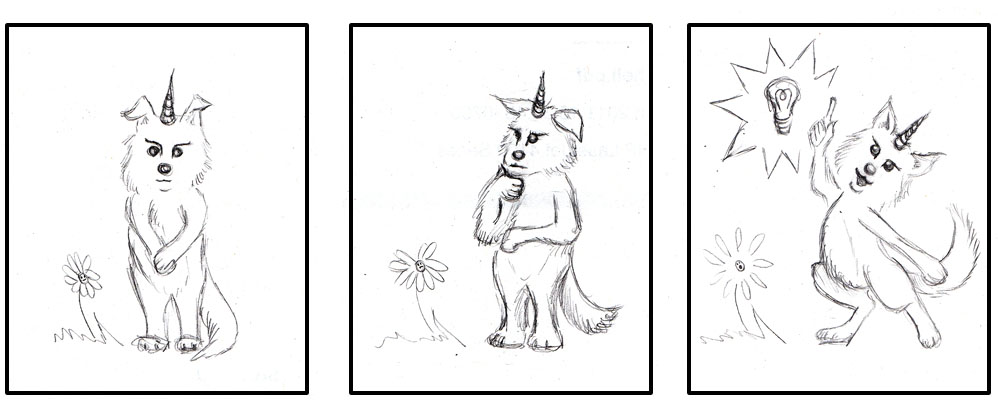 They are illustrating the important movements needed to get across that she started thinking hard, and then thought of something. You don't need the in-between movements to understand what is going on. In Premiere: Go to File -> Import... and select your image files. Select the first image you want in your movie in the Project Control Panel. Then left click on it and drag it into the Timeline Panel. You should see the clip appear as a rectangle at the start of the timeline. If you hover on the top right edge of the clip your cursor will turn into a red bracket with two arrows. This tool will let you adjust the length of your clip, so click and extend your clip to the desired amount. Repeat this process for all your images, dragging them after the previous one in the timeline on the same track. You will notice that Premiere has a nice feature that automatically tries to snap your next clip onto the end of the previous one. Now that you have them all in the timeline, scrub through your film and make sure all the images appear the way you want them to in the top right panel. In After Effects: Go to Composition -> New Composition… and set the width and height to 640 x 480. Go to File -> Import and select your image files. Left click and drag your images into the timeline. Put the image you want shown first on top, second one below that, and final on bottom. Select all the layers and at the far right edge of the timeline click the right edge of the purple layer bars and drag it to the left until the shots are the desired length (you can also do them one at a time if you want them of different lengths). Next, make sure they are all selected again and go to Animation -> Keyframe Assistant -> Sequence Layers… Hit "OK" and your layers will space themselves appropriately. Scrub through to make sure your images appear as desired. If you need to resize anything you can click the arrow to the left of the layer name, then click the arrow next to "Transform" and you should see the general adjustment settings. 2. Replacement/Simple Movement If you want to quickly change a facial expression or move the background but keep everything else the same, keying the transparency of a layer is a simple way of achieving this. Take a pose that you used for part 1. Now draw a different mouth for your character. In Photoshop put the body on one layer and put the mouth on another (make sure the mouth is surrounded by transparency!). Save as a .PSD. 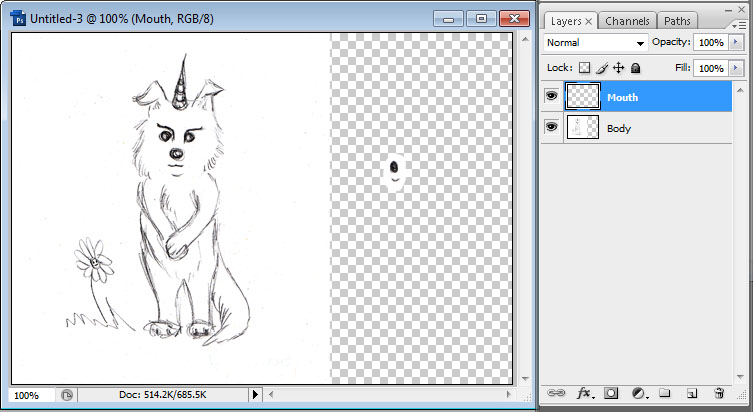 In Premiere: Go to File -> Import… and select your Photoshop file. On the popup box select Import As Sequence and hit "OK". Click and drag your body image onto track Video 1 and adjust its length. Drag the mouth onto track Video 2 and make it the same length as the image below. Move the mouth so that it is in the correct place on your character's face. Then click on the mouth layer in the timeline and go into the Effect Controls tab. You should see "Opacity". Click the arrow next to the word opacity and you should now see a little stopwatch, a percent, and two arrows around a little diamond. Normally to have these video programs start keeping track of keyframes you would need to click the stopwatch icon first, but in Premiere the opacity is already turned on by default. Start by dragging the time indicator to about the middle of your clip. Change the opacity percent to 0%. You should no longer see your mouth and a little diamond should appear on the clip timeline. The diamond represents that you have saved a value on the attribute for that frame. Now drag the time indicator to right after the first diamond and change the opacity to 100%. A second diamond should appear on your timeline. Every time you change a value for the attribute a new diamond will appear. You can set keys even when you don't change a value by pressing the diamond icon next to the percent value on the left, and you can jump from key to key by using the arrows to either side of the diamond icon. Now when you scrub through your mouth should change in the middle. In After Effects: Go to File -> Import. When you import a Photoshop file select "Composition - Cropped Layers" from the dropdown menu and keep "Editable Layer Styles" clicked before hitting "OK". Drag the body layer into the timeline and then drag the mouth image above it. Move the mouth so that it is in the correct spot on the character's face. Click the arrow to the left of the mouth layer's name and click the arrow next to "Transform". You should see "Opacity" as an option at the bottom of the list. Put the time indicator at about the halfway point in your clip, change the opacity percent to 0% and click the stopwatch icon. Your mouth will disappear and you will have a diamond shape on your timeline. Advance the time indicator a very small amount and change the opacity to 100%. A second diamond should appear. Now when you scrub through your mouth should appear in the middle of your clip. 3. Hierarchy Animation This example is closer to what you would be doing if you were to be fully animating a film in 2D. You will rarely use this technique, but it is good to know how to do it all the same. This time we will try to make our character wave. This time have a body with one of its arms deleted, an upper arm, a lower arm, and a hand all on separate layers. Name them appropriately by double clicking on the layer name. Save the Photoshop file. 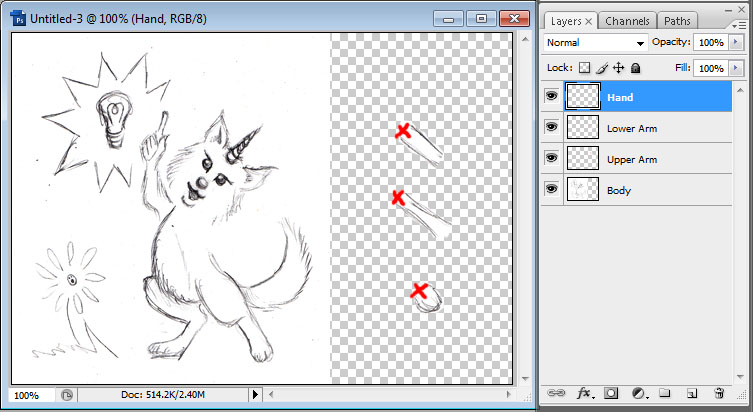 In Premiere: Import your images like in part 2 and layer them in the same order you had them in Photoshop on the video tracks. If you need to add a track go to Sequence -> Add Tracks… Select the upper arm layer and go into the Effect Controls tab. Click on the arrow next to Motion and the click the word "Motion" itself. You should see a box around your arm and crosshairs in the middle. The crosshairs are the Anchor Point and indicate where the layer will rotate around. Change the values for the Anchor Point until the crosshairs are at the top of the arm (I put red x's on the picture to indicate where the anchors need to be for the different parts). Now change the Position values so that the arm re-attaches to the shoulder. Change the Rotation and verify that the arm is rotating at the shoulder now. Change the Anchor Points and Positions for all the remaining parts. Now, change the time indicator to where you want your motion to start. Click the stopwatch for Rotation and Position on all the layers. Advance the time indicator. Rotate the upper arm to where you want it to be. Go through the other layers and re-position them so they are attached again. Rotate the lower arm and then re-position the hand. Every time you change a value, a new diamond shape should appear on the clip timeline. Keep advancing the time indicator and changing the rotations and positions of the parts until you achieve a wave. In After Effects: Import your images like in part 2 and layer them in the same order you had them in Photoshop on the timeline. Select the upper arm layer. Now go to the tool box below the Menu bar and find the Pan Behind Tool (or just hit the "y" key). This allows you to directly move the pivot. So find the crosshairs in the middle of the box around your arm piece and click on it and drag it to the right place. Select the other layers and move their pivots in the same way. Now select the upper arm layer and to the right of the layer name find the little spiral icon. To the right of the spiral is a drop down menu that should currently say "none". Change this to be your body layer. You have just parented your upper arm to the body so that if you re-position or rotate the body, the upper arm will follow. Parent the lower arm to the upper arm, and the hand to the lower arm. Now when you rotate a piece, you don't have to worry about the rest of the arm becoming disconnected so you don't have to re-position everything every time like you had to in Premiere. Go ahead and key the rotation of the arm pieces so you get a wave motion. You are now done with the film you need to turn in for next week so go ahead and render it out. Follow the instructions from the previous lab for Premiere and for After Effects move the work area slider to the end of your last clip and then go to Composition -> Trim Comp to Work Area. Next, go to File -> Export -> QuickTime Movie… Set the Compression to H.264 under the Settings button if it isn't that already, and uncheck the Sound and Prepare for Internet Streaming checkboxes before hitting "OK". Extra Fun in After Effects, the Puppet Pin Tool: Another method of quickly animating that I showed during the demo today was the puppet pin tool available in After Effects. If you have a character on a transparent background (you don't need layers for this one!) you can bring it directly into After Effects. Select the Puppet Pin tool from the bar right below the Menu (or just hit Ctrl+p). Now click on your image on those locations you would like to move such as the pivot locations from the previous part 3. You should see little circles appear on the locations you selected. Now, if you go back to the arrow tool (hit "v") you can grab the dots and move them around. You may notice that other parts of the body are moving that you didn't intend. Just add extra pins to those locations and After Effects will hold them still. You can key your position changes by navigating through the arrows from the main layer arrow to Effects -> Mesh 1 -> Deform -> Puppet Pin # -> Position. This is a very quick way to add motion so have fun and experiment. Below are some online video tutorials that go more in-depth than what I did in class and further than we require. However, if you want more visuals or are curious there are two good ones here: Hierarchy and animating mouths: http://www.lynda.com/After-Effects-training/2d-character-animation/734-2.html Advanced puppet pin tool: http://www.motionworks.com.au/2009/02/the-dancing-can-part-1/ |
||