Out: Thursday, April 14
Part 1, 2, and 3 Due: Thursday, April 28 at 12:00PM
Part 4, 5, and 6 Due: Monday, May 9 at 11:00am, hand in report at
start of lecture
For this project, you will be working in groups of 3.
Tasks:
In the beginning (well, the relative beginning), there was UNIX. UNIX supported multiprogramming; that is, there could be multiple independent processes each running with a single thread of control.
As new applications were developed, programmers increasingly desired multiple threads of control within a single process so they could all access common data. For example, databases might be able to process several queries at the same time, all using the same data. Sometimes, they used multiple processes to get this effect, but it was difficult to share data between processes (which is typically viewed as advantage, since it provides isolation, but here it was a problem).
What they wanted was multithreading support: the ability to run several threads of control within a single address space, all able to access the same memory (because they all have the same mapping function). The programmers realized that they could implement this entirely in the user-level, without modifying the kernel at all, if they were clever.
As you'll discover in the last part of this assignment, there were some problems with this approach, which motivated kernel developers to include thread support in the kernel itself (and motivated researchers to do it better; see Scheduler Activations).
You will be using the simplethreads package for this assignment. It is available on spinlock/coredump in /cse451/projects/simplethreads-1.X.tar.gz or for download. (Where X is the release number, which may be updated. Use the latest version. Please watch for updates as the project progresses.)
This project, since it does not involve modifying the kernel, does not require VMWare. The simplethreads package has been tested on various platforms; however, please develop your code on spinlock/coredump, where we are going to test it.
Please do not use attu.
To begin, copy the tar.gz file to your work directory (/cse451/LOGIN) and run
tar -xvzf simplethreads-1.X.tar.gz
to expand it (if you are working on a different machine, see scp(1)).
Simplethreads contains a lot of files, but most are safe to ignore. Pay attention to:
| Dir/File | Contents |
|---|---|
| lib/ | The simplethreads thread library itself. |
| lib/sthread_user.c | Your part 1 and part 2 implementations go here. |
| lib/sthread_ctx.{c,h} | Support for creating new stacks and switching between them. |
| lib/sthread_switch_{powerpc,i386}.h | Assembly functions for saving registers and switching stacks. |
| lib/sthread_queue.h | A simple queue that you may find useful. |
| lib/sthread_preempt.h | Support for generating timer interrupts and controlling them (see part 4) |
| include/ | Contains sthread.h, the public API to the library (the functions available for apps using the library). |
| test/ | Test programs for the library. |
| web/ | The webserver for part 3. |
Like many UNIX programs, simplethreads uses a configure script to determine parameters of the machine needed for compilation (in fact, you'll find many UNIX packages follow exactly the same build steps as simplethreads). In the simplethreads-1.X directory, run ./configure to generate an appropriately configured Makefile.
Finally, build the package by typing make. You can also build an individual part, such as the library, by running make in a subdirectory. Or, if you just want to compile one file, run make myfile.o (from within the directory containing myfile.c).
Note that, as you make changes, it is only necessary to repeat the last step (make).
In summary, the steps are:
If you add a new source file, do the following:
test_silly_SOURCES = test-silly.c other sources here
| Part 1: Implement Thread Scheduling |
For part 1, we give you:
It is your job to complete the thread system, implementing:
The routines in sthread_ctx.h do all of the stack manipulation, PC changing, register storing, and nasty stuff like that. Rather than focusing on that, this assignment focuses on managing the thread contexts. Viewed as a layered system, you need to implement the grey box below:
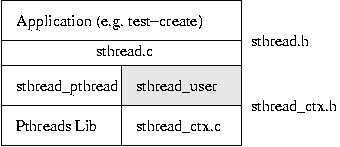
At the top layer, applications will use the sthread package (through the API defined in sthread.h). sthread.c will then call either the routines in sthread_pthread.c or your routines in sthread_user.c (it chooses based on the value passed to sthread_init()). Your sthread_user.c, in turn, builds on the sthread_ctx functions (as described in sthread_ctx.h).
Applications (the top-layer) may not use any routines except those listed in sthread.h. They must not know how the threads are implemented; they simply request threads be created (after initializing the library), and maybe request yields/exits. For example, they have no access to sthread_queue. Nor do they keep lists of running threads around; that is the job of the grey box.
Similarly, your grey box - sthread_user.c - should not need to know how sthread_ctx is implemented. Do not attempt to modify the sthread_ctx_t directly; use the routines declared in sthread_ctx.h.
[New Thread
					1024 (LWP 18771)]
. These messages refer to kernel threads.
| Part 2: Implement Mutexs and Condition Variables |
For part 2, you'll use the thread system you wrote in part 1, extending it to provide support for mutexs (a.k.a. locks) and condition variables. Skeleton functions are again provided in lib/sthread_user.c. You need to:
So far, your threads are non-preemptive, which gives you atomic critical sections. For this part, get your synchronization primitives working with this non-preemptive assumption and start thinking about where the critical sections are (add comments if you find it useful). When you add preemption, you will have to go back and add appropriate protection to critical sections. The details about this are in part 4.
| Part 3: Implement a Simple Synchronization Problem |
There are several famous synchronization problems in computer science. For part 3, your job is to implement a "food services" problem, an instance of the better-known multiple-producer, multiple-consumer problem. There are N cooks (each a separate thread) that constantly produce burgers. We'll assume for debugging purposes that each burger has a unique id assigned to it at the time it is created. The cooks place their burgers on a stack. Each time a cook produces a burger, she prints a message containing the id of the burger justed cooked. There are M hungry students (each a separate thread) that constantly grab burgers from the stack and eat them. Each time a student eats a burger, she prints a message containing the id of the burger she just ate. Ensure, for health and sanity reasons, that a given burger is consumed at most once by at most one student.
Note that you are implementing an application now. That means the only interface to the thread system that you should use is that described by sthread.h (as distributed in the tar.gz). Do not use functions internal to sthreads directly from your solution to this problem.
Place your solution in a new file called test-burgers.c in the test directory. Make the program take 3 command-line parameters: N, M, and the total number of burgers to produce. For example, test-burgers 3 2 100 should simulate 3 cooks, 2 students, and 100 total burgers.
| Part 4: Implement a Multithreaded Web Server |
Every web server has the following basic algorithm:
The sioux webserver in the web directory implements the server side of the above algorithm.
For this part of the project you will make sioux into a multithreaded web server. It must use a thread pool approach; it should not create a new thread for each request. Instead, incoming requests should be distributed to a pool of waiting threads (this is to eliminate thread creation costs from your experimental data). Make sure your threads are properly and efficiently synchronized. Use the routines you implemented in part 2.
Don't forget that the only interface to the thread system that you should use is that described by sthread.h. Do not use functions internal to sthreads directly from sioux.
You should accept a command-line flag indicating how many threads to use.
In testing, you may encounter "Address already in use" errors. TCP connections require a delay before a given port can be reused, so simply waiting a minute or two should be sufficient.
Because we have not used asynchronous IO in sioux, it will be very difficult to obtain good performance using the user-level threads. In some cases, it may be difficult to even get correct behavior at all times (e.g., if no new requests are sent, existing requests may not be serviced at all). We recommend using kernel-level threads for testing this part (meaning you should configure your library with pthreads).
At this point you should perform a sanity-check by doing the "Run the Web Benchmark and Report the Results" portion of Part 6, below.
| Part 5: Add Preemption |
In this part, you will add preemption to your threads system. This part of the project is not a lot of work (it represents perhaps only 10% of the code you will write), but it's a little tricky. We've made it the last part of the project (aside from the "Report" part) so you won't get stuck on it and fail to get the multi-threaded web server running. (The multi-threaded web server does not require preemption.)
We provide you with:
See sthread_preempt.h for more details on the functions you are given.
It is your job to:
To initialize the preemption system, you must make a call to sthread_preemption_init,
which takes two arguments: a function to run on every interrupt, and a period
in microseconds, specifying how often to generate the timer interrupts. For
example, sthread_preemption_init(func,50) will call func every 50
microseconds. You should add a call to sthread_preemption_init as the
last line in your sthread_user_init() function. Make it so that the thread
scheduler switches to a different thread on each interrupt.
The hard part will be figuring out where to add synchronization to your thread
management routines. Think about what would happen if you were interrupted at
various points in your code. For example, we don't want to be preempted when
we're inside yield() and in the middle of switching to a different thread. The
safest way to ensure this never happens is by disabling interrupts. You are
provided with a function splx(int splval), where splx(HIGH) disables
interrupts and splx(LOW) enables them. Here is an example:
int oldvalue = splx(HIGH); // disable interrupts; put old interrupt
state(disable/enabled) into oldvalue
{critical_section};
splx(oldvalue); // restore interrupts to original state
You are also provided with two other synchronization primitives:
atomic_test_and_set and atomic_clear. See sthread_preempt.h for a usage
example. These will be useful for less important critical sections, such as
ready queue manipulation. Note that it is also necessary to synchronize your
mutex and condition variable code. For example, in sthread_user_mutex_lock,
you will want to use atomic_test_and_set
for grabbing a lock.
A note: timer interrupts are set up so that they only fire when you are executing your code (either the user application or the thread library). Interrupts occuring inside printf or other system functions will be dropped. Also, interrupts in the critical assembly code inside sthread_switch are also dropped. This simplifies your task greatly.
"Stress testing" is important. It's common to get this part of the project "90% correct." You forget to disable interrupts in just one or two situations. This may not show up with cursory testing. That's what "race conditions" are all about -- they're devilishly difficult to track down because they're timing-dependent. But eventually they will show up!
IMPORTANT! The code that we have provided to support preemption works correctly only on the x86 architecture! Do not attempt this portion of the assignment on a Mac or other non-x86 architecture!
Hints
| Part 6: Report |
Include the following in a written report to be turned in in lecture on the due date. This should be at most 3 pages long.
Briefly describe the design of your user-level threads, synchronization primitives, and webserver. Mention any design decisions you had to make, and why you made them.
Does your implementation work? Which parts work and which don't? For the ones that don't work, how do you think you would fix them?
Consider these two web server configurations:
Using the web benchmark described below, measure the throughput and response time for these two web servers using 1, 5, and 25 clients. Each client should fetch the file emacs.html (found under /cse451/projects), so you should copy this file into your web/docs directory (which is the web server root directory) and include it in urls to pass to the webclient benchmark. For best results, make sure you run sioux and webclient on different hosts (for example, run sioux on spinlock and webclient on attu - this is the only place where using attu is ok!).
Report these results in a few easy to understand graphs. Explain your results. How does the multithreaded aspect of the web server affect throughput? What about response time? How would web server performance be affected if you were to use your user threads? (You're welcome to try it and measure it, although this is not required.)
Discuss conclusions you have reached from this project. Was this a good experience?
The WebStone web benchmark tool is installed on spinlock and coredump as /cse451/projects/tools/webclient. It measures the throughput and latency of a webserver under varying loads. It simulates a number of active clients, all sending requests in parallel (it does this by forking several times). Each client requests a set of files, possibly looping through that set multiple times. When the test is complete, each client outputs the connection delay, response time, bytes transfered, and throughput it observed (depending on the server, the clients may all observe very similar results, or the data may vary widely). The tool takes the following arguments:
All of the above parameters are required. The URLLIST file should contain one relative URL (just the file name) per line followed by a space and then a number (the number is the weight representing how often to request the file relative to other files in the list - most likely, 1 is the value you want).
For example, to test a webserver on almond.cs.washington.edu, with two simulated clients each fetching the index.html file twice, one would run:
/cse451/projects/tools/bin/webclient -w almond.cs.washington.edu -p 12703 -l 2 -n 2 -u ./urls
Where the file urls would contain the following single line:
/index.html 1 | Turnin |
Please turnin one copy of the project per group. It would help us if you select one group member to execute all turnins (only the last submission will be graded).
In your top-level simplethreads directory, run make dist. This will produce a file named simplethreads-1.X.tar.gz. Make a new directory called username where username is your CSE login and move simplethreads-1.X.tar.gz into that directory. Submit this directory using the turnin(1L) program under project name project2a. Turnin will not work on coredump/spinlock, so you'll need to use attu.
Run tar tvzf simplethreads-1.X.tar.gz and check to make sure all simplethreads files, and any new files you have added, are listed.
All submitted files should be in text format. Word documents should not be submitted (by turnin or email).
Follow the same instructions as above. Turnin a final version of your code including any scripts or other files you used in part 6. It should be submitted under the project name project2b. The turnin closes at 11:00am on Monday, May 9.
Turn in your written report for part 6 on Monday, May 9 at the beginning of lecture.