Project 8: Debugging & Implementing a Compiler
Due Date: Wednesday, March 6, 2024 at 11:59pm
Learning Objectives
- Apply the concepts of the Scanner, Parser, and Code Generator to a real compiler.
- Go through the process of immersing yourself with a sizeable existing codebase.
- Deliberately practice debugging strategies in building a compiler.
Introduction
Now that we have covered the main phases of the compiler from lecture, we will dive into one specific compiler phase that you will debug and implement: the code generation phase. Recall from lecture that the code generation phase involves traversing through the Abstract Syntax Tree (AST) and depending on the AST node, printing the corresponding lines of code. In this project, you will debug two AST nodes and implement a few other AST nodes to completing a working compiler.
Instructions
Navigate to the Project 8 assignment on Canvas. Download the document template
titled Project 8.docx. Open the document, read the instructions on the first page, and estimate the
amount of time you think it will take you to complete this project. Then, complete parts I and II of the
project.
Part I: Building a Compiler (25 points)
Background
In this part of the project, you will finish a buggy and incomplete implementation of a compiler that converts
from MicroJack (a rough subset of the Jack programming language) to Hack assembly instructions. This project will
complete our journey from Nand gates to a high-level language like Java. When your compiler is
finished, you will be able to write high-level Jack code, compile it to Hack assembly, and execute that assembly
on the computer you built! We hope you will find the experience empowering.
Implementing a compiler is a significant task. As we saw in lecture, compilers are typically organized into a "front-end" that discovers the structure and meaning of the source code (the Scanner and Parser), a "middle-end" that processes that structure to verify properties or improve execution (the Type Checker and Optimizer), and a "back-end" that spits out equivalent code in the target language (the Code Generator). In this assignment, you are provided with a working Scanner and Parser, and you are given a substantial amount of starter code for the Code Generation step—you will debug some parts of the Code Generation step and implement others, ultimately completing the compiler. Our goal with this division of work is to make the huge challenge of building a compiler manageable and less overwhelming while strategically picking parts for you to implement that preserve the learning objectives of this assignment.
Getting Help Understanding Code: There is a significant amount of starter code in this assignment, and it is normal to find a large piece of code difficult to understand on the first read. If at any point you would like clarification about what part of the starter code is doing, we strongly encourage you to post on the Ed discussion board. Since everyone has the same starter code, you can post about specifics and get a second opinion from your peers without fear of posting any solutions. Reading the starter code is an important part of this assignment, but we don't want it to be a barrier to the implementation. Therefore, post as much as you would like about clarifications. Remember that if you're confused about a piece of code, it's likely that someone else in the class is too!
Overview: The MicroJack Programming Language
See the MicroJack Programming Language specification for a description of the source language that our compiler will read in. MicroJack is almost a subset of the Jack programming language provided by Nand2Tetris, and is very similar to Java.
Overview: The MicroJack → Hack ASM Compiler
In this assignment, you are implementing a MicroJack → Hack ASM compiler, meaning a program that reads in a file containing MicroJack source code and spits out another file containing equivalent Hack ASM that, when executed, has the behavior specified in the MicroJack source. Note that the compiler is itself a program, and in this case one that is written in Java (and compiled with the Java compiler)!
This compiler has three parts: a Scanner, Parser, and Code Generation phase. The starting point of the program is
in compiler/Compiler.java, which manages the execution of the other three components based on user
input. The Scanner is implemented in compiler/JackScanner.java, which is given a file and
scans through that file to generate tokens. The scanner class is intended to be used like an iterator, so it
doesn't immediately scan through the whole file but instead produces each subsequent token on request when
advance() is called.
The Parser is implemented in compiler/JackParser.java, which is given a
JackScanner object and uses it to iterate through the token stream, detecting the program's structure
as it goes and building up an Abstract Syntax Tree corresponding to the program. A substantial part of the
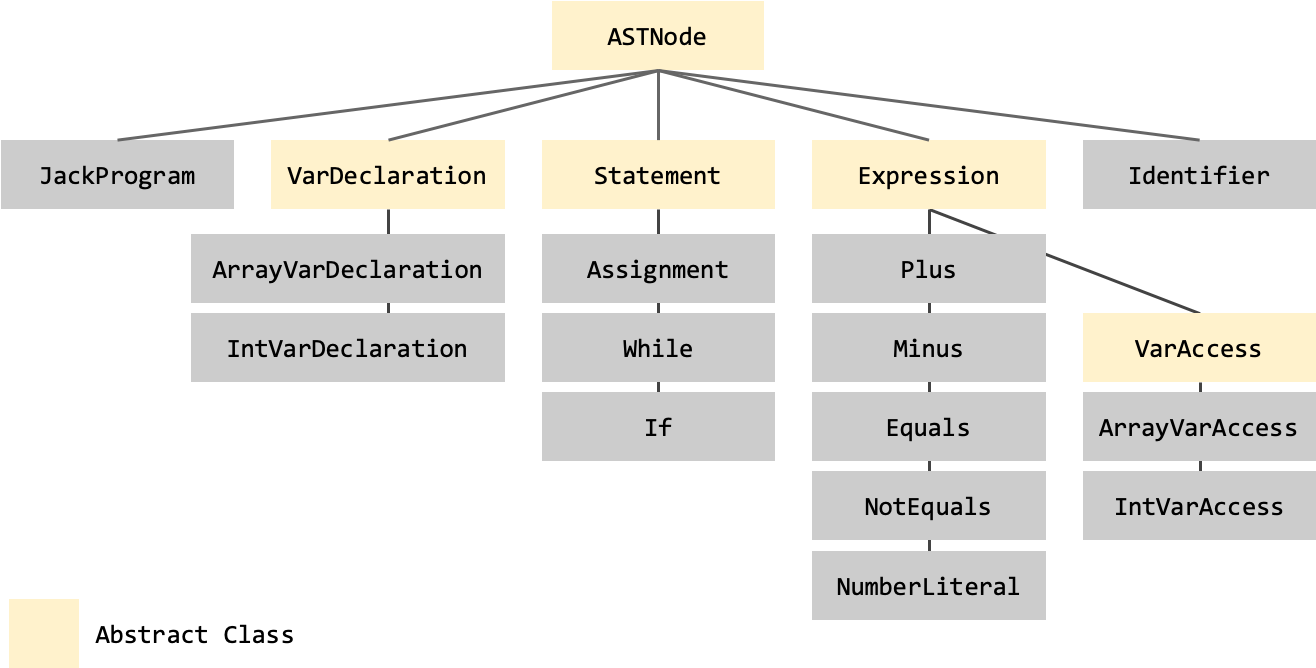
compiler starter code is the AST nodes found in compiler/AST/. The following diagram shows the
inheritance hierarchy among those AST nodes, where JackProgram is the root node,
VarDeclarations represent different types of variable declarations (int vs.
int[]), Statements are the pieces of code that "perform an action" and that make up the
main body of the program, Expressions are the pieces of code that evaluate to a result,
VarAccesses are special expressions that access a variable in memory, and Identifier is
a simple wrapper class around a String name that is used throughout the other nodes.
The Code Generation phase is not a single piece of code at all, but is distributed among the AST
Nodes—each AST node knows how to generate its own Hack ASM when the printASM method is
called on it. Thus, when an AST Node has child AST nodes, it can simply recursively call printASM on
them in the appropriate place to generate a chunk of assembly code wherever it makes sense among the assembly code
being produced. The Code Generation phase of the compiler, therefore, simply consists of calling
printASM on the root of the AST (JackProgram) and letting recursion take care of the rest!
In this assignment you will debug and implement printASM() methods as listed below. As a reference
of how this recursive process works, you can look at the printDebug() methods already implemented in
each AST Node—note that the two methods have very different purposes, but both model the recursive calling
of child nodes. Each printASM() method's task is to generate assembly, which is best done using the
convenience instr(), label(), and comment() functions implemented in the
base ASTNode.java class—take a look in there to see what's available to you as you write these
printASM methods.
Pulling Project 8 Starter Code
To complete this assignment, you will need to use git to access the starter materials that have been pushed to
your repository by the course staff.
First, run git status and see if it reports any changes. If you have any, you'll need to commit them
before proceeding (git add . followed by git commit -m "Your message here").
Then, run:
git pull(Downloads commits on the GitLab server to your local repository)
After running this command, you have synchronized the local copy of your repository with the copy on the server.
Setting Up
We encourage you to use whatever setup you are comfortable with for editing Java code. Feel free to edit using
any editor (e.g., VSCode, Atom, Sublime Text, Vim, Emacs, etc.) and then compile the Java source code of the
compiler manually, using the java and javac shell commands. You can also use an IDE
(e.g., IntelliJ, Eclipse, etc.) if you'd prefer.
Command-Line Instructions: First, navigate to the src directory, and from within that
directory, run the following command to compile all Java source files:
javac $(find . -name "*.java")
Repeat that command whenever you make changes to the compiler source code. Then, when you want to execute the compiler, run:
java compiler/Compiler compile <PATH TO MICROJACK FILE>.jack
The Compiler main class (provided) accepts two command-line arguments. The first is the mode, where "compile"
runs the entire compiler and generates corresponding .asm file, but "scan" and "parse" are also available and
simply print out the output of those compiler phases for debugging purposes. The second argument is the path of a
MicroJack file to run, which must end with the .jack extension.
Project 8 Steps
Because there's a lot of starter code to look at, we've organized your task in this assignment into eight steps. We strongly recommend that you follow this order.
| 1. | Familiarize yourself with the starter code. | Look through the provided implementation, especially the Scanner, Parser, and AST Nodes in
src/compiler/AST/. The AST classes are where you'll do the bulk of the work in this assignment.
Make sure to review the abstract classes that form the basis of the inheritance hierarchy so you know how the
classes are organized.
|
| 2. | Implement printASM in src/AST/NumberLiteral.java |
This is a simple warm-up to practice the weird-but-cool concept of writing Java code that generates Hack ASM
code. The solution is very short and should simply place a literal number value in the right place when the
ASM is executed. Hint: You can find the solution in Lecture 16 when we covered the how to implement the printASM method in NumberLiteral.java. |
| 3. | Debug printASM in src/AST/Plus.java |
This is a more complex (and recursive) expression that needs to evaluate both arguments, then produce a
result that is the sum of their two results. The implementation is mostly complete but contains two bugs:
you'll want to run the compiler to generate the buggy ASM code and then step through it to understand why it
doesn't produce the correct result. Look at test/SimpleAddition.jack for a good starting point in
your debugging process. |
| 4. | Implement printASM in src/AST/Minus.java |
This expression is very much like Plus, but it should subtract the right expression's result
from the left expression's result. |
| 5. | Implement printASM in src/AST/NotEquals.java |
This expression is very much like Equals (which is completed for you), but should produce the
inverse effect. First read through the printASM method in Equals, then demonstrate
your understanding by making the necessary changes to invert the result. |
| 6. | Implement printASM and printASMToGetAddress in
src/AST/ArrayVarAccess.java
|
This node is very different from the others -- as a child of the VarAccess class, it has
two ASM-generating methods. One produces the assembly corresponding to reading from a variable
(printASM) as normal, and one produces the assembly corresponding to getting the address
of a variable (printASMToGetAddress), which is only used by the Assignment node for
the VarAccess that appears on the left side of the =. As you implement this node, look at
IntVarAccess for a similar example. Note that for an array access like a[1+2], the
expression inside the [] should be evaluated to get some resulting int, which is then added to the address of
the array itself (here, a) to get the address of the slot within the array to read from or write
to.
|
| 7. | Debug printASM in src/AST/If.java |
The If node contains an expression as its condition and a list of statements to execute if that condition evaluates to true (the int 1 in our case). Debug the code to find two bugs preventing it from matching that behavior. |
| 8. | Implement printASM in src/AST/While.java |
This is the most difficult part of the assignment, where you are asked to implement the ASM generation for a while loop with no starter code. Remember that a while loop should evaluate its condition before the first execution of its inner statements, and can repeat infinitely. |
Step 1 should not be underestimated—your job in the rest of the assignment will be much easier if you
understand how the printASM() is used, and why the compiler is built that way.
After reading through the code, you can search for "Project 8 TODO" in the repo to find all of the
changes you need to make to complete the assignment. We recommend going in order, because they are arranged by
difficulty but also to guide you in becoming gradually more comfortable with different features of the compiler.
How to Run Tests
We've provided some sample jack programs in the test/ directory to help you test and
debug your compiler implementation.
You'll note that if we were designing a test suite for our compiler,
ideally we'd write individual unit tests that attempt to test each AST node in isolation from others as much as
possible.
That would make debugging errors much easier.
Because the focus of this assignment is partly practicing your debugging skills, the test programs we've provided are not nicely isolated. Some tests incorporate multiple AST node implementations, and you'll have to spend time debugging to figure out which implementation is the source of your bug. This simulates situations you'll run into in the real world, where your code might rely on multiple helper methods, you might be working on something that isn't easily unit testable. You may also work in a code base where there is a lack of good testing infrastructure.
For each test, there are three files: a .jack file containing the high level code
and a .tst file and a .cmp file for testing your assembly output from the compiler.
At the top of each .jack file there is a comment describing what the program should do.
For the programs that use the screen, you can additionally check the "Screen" view to make sure things look
correct.
The general process for running one of the tests is:
- Navigate to the
src/directory (e.g.cd src/) - Compile your
javasource code by runningjavac $(find . -name "*.java") - Use your compiler to compile the
jackfile for the test you want to run usingjava compiler/Compiler compile ../test/TESTFILE.jack - Load the corresponding
.tstfile using the CPUEmulator. - Run the
.tstfile in the CPUEmulator. Several of the files will take a long time to run if you have animations turned on, so we recommend turning off animations (set the Animate option at the top of the emulator to "No animation"). You may want to turn animations back on when debugging, particularly the "Program Flow" option to step through the code.
You can also load the generated Hack assembly language code directly using the CPUEmulator, which lets you step through, inspect various regions of memory, and also interact with the program through the keyboard and screen.
To help you understand what each test uses (and to guide your debugging process) we've identified which AST nodes are used in which of the test programs. This is not intended to be an order related to how you should develop and test your programs. Here is an overview of what each file uses:
OnlyVarsUses only chips already implemented for youSimpleAdditionUses NumberLiteral and PlusNestedAdditionUses NumberLiteral, Plus, and ArrayVarAccessMultipleExpressionsUses NumberLiteral, Plus, Minus, NotEquals, and ArrayVarAccessSimpleConditionalUses NumberLiteral, Minus, ArrayVarAccess, and IfSimpleLoopUses NumberLiteral, Plus, NotEquals, and WhileFibonacciUses NumberLiteral, Plus, Minus, NotEquals, ArrayVarAccess, and WhileNestedLoopsUses NumberLiteral, Plus, Minus, NotEquals, ArrayVarAccess, and WhileNestedLoopsAndConditionalsUses NumberLiteral, Plus, Minus, NotEquals, ArrayVarAccess, If, and While-
TinyGameUses pretty much everything you implement. There is no.tstfile for this program. TinyGame is a small game you can play in the CPUEmulator. See the comment at the top of the file to see what it does.
You may find it helpful to modify some of the test programs when debugging.
We do not recommend you directly edit the test files. Instead, we have provided
a Sandbox test with empty .jack, .tst, and .asm.
Feel free to copy over files from other tests into your Sandbox
files and then modify, test, and debug with those files.
Submitting Part I
To submit Part I, make sure you commit and push your changes, then tag them as project-8 and push
that tag as well:
git add .(Stage all your changes)git commit -m "Finish project 8"(Bundle those changes as a commit)git push(Push that commit to the GitLab server)git tag project-8(Add the project-8 tag to that last commit)git push --tags(Push the tag to the GitLab server)
Lastly, verify that the tag and all your code is uploaded correctly by checking on https://gitlab.cs.washington.edu/.
Part II: Project 8 Reflection (5 points)
In the document Project 8.docx, record how long the project took you in
reality and write a short reflection about your experience completing this project.
Submitting Your Work
Save your changes from the Project 8.docx document as a PDF and submit the document to the assignment titled "Project 8: Debugging & Implementing a Compiler" on Gradescope. Project 8 will be considered completed once you have followed these steps.