Synopsis
In this assignment, you will implement a concurrent job scheduler in the Go programming language. This extra credit assignment requires a substantial amount of independent learning, and is largely meant to teach you how to learn new programming skills on your own.
In the class thus far, we’ve already learned three separate languages (bash and C/C++). By completing this assignment, you’ll realize how far you’ve come in your ability to pick up new programming skills on the fly and apply them in a foreign code base.
Go
Go is a modern programming language originally created by Google. Its inventors sought to simplify a lot of the complexity commonly found in other programming languages (i.e. less is more).
Go is a fantastic language, and it is built with concurrency in mind - it even reserved the go keyword to create goroutines (or lightweight threads).
Prerequisites
Before starting this assignment, you should explore the Tour of Go, which highlights a variety of features in the language. It only takes ~30 minutes to complete. The go command is already installed on calgary, so you don’t need to worry about any of the installation instructions.
We will be using Go 1.20, which is one of the more recent releases.
Functionality
In this assignment, you will build a concurrent job scheduler. The job scheduler will read a sequence of “jobs” and execute each job concurrently as long as all of the other jobs it depends on have concluded. Executing a job simply requires writing its name to stdout, where each job’s name is separated by a newline (\n). This is best described with a few examples (all of which are also included in the project’s README.md).
1. Job Scheduling (3 points)
The following configuration file (written in YAML) defines a single job with its name set to echo.
jobs:
  - echo
If the job scheduler is run with this configuration it should write (with a \n at the end):
echo
A configuration that defines multiple jobs are written across multiple lines like so:
jobs:
  - ls
  - cd
  - echo
ls
cd
echo
Given that the job scheduler runs jobs concurrently, it is equally valid to see these jobs written in a different order, such as:
cd
ls
echo
Your task is to start implementing the scheduler.Run function to handle this case. All configuration parsing is already handled for you, so you can simply act upon the configured jobs found in the Scheduler. You can experiment with this command by running the run sub-command like so:
./scheduler run ./path/to/your/schedule.yaml
You’re expected to create your own job configuration files, but a variety of examples are provided in the ./internal/testdata directory.
Your solution must run each job concurrently. Purely sequential solutions will not receive credit.
Note
We are not asking you to run the following as shell commands. It is equally as valid to have arbitrary names configured like one, two, and three.
2. Handling Dependencies (10 points)
As mentioned above, jobs may define dependencies on one another. Any given job MUST NOT be executed until all of its dependencies have been executed. For example, consider the following:
jobs:
  - ls
  - cd
  - name: echo
    dependsOn: ls
In this case, echo should never be executed before ls has finished. In other words, ls should always be printed above echo. It should be impossible to produce the following output:
cd
echo
ls
Handling this case is the primary goal of the assignment. Several hints are labeled in the starter code to help get you started. Note that you will be graded on how well-structured and computationally efficient your solution is. You will not receive full credit if you unncessarily loop over the job list more times than needed.
Note
If any job requires dependencies, you will need to specify the name key, too. Jobs that don’t have dependencies can omit the name key entirely (e.g. ls and cd in the example above).
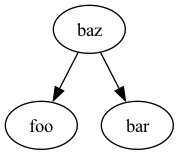
3. Generating a DOT graph (5 points)
The job scheduler configuration can be represented as a directed acyclic graph (DAG). Jobs without any dependencies are the leaf nodes (i.e. they have no outgoing edges), and jobs with dependencies have outgoing edges that point to their dependencies’ nodes.
Your task is to implement the graph sub-command and write out a DOT-graph that can be visualized like so.
Your program should generate the graph with the graph sub-command like so:
./scheduler graph ./path/to/your/schedule.yaml
An example is outlined in the starter code’s README.md, as well as marked with TODOs in the code. If you implement this feature, you will also need to submit a dependencies.png file that encodes the graph represented by internal/testdata/config/dependencies.yaml.
4. Testing (3 points)
A variety of test files are provided in the ./internal/testdata directory, most of which are tested in internal/config/config_test.go.
You are expected to add more tests in both internal/config/config_test.go and internal/scheduler/scheduler_test.go to test that your program works as expected. This task is intentionally open-ended; it’s up to you how you test your code, but you will be evaluated on their efficacy.
5. Add the delay configuration (2 points)
Now that you have things working and can visualize your results, we will see what it takes to extend the definition of a job. Your task is to add a configurable delay, which is expressed in seconds. For example, consider the following job configuration:
jobs:
  - ls
  - name: cd
    delay: 2
  - name: echo
    dependsOn: ls
    delay: 3
With this, both ls and cd can be scheduled concurrently, but the cd job should wait for 2 seconds before it writes its name. Similarly, the echo job should wait for an additional 3 seconds after both the ls and cd job conclude. This is to emulate a more realistic use case, where each job does not finish right away.
A TODO is left in the code to help get you started.
6. Add the --debug flag (2 points)
With the configurable delay, there’s a potentially significant amount of time between a job being initially scheduled and a job completing. It would be helpful to write a debug message to stderr as soon as a job is scheduled (e.g. ‘Scheduling job “ls”’).
Add support for a --debug flag that can be used to enable these debug messages. These messages should not be written by default (i.e. when --debug is not specified). When enabled, the messages should always be written to stderr.
Specifying the --debug flag should look like the following:
./scheduler run ./schedule.yaml --debug
Again, a TODO is included to help get you started.
Implementation Hints
Take your time and familiarize yourself with the entire codebase before you write any code. It’s a lot easier to debug issues when you have a general idea of how each component fits together.
Play around with the scheduler command and see how it behaves in its current state. Not everything will work right away, but it will successfully execute and report errors, where applicable.
You’re encouraged to use external resources to help learn Go. If you end up using or referencing any code snippets, please cite them in your implementation with a comment.
The implementation includes a variety of hints marked as TODO comments, such as the following:
// Hint: You will need to use the 'go' keyword, which runs the
//       job in a goroutine (which is a lightweight thread).
//
//       For details, see https://go.dev/tour/concurrency
These TODOs will shed light on how to implement the behavior defined above.
