Unlike P0, the rest of the projects for this course are designed to be completed in teams of 2 or 3 students. The purpose of project teams is to develop your process skills and interpersonal skills, not to reduce the amount of work that each student contributes.
Adding a Partner
Task
Grab your partner(s) and set off on a new journey together!
If you are not working with a partner, you may ignore this section.
There are multiple ways to work on the same codebase for these assignments, but here’s our recommended way:
- Arbitrarily choose one of the two group members, and work in that member’s personal GitLab repository. It doesn’t matter which member you choose, since the code from project 0 will not be needed again.
- The chosen partner gives the other member access to their repository on GitLab. That partner should:
- Navigate to the Project information | Members page from the sidebar of their repository’s webpage on GitLab.
- Invite the other member (using their UW NetID) with Maintainer permissions. Any role less permissive will not allow them to push to the
mainbranch.
- The other member clones the chosen member’s repository as described in P0. They will also have to complete the per-IntelliJ project setup steps in P0.
Afterwards, both partners should have the chosen member’s repository cloned and should be able to push and pull from the chosen partner’s GitLab repository.
Note
If your group decides to terminate the partnership after the assignment, the chosen member should revoke the other member’s access to their GitLab repository. The other member should pull one last time before this happens, so that they can manually copy the latest version of code into their own repo.
Pair Programming
When working on code in your group, we strongly recommend against trying to divide-and-conquer the separate sections of assignments. Not all sections require the same amount of time and effort, and sections of an assignment often depend on previous sections, so splitting work this way will likely reduce your ability to understand the assignment rather than saving any time.
Instead, we recommend pair programming—programming out loud while collaborating on the same piece of code. This helps everyone contribute equally, develop a better understanding of the program, catch and debug issues that arise, and create opportunities to learn new programming tips from each other.
Info
If you’re meeting online, consider using Code With Me, an IntelliJ feature that lets you remotely code together on one person’s computer. The standard IntelliJ license allows sessions up to 30 minutes long, but you can also request a free educational license for unlimited session length.
Merging
If your group decides against pair programming for whatever reason and instead decides to work separately and simultaneously, you may need to pull and merge any new commits pushed to GitLab by your partner before you are able to push yourself.
Git will try to automatically attempt a merge when you pull, leading to 3 scenarios:
- If the two sets of commits involve different files, it will just apply both sets.
- If both sets of changes alter different parts of the same file, Git will attempt to integrate both sets of changes automatically.
- If both sets of changes touch the same line, you’ll get a merge conflict which you will need to manually resolve.
Warning
If you aren’t careful in this process and cancel the merge by clicking “Abort”, your repository may be left in a half-merged state, which will prevent most Git functionality from working properly. If anything goes wrong, we recommend coming into office hours for help unless you’re confident in your Git knowledge. Googling and trying random things may create more issues, and these things tend to be difficult to debug via Ed.
Getting the Assignment
Info
For those working in teams, only 1 member needs to go through this process. After that member pushes the changes, the other member can then acquire the changes by pulling normally (from the default origin remote). Having both members go through this process separately is likely to cause merge conflicts.
To get the skeleton (starter) code for the assignment, first open your personal repository in IntelliJ. In the menu bar:
- Click on Git | Fetch. It should work in the background for a while. This lets IntelliJ read from GitLab so it knows that the skeleton repo exists.
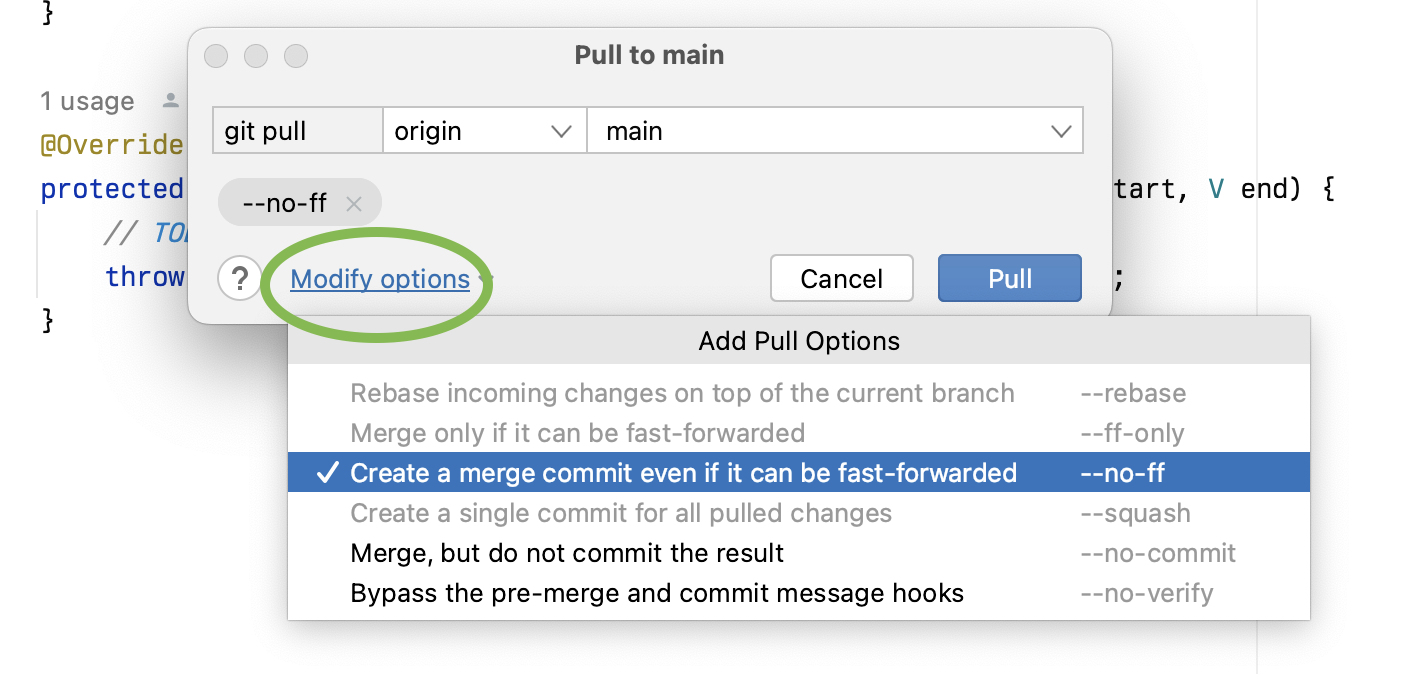
- Click on Git | Pull…, making sure the popup window looks like the image below (choose
skeletonfor the origin, and choose--no-ffas the option under Modify Options). Click the blue Pull button to get the project skeleton code.
If skeleton doesn’t show up in the drop down menu, open up the terminal/command prompt, paste the following command, and hit Enter:
git remote add skeleton git@gitlab.cs.washington.edu:cse373-23sp-students/skeleton.git
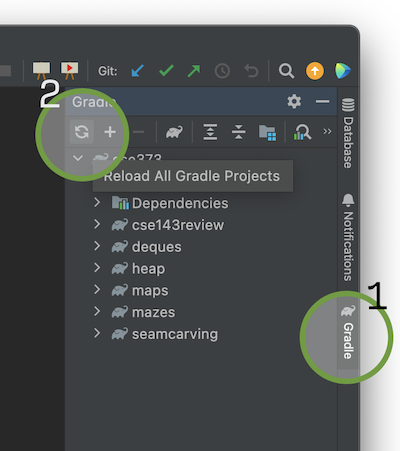
Troubleshooting
If the deques folder that you just pulled isn’t bolded in the file explorer like cse143review, or you can’t seem to run any tests, it is likely that IntelliJ didn’t react to the change in time. We can manually ask it to reimport your project.
On the far right-hand side of IntelliJ, there’s a Gradle tool window that you can bring up. Click on “Reimport All Gradle Projects” (refresh button):