LabsLand Audio Interface Guide
Audio on the DE1-SoC
The DE1-SoC has an audio coder/decoder (CODEC) that allows you to interface with microphones and speakers/headphones through the board's Mic In, Line In, and Line Out connectors. Using the CODEC is much more complicated than something like the GPIO pins, but we have provided you with a set of Verilog files that handle most of the complex details of the hardware and provides a much simpler set of ports to use.
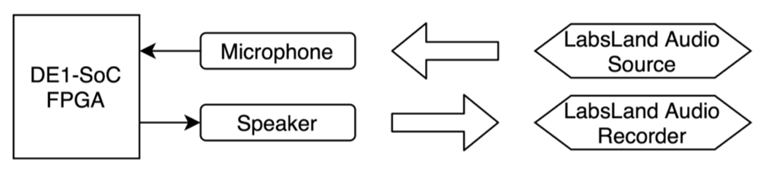
Since you won't have physical access to the remote FPGAs, there isn't a way for you to listen to the audio in real-time, unfortunately. LabsLand's DE1-SoC FPGAs have been set up according to the figure below. Specifically you can play audio into the FPGA's microphone through the LabsLand Audio Source and the LabsLand Audio Recorder can record from the FPGA's speaker and save the recorded audio into an audio file for you to download.
Audio Interface on LabsLand
- Log into your LabLands account (please refer to LabsLand setup for an account).
-
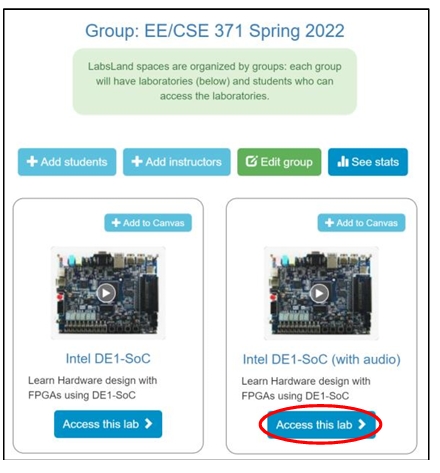
Under the course group, locate the "Intel DE1-SoC (with audio)"
lab and click the "Access this lab" button under it:
-
Navigate to the SystemVerilog IDE:

-
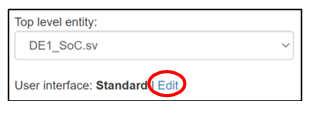
Locate the "User interface" heading above the Documentation
box and click "Edit" next to it:
-
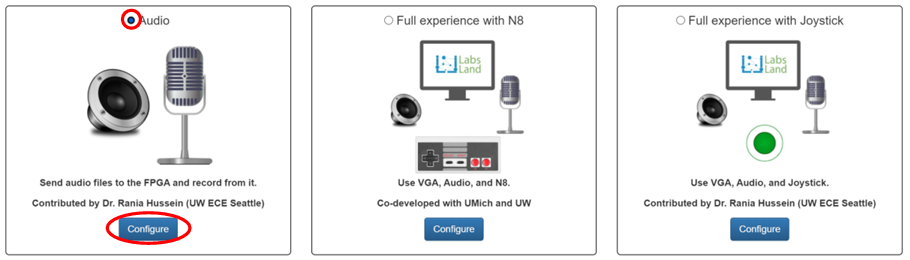
In the resulting pop-up window, select the "Audio" option.
If you need/want to upload audio files for the mic, then click
the "Configure" button under the "Audio" tile:
-
In the pop-up window, click "Choose File" and select an audio
file of your choice.
You can upload up to 5 audio files by continuing to click
"Choose File." Click "Close" to exit the Audio
configurator and the user interface switch.
Audio files are, unfortunately, restricted to
.mp3or.oggformats and < 5 MB in size.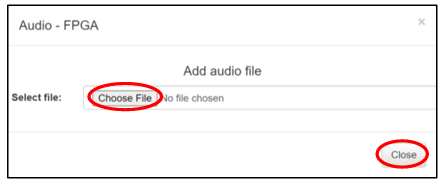
-
In the pop-up window, click "Choose File" and select an audio
file of your choice.
You can upload up to 5 audio files by continuing to click
"Choose File." Click "Close" to exit the Audio
configurator and the user interface switch.
Testing Your Audio Project in LabsLand
- Synthesize your SystemVerilog code and upload the project to FPGA.
-
A user interface similar to what is depicted in the figure below will
be shown to you. The FPGA's live video feed, switches (
SW), and pushbuttons (KEY) are in their usual positions, but the audio files you uploaded earlier are shown at the bottom of the page.- If you want to confirm that your audio file can be played by the system, click the corresponding play button under "Preview" to hear the audio from your browser. Note that this function does NOT play the audio into the FPGA's microphone.

-
Click "Play into device" to use the LabsLand Audio Source to send audios into the FPGA’s
microphone. Then, click "Record from device" to use the LabsLand Audio Recorder to record
audios from the FPGA's speaker. Remember that you won't be able to hear sounds coming out
from your web browser while it's recording.

-
To finish recording, click the two "Stop" buttons shown in the figure below.

-
The audio will then be processed and displayed at the bottom of the page. To download the
recording, click the "Download file" button. Make sure to download the audio recording to your
local machine before your session's time ends.
