HW6: Assertions, Classes, and Randomization
Out: Thursday, May 21, 2026
Due: Monday, June 1, 2026 by 11:59 PM
Closes: Tuesday, June 2, 2026 by 11:59 PM
EDA Playground Setup
Registering an Account
The advanced verification features (concurrent assertions, classes) cannot be run in ModelSim so we will use EDA Playground instead, which is a web application that will let you use these features via more powerful commercial simulators.
- Go to EDA Playground and register your account using your UW email.
- You will receive a confirmation email from getedaplayground@gmail.com with a link to visit.
- Now you should be able to log in with your UW email.
Using EDA Playground
Projects are called "Playgrounds." The following are general setup and usage tips.
- You can always start a new project from scratch by
clicking the EDA Playground logo in the upper-left.
To open an existing project, click on
 Playgrounds → "Your Playgrounds" in the upper-right.

- To name your project, click the
 Share tab (you may need to scroll upwards) at the bottom of the
screen and add a title (and optional description).
You can also change your sharing settings in the drop-down menu
here – you will want "Public" if you want to share your code
with others and "Private" otherwise.
A sharing button
(
Share tab (you may need to scroll upwards) at the bottom of the
screen and add a title (and optional description).
You can also change your sharing settings in the drop-down menu
here – you will want "Public" if you want to share your code
with others and "Private" otherwise.
A sharing button
( )
will appear once you've saved your project and you can click it to
generate/view your project's URL.
)
will appear once you've saved your project and you can click it to
generate/view your project's URL.

Figure 1: EDA Playground's Share tab with options for naming and saving your project as well as sharing settings. - To save your project, you can click either
 Save button (one at the top, one in the
Share tab) or press Ctrl+S on your keyboard.
Save button (one at the top, one in the
Share tab) or press Ctrl+S on your keyboard.
- To edit your project, type into the windows
for your test bench (left) and design unit (right).
If you need to create or upload submodules or other files
(e.g., data files for
$readmem), click the icon next to either the test bench.sv or design.sv
tabs.
icon next to either the test bench.sv or design.sv
tabs.
- Waveforms are viewed in EPWave by reading
value change dumps (.vcd files), so make sure to include
$dumpfile; $dumpvars;at the beginning of your test bench's test inputinitialblock. This also means that the displayed waveforms won't persist across different sessions andenumvalues will be displayed instead of names (e.g.,00instead ofS_idle). - To run your project, click the
 Run button or press Ctrl+Enter.
However, you first need to select a few settings in the left side
menu:
Run button or press Ctrl+Enter.
However, you first need to select a few settings in the left side
menu:
- In the "Languages & Libraries" section make sure that "SystemVerilog/Verilog" is selected.
- In the "Tools & Simulators" section, make sure that "Siemens Questa" is selected.
- If you want to view the simulation waveforms, check the "Open
EPWave after run" box.
By default, this will open EPWave in a popup frame.
You can make it open in a new tab by checking "Open EPWave
waveforms on a separate page after run" setting in
 Profile → Profile.
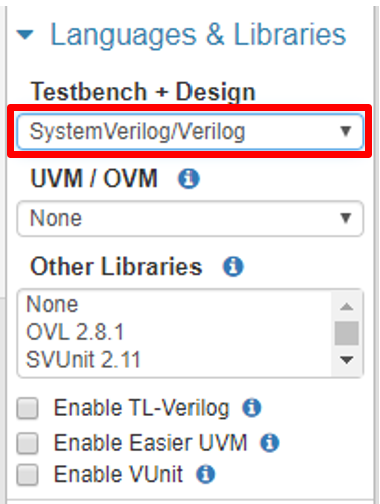
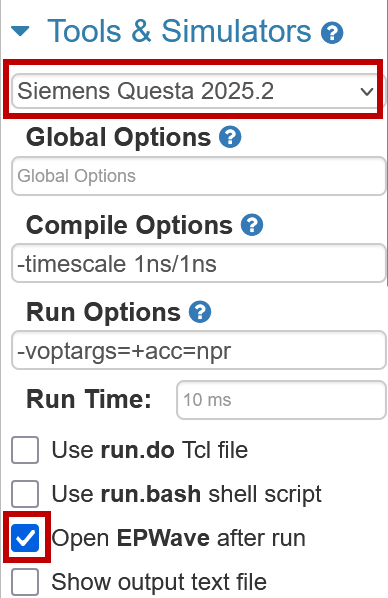
Figure 2: EDA Playground's left side menu areas for selecting your desired HDL (left), simulator (right), and waveform settings (right).
Homework Files
For .txt files, you may want to right-click and save/download instead of clicking.
Problems
Problem 1
- Open problem1.txt (files) and split
the code there appropriately into the test bench and design
textboxes in a new project in EDA Playground.
- This code uses a few SystemVerilog features and constructs we haven't discussed, but should be understandable.
- Now make sure that you can run the code and view the waveforms of all signals in EPWave.
- Compare the comments in the test bench to the waveforms and the simulation log. Make a single change to the concurrent assertion (not the test bench) to make the test bench comments true. In your text file, indicate the change you made and the line number in your final design.sv file.
- Think about what this assertion is checking for
(
reqis "request" andgntis "grant") and update the assertion failure message to be more descriptive. - The
disable iffclause disables the property trigger when its expression is true. Add to the end of the existing test bench to verify this disabling feature. In your text file, indicate what period of simulation time corresponds to your added verification and briefly how you designed it. - Add a second assertion,
also disabled on
reset, that checks thatreqis never high for more than 3 consecutive clock cycles (hint: implicitly this meansreqis eventually de-asserted). Give it an appropriate name and error message and add to the end of the test bench to verify its behavior.- Make sure that long chains of
reqbeing high (e.g., 231-261 ns of the original test bench) only fail your assertion once. - You can find useful functions in Section 23.10 of the SystemVerilog Reference Manual [PDF].
- Make sure that long chains of
Problem 2
- Open problem2.txt (files) and copy
everything into the test bench textbox in a new project in EDA
Playground.
Uncheck the "Open EPWave after run" box.
We are not covering SystemVerilog classes in depth, but a few
things to note that might help your understanding of this code:
- A
programis basically amodulefor verification. - The one-argument constructor uses
thisto differentiate between its argument and the class property, both of which have the namesize. - A
taskis a more generalfunctionthat uses ports instead of arguments and a return value. Tasks may also include timing statements. - A function specifies its return value by assigning to the
name of the function OR by using the
returnkeyword.
- A
- Because the
classis defined inside of theprogram, it is within scope. Run the code and you should see the expected output:# Payload : b8 26 66 b6 c6 # Size of packet 5
You may notice that you always get these results despite the use of$urandom_range(). This is because the default random seed is always1. - Cut the class out of the program and paste it into
the design textbox.
Run the code again to see an error on the line with
new(). The program can no longer see the class definition! - Add the line
`include "design.sv"(no semi-colon) to the top of testbench.sv. This will copy the text of the included file directly where you place it. Run the code and you should see the expected output. - Now comment out or delete the
includeline. Wrap a package definition (e.g.,package pack;) around the class definition. Run the code now and the scoping error should be back. - Add the line
import pack::packet;to import the class definition from your package. Try placing this line in different parts of the code (e.g., inside or outside theprogram, above or below the handle definition) to see what works and what doesn't. - Inside of your package,
create another class called
packet_bufto represent a circular buffer of 4-bytepacketobjects, whose specifications follow. It is recommended that you take liberal inspiration from thepacketclass.- Its properties should include a buffer
[array of packets], the size of the
buffer [
byte], and a read pointer [byte]. - It should have a one-argument constructor that specifies the size of the buffer and then initializes all of its elements (packets of size 4).
- Define functions/tasks
next, which advances the read pointer by one,read, which returns the packet currently pointed to in the buffer, andprint_buf, which prints the indices and contents of the entire buffer.
- Its properties should include a buffer
[array of packets], the size of the
buffer [
- Add to the test program to instantiate a
packet_bufof size 3, callprint_buf, and then usenextandreadto print out every packet individually, including the first one twice (to verify circular behavior).
Problem 3
- Open problem3.txt (files) and copy everything into the design textbox in a new project in EDA Playground. Uncheck the "Open EPWave after run" box. This is the beginning of a class that represents 4-sided die of 5-bit prime numbers.
- Create an initial test bench
programthat instantiates aPrimeDie4object and sets its random seed to 371. Then, in arepeat (30)block, it should randomize the object and call itsdisplaytask (i.e., your output should show 30 different sets of randomized die faces).- Use an immediate assertion to check the return value of
randomize. Upon failure, call$fatalwith a first argument of1and appropriate message.
- Use an immediate assertion to check the return value of
- Very likely, your generated die faces don't meet
the class' specification – at least one of its sides may not be
prime or the side values may not be unique.
Add a new constraint called
c_uniqthat specifies that none of the 4 sides can have the same value. - When you run the code now, you should fail your
assertion!
This is because the existing constraint
c_badconflicts withc_uniq. One benefit to defining multiple constraint blocks is that you can manually enable and disable them individually using the syntax<handle>.<constraint_name>.constraint_mode(<0/1>);. Leave the code forc_badwhere it is, but disable it in your test bench before your call torandomize. - Running your code should now produce 30 sets of
unique die faces, but they're not all prime numbers!
Make use of the given arrays
prime_low[]andprime_high[]to create additional constraints that achieve the following behaviors:s4should be any of the values inprime_high[]with equal probability.s2ands3should be any of the prime numbers in range with equal probability.- The probability of
s1being any of the numbers inprime_low[]should be three times higher than the probability ofs1being any of the numbers inprime_high[].
- The point of a die is to be rolled so now create a
method called
rollthat will randomly pick a number between 1 and 4 and then return the value of the corresponding side (s1-s4). - Modify your test bench so that each time you
randomize your
PrimeDie4, you roll that die 5 times and output the result (e.g., "Rolled a 3"). - Double-check that your program now outputs 30 different sets of unique prime numbers and 150 roll outcomes in total.
Submission Requirements
Due by the end of the deadline day, submit your solutions (e.g., EDA Playground URLs, text) in the provided text file hw6.txt (files) to Gradescope.
- At the end of your document, estimate how long you
spent working on the homework and rate the difficulty on the
following scale:
Very Hard — Hard — Moderate — Easy — Very Easy - Double-check that your hw6.txt contains the requested responses as well as 3 different EDA Playground links to PUBLIC projects.
Grading Rubric
- Implication change (part c)
- Assertion message change (part d)
- Test bench additions (parts e and f)
- Code split (part f)
packet_bufimplementation (part g)- Updated test bench (part h)
- Random seed set
- Constraints written for
c_uniq,c_bad,s1-s4 rollmethod implemented- Code outputs 30 sets of die + 5 rolls