INTRODUCING VERILOG
SECTIONS
WHAT IS A TEST FIXTURE?
A Verilog Test Fixture is a testing file with .TF extension. The Test fixture
file contains test fixtures for a design using ABEL-HDL and schematics.
This file is usually a just a skeleton of what can be tested (we can also
edit the file to add more). Synario also includes the .TFI file with .TF
file. The .TFI is the copy of the device that contains the signal declarations
and is automatically generated by Synario.
WHY ARE TEST FIXTURES USEFUL?
Test fixtures are useful tools to simulate the design. They provide the
necessary inputs for our design. Using test fixtures, we can vary our inputs
and see the appropiate changes in the outputs. They are important in testing
the validity of our design. They create the simulator input which consists
of translating equations into something that the simulator understands
and a specification of the input signals to apply to the circuit.
HOW TO CREATE A TEST FIXTURE
To provide the necessary input stimuli for the simulation, let's start
by adding a new "Source" to our design. This time select "Verilog Text
Fixture" as the new source document from the Project Navigator window.
We will be prompted to associate this test fixture with one of the existing
design elements. You should choose the schematic file that you just created.
In larger designs, we may conduct simulations of pieces of the design and
will then have different test sources associated with various parts.
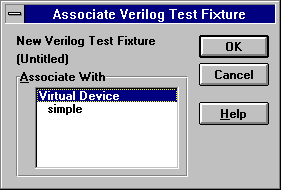
We'll call our test fixture "simple.tf".
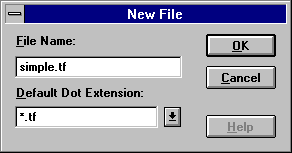
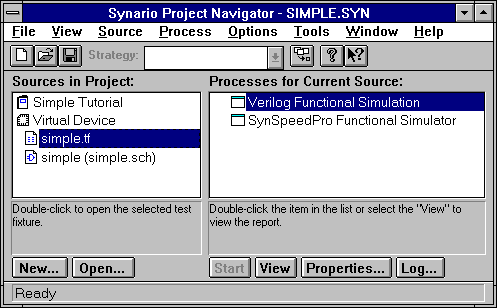
Notice now that the new file has been added to the "Sources" sub-window.
If we select it, we'll note there are two items in the "Processes" sub-window
associated with it. These are two simulators. We will be using the "Verilog"
simulator. Note that sub-programs of Synario are shown as they would be
by Windows, as boxes with a menu bar.
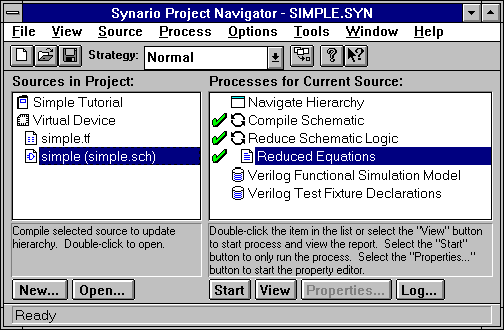
Some other things have changed as well. If we now re-select the schematic
"Source" we'll see that there are two new "Processes" associated with it.
This has happened because Synario has figured out that we are now interested
in simulating our design and the items listed correspond to the preparation
of files for input to the simulator. In this case, these are a functional
simulation model of the guts of the AND gate and a test "fixture" to be
used to connect to the input stimulus file.
COMMON MISTAKES AND TIPS
-
While writing the test file(.tf) a common mistake that can occur is typing
'(apostrophe) instead of ` (key to the left of 1 above the tab key) in
the line 'timescale 1 ns / 1 ns'.
-
While writing the test file be very careful about typing and and do not
forget to put semicolon where needed. Any typo leads to the cryptic 'Failed'
message during simulation.
-
One very important thing to remember is that the module name in the .tf
file must be different than the .tfi file that we include inside the .tf
file. In the verilog code that we wrote earlier note that the name after
the keyword module is "hw3_simple" and the file that we include is "simple.tfi."
-
Do not forget to mark all the inputs in the schematic with I/O markers.
If we fail to do this, Synario would complain that the input variables
that we are using in our test fixture haven't been declared yet.
AN EXAMPLE
We will write an input stimulus file for our simple AND gate. We'll vary
the inputs to the AND gate at different times. The effect of doing this
can be seen during simulation of design. The input stimulus file must be
written in the Verilog language. Verilog is a hardware description language
with syntax very similar to C. We will only be using Verilog for driving
our simulator, that is, telling it what input signal we want and when during
our simulation. For our purposes, a very small subset is required. We will
edit the "Source" file "simple.tf" that we created earlier by selecting
it and using the "Open..." button at the bottom of the "Sources" sub-window.
This will cause a simple text editor to pop-up. The text we will enter
will be like the following:
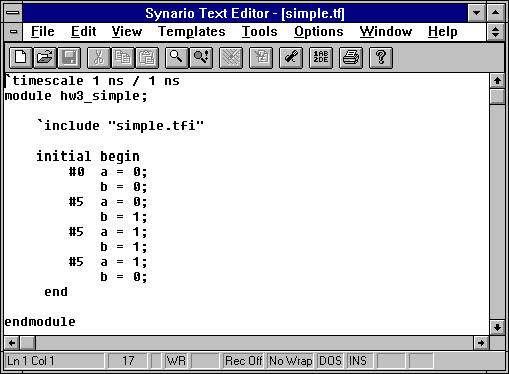
Let us now see what the above verilog code means. Most of this is boiler-plate.The
timescale will always be set to the same values. We need to give the module
a name (different from the name of our schematic - this is important)
and tell the simulator to use the models that Synario will help us
create (the `include "simple.tfi" statement). Finally, there is
an "initial" block that specifies the values of the inputs and how much
time to let pass. The "#" symbol is used to denote the passage to some
units of time. In this case, we begin at time 0 with 'a' and 'b' both set
to 0, then we allow five time units to pass (to let the inputs propagate
through the gate and reach stability - note that in this simulator each
basic gate has a unit delay, that is, one time unit - so that 5 is more
than enough in this case) and set b to 1, another 5 time units later
we set a to 1 as well, and finally after yet another 5 time units we set
b back to 0.
RELATED LINKS
SIMULATING
THE DESIGN
BUSES
IN VERILOG
BUSES
IN WAVEFORM VIEWER