Lab 8: Final Project
Overview
It's time to prove yourself with the DE1 board and your digital design skills! For this lab, you'll choose one project from a list of simple video games and simulations to implement in Verilog. Each game has a "base score" you'll get for developing working implementation (along with a good report and thorough simulations), and you can earn extra points by completing extra features beyond what is described in the basic requirements. You can also earn bonus points for turning your work in early.
Code (and hardware) for this lab
Feel free to copy any needed files from previous labs or from lecture as a starting point. In addition, you may use the following hardware and code as you see fit:
- Verilog generate statements: See the "369 SystemVerilog Tutorial" on the course website.
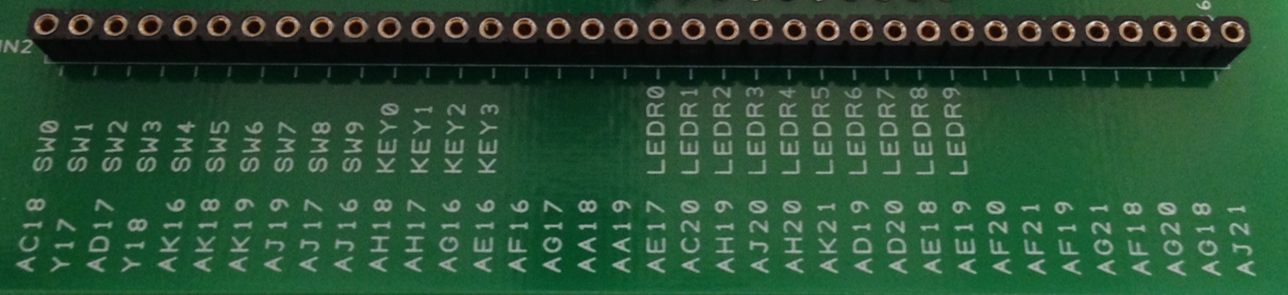
- Prototyping board: The labeled pins (Figure 1) are connected to the FPGA and usable. You can access these pins using a bus connection of "inout [35:0] GPIO_0" (inout for input/output) to your top-level module (similar to KEY, SW, LEDR in previous labs). GPIO_0[0] is the leftmost connection (AC18), and GPIO_0[35] is the rightmost connection (AJ21).
- Breadboard (white): All of your digital logic should be done inside of the FPGA (Verilog), but the breadboard can be used as a place to make electrical connections to additional input/output (I/O) devices. There are wires and wire cutters available in lab for you to use.
- 16×16 Bicolor LED Expansion Board: One should have been included in your lab kit. See the and for usage and getting started.
- Multiple "clock speeds": Your entire circuit should use a single clock – either CLOCK_50 or one of the outputs from clock_divider circuit. If you need multiple clock trigger speeds, first set the clock to the fastest speed that you need and then use a counter to generate a slower Enable signal. All slower elements/modules will still use the faster clock, but will only change state when the slower counter signal occurs.
- Additional input/output devices: You can use other I/O ports on your FPGA or other devices, but you are responsible for procuring these yourself. You should run your idea by the staff first to make sure your proposed device doesn't handle too much of the digital logic design for you. A list of other DE1-SoC peripherals (and starter code) can be found .
Possible Projects
Listed below are a number of different possible projects and the point
values awarded for implementing their basic requirements. These projects
vary a bit in difficulty and their point values try to reflect this, but
your experience may vary.
For full credit in the course you should
aim to earn 80 points worth of project
features total, either through basic requirements or extra credit. You can earn a maximum of 20 extra points for completing features on top of
the project's basic requirements.
Frogger [80 feature points out of 80]
The urban horticulture program on campus thinks we can eliminate roadkill incidents by training the local wildlife to avoid cars. Your job is to develop a high-tech traffic simulator so they can learn how to safely cross the road (see ).
Basic Requirements:
- A board of at least 4×8 of LEDs with easily recognizable ends of the road (where cars start/end).
- One LED color representing cars and another LED color representing your frog.
- Cars moving in one direction in some basic pattern.
- User has left, right, back, forward buttons to move the frog.
- If the frog ends up in the same square as a car, they get squished and it's game over while the frog gets resuscitated in the frog hospital (don't worry, they'll live to hop another day).
- If the user gets the frog from one side of the board to the other, they win and play again.
- The frog should be able to move faster than the cars.
Conway's Game of Life [65 feature points out of 80]
I'm tired of people saying we should get a life – we've got ! This is a simple computation that can give rise to very interesting behaviors over time.
Basic Requirements:
- A board of at least 8×8 LEDs with easily recognizable edges.
- User must be able to input a new starting pattern then "start life."
- Once you reach the end of your board, your game should wrap around and continue.
Thumb Thumb Revolution [80 feature points out of 80]
Implement a simplified version of .
Basic Requirements:
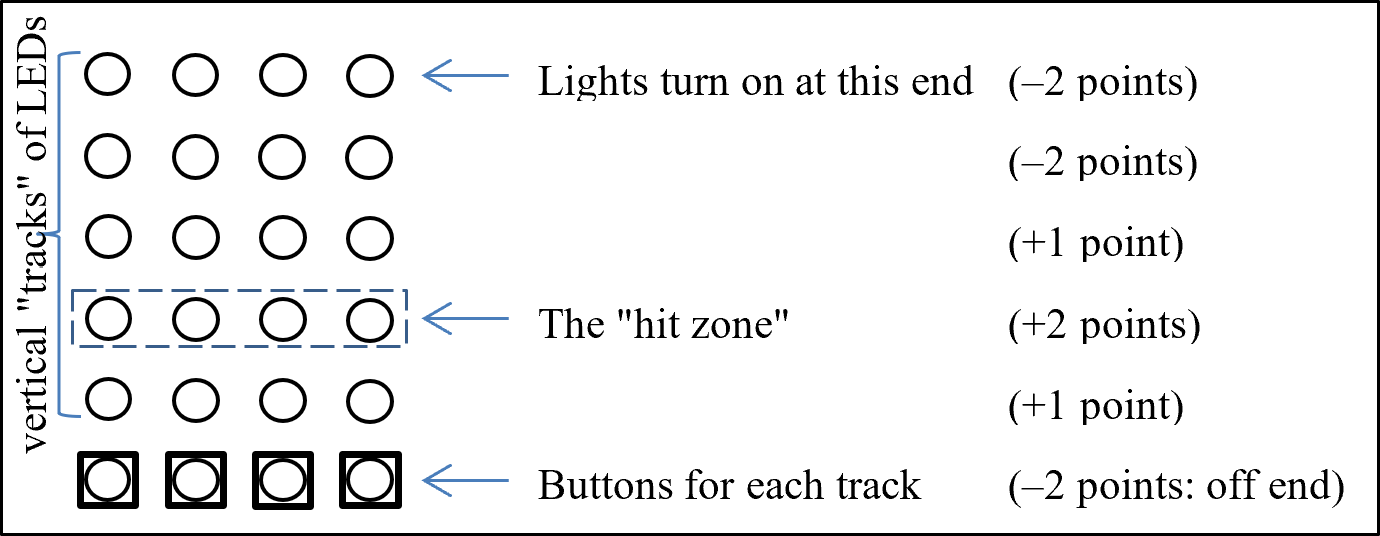
- One LED color to represent moving "arrows" and another LED color to represent the "hit zone."
- Your machine will have four vertical tracks of lights of length eight or more, each with a corresponding button for user input.
- The system will randomly turn on a light at the "top" of a track and move it quickly towards the "bottom." The 2nd light from the bottom of the track is part of the "hit zone."
- The user's goal is to press the corresponding button for the track when the light is in the hit zone. Scoring: in hit zone (+2), off by one (+1), any other position (–2), off end of track (–2).
- Your system should track and display the user score over time.
Flappy Bird [85 feature points out of 80]
has our hero the Caped Cardinal (a red dot) flapping through a maze of "pipes" (green vertical lines).
Basic Requirements:
- The hero will "move forward" through a maze of randomly-generated pipes at a constant speed.
- Single button input: The red dot goes up when the button is pressed and down when the button is released.
- The user's goal is to avoid the pipes for as long as possible by flying through the gaps.
- Your system should track and display the user score. Be prepared to display a score up to at least 999.
Elevator [30 feature points out of 80]
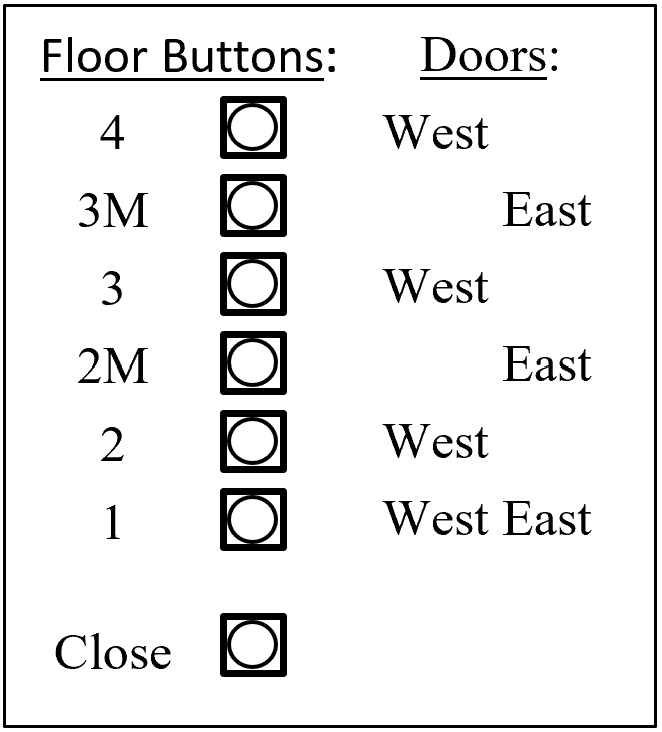
The CSE building freight elevator is down again! The faculty and staff have decided that a student should design a system that will work more reliably than the current one. Your task is to implement the floor selection system from within the elevator (i.e., passenger enters elevator and selects destination floor) – you do not have to worry about "calling" the elevator.
Basic Requirements:
- Take inputs that cover floors 1 through 4 of the building (see Figure 3).
- The elevator cannot teleport! When traveling between two floors, the elevator must go through every intermediate floor.
- The freight elevator has both East and West doors. The doors should only open when we are stopped. Doors should not open if there isn't an exit on that side for a particular floor. It is okay to open both doors simultaneously, if both exits are available.
- When stopped at a floor, the elevator will not move again until the "Close" button is pressed. Your system should be able to accept multiple destinations while stopped.
- The next floor to stop at is first determined by the current traveling direction of the elevator (e.g., two passengers enter on floor 2: P1 going to floor 1 and P2 going to floor 3. If the elevator was traveling downward, then the elevator should go to floor 1 before floor 3).
- Your system should have indicators of elevator direction (Up/Down), open doors (West/East), and current floor. You may choose to use floor indicator lights or 7-segment displays.
Connect Four [60 feature points out of 80]
Basic Requirements:
- An 8×6 game board with easily recognizable borders.
- Player pieces will be shown using different LED colors.
- User input is most easily done using 8 switches to indicate which column to play the next piece in. Think about how to avoid playing multiple pieces on a single switch flip.
- There must be a turn indicator (i.e., which player's turn it currently is).
- At end game (i.e., player victory or draw), there must be an outcome indicator (e.g., 7-segment message).
- A reset button or switch will restart the game.
Tic-Tac-Toe [65 feature points out of 80]
Basic Requirements:
- A board of at least 11×11 LEDs, making sure to show gridlines.
- Two clearly distinguishable player symbols (e.g., X's and O's).
- User input needs to happen via "next" and "select" buttons, NOT switches. The current space under consideration should be indicated on the board. Pressing "next" will move the indicator to the next open space (including wrap-around). Pressing "select" will place the current player's symbol in the selected space and start the next player's turn.
- At end game (i.e., player victory or draw), there must be an outcome indicator (e.g., 7-segment message).
- A reset button or switch will restart the game.
Snakes & Apples [90 feature points out of 80]
The folks at WSU want to test out Washington State's new crop of Cosmic Crisp apples by feeding 'em to snakes! Implement a version of the .
Basic Requirements:
- A board of at least 8×8 LEDs.
- The snake is represented by a green dot head and trailing body segments (start with two trailing body segments); apples are red dots.
- When the snake head hits an apple, a point is scored, the snake grows longer, and a new apple appears.
- If the snake ever runs into any part of its own body, it dies.
- Your system should allow the snake to grow long enough for the game to become challenging.
- Your system should track and display the user score.
Inspiration Strikes [Points To Be Negotiated]
This is a project of your choice. It must be approved by your Instructor before you can start. Set up a time to meet with your Instructor to discuss your plans well in advance.
Project Milestones and Requirements
You must complete all three of these milestones (check-in, gradescope submission and live demo) and turn in your lab kit to get credit for this project. Not demoing your project to TAs will result in either a 0 for your project score or an Incomplete for the course, depending on your overall course standing and the discretion of your course staff.
1. Check-In
[10 points for submitting materials and discussing them with your TAs.]
You'll meet with your TAs during your regular demo time to show them a block diagram for your system and tell them about the features you plan to implement. This is a great time to get feedback about your design, which will help your remaining work go much more smoothly. You'll also have developed, tested and turned in at least one new module.
Due before Wednesday, May 27, 2026 at 2:30 pm on :
- A PDF summary of your project that includes the
following details:
- Which of the project ideas you are going to implement
- A labeled top-level block diagram of your proposed implementation.
- It's okay if this changes between the check-in and final turn-in, we just want you to start thinking about it ahead of time!
- This block diagram should not consist of a single "game logic" module; it should include all major components and their interactions.
- The SystemVerilog code for at least one of these modules and its testbench. This cannot be a module you've written for a previous lab. Turning in clock_divider, synch, pulse, or other modules from previous labs will not get you full credit.
Then at your normal demo time:
- A quick walkthrough of your submitted materials.
2. Project Code and Report
[50 points for your submitted materials, plus up to 10 extra points for an early finish bonus.]
Due before Friday, June 5, 2026 at 11:59 pm on :
- A final report which must include the
following information in your own words:
- The User's Manual: How does someone use/operate/play your design?
- What special features beyond the base requirements did you implement?
- For each module:
- Either a block diagram or an FSM diagram that matches the functionality implemented in Verilog
- A brief description of the module's purpose, inputs and outputs
- Annotated ModelSim simulation results that reasonably prove correct behavior.
- Briefly describe how you went about testing the system as a whole.
- How many hours (estimated) it took to complete this lab in total, including reading, planning, designing, coding, debugging, and testing.
- The SystemVerilog code
(including test benches) for all modules. Your top-level module should be named
lab8. - The synthesized bitfile (ending with
.sof) that you would like to demo. This must be the bitfile you do your final demo with — you may not continue working on your project after submitting it on Gradescope.
Early Finish Bonus
Up to 10 points for finishing your project ahead of time. Encouragement to start early!
Your project is due by 11:59 pm of the last day of class (June 5, 2026). Finishing and submitting ahead of the deadline will earn you 2 extra points for each school day you are early, with a maximum of 10 points (e.g., 10 points for May 29, 8 points for June 1, 6 points for June 2, etc). You may schedule project demo times outside of the normal lab hours with the TAs as needed.
3. Project Demo
[50-130 points depending on project and features]
Show off your hard work to us! Come in for a victory lap and show us the working bitfile you submitted to Gradescope. This is typically due during your assigned demo slot in the last week of classes. If you haven't submitted by this time, we will have a limited number of slots open to demo at the beginning of Finals Week. We will open sign-ups for these slots after the project check-in.
During your demo:- Demonstrate your complete system working on the DE1-SoC board, along with any additional features you added.
- Be prepared to answer questions on both the theoretical and practical parts of the lab.
- Say goodbye to your lab kit and turn it in to your TAs.
Grading
In terms of your course grade, doing 80 feature points for a total project score of 160 is considered "full credit" for your course grade, and everything else is extra. If you do fewer than 80 feature points, you are not getting full credit for your project.
Rubric
(points contingent on all modules, including top-level, being properly documented)