Installing Quartus
Credit for the organization and much of the contents of this tutorial
goes to Kevin Bishop and the course ECE 272 from Oregon State
University.
Introduction
The Quartus design software is available for Windows (and Linux, but it is much trickier to set up and is therefore not officially supported for this class).
If you are installing on a Windows machine, then you ONLY need to
read and perform Step 4 of the Instructions
(Download and Install Quartus).
The rest of this document contains instructions describing how to install Quartus on macOS using the VMware Fusion virtual machine tool, which is one of two main methods for macOS users:
- Use a virtual machine. A virtual machine runs Windows as an application within macOS. The advantage of this is that you will not have to partition (i.e., section off part of) your hard drive for use by Windows, meaning that your entire disk space is still accessible to macOS should you need it. This method is suggested if you do not have a lot of extra space on your hard drive or if you do not plan on using the Windows virtual machine extensively.
- Dual-boot your laptop using Boot Camp. This method splits your hard drive into two parts: one for macOS and one for Windows. The division cannot be changed without fully deleting the Windows side, so you will need reserve all the space you could potentially need when your set it up. This also generally requires much more space to be set aside for the Windows boot (30-60 GB) than is needed for a virtual machine. This method will run faster than a virtual machine and is suggested if you will be using Windows extensively and have ample space on your hard drive. For assistance with Boot Camp, please contact the CSE support staff (support@cs.washington.edu, CSE 207).
Mac computers using Apple silicon (the "M1 chip") cannot currently
run Windows through VMware Fusion nor Boot Camp.
Other virtualization options exist (e.g., Parallels Desktop,
VirtualBox), but are not officially supported for this class.
You will also have the option of using the computers in the lab (CSE
003), which have Quartus installed.
Install Instructions
Step 1: Download and Install VMWare Fusion
- Visit VMware's web site at https://customerconnect.vmware.com/en/evalcenter?p=fusion-player-personal-13, register for an account, and then log in.
- Back on the Fusion Player page, click on the "License & Download" tab and find the "LICENSE KEYS" portion of the "License Information" section. Copy down the license key.
- Now click the "Manually Download" button in the "Download Packages" section and run the installer. When prompted, enter the number you copied in the previous step when asked for your license key.
Step 2: Download and Install Microsoft Windows
- Sign up for the Microsoft Development Tools program by browsing to https://itconnect.uw.edu/uware/microsoft-windows/ and clicking the link with that name.
- Visit the Microsoft Azure Education Hub at https://portal.azure.com/#blade/Microsoft_Azure_Education/EducationMenuBlade/software and log in with your UW NetID.
- Search for either Windows 10 Education or Windows 11 Education and click on your version of choice (the N version excludes media related technologies & Skype). Click the "View Key" button.
- Copy down the product key given and then click on the blue "Download" button at the bottom to save the .iso file to your system (over 5 GB).
- Open VMware Fusion and drag the Windows
.iso file you downloaded to the "install from disc or
image" area.
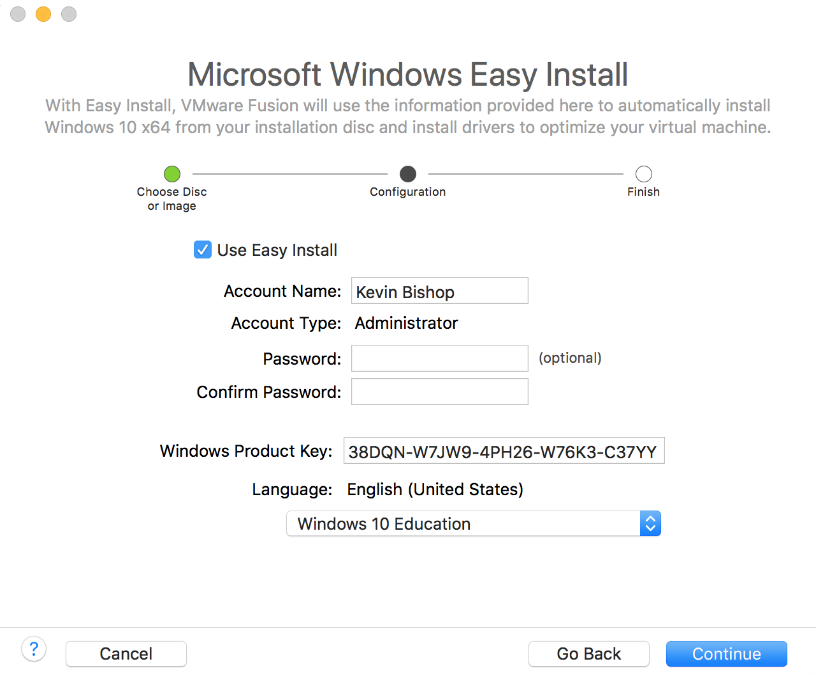
Enter the Windows product key when prompted and select Windows
10/11 Education as shown below, then click "Continue".
- Select "more isolated" and save the setup to "virtual machines" (the default option).
- The virtual machine should open and install Windows. This will take some time and the virtual machine may restart itself several times. You may also get an alert during installation if you do not have enough space on your hard drive – if so then delete some files (or transfer them to an external drive) and click continue. Finally, the VMware Fusion window may go black if an alert pauses the installation and you leave it for too long. This is fine – it is just the virtual machine going to sleep. Click in the VMware Fusion window to wake it up and continue the installation.
- Once the installation is fully completed you may delete the .iso file.
Step 3: Set Permanent MAC Address
- Fully shut down the virtual machine (select the virtual machine window, "Virtual Machine" → Shutdown).
- From the VMware Fusion menu bar, select Window → "Virtual Machine Library".
- Select the virtual machine and click the settings button (the wrench in the upper right corner).
- Under "Removable Devices" in the settings window, select "Network Adaptor" and click Advanced options.
- Click the Generate button next to the listed MAC address; the address in the text box should change. Use this newly generated address when you request a license in the next step. You can now close the settings window.
Step 4: Download and Install Quartus
We will use the Quartus II web edition release 17.0.
- Download the files from from a browser within your VM. You'll need the Quartus and ModelSim install files and the CycloneV .qdz file. Save all of these to the same directory.
- Run the QuartusLiteSetup executable (this is slow to start up). When it asks for components to install, select all of the following: "Quartus Prime," "Devices→Cyclone V," and "ModelSim – Intel FPGA Starter Edition." When the software is done installing, make sure to select "Launch USB Blaster II driver installation."
- Start the Quartus software. When it asks about licensing, select "Run the Quartus Prime software" (the free version doesn't require a license). You will likely have to start it twice to get it to run the first time.
Step 5: Connect Your DE1-SoC to Your VM
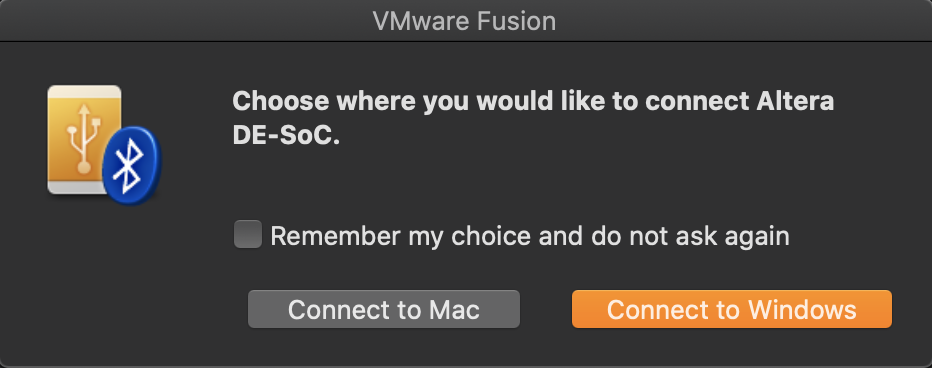
- With the virtual machine running, plug your DE1-SoC board (with power on) into your computer using the USB cable provided.
- If you see a window like the one shown below,
select "Connect to Windows" and then you're done!
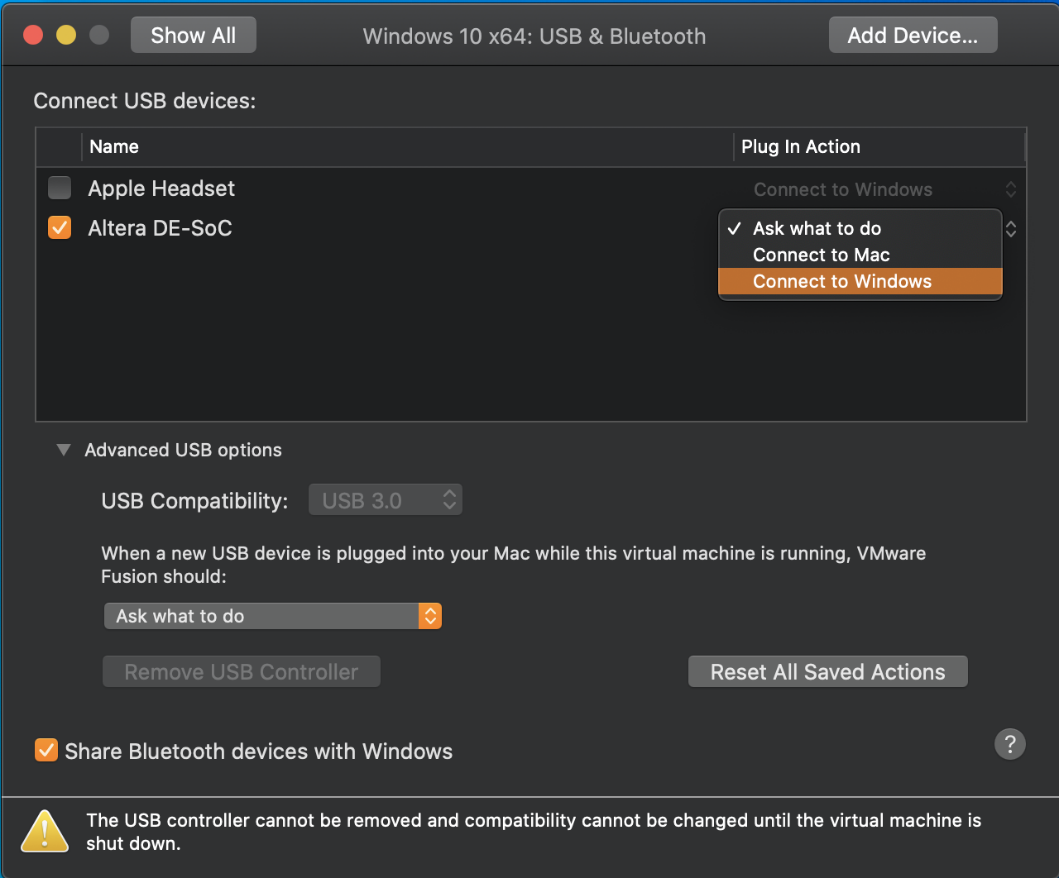
- If you do NOT see the above popup, from the VMware
Fusion menu bar, select "Virtual Machine" → "USB &
Bluetooth" → "USB & Bluetooth Settings..."
In the window that opens, find the FPGA and in the "Plug In Action"
column, select "Connect to Windows" from the dropdown menu.