Software Setup
Git
If you don't already have it, install git.
If you're on macOS, we recommend installing the full developer tools suite by running
xcode-select --installIf you're on Windows, we recommend running the installer from the git homepage. This will also install Git Bash, which is a great first Unix-like command line to learn if you are a Windows user and are not already using something more advanced like WSL.
Java
Install Java 11 if you don't have it already. A good place to get it is AdoptOpenJDK. Choose the OpenJDK 11 (LTS) and HotSpot JVM options, and then download. MacOS and Linux users can just run the installers directly using the default options. Windows users should run the installers and additionally make sure "Repair Registry" and "Set JAVA_HOME" are checked when prompted. We generally suggest that Windows users uninstall all previous versions of Java (JDK or JRE) before installing the current version to reduce the chances that IntelliJ or other tools will pick the wrong version by accident.
To verify your installation, open a terminal (the Terminal app on macOS, or Git Bash/Command Prompt/Powershell/WSL on Windows) and run the command
javac --versionIntelliJ
Run the installer for your OS from the IntelliJ homepage.
If you already have IntelliJ installed, be sure to update to at least version 2021.1 so that you have Lombok support.
Open IntelliJ and click through the initial setup steps. You do not need anything more than the default plugins and configuration for this course. At the splash screen, click "Configure" at the bottom-right and open "Preferences." Navigate to Version Control > Git and click the "Test" button at the top right. This test should succeed and report a git version. If you have any trouble with this, contact the course staff for help.
Cloning your homework repository
You always edit your own personal copy of files that are under git control. Before you can make such edits, you must "clone" to create your local repository. You need to do this step only once at the beginning of the term.
Ensure that your repository exists, by browsing to
https://gitlab.cs.washington.edu/cse341-22sp/cse341-22sp-NETIDNETID is your netid). If the repository does not exist,
contact course staff.
If you do not already have one, set up an ssh key as follows
Open a terminal and run the following command, replacing "your@email.com" with any identifying text (this is just 'comment' text). Do not remove the quotations.
ssh-keygen -o -t rsa -b 4096 -C "your@email.com"- Press enter when asked for a file name (use the default name).
- Do not use a passphrase (just press enter).
-
You'll receive a message stating that "your public key is saved in
[some file]". The file is probably called
~/.ssh/id_rsa.pub, but use whatever is listed from your command. It will end with.pub. -
You need to copy/paste the contents of that public key. You can
either open the file (in Notepad on Windows or in TextEdit on
macOS), or you can print the file to the teminal and copy it from
there by running the following command:
For example, if your file was saved ascat [public key file name here] | clip # Windows cat [public key file name here] # (macOS/Linux)id_rsa.pub, then on macOS/Linux the command would be:
For Windows users, the above command automatically copies the data. On macOS/Linux, you will need select with the mouse and copy it.cat ~/.ssh/id_rsa.pub - Navigate to CSE Gitlab and sign in. In the top right corner, open your profile menu and click "Settings". Choose "SSH Keys" on the left, the paste your public key that you copied into the text box. The "Title" field can be whatever you want—we recommend writing something that identifies which computer you created the key on, like "Personal Laptop" or "attu." Finally, click the "Add Key" button.
-
Run the following command to ensure that your key is correctly
setup. You should receive a welcome message and should not be
prompted for a password. If you receive a message saying "the
authenticity of the host could not be established", it's safe to
type 'yes' to bypass this message.
If you get stuck, also check these instructions from Gitlab.ssh -T git@gitlab.cs.washington.edu
Now that you have an SSH key, you are ready to clone the repository. You can clone from inside IntelliJ or on the command line.
Cloning with IntelliJ
(Occasionally, Windows users have had trouble cloning their repository within IntelliJ. These Windows users had success cloning their repository from the command line using the "git bash" tool, then doing all their work within IntelliJ after the initial clone step. Please try that if you have trouble, and contact course staff if you are still stuck.)
Open IntelliJ. On the splash screen, choose "Get from Version Control". Select "Git" under Version Control, and choose a convenient place on your computer for "Directory"—this is where you'll be storing your work for the rest of the quarter. For URL, use the text below. Be sure to replace "NETID" with your netid.
git@gitlab.cs.washington.edu:cse341-22sp/cse341-22sp-NETID.git
After the project opens, you need to close it and repoen the java/ subfolder as the project root.
To do this, click File > Close Project. And then File > Open, and navigate to wherever you cloned the project,
and then double click the java/, and finall click the open button. You should be able to click the build
button and see no errors. Contact course staff if you get stuck.
Cloning from the command line
First, decide where you want to clone the repository. If you are not sure, one easy place to find later is to use your home directory,
which is abbreviated by the tilde character ~.
Then run the following command to clone the repository, being sure to replace "DESIRED_DIRECTORY" with the path to wherever you decided to clone your work (or just "~" to use your home directory), and also replace "NETID" with your netid.
cd DESIRED_DIRECTORY
git clone git@gitlab.cs.washington.edu:cse341-22sp/cse341-22sp-NETID.git
OCaml
macOS
The easiest way is to first install the Homebrew package manager. After installing Homebrew, close the terminal and reopen it before proceeding. Then run
brew install ocaml
brew install opam
Then install the command-line developer tools if you haven't already. After that, install the necessary opam packages.
xcode-select --install
opam install dune utop ocaml-lsp-server ppx_inline_test ppx_deriving
Windows
Unfortunately OCaml support on Windows is quite bad. If you are willing to try the Windows Subsystem for Linux (WSL), which allows you simulate a Linux environment from inside Windows, that may be your best bet. After installing WSL, you can follow the instructions for Ubuntu Linux below.
An alternative approach is to install OCaml for Windows.
Use the 64-bit graphical installer.
After installation, make sure ocaml-env is accessible on the PATH.
From inside the installed custom cygwin environment, run
opam install dune utop ocaml-lsp-server ppx_inline_test ppx_deriving"C:\\OCaml64\\bin\\bash.exe".
Also add the setting
"terminal.integrated.defaultProfile.windows": "Cygwin"If you are a Windows user who succeeded in getting OCaml setup, we would love to hear from you so that we can improve these notes. Please contact course staff.
Ubuntu Linux 18.04 and newer
Run these commands.apt install build-essential ocaml
add-apt-repository ppa:avsm/ppa
apt update
apt install opam
opam install dune utop ocaml-lsp-server ppx_inline_test ppx_derivingAttu
You can also run OCaml on attu, but you will need to upgrade its version of OCaml to a later version.
opam is already installed globally, but you will need to initialize it for your username
opam init~/.bash_profile. Press y to say yes.
Then run
opam switch create 4.12.1Log out and log back in to reload your shell configuration. Then run
ocaml -version4.12.1.
If you still see the wrong version, it's possible that your shell is not correctly configured. Some students were able to work around their broken shell configuration by running the command.
eval $(opam env --switch=4.12.1)Finally, run
opam install dune utop ocaml-lsp-server ppx_inline_test ppx_derivingVS Code
Follow the instructions on the VS Code homepage.
Once open, install the "OCaml Platform" extension (not the "OCaml and Reason" extension).
Using git to commit and push your code
Git is famous for being difficult to use and easy to screw up. If you get stuck, please ask for help!
In IntelliJ (Good while working on Java)
Go to View > Tool Windows > Commit. This should open a small window on the left side of the editor. Find all the files you changed or added and check the checkbox next to them. Write a little message in the text box below and press "Commit and Push". That's it! For more information, see the IntelliJ documentation.
In VS Code (Good while working on OCaml)
Go to View > SCM. This should open a small window on the left side of the editor. Find all the files you changed or added and click the plus sign next to them. Write a little message in the text box at the top of the window and press Control-Enter (Command-Enter on macOS) to commit.
To push, click the tiny 3 dots icon in the upper right corner of the small Git window, and select "Push". That's it! For more information, see the VS Code documentation.
From the command line
For each file that you changed, and for each new file that you want to add, run git add FILE
where FILE is the name of the file.
To make sure you are about to commit what you intend, you can run git status.
To make a commit, run git commit -m "my commit message" replacing the message between quotes
with a short descriptive message about your changes (don't delete the quotes).
To push your changes to gitlab, run git push.
Turning in your code
We are using Gradescope to manage grading and submissions this quarter. Go to Gradescope and click "Upload submission" for the assignment you are trying to submit. You should see a window like this:
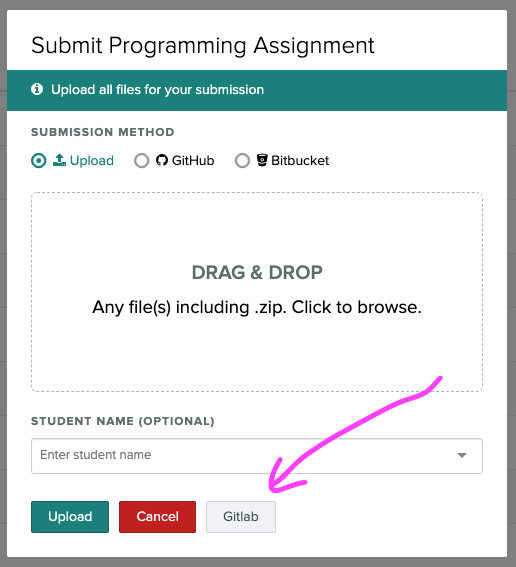
Click the Gitlab button. Then you will see a window like this:
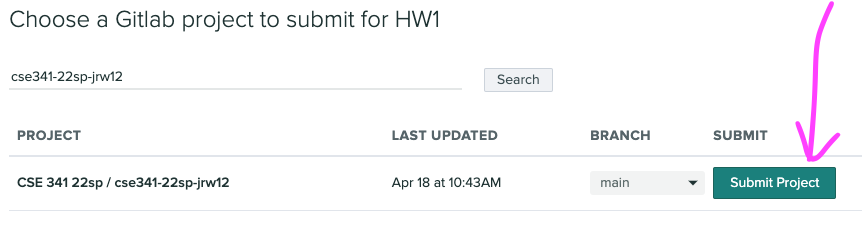
If you have many repositories on CSE gitlab, use the search bar at the top to search for cse341-22sp.
Ensure the main branch is selected. (Or, if you are using git branches to organize your work, select the correct branch.)
Press submit.