# Hall of Shame (from [CSE 154](https://courses.cs.washington.edu/courses/cse154/19au/lectures/lec05-css-iii-more-layout/index.html#/4))  Thoughts? .footnote[[gatesnfences.com](http://www.gatesnfences.com/)] ---  Thoughts? ??? Key Issues - where do components get placed? - how much space should they occupy? --- name: inverse layout: true class: center, middle, inverse --- # Layout I: Introduction to Layout Lauren Bricker CSE 340 Winter 2022 --- name: normal layout: true class: --- [//]: # (Outline Slide) # Today's goals - Announcements - Reminder: Peer review emails will go out Friday night/Saturday morning - Layout will be released soon (no earlier than Thursday) - Reminder: review the last part of [Animation](/courses/cse340/22wi/slides/wk02/animation.html#40) - Start Layout - Interface tree construction - Using tree for layout - Container components - Android Support for Layouts --- # Why do we need layout? .left-column30[ <br>  ] .right-column60[ How can you center something? How can you lock it to an edge? How can you design layout that reacts (responds) well to turning your phone? Examples for web - c0FFEE shop with [no layout](https://courses.cs.washington.edu/courses/cse154/19au/lectures/lec05-css-iii-more-layout/code/coffee-shop-starter/coffee-shop.html) - c0FFEE shop with [layout](https://courses.cs.washington.edu/courses/cse154/19au/lectures/lec05-css-iii-more-layout/code/coffee-shop-solution/coffee-shop.html) ] .footnote[from [CSE 154](https://courses.cs.washington.edu/courses/cse154/19au/lectures/lec05-css-iii-more-layout/index.html#/6)] --- # Interface tree construction .left-column30[] .right-column60[ Circle all of the interactors in this interface. ] --- # Interface tree construction .left-column30[] .right-column60[ Circle all of the interactors in this interface. ] --- # What is the interactor hierarchy? .left-column30[] ??? naive version --- # What is the interactor hierarchy? .left-column30[ ] .right-column60[ A naive approach might look like this: <div class="mermaid"> graph TD W(Window) --> M[Icon:Mag Window] W --> A[Slider:Aperture Size x y w h] W --> C[Menu:Choice x y w h] W --> I[Icon:Color x y w h] W --> T[Text:RGB x y w h] W --> La[Text:Label x y w h] class W green class M,A,C,I,T,La blue </div> ] -- count: false .right-column60[ If we had special (hidden to the user) layouts and interactors to help us with positioning, where might we put the interactors we put them in this tree? ] --- # What is the interactor hierarchy? .left-column30[  ] .right-column60[ Exercise: Add your interactors into the tree (In class worksheet/interactive drawing) ] --- # What is the interactor hierarchy? .right-column60[ <div class="mermaid"> graph TD W(Window) --> L(LeftSide:DisplayVert) W --> R(RightSide:DisplayVert) L --> Z[Space:Fixed] L --> M[Icon:Mag Window] L --> A[Slider:Aperture Size] L --> Y[Space:Stretchy] L --> C[Menu:Choice] R --> D(RGB DisplayHor) D --> V[Space:Fixed] D --> I[Icon:Color] D --> T[Text:RGB] D --> U[Space:Flexible] R --> Q[Text:Label] class Y,Z,V,U darkblue class W bluegreen class L,R,D green class Z,Y,V,U yellow class M,A,C,I,T,Q blue </div> ] .left-column40[ What information is contained in an interactor hierarchy? ] -- count: false .left-column40[ - z order - position - size - layout hints - event delivery - damage (when to redraw) ... ] -- .left-column40[ What else? ] --- # All of this specified through Views Example: What if you wanted to change background color of all of the buttons to red? ```java for (int i = 0; i < layout.getChildCount(); i++) { view = layout.getChildAt(i); view.setBackgroundColor(Color.RED); } ``` --- [//]: # (Outline Slide) # Today's goals - Interface tree construction - Using tree for layout - **Container components** - Android Support for Layouts --- # Containers can hold views They handle a lot of things for us invisibly - Layout out their children - "Decorating" their children - Deciding who should get input events - Passing down information (such as redraw requests) --- # Container Components in Android .row[ .left-column50[ - Views - Base class for __all__ UI elements - Interactors (e.g buttons, labels, image views, etc) - ViewGroups - Encapsulates one or more views (e.g. Android Components, **Layouts**) - Can define specific **layout** properties ] .right-column50[ <div class="mermaid"> graph TD W(ViewGroup) --> V[ViewGroup] W --> V1[View] W --> V2[View] V --> V3[View] V --> V4[View] V --> V5[View] class W,V darkblue class V1,V2,V3,V4,V5 blue </div> ] ] .row[We will use the word *Components* to include both layout components and interactors (Views) since you don't generally "interact" with layouts] --- # Example (Layout Assignment) .left-column50[ ] .right-column30[ 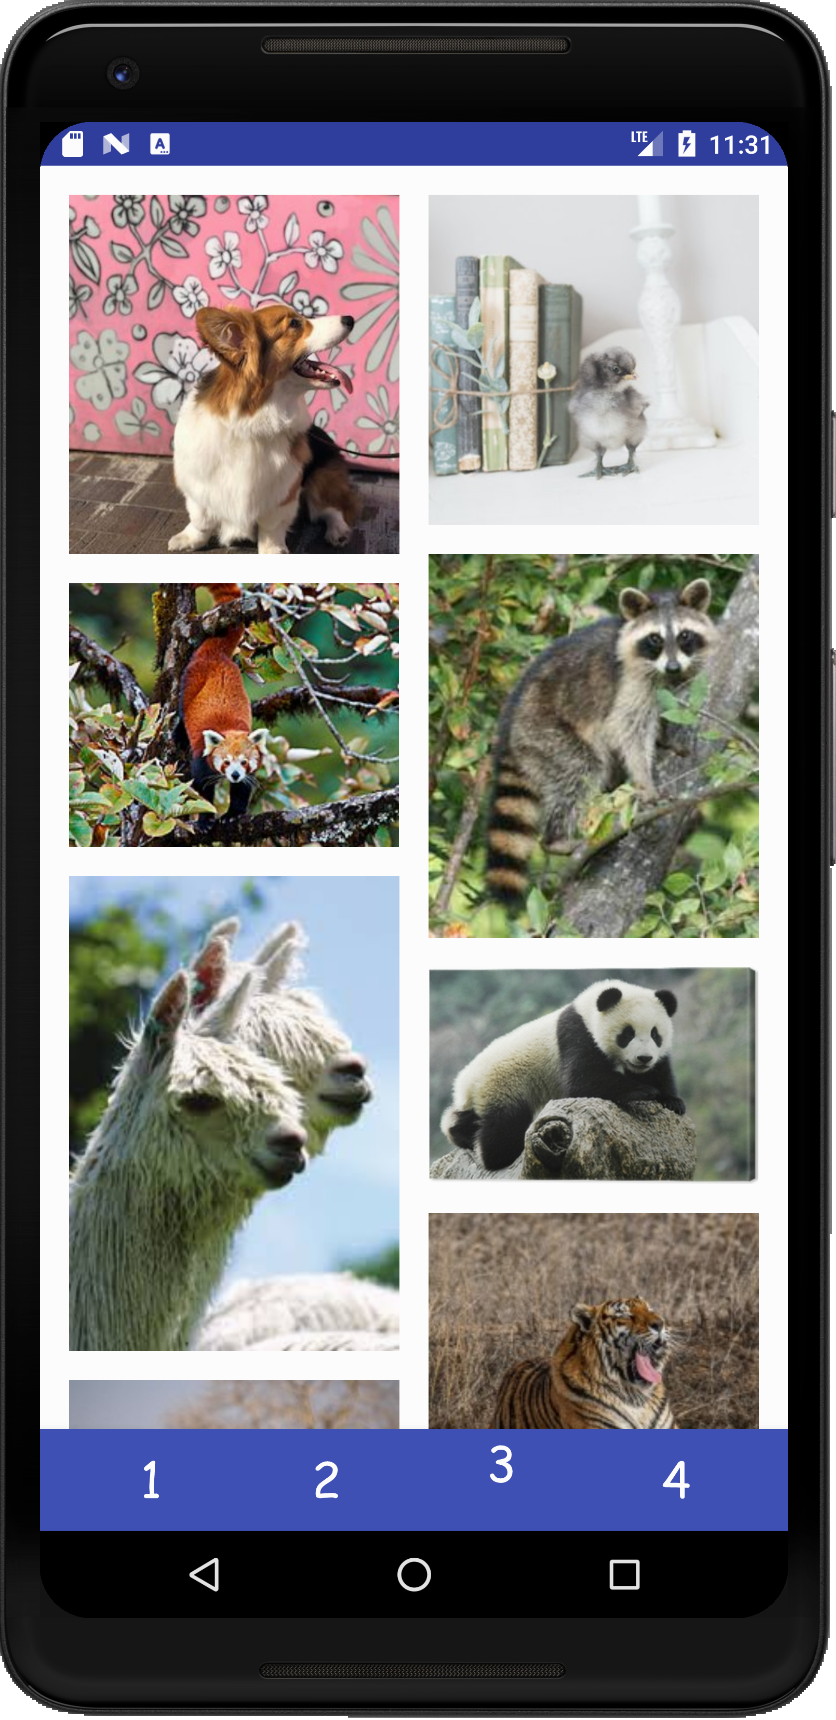 ] ??? This is the kind of stuff we can do thanks to viewgroups --- # Example (Layout Assignment, part 3) .left-column50[ I've highlighted things that are visible (as opposed to just doing layout work) <div class="mermaid"> graph TD C[ViewGroup:ConstraintLayout] C --> Column1[ViewGroup:Column1] C --> Column2[ViewGroup:Column2] Column1 --> V1[View:Fox] Column1 --> V2[View:Squirrel] Column1 --> V3[...] Column2 --> V4[View:Duckling] Column2 --> V5[...] class C,Column1,Column2 blue class V1,V2,V3,V4,V5 darkblue </div> ] .right-column30[  ] ??? This is the kind of stuff we can do thanks to viewgroups --- # Android's runtime view of the same .left-column30[ VERY IMPORANT debugging tool  ] .right-column60[  ] --- [//]: # (Outline Slide) # Today's goals - Interface tree construction - Using tree for layout - Container components - **Android Support for Layouts** --- name: xml-layouts # Designing XML Layouts in Android .left-column50[  ] ??? This is Android's GUI layout editor Where's the interactor hierarchy here? point out the "space" --- template: xml-layouts count: false .right-column50[ This is Android's GUI layout editor Where's the interactor hierarchy here? - It's the component tree! - The XML is a visual way of specifying the hierarchy that exists once the XML is loaded into the application What are the leaf nodes? Do you see anything unusual? ] ??? point out the "space" --- # What is a spacer? .left-column50[  ```xml <space android:layout_width="0dp" android:layout_height="wrap_content" android:layout_weight="1"></space> ``` ] .right-column50[ What is a Space? - Works extra well with layout containers - We can add *struts* - Think of it like a strut in a building - They hold things a fixed distance apart - We can also add *springs* - they push things apart as much as possible ] ??? see next slide! --- template: xml-layouts .right-column50[ In this case, they are in a `LinearLayout` - It always has a direction (horizontal or vertical) - And it places its kids, in order, in that direction, within its bounds Where is the linear layout on the screen? ] --- template: xml-layouts .right-column50[ It's the box around 'Save and Discard' - We call this a *Layout Container* - Note: this is not visible in the actual GUI, it's a hidden interactor tree element ] --- template: xml-layouts .right-column50[ A Layout Container can - automate a lot of the layout tasks - make it much simpler to ensure reliable results - use these whenever they do the job - you will implement one for your assignment ] --- # Designing XML Layouts in Android Many layout and other attributes for components. You should explore! 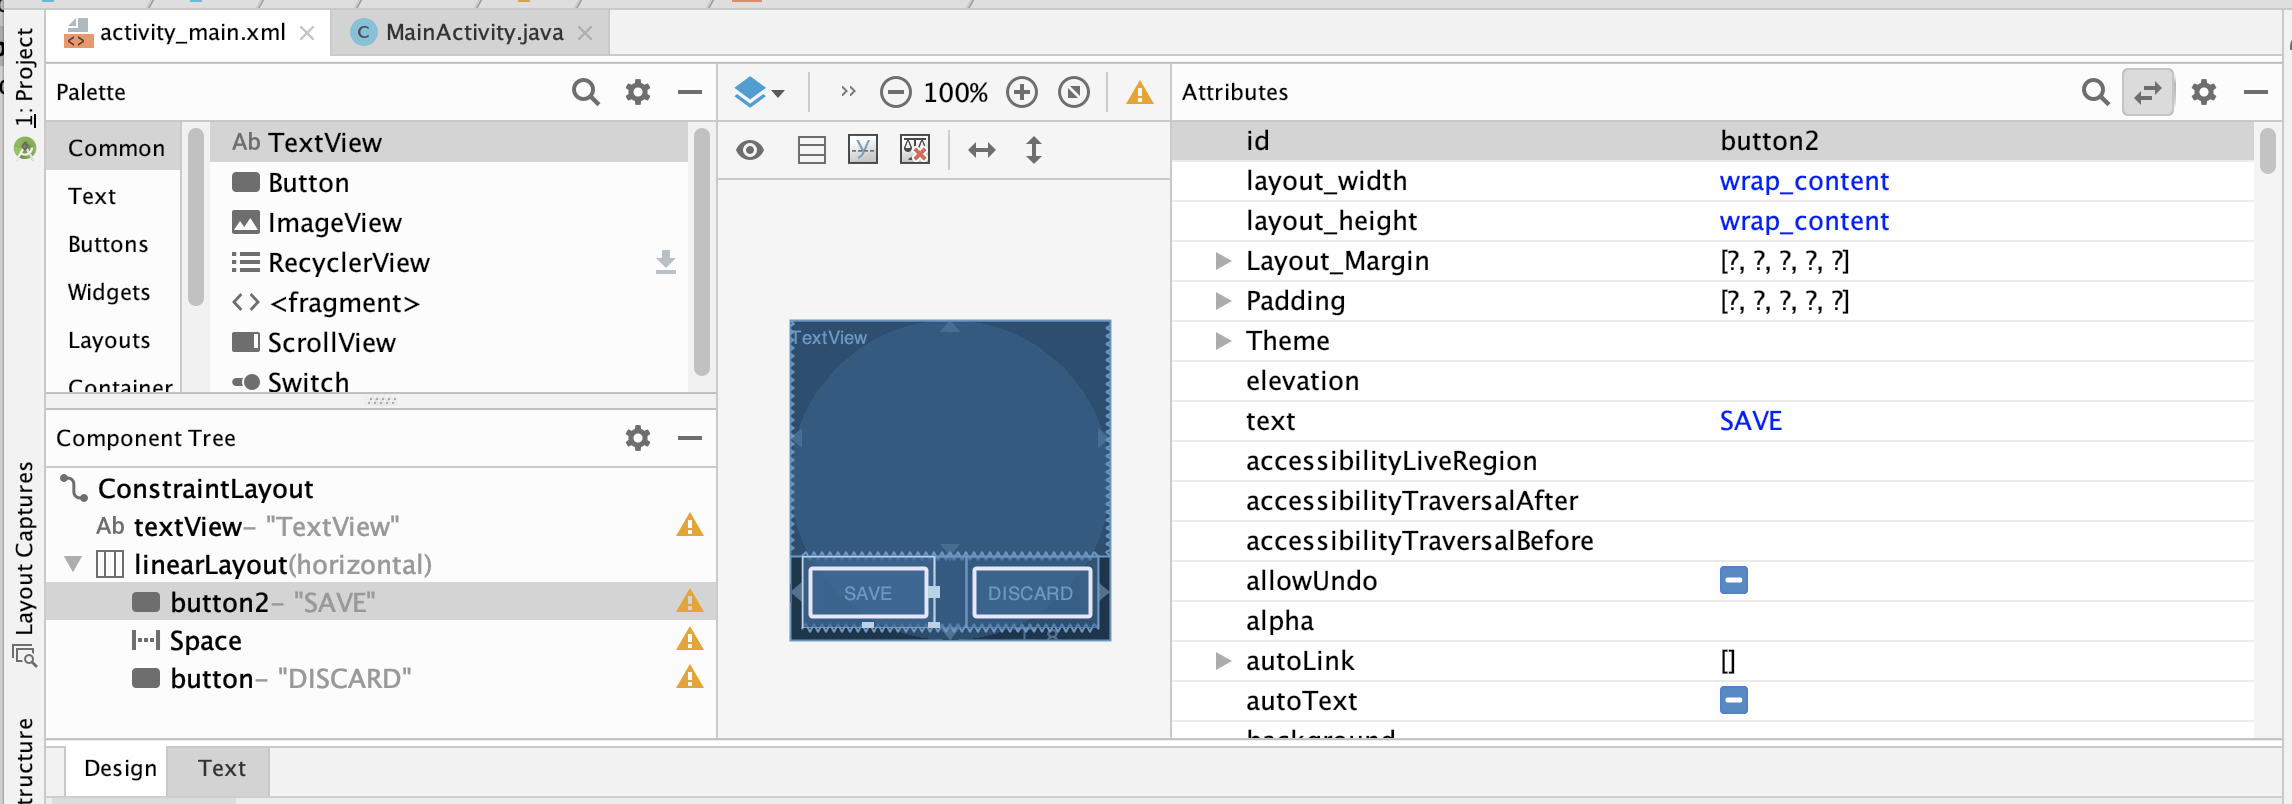 ??? Talk about how there's many layout and other attributes for components that they should explore! --- # Exercise: Adding containers and spacers .row[ .left-column30[] ] .row[ <div class="mermaid"> graph TD W(Window) --> L(LeftSide:DisplayVert) W --> R(RightSide:DisplayVert) L --> Z[Space:Fixed] L --> M[Icon:Mag Window] L --> A[Slider:Aperture Size] L --> Y[Space:Stretchy] R --> C[Menu:Choice] R --> D(RGB DisplayHor) D --> V[Space:Fixed] D --> I[Icon:Color] D --> T[Text:RGB] D --> U[Space:Flexible] R --> Q[Text:Label] class W bluegreen class L,R,D green class Z,Y,V,U yellow class M,A,C,I,T,Q blue </div> ] --- # Vertical Container Components .row[ .left-column30[  ] .right-column70[ Linear (1D) layout of components - Always layout in the same direction - Places its direct descendants, in order, in that direction ] ] .row[ <div class="mermaid"> graph TD W(Window) --> L(LeftSide:DisplayVert) W --> R(RightSide:DisplayVert) L --> Z[Space:Fixed] L --> M[Icon:Mag Window] L --> A[Slider:Aperture Size] L --> Y[Space:Stretchy] R --> C[Menu:Choice] R --> D(RGB DisplayHor) D --> V[Space:Fixed] D --> I[Icon:Color] D --> T[Text:RGB] D --> U[Space:Flexible] R --> Q[Text:Label] class L,R darkblue class W bluegreen class D green class Z,Y,V,U yellow class M,A,C,I,T,Q blue </div> ] --- # Horizontal Container Components .row[ .left-column30[  ] .right-column70[ Same: Linear (1D) layout of components - Always layout in the same direction - Places its kids, in order, in that direction ] ] .row[ <div class="mermaid"> graph TD W(Window) --> L(LeftSide:DisplayVert) W --> R(RightSide:DisplayVert) L --> Z[Space:Fixed] L --> M[Icon:Mag Window] L --> A[Slider:Aperture Size] L --> Y[Space:Stretchy] R --> C[Menu:Choice] R --> D(RGB DisplayHor) D --> V[Space:Fixed] D --> I[Icon:Color] D --> T[Text:RGB] D --> U[Space:Flexible] R --> Q[Text:Label] class D darkblue class W bluegreen class L,R,D green class Z,Y,V,U yellow class M,A,C,I,T,Q blue </div> ] --- # Spacers .row[ .left-column30[  ] .right-column70[ - Work extra well with layout containers - *Fixed Space* (struts) hold things a fixed distance apart - *Stretchy Space* (springs) push things apart as much as possible ] ] .row[ <div class="mermaid"> graph TD W(Window) --> L(LeftSide:DisplayVert) W --> R(RightSide:DisplayVert) L --> Z[Space:Fixed] L --> M[Icon:Mag Window] L --> A[Slider:Aperture Size] L --> Y[Space:Stretchy] L --> C[Menu:Choice] R --> D(RGB DisplayHor) D --> V[Space:Fixed] D --> I[Icon:Color] D --> T[Text:RGB] D --> U[Space:Flexible] R --> Q[Text:Label] class Y,Z,V,U darkblue class W bluegreen class L,R,D green class Z,Y,V,U yellow class M,A,C,I,T,Q blue </div> ] --- # Some Layout Types in Android .footnote[More on https://developer.android.com/guide/topics/ui/declaring-layout.html] - [FrameLayout](https://developer.android.com/reference/android/component/FrameLayout.html) - good for position views on top of each other, or encapsulating a bunch of views. Used in [Doodle](/courses/cse340/22wi/assignments/doodle). - [__LinearLayout__](https://developer.android.com/reference/android/component/LinearLayout.html) - places views one after the other in order according to the orientation (Horizontal or Vertical). Used in [Layout](/courses/cse340/22wi/assignments/layout). - [RelativeLayout](https://developer.android.com/reference/android/widget/RelativeLayout) - Positions of the children are desribed in relation to one another - [TableLayout](https://developer.android.com/reference/android/component/TableLayout.html) - Rows and columns style way of declaring a layout - [GridLayout](https://developer.android.com/reference/android/component/GridLayout.html) - Uses an [*adapter*](https://developer.android.com/reference/android/interactor/Adapter.html) that provides items to display in a grid - [ConstraintLayout](https://developer.android.com/reference/android/component/ConstraintLayout.html) Let's you use constraints to specify how things should lay out. Used in [Layout](/courses/cse340/22wi/assignments/layout). ??? We'll talk more about Constraint layouts later --- ## Example: Linear Layout of Email .left-column[ [Linear Layout Tutorial](https://developer.android.com/guide/topics/ui/layout/linear) 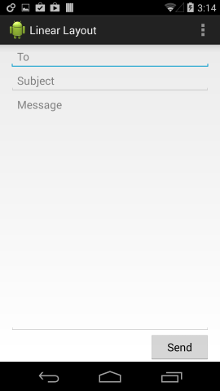 ] .right-column[ ```xml <LinearLayout xmlns:android="http://schemas.android.com/apk/res/android" android:layout_width="match_parent" android:layout_height="match_parent" android:paddingLeft="16dp" android:paddingRight="16dp" android:orientation="vertical" > <EditText android:layout_width="match_parent" android:layout_height="wrap_content" android:hint="@string/to" /> <EditText android:layout_width="match_parent" android:layout_height="wrap_content" android:hint="@string/subject" /> <EditText android:layout_width="match_parent" android:layout_height="0dp" android:layout_weight="1" android:gravity="top" android:hint="@string/message" /> <Button android:layout_width="100dp" android:layout_height="wrap_content" android:layout_gravity="right" android:text="@string/send" /> </LinearLayout> ``` ] ??? Can implement all of the things we discussed earlier using constraints note that they can be hard to debug? Discussion of specific inheritance hierarchy for constraints - Only have to write once when we use classes properly - can mix and match things --- # How to view the XML - The Layout XML View completely specifies what was in the GUI (and vice versa) - Get to it by clicking 'Text' (next to 'Design') .left-column50[ 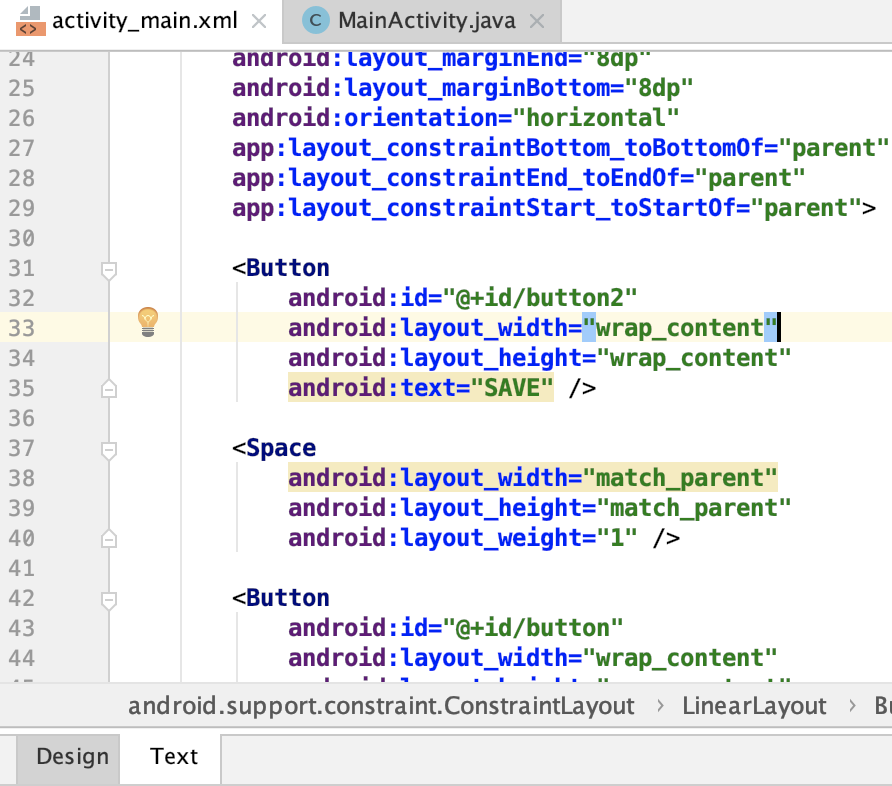  ] .right-column50[ ```xml <?xml version="1.0" encoding="utf-8"?> <-...-> <TextView <-...-> <LinearLayout <-...-> <Button android:id="@+id/button" android:layout_width="wrap_content" android:layout_height="wrap_content" android:text="@string/Save" /> <-...-> </LinearLayout> ``` ] ??? What examples do we have here? - Layout container (linearlayout) - Spacer - springiness - struts - constraints --- # Reminder about XML and Android .left-column[ 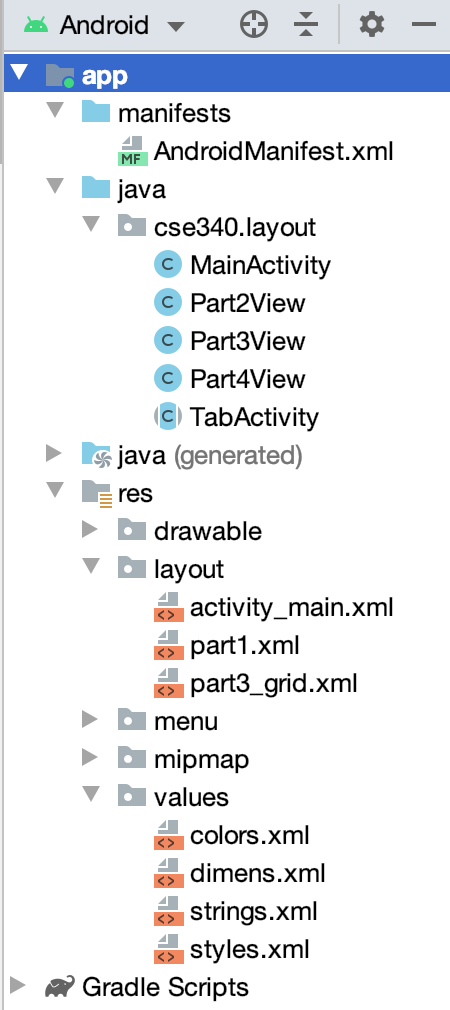 ] .right-column[ Android puts XML in `res`/[`layout`|`values`|`...`], where all sorts of static properties can be specified In XML you can set variables that we can access later in XML or code - In XML access a value (such as `vMargin` from our assignment) using `@(file name)/(value name)` , where the file name is a file somewhere in `res` and the value name is an xml value found in that file. i.e., for `vMargin`, you can use `"@dimen/vMargin"` - In code, you refer to that value by `R.(file name).(value name)` ] --- # Runtime Instantiation *FROM XML* XML layouts are particularly useful - We can add them to the interactor hierarchy using **Inflation**. - We can do this many times over (for example if a sub-layout is repeated a lot) We use a [LayoutInflater](https://developer.android.com/reference/android/view/LayoutInflater) pass it in the id of the xml we're interested in (`R.layout.part1`). (To do inflation in your code you need to `import [package].R;`) --- # XML Layout Inflation Inflation can be done by any `Context` object ```java // ask the Context for the inflater LayoutInflater inflater = getLayoutInflater(); // newView is at the root of the inflated tree View newView = inflater.inflate(R.layout.part1, contents); // params here is a set of layout paramaters for the new view contents.addView(newView, PARAMS); ``` In a View (in say `Part3View.java`) get the inflater this way: ```java // Use a static method to get the inflater LayoutInflater inflater = LayoutInflater.from(context); // The rest is the similar ``` ??? Remind that you can inflate once but use many times --- # XML Layout Inflation four ways There are four overloaded versions of `LayoutInflater#inflate` - the resource versions are relevant to this class/assignment: ```java // Inflate the view from a resource and attach it to the given root public View inflate (int resource, ViewGroup root) // Inflate the view from a resource, to the given root, if the boolean value is true. public View inflate (int resource, ViewGroup root, boolean attachToRoot) // Inflate the view from an XML DOM node and attach it to the given root. public View inflate (XmlPullParser parser, ViewGroup root) // Inflate the view from an XML DOM node , to the given root, if the boolean value is true. public View inflate ((XmlPullParser parser, ViewGroup root, boolean attachToRoot) ``` --- # Specifying layout parameters in code ```java *RelativeLayout.LayoutParams params; params = new RelativeLayout.LayoutParams( RelativeLayout.LayoutParams.MATCH_PARENT, RelativeLayout.LayoutParams.MATCH_PARENT); ... ``` Use [ViewGroup#addView(View, ViewGroup.LayoutParams)](https://developer.android.com/reference/android/view/ViewGroup#addView%28android.view.View,%20android.view.ViewGroup.LayoutParams%29) method on the parent to add it to the Interactor Hierarchy (with the params) ```java Part2View p2v = new Part2View(this, getImageStrings(), vMargin); *contents.addView(p2v, params); ``` --- # Specifying layout parameters in code There are a lot of options for layout parameters, study the documentation! This is different for [RelativeLayout.LayoutParams](https://developer.android.com/reference/android/widget/RelativeLayout.LayoutParams) and [ConstraintLayout.LayoutParams](https://developer.android.com/reference/android/support/constraint/ConstraintLayout.LayoutParams) 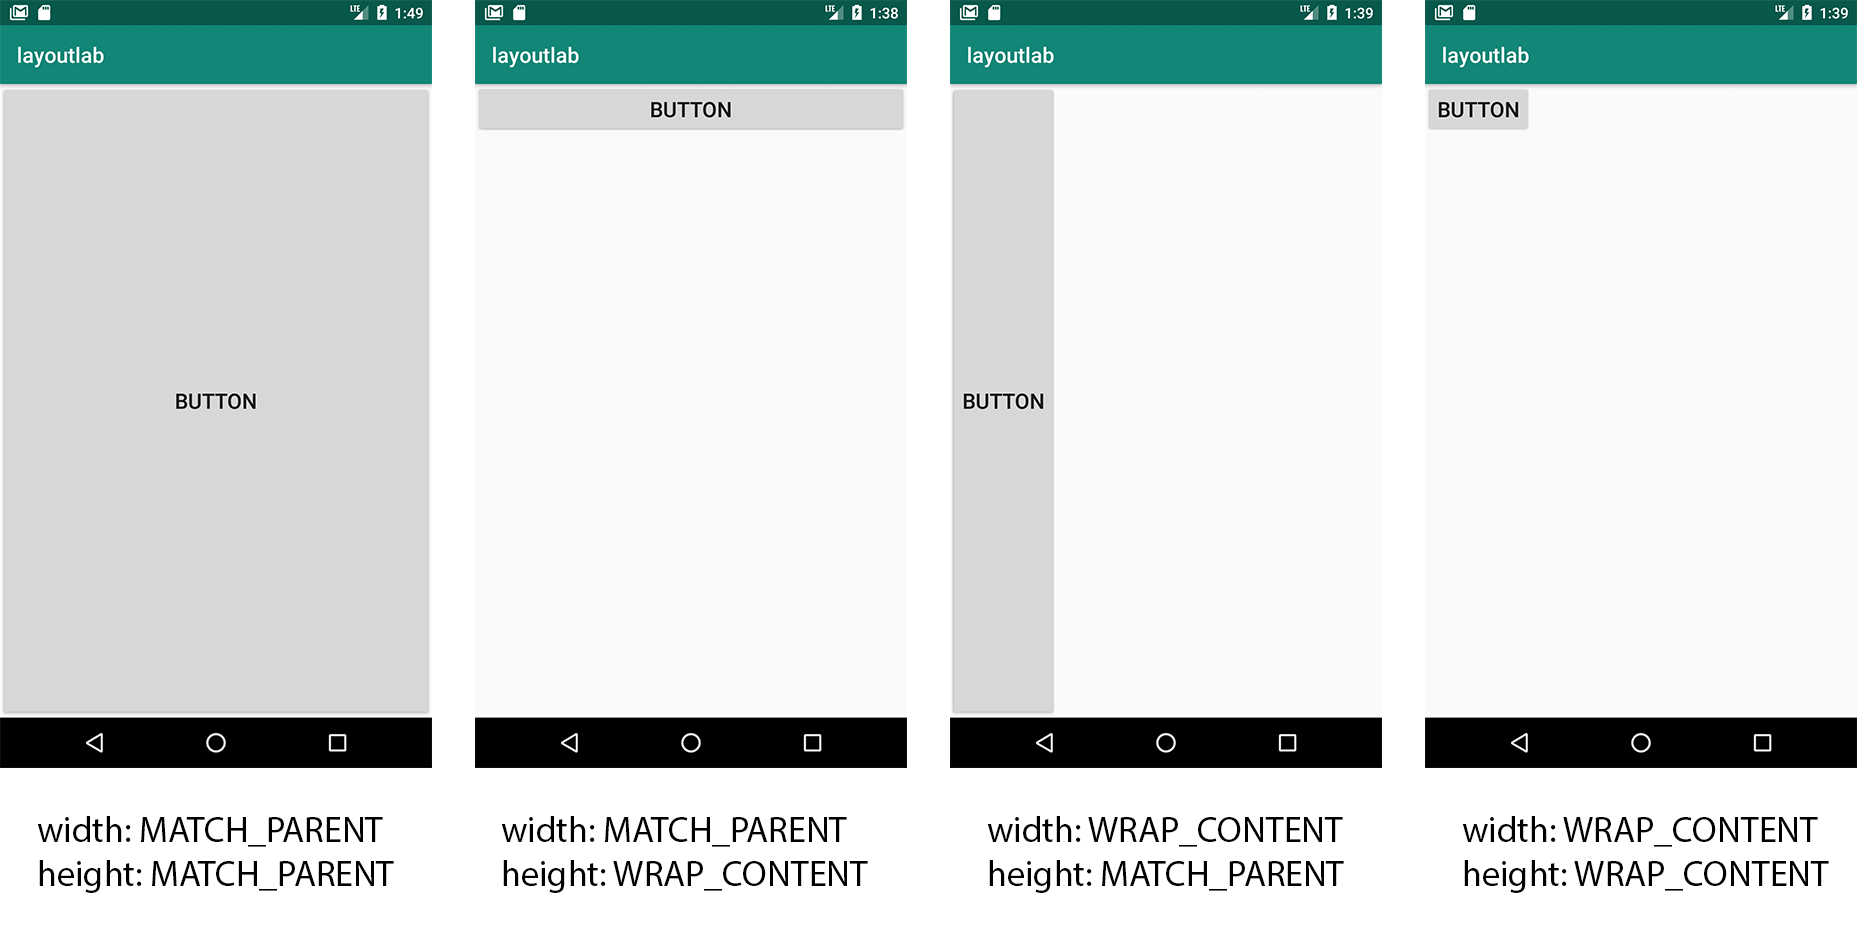 --- # Lots of Examples in Layout Look for `addView([view], PARAMS)` in the code You'll need to do this for the `ImageView` objects you create and add For example in `MainActivity#onCreate(Bundle)` we see ```java contents.addView(getLayoutInflater().inflate(R.layout.part1, null), PARAMS); ``` This statement loads `res/layout/part1.xml`. ```xml <scrollview android:layout_width="match_parent" android:layout_height="match_parent" xmlns:app="http://schemas.android.com/apk/res-auto"> <android.support.constraint.constraintlayout android:layout_width="match_parent" ...></android.support.constraint.constraintlayout> </scrollview> ``` ??? Looking deeper we see that contains a `RelativeLayout` which contains a `ScrollView` and the `BottomNavigationView`. --- # Specifying Ids .left-column50[ - Set the IDs in your layout XML when you create things! - Use good ID names (like variables in programming) - Access it programmatically using `[Component].getId()` and `[Component].setID()`. - Access all Ids using `R.id.[ID]` - We use this to implement the tab navbar in Layout  ] -- .right-column50[ In `MainActivity.java` for Layout ```java // Set window contents based on selected item. *switch (item.getItemId()) { * case R.id.action_part_1: * setCurrentTabId(R.id.action_part_1); contents.addView(getLayoutInflater().inflate(R.layout.part1, null), PARAMS); // params here is a set of layout paramaters for this view return true; * case R.id.action_part_2: * setCurrentTabId(R.id.action_part_2); contents.addView(new Part2View(this, getImageStrings()), PARAMS); return true; //... } ``` ] --- # Using that id So we find the `contents` (a `ScrollView`) by that unique id ```java ScrollView contents = findViewById(R.id.tab_contents); ``` --- # Layout Assignment .left-column[  You can scroll this and the images are all equidistant. ] .right-column[ - Part 1 is about basic reactive layout using XML and constraints for a fixed number of images - Part 2 replicates this in code for a fixed number of images - Part 3 you create a *Layout Container* that can do a fancier layout, for an arbitrary number of images **Pinterest** style! - Part 4 you try to recreate a layout of your choice! ] --- # Layout Assignment .left-column[ 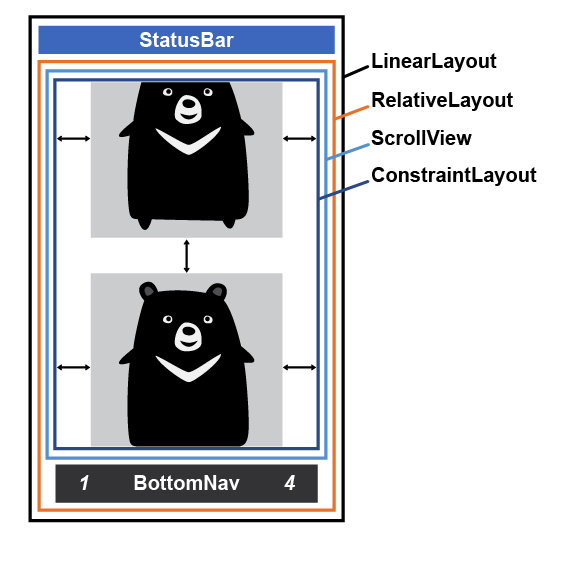 ] .right-column[ Part 1 is about basic reactive layout using XML and constraints - We will use constraints for the left/right/top/bottom of each image - `scaleType`, `width` and `height` will be provided for you There are also things we specify without constraints: margins, for example. - Android best practice is to use a variable for this - How do we do that in XML? Note: the image on the left is what we are calling a __Layout Wireframe__ ] --- # Layout Assignment .left-column[  ] .right-column[ Part 1 is about basic reactive layout using XML and constraints Part 2 asks you to reproduce this in code - Not all that different from creating views in Doodle - What are the key steps here? ] ??? instantiate add to the hierarchy Just now we will also add layout containers --- # Layout Assignment .left-column[  ] .right-column[ Part 1 is about basic reactive layout using XML and constraints Part 2 asks you to reproduce this in code - Not all that different from creating views in Doodle - What are the key steps here? - instantiate (create an interactor) - add to the hierarchy - just now we will also add layout containers ] --- # Layout Assignment .left-column[  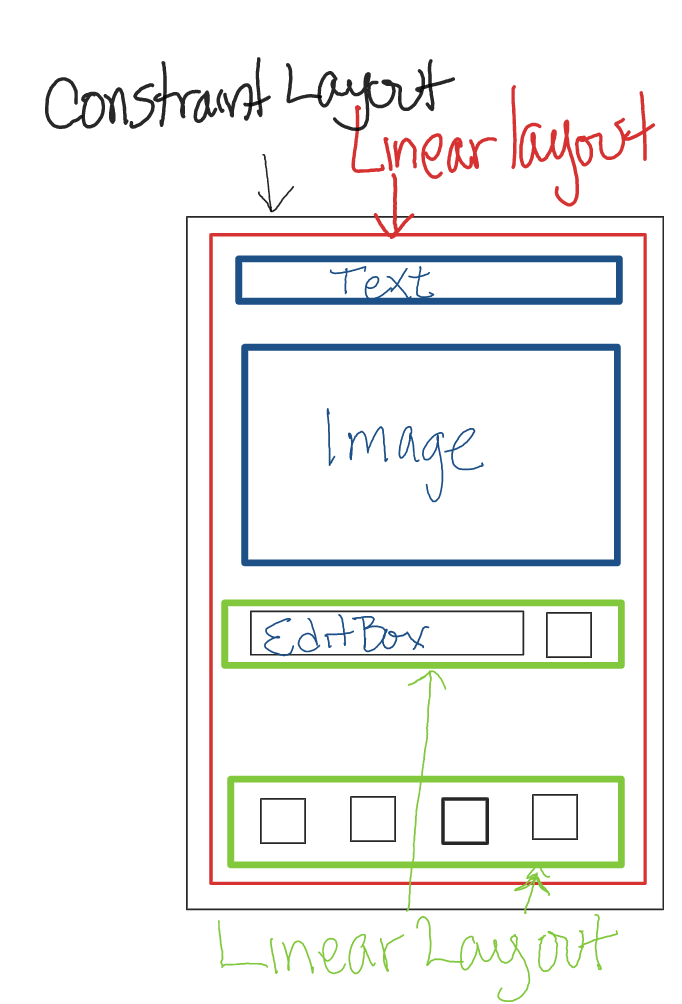 ] .right-column[ Part 3 is about using both XML and programatic means to create a Pinterest style Layout Part 4 is about designing and creating your own mock up of another app layout - Make sure you do the design first - Create your Layout Wireframe (see left) - Create your interactor hierarchy ]
