as6: Final Project
Last revised: 20 Feb, 2022- 25 Feb, 2022
- Design document & App shell
Due 3-Mar, 10:00pm
Lock 5-Mar, 10:00pm
- Code
Due 11-Mar, 10:00pm
Lock 13-Mar, 10:00pm - SUS Testing
Due 13-Mar, 10:00pm
Lock 14-Mar, 10:00pm - Video/Report
Due 17-Mar, 10:00pm
No Lock
Android Goals:
- Create an Android app with activities and fragments
- Utilize Android onboard sensors to enrich the user experience
HCI Goals:
- Design an app based on usability principles and guidelines
- Use Low fidelity prototypes to sketch out your app screens
- Revisit Layout Wireframes and Interactor Hierarchies
- Use System Usability Scale (SUS) to measure the usability of your app
- Turn-in links
- Overview of assignment
- Part 1: Design your app
- Part 2: Create your app
- Part 3: Test your app
- Part 4: Record a video
- Part 5: Report/Reflection
- Turn-in
- Acknowledgements
Turn-in links
- Design Document: Write your design doc and turn it into Gradescope
- Code Checkpoint: Upload your zip file to Gradescope (the same way we did for Ed)
- Final Code: Upload your zip file to Gradescope
- SUS Testing: Use the SUS testing form, then reply on Gradescope that you have completed the work. We will check through the form responses.
- Video: Upload your video to Gradescope
- Reflection: Write your reflection and turn it into Gradescope
Overview of assignment
The goal of this open ended assignment is for you to demonstrate what you learned in this class to create an Android App that both is context aware (uses sensing or location) and satisfies a user need (preferably an accessibility need).
This assignment will be completed in four major steps:
- Design your app
- Identify an accessibilty problem that could be solved by creating an Android app
- Brainstorm your final app ideas and develop sketches of your app screens
- Explain your goals in a lightweight final project design document.
- Implement an Android App from scratch that meets the class requirements
- Test the app using the System Usability Scale (SUS)
- Reflect on your work
- Record a video of your app running and a high level explaination of your code
- Reflect on the results of the testing as well as your work on this project and in this class.
Unlike other assignments, you have a lot of freedom in the design and implementation choices you will make to satisfy the following requirements:
Your application must:
- be designed to help with a user need. Please refrain from creating a game that has been created elsewhere.
- be context aware, that is make significant use of one of the mobile sensors. This could include (but is not limited to) location, motion (like the accelerometer), messaging, environmental sensors (temperature or light), communication (like bluetooth, WiFi, messaging), or multi-touch.
- be accessible. Items on the screen must at least have content descriptions. If you have time you should announce changes for accessibility as well to provide a good flow if it were used with a screen reader.
- be built primarily using the Android SDK level 29 (Q).
- be an app specifically designed for a mobile device, not desktop or web.
- must have at least three majors “screens” or tasks a user can perform.
Your screens could be made with different
Activityobjects (like Doodle),Viewobjects (like Layout), or by exploring and usingFragmentobjects.
Your application might also have the following additional improvements:
- Store application data through
SharedPreferences,Bundle, or other storage mechanisms. - Make your screen design responsive - i.e. work in both portrait and landscape mode, as well as on a phone OR a tablet.
- Ensure that your app is completely accessible using TalkBack (setting focus, announcing for accessibilty. etc)
- Use Google’s TensorFlow or other machine learning platforms to learn from the data you gather through sensing.
You should strive to make the app as appealing and usable as possible, using views, menus, and other widgets appropriately. Navigation (including back navigation and app switching) should be fluid and intuitive. The app should also be robust to user input, i.e. it won’t crash if the user tries to do something they shouldn’t - instead you should warn the user and return to a previously stable state.
Finally, your app must contain school appropriate content. Using curse words, derogatory, insulting, and/or any other staff-deemed inappropriate language will not be acceptable (even if included as a joke). Please see our syllabus for more details.
Note: while you may use existing apps as inspiration, your final project must be of your own design and implementation. We also expect you will not copy code from our existing assignments or tutorials and turning that in as your own. If you do use online or in class resources for inspiration, they must be cited (see the Academic Integrity section for more details). The only portions that will count towards your assignment requirements will be your original work.
Resources
Part 1: Design your app
Design your app screens
You should start by by brainstorming some ideas for your app. It can be helpful to bounce ideas off friends, classmates, family, a rubber duck, and/or your instructor/TAs.
Once you have your idea in mind, plan your app’s screens by doing the following:
- Start by listing out the purpose of each of your screens, Give each screen a title and a brief description of what the goal of this screen is and how a person would use this screen.
- Make a low fidelity paper prototype
of each screen. THis is where you get to let out your inner Kindergartener … start
drawing what you feel these screens will look like. It can be helpful to draw these
screens on some 3x5 index cards to emulate a phone’s screen size. Each of the
screen for your app is drawn on a separate notecards or rectangle.
- Oher tools such as Figma can be very helpful in this process.
- It can also be helpful draw arrows that show how a user navigates between your screens. For example, if there is a button that when you click it, it brings up another screen, draw a line between the button and that other screen, or label the lines between the screen with the action that takes the user on that path.
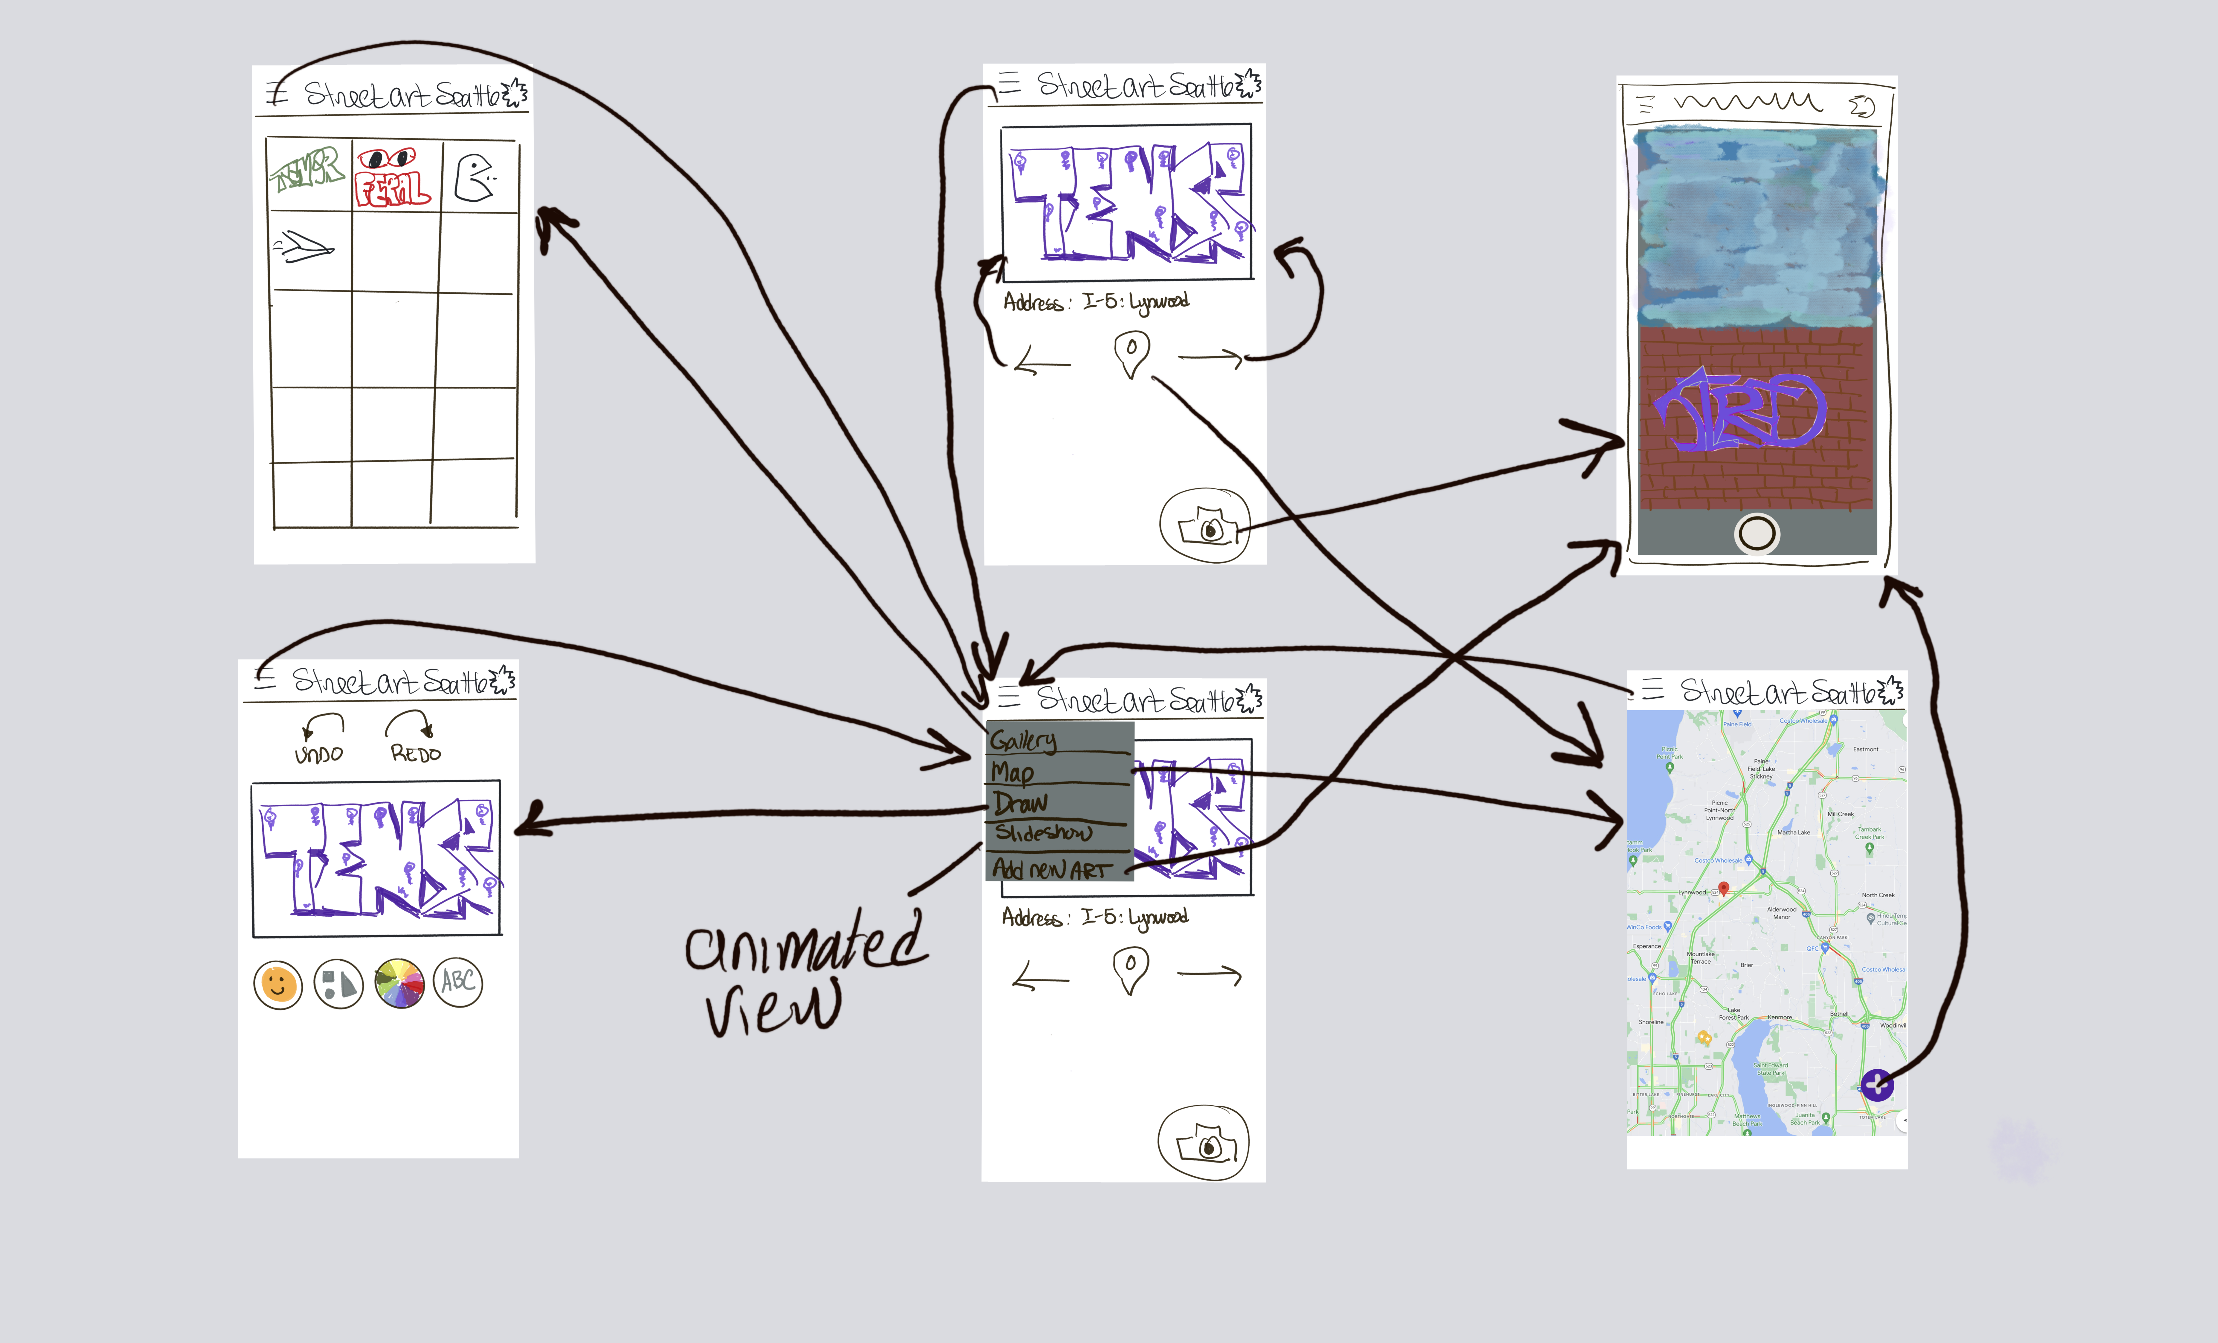
A sample paper prototype for an app (not done for this class) called “What’s for Lunch?” is below:
Optional: Once you have completed your design, test the low fidelity prototype on the notecards with potential users in a role planing scenario (a participatory design technique and use the results to iterate on yoru design.
Write a lightweight design document
Your prototype design must be added to a lightweight final project design document that will explain the goals of your project and help you with your planning.
This document must show your app name and contain six major sections:
- Functional Overview - a 1-2 sentence description of your app.
- Design Overview - Descriptions and prototypes of your app’s screens.
- Prioritization of features - a list of things you must, ought, and would like to develop, and even parts you don’t think you’ll develop due to lack of time.
- Design Details - A Layout Wireframe and Interactor hierarchy for each screen at a minimum.
- Proposed Implementation Schedule - working backwards from the last day of class, make a schedule.
- Potential Showstoppers and Open Questions - A list of problems, questions, or concerns you may have about this final project.
We have provided a template for you to use with details on what must be in each section. Please reference this template as necessary, but the information in the report must be your own descriptions.
Participate in a design review
We will have a structure design review just before your Design document is due
Resources
- Final Project Design Document template
- Paper Prototyping: The 10-Minute Practical Guide
- The Eight Golden Rules of Interface Design
Part 2: Create your app
Requirements
Create an Android App from scratch that meets the project requirements. Your program should have a reasonable set of functionality implemented to attain a “Minimum Viable Product” (a product that is minimally useful and demonstrates all of the features “well enough”).
It is highly unlikely that you will get the entire app that you designed built in the time frame allotted. If you are unable to build the complete app (as you had designed it) implemented, focus on the functionality that will allow you to best demonstrate the bulk of your design when others test it. This is why you should have planned during the Feature prioritization and time estimates in your design document.
For full credit, your MVP must demonstrate that it is context aware and accessible.
Important Note:The maximum size for your code and images must be no larger than 15MB to be accepted by our grading system. Please make sure to use smaller images if you include your own in the app.
Setting up a new Android project
Unlike in previous assignments where we gave you an existing codebase to build on, for your final project you will need to create a new project in Android Studio from scratch.
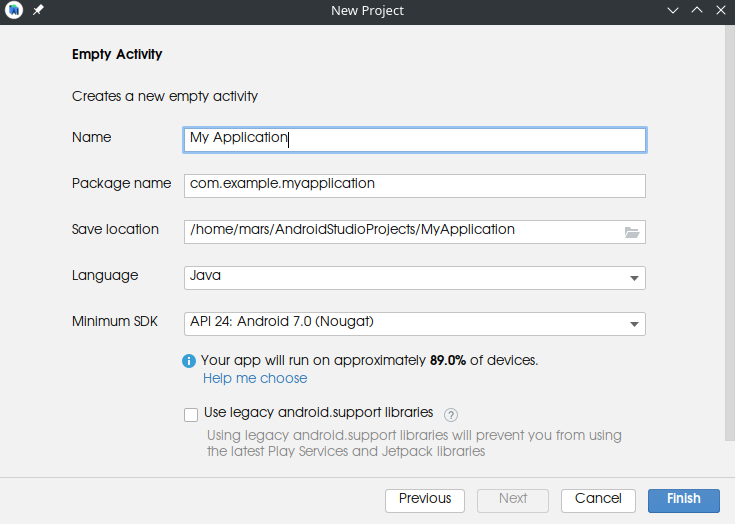
- In Android Studio choose File > New Project
- Select a template. Pick “Empty Activity”, you can always make changes to the layout later.
-
Come up with a project name, a package name, and a folder to save your project (make sure the folder name doesn’t contain spaces). Be sure to set the Minimum SDK to API 24.
-
With your new project created, find the Module-level build.gradle file under Gradle Scripts (the second one). Change the
targetSdkto 29. ThecompileSdkshould be set to 31.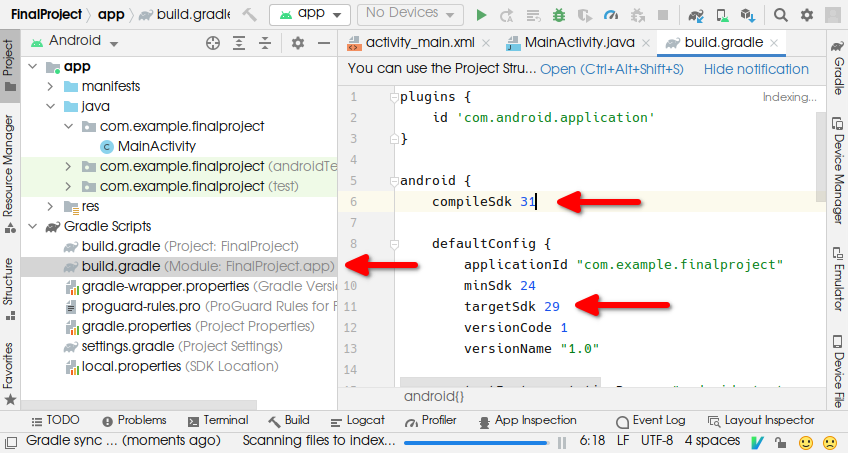
Adding your code to GitLab
We have created empty starter repos for you. You will need to add this repository as a “remote” for your existing project, rather than cloning the repository as we have done previously.
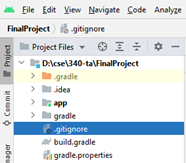
- In Android Studio switch the Project browser to “Project Files” view.
- Find the existing
.gitignoreand replace it with the following: Content of .gitignore
- Choose VCS > Enable Version Control Integration… and select Git as the version control system.
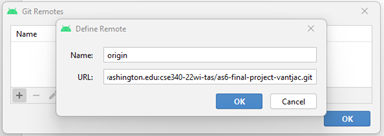
- Now the VCS menu should be replaced with a Git menu. Choose Git > Manage Remotes… to open the Git Remotes dialog.
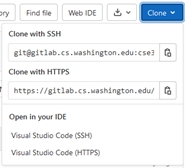
- Find your starter repo in GitLab and copy the SSH clone URL. In the Git Remotes dialog, add a new Remote and paste the URL.
- First, commit just the
.gitignorefile. This will prevent build/config files from being pushed to GitLab. - Try committing all “unversioned files” (there should only be about 35, you may need to refresh) and pushing them to GitLab.
Checkpoint
At the same time you turn in your
Final Project Design Document, you must also turn in a shell
of your application. This checkpoint will demonstrate you know how to create an
application and have picked the type of starter app code (from Android) that you
will build on. This checkpoint will also demonstrate that you have been able to
accept the starter repo that contains the .gitignore file needed to generate
the .zip file for use with Ed.
Code Quality
We expect that you will continue to use good coding practices similar to the Code Quality from our introductory series (please see their Code Quality Guide) for more details.
In addition, all Java files must include Javadoc comments (including @param and @return
comments) on methods and comments on any non-trivial code.
Your .xml files do not need to include any documentation.
README.md file (optional but recommended)
It may be beneficial for you to add a README.md file in the root directory of your repository
that includes any clarifying information about how to run your program. For instance, if a
particular button on one of your required screens is not required for your Minimum Viable Product
please let us know! (Better still, let us know AND pop up a Toast to let your user know as well.)
Other things that could potentially be useful in your README file might include
- Any gradle settings that are required for your libraries to work
- That you have sent an API key to the course staff via email.
- Any particular information about the code - for instance the best order to read the files in.
- Anything else you think is relevant for us to use when testing your code
Resourses
- CSE 14x Code Quality Guide
Part 3: Test your app
We have already done some amount of user testing in prior assignments: In our Doodle assignments you had other students anonymously critique your creative portion of the your app; In Menus you did a (more) formal user study where you collected data and did an analysis in order to draw some conclusions relative to the theory we learned about user interaction.
For this assignment you’re going to again ask other users to do evaluate your work in a using a light weight user methodology called System Usability Scale (SUS) testing.
Tasks
- Prepare a list of tasks you would like your users to do in testing your app. These tasks should
be pretty general in nature (such as “Go to the gallery page”) vs detailed step by step instructions
(such as “Click on the hamburger menu, select the gallery page”). The goal is to have the user
“discover” how to do the task.
- You prepare at least 3-4 tasks the user should complete with your app
- Conduct the set of steps yourself, so you have a general idea on how long it will take
- Recruit at least 3 (preferably more) participants
- Consent the participants via the SUS testing form.
- For each participant, run the study with your app.
- Send your APK to any participants who are testing your app remotely through Zoom, or
- allow your in person participants to use your phone or emulator.
- Have them complete the tasks
- The form will automatically email you back an anonymized copy of their answers.
Conducting the study Recruit your (at least) 3 participants from family and friends who can safely use your app on your device or your emulator in person (co-present), or from the random group you have been assigned from class. Please see our discussion board for a list of remote group members.
Consenting your participants will be very similar whether they are co-present or remote. First, set up a time when can speak to your participant (in person, over the phone, or over a Zoom or other video conferencing call).
Send the link to the SUS testing form to your user. Ask them to readthe first page of the form. Let them know they can ask you any questions, and when they’re ready, they can click continue if they agree.
Collect data
Once your participant has been consented, allow them to test the app.
Give your user the list of tasks they should complete and let them work through the interface to get a feel for it. Again, they can ask you any clarifying questions as they are using the app.
When they are done they should complete the 10 question survey regarding their overall experience with the app. Once they hit submit, a copy of their answers will be sent to you anonmymously. (Please reach out to the course staff if you do not get this information, we can send it to you if the autoresponder does not work).
Determine your SUS score
Your users will have ranked each of the 10 templates questions above from 1 to 5, based on their level of agreement with the question. The overall SUS score is computed as follows:
- For each of the odd numbered questions, subtract 1 from the score.
- For each of the even numbered questions, subtract their value from 5.
- Take these new values which you have found, and add up the total score. Then multiply this by 2.5.
The result of this calculation is a number that is less than 100 - it is NOT a percentage, but rather a clear way of seeing your SUS score. Do this for all of your users - and average their final scores.
It may be helpful for you to create an excel spreadsheet for your SUS scores. In that way you could also average the individual question scores. In particular, items 4 and 10 provide a learnability dimension and the other 8 items provide a usability dimension, so it could be interesting to calculate those as subscores.
Resourses
Part 4: Record a video
You will need to make a 3-5 minute video of your final solution with two main parts
- A demonstration of how your app functions and responds to sensor or location input.
- A quick walk through of your project code.
It will be best if you record this video through Zoom as you will need to demonstrate the device as well as how you are manipulating the sensors. You can record your device through sharing your screen. You should still ensure that your clicks are visible in the same way you did for the Undo assignment.
Your video should include you performing at least the same tasks that you asked your user to do for the SUS testing. Please narrate your tasks so the course staff can hear what you are doing and make sure we can see how the input and output appear on the phone clearly. If you are recording this on your emulator, you can use the … to show and manipulate the virtual sensors. The course staff will also need to see how you have manipulated the sensors as well as how the app reacts to those sensor changes.
Finally, your video will need to include a walk through of your implementation details. Briefly show and explain your code, highlighting pieces that are uniquely yours and something that you are particularly proud that you accomplished.
We do not have any sample videos from CSE 340 since this is the first time we have done this project. However, this model of an assignment has been used with other courses, most notably the Allen School Early Fall Start Startup class with entering first year students. Here are some videos from their assignment which was similar in nature (show the product, describe what they found interesting about the coding)… only they were using Arduino/Circuit playgrounds and had only 3 minutes to do this.
A good way to record your video is using Zoom, particularly if you’re using the emulator. Remember, however, that if you want to record the sound from the emulator (for instance from TalkBack) with Zoom you need to make sure your sound is shared when you share your screen.
Part 5: Report/Reflection
Once you have completed the SUS user testing and your video, write up a brief report that includes a reflection on the results of the testing as well as your work on this project and in this class.
We have provided a template for you to use. Please reference this template as necessary, but the information in the report must be your own descriptions.
Turn-in
Submission Instructions
- Everything for this assignment will be turned into Gradescope
- Design document
- Code Checkpoint
- Final Code
- SUS testing acknowledgement. The course staff will check the form responses for the final grade.
- Video
- Reflection
Turning in your code will be similar to what we’ve done all quarter with Ed, only this time we will turn it in to a an assignment on Gradescope.
Step 1. Make sure you have committed and pushed (add/commit/push) all of your code to your
as6-final-project-<uwnetid> repository on Gitlab. Note: We will be grading based on what is
turned in to Gradescope (not Gitlab) so it is in your best interested to double and triple
check that what you turn in is correct, compiles and runs correctly. We recommend you
re-download your submission and double check it works as you expect.
Step 2. Click on the assignment to get the Gradescope turn in dialog box, then click on the Gitlab button:
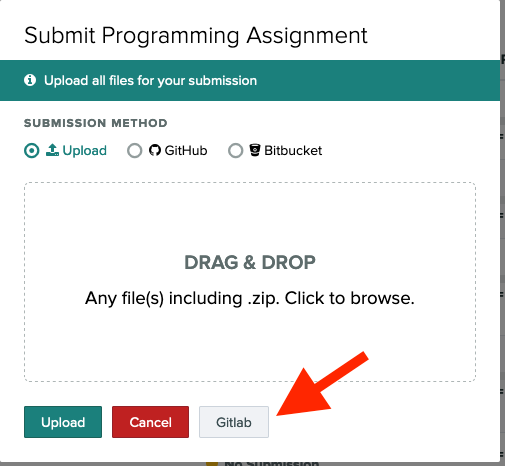
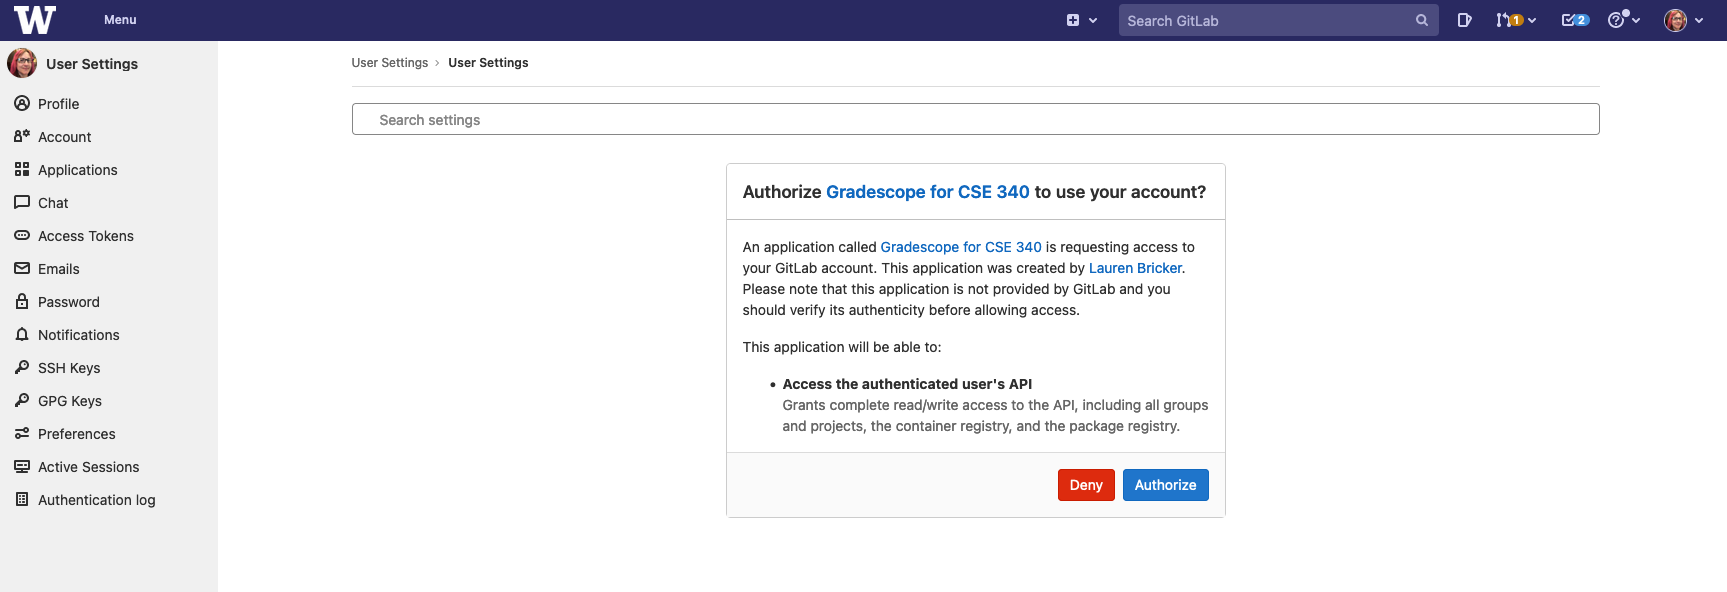
Step 3. Log into Gitlab if you need to then authorize the Gradescope for CSE 340 “application” created by your instructor.
Step 4: Find your Gradescope repo and click on the “Submit Project” button. Note there’s no autograder for this assignment.

Grading
This HW will be out of 70 points and will roughly (subject to small adjustments) be distributed as:
Design (10 pts)
- Functional overview (1 pt)
- Design overview (including prototypes) (3 pts)
- Prioritization of features (1 pt)
- Detailed Design (3 pts)
- Layout wireframe
- Interactor Hierarchy
- Implementation Schedule (1 pt)
- Open question & show stoppers (1 pt)
Code Checkpoint (2 pts)
- Application framework turned in with design
Implementation (24 pts)
- App contains at least one activity
- App contains at least 3 major screens
- User can navigate between screens
- Usage of sensor or location data
- App has no major usability flaws (i.e no Exceptions are thrown)
- App code uses appropriate accessibility
- Correct use of inheritance hierarchy
- Code quality
Video (10 pts)
- Demonstration of overall interface
- Demonstration that interface is responsive to orientation changes, if implemented
- Demonstration of application accessibilty
- Demonstration of sensor or location usage
- Code walk through
SUS Testing (1 pt)
Report/reflection (21 pts)
- Method 8 pts
- Results 2 pts
- Conclusion and Future work: 6 pts
- Acknowledgements: 1 pt
- Final reflection: 6 pts
Academic Integrity
All work submitted for your CSE 340 final project must be your own and should not be shared with other students. This includes but is not limited to:
- You may not use code directly from any external sources (no copying and pasting from
external sites), other than
- code explicitly given to students for use in class.
- small snippets of code found through Android Tutorials or even Stack overflow, as long as that code is cited with a comment as to where you found that solution.
- Images and content must be your own or in the public domain (and properly cited as well). You may not use images or content that is copyrighted by any other individual or corporation.
Doing any of the above is considered a violation of our course academic integrity policy.
Acknowledgements
Large portions of the final project were modeled after the following
- UW Info 448 final project
- The CSE 190E/Startup App project
- The CSE 190Z/STARS PreCSE final project
- The CSE 154 final project