AS1: Doodle
Last revised: March 31, 2021- March 31, 2021
-
Code
Due 10:00pm, 8-Apr, 2021
Lock 10:00pm 10-Apr, 2021 -
Peer evaluation
Due 10:00pm, 11-Apr, 2021 -
Reflection
Due 10:00PM 11-Apr, 2021
Lock 10:00PM 12-Apr, 2021
Android Goals:
- Get familiar with Android Studio
- Understand XML and View
- Load image and drawable resources
HCI Goals:
- Use abstractions to draw on screen
- Properly size and orient components
- Create animations
GitGrade Turn-in links
Assignment Description
For this assignment, you will be creating an activity class which will allow you to create “Doodles” consisting of images, lines, and text. There are three screens that a user can switch between based on a tab bar at the bottom. The first and second screens are to help you test your implementation against the expected output. The third screen is for you to make your own creative doodle. Here is a video of our implementation runing on the Pixel 2 emulator (use API level 28):
You’ll notice that the relative position of everything is pretty similar even when the screen is rotated. This helps to make things work better on a variety of screen sizes, including whatever device you are testing on.
However, be aware that for actual grading, we will use a Pixel 2, and we recommend that you use a Pixel 2 emulator to compare the finished doodle against our screenshot to be sure you’re implementing everything right.
This assignment will take about 10 - 12 hours to complete. Workload may be less on future assignments, or if you have mastered, Git, Android Studio, and with reading documentation on your own. However, this is a good time to build good habits, especially if you are new to this sort of programming ecosystem.
If you find yourself taking additional time on this submission, we strongly suggest that you get in touch with the course staff for help.
Also please remember that we encourage you to explore Android Studio and Stack Overflow resources, and not all tools will be provided in the spec. A big learning goal of this class is to help you become more resourceful and independent as programmers.
The assignment is broken into four parts
- Assignment Description
- Part 1: Learning by Doing
- Part 2: Custom Doodle
- Part 3: Peer Review
- Part 4: Reflection
- Turn-in
- Grading (40pts)
Part 1: Learning by Doing
Tasks:
- Get your development environment ready
- Download and install Android development environment and git if you do not already have it
- Accept the Doodle assignment from GitGrade
- Successfully clone our starter code to your computer
- Open our skeleton code in Android Studio, read through and understand it
- Implement
CircleView,TextView, andLineView- You will need to use the docs to understand how circles, text and lines are specified
- You will need to use your knowledge of geometry to correctly specify the bounding boxes and position of these views
- Animate
UWso it slides from left to right when the app opens - Compare your app screen with our screenshot
Prepping your development environment
Follow the instructions for downloading and installing the Android development environment. Please come to our first section or office hours if you are having any trouble with your machine set up.
Use GitGrade to accept the assignment and receive the starter code. See the instructions for more details.
Understanding the starter code
We have provided you with the shell of an application which has the following class structure.
TabActivity is used to switch back and forth
forth between your Part 1 Activity, the provided Part 1B Activity and your Part 2 Activity using the blue navigation bar at the bottom of the screen.
You must not edit this part of the code but if you are curious, this tabbing functionality is
controlled by the code in the AbstractMainActivity#onCreate(Bundle) method.
We are using a View called BottomNavigationView that gives the functionality of a navigation bar -
the switch statement in each of the onCreate methods tells the program when to show which activity.
Part1Activity is almost complete – all that is missing is the animated UW. However, it will only work once DrawView, CircleView, TextView, and LineView are implemented.
Part1BActivity is complete (once the Views are implemented), it is provided to help you test your code.
Until then, your assignment will look more like this:
As you can see, the position of pictures is wrong (their size is fine because we provide that code for you), and nothing else draws at all.
You will need to design your own Part2Activity, that is the open ended, creative part of the assignment.
Note: The notation such as AbstractMainActivity#onCreate(Bundle) is a common shortcut to demonstrate a specific
method in a specific class (here the onCreate method which takes a Bundle as parameter
in the AbstractMainActivity class).
Your Tasks
Your primary task is to implement the missing pieces of the View inheritance hierarchy.
DrawView
The DrawView parent class is responsible for maintaining a copy of the Paint object that will be used to style drawings, and for making sure that the View position and size are fixed in place properly in the parent.
The DrawView and all of its children assume they recieve coordinates in density independent pixels (dp). However when drawing on the screen, you must use regular pixels (px). We have provided a helper class to handle conversions (DimHelp). You should convert from dp to px before calling initFromParentCoordsPX (i.e. in your constructor).
You will need to implement initFromParentCoordsPX(float parentX, float parentY). The goal is to position the DrawView so that onDraw() can assume that (0,0) is the top left of the view (in px) and draw from there.
The DrawView will also ensure that if width and height are set, it disallows any drawing outside of its bounds. We have provided the solution to this for you, in onMeasure(), which is used by other parts of the Android toolkit to determine a View’s width and height.
If you run the stub code, or review the video of it above, you will note that the position of the images is wrong, but the size of the images is correct. This is because we provide an implementation of initFromParentCoordsPX(parentX, parentY, width, height) and of onMeasure() which work together to correctly support width. However, since our implementation of initFromParentCoordsPX(parentX, parentY, width, height) calls initFromParentCoordsPX(parentX, parentY), position is wrong until you implement initFromParentCoordsPX(parentX, parentY).
Once you have correctly implemented DrawView you should see that your images are correctly placed in a heart shape in Part1Activity and in a grid in `Part1BActivity.
Related APIs and documentation
CircleView
We recommend you start next with CircleView as it is the simplest DrawView you will need to implement. You must not add any fields to CircleView, your entire implementation will be possible simply by using initFromParentCoordsPX(x, y, width, height) in your constructor; and getWidth() and canvas.DrawCircle() in CircleView#onDraw().
Pay careful attention to what x and y means in each instance that it is used – which coordinate system are x and y in (parent or CircleView coordinates)? What do they refer to, the bounding box or the circle’s center?
In addition, make sure to account properly for the thickness of your line, so that the circle’s radius is correct AND the bounding box doesn’t cut off the line.
Also be sure to use getBrush() to retrieve the Paint object used to style your circle.
LineView
A good next task to tackle is LineView. As with CircleView your solution must not add any new fields to LineView, your entire implementation will be possible simply by using initFromParentLinePX() in your contsructor; and mStart and canvas.DrawLine() in LineView#onDraw()
The most challenging aspect of LineView is to translate between the coordinates that are passed in, which specify the start and end of the line, and the position and size, which are needed for initFromParentCoordsPX(). This is done in initFromParentLinePX().
In addition, initFromParentLinePX() will need to properly set mStart. This is because the bounding box alone is not sufficient information for onDraw() to properly draw the line. You also need to know what corner to start and end in. Otherwise, all of your lines will be drawn from top left to lower right. To understand this, let’s talk about onDraw().
onDraw() needs to know the starting, and ending, position of the line to draw it properly. It calculates this entirely from the LineView’s bounding box, and the mStart quadrant. The simplest case is a line that starts
in the upper left quadrent and ends in the lower right quadrant – this would simply go from 0, 0 to width, height. You’ll need to figure out what would have to happen for all the other examples.
One important note: When a line is horizontal or vertical, the bounding box must be set up by initFromParentLinePX() to adjust for the thickness of the stroke, and you’ll have to adjust the position of the line in onDraw() to compensate for this. You must center your line. For example, a horizontal line’s bounding box must start above the actual line by half the stroke thickness and extend below the line by the same amount. When you draw the line, you’ll then need to provide y coordinates that are similarly adjusted.
Also note that when a line is not vertical or horizontal it’s end will be clipped, by the bounding box, and not be square; and you do not need to adjust for thickness.
This is visible in the following image of the horiontal line across the bottom of the screen in Part1Activity:
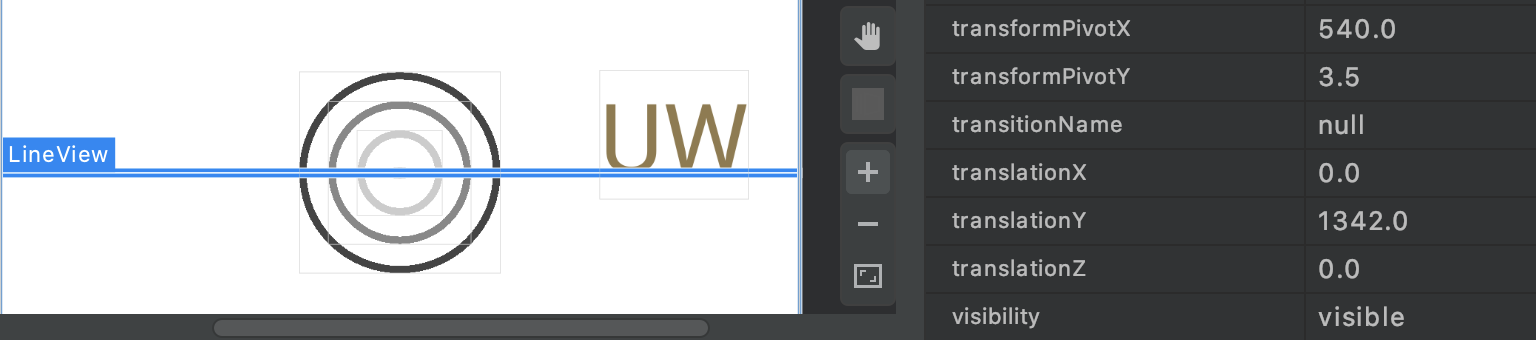
This is a picture of Android Studio’s layout inspector View -> Tool Windows -> Layout Inspector, which draws bounding boxers around every view on the screen and shows coordinates in dp. The selected view’s bounding box is shown in blue, and to the right of it Android Studio shows the x, y, width and height of the line’s bounding box. This line is drawn in Part1Activity.java, specifically in this code on line 83 of Part1Activity: LineView lineView = new LineView(this, 0, bottom_offset_line, PHONE_DIMS.x, bottom_offset_line, purple);
We’ve added a printout to the Logcat View -> Tool Windows -> Logcat showing the actual position of the line, if you search for line in Logcat you’ll see something like this:
2021-04-02 18:33:03.725 3318-3318/cse340.doodle I/line: doodle line position: x 0, y 512.5714
Note the difference in y position: in the layout inspector, translationY (the LineView’s position in it’s parent View) is 1790.5 while in the printout it is 1794. This illustrates how we have adjusted the position of the boundingbox upward by 7/2 = 3.5 pixels to account for the horizontal line’s width (which is set to 7 on line 79 of Part1Activity when we setup the brush: purple.setStrokeWidth(7);).
TextView
Implementing TextView is more complicated than the others primarily because there are so many nitty gritty details to how graphics APIs handle text. In particular, you’ll need to calculate the width and height of your TextView from the font size and string being displayed in order to call initFromParentCoordsPX() properly in your constructor.
For this view, the following requirements should be met:
- The bounding box height is conceptually meant to capture (essentially the height of the font regardless of what characters are displayed)
- The width is meant to capture (the width of the specific text being displayed)
- The text’s bounding box should be positioned so that the x given to the constructor corresponds to the start of the text and the y given to the constructor corresponds to the baseline of the text.
We recommend doing this by using a FontMetrics object to set the text size. You can also use paint.measureText() to get the width of your text. This only requires a few lines of code, but will require that you read the documentation for these methods and objects thoroughly. Some of the documentation you will find in the comments in our code base, but you will also have to effectively read and navigate the Android documentation as well.
Note: If you read a post on Stackoverflow make sure you understand the answers given thoroughly before making use of the solutions. In line with the course policy, we require that you provide links in your reflection to any documentation that you used to figure out how to implement this (including the android documentation or anything on stack overflow).
Related APIs and documentation
- Visual explanation of text (Meaning of top, ascent, baseline, descent, bottom, and leading in Android’s FontMetrics) and supporting software
- Intro to FontMetrics
- Paint.FontMetrics
Animating Text
Once you’ve implemented the three methods defined above, you also need to figure out how to animate text for Part1Activity. You will
use animations to move the TextView variable UW from its current position to a new X position, the variable right (which we have already converted to px for you, since animation expects px). The animation must last 1000ms (milliseconds not seconds).
Related APIs and documentation:
- ObjectAnimator
- A beginners guide to implement Android Animations — Part 1 and Part 2
Part 2: Custom Doodle
Tasks:
- Design a beautiful doodle of your own.
- Add a new “MyView” to support this Doodle
- Create a video of your Doodle
This is where your creativity comes into play. You are welcome to explore Android outside of what is taught in lecture. We’ve created a blank slate for you in Part2Activity
- To do this part you must add a new
ViewcalledMyView-
MyViewmust be substantively different from the otherViews implemented already (Circle,Image,LineandText) -
MyViewshould be reasonably complex - so just drawing a simple shape (such as a rectangle or oval) would not be complex enough. A complex polygon, or a view that contains multiple things that are drawn in the view would be considered complex “enough”
-
- You must use at least two of the views from Part 1 plus your
MyViewto draw your own doodle - Your doodle must have an animation incorporated into it, lasting at least 5 seconds. Here are some examples from previous years
- You are also welcome to implement new methods in
Part2Activityto make a more creative and beautiful doodle
To start, spend 5-15 minutes sketching out your idea. Here you should you think about how to incorporate lines, text, and images, and how these will be moved around the screen. Storyboarding is a good way to sketch out how this animation will progress. For more information about storyboarding watch at least the first 1:30 of this video. This storyboard does not have to be very complex - even 2-3 frames will give you an idea of how to progress. This storyboard will be turned in as part of your individual reflection.
Then design a doodle. When you are done, take a video of the running doodle to submit through the Canvas assignment entitled Doodle Video.
- To see how to capture a your running animation on the emulator, watch this video.
- To capture your doodle on your phone (tethered to Android Studio), do this, but you have to put your phone into Developer mode first.
Tips:
- Aim for complexity similar to Part 1 (images, text, and shapes) though you don’t need to use as many images
- You may use the attractive home-cooked food images (photo credit)
we include in
res/drawableor use your own images - If you choose to add your own images, add at most .5 GB of data
- If your animation is slow, laggy, or not visibly showing (particularly on the emulator), try the following
- Reduce the number of images you put on your canvas or reduce the file size of images (e.g., convert
.pngto.jpgfiles then reduce resolution of image file) - Check the duration of the animation. Recall that the parameter to the method if in milliseconds, not seconds. It may be worth inflating the number you pass in during testing but be sure to remember to change it back before turning in your assignment
- Ensure that your animation
propertyNameis set correctly for your intended animation - Ensure that your animation starts and ends in different locations if necessary (translating in place is not visibly discernible)
- Recall that
PathandonFloattake absolute coordinates unless otherwise specified - Ensure that animations have not been turned off in the settings app of the phone/emulator
- Reduce the number of images you put on your canvas or reduce the file size of images (e.g., convert
- Recall that “Child views are drawn in a stack, with the most recently added child on top.” (from the FrameLayout documentation)
- You can add a child at a specific index in the child list, see the documentation of the ViewGroup documentation for more about how to add and remove children
- You can switch between the activities by using the navigation bar at the bottom of the screen
-
Make sure that your doodle depends on nothing outside of the files described in Turn-in
- This is primarily related to files. You may still import Android libraries (e.g. Viewgroup).
Related APIs: Android Animation / View Animation / Property Animation / Vogella Tutorials - Android Animation
Commenting your code
Most of the starter code has been fairly well commented for you. However there are some places you must add comments as you are completing your solution:
- If you have any significantly complicated code for your custom doodle, add comments that might help your TA effectively grade your awesome work!
- If you received significant help from another student on any part of your code, be sure to add a comment referencing their help. See the Collaboration Policies portion of our syllabus for more details.
- If you add and use an image that requires copyright, you may add the attribution in your source code where you add the image to the screen. See the Application Content portion of our syllabus for more details.
Part 3: Peer Review
The Custom Doodle will be peer reviewed as part of the grading process. We will use these peer reviews to ensure that you have implemented all of the parts required for Part 2
Peer grading will take place once everyone has turned in their assignments, using the Canvas Peer Review support. You will receive have access to three other students’ videos and will fill out the grading rubric for each.
Additionally, you will have a chance to nominate the most creative doodles! The winners will be shown off in class later this term.
Part 4: Reflection
Each assignment this quarter will have a reflection component as it is a vital part of your work as a Programmer, Computer Scientist, and/or Engineer. Your reflections do not have to be long (please no more than a paragraph or two in length). Details on what a well written reflection includes can be found here. You will be graded on your answers to these reflection questions based on the following
- Student gives at least a minimum answer to all parts of the guiding question.
- Clear/concise but descriptive examples are given throughout the response. An uninformed reader can create a mental picture of the situation being described. Abstract concepts are explained accurately.
- Student elaborates on the significance and meaning of the examples; why they are important.
- Occasionally a student will be given extra credit for an particularly insightful reflection.
Instructions: Create a MS Word, Google or other type of document and copy the following questions (in italics below) into that document. Add your your responses below each question. You can have more than one answer per page, but if you can, please try to avoid page breaks in the middle of a question. Insert page breaks between questions as needed.
You will need to submit your write up as a PDF file. If you are new to Gradescope, see this document for instructions on how to scan and submit hand-written solutions.
Gradescope accounts will be synced with Canvas accounts during the first week or so of class. Please reach out to the staff on the discussion board if your Gradescope account does not have access to our classroom.
For this assignment, your reflection must cover the following:
-
Include the sketches and storyboard you made as part of your design work for Part 2 and a screen capture of your beautiful Doodle.
-
In looking at your design sketches from Part 2, what changed when you did your actual implementation? Why did you make those changes from your original design vision?
-
Why is be better to animate a
View, rather than invalidate/redraw its contents? -
At the moment, other than the bottomNavigationBar, our application does not respond to the user at all. Think of at least two ways that you would go about adding interactivity to this application.
-
What is one mistake that you made or misunderstanding that you had while you were completing this assignment? What is something that you learned or will change in the future as a result of this mistake or misunderstanding?
-
Acknowledgements: Cite anything (website or other resource) or anyone that assisted you in creating your solution to this assignment. Remember to include all online resources (other than information learned in lecture or section and android documentation) such as Stack Overflow, other blogs, students in this class, or TAs and instructors who helped you during OH.
Turn-in
Part 1 and Part 2 Code
You will turn in the following files on GitGrade here.
Make sure you only edited the following files for turn in:
─ Part1Activity.java
- DrawView.java
- CircleView.java
- LineView.java
- TextView.java
- Part2Activity.java
- part2.csv (optional)
- MyView.java
Do not edit any of the other files.
Part 2 Images
If you use your own images in Part 2, please make sure to add and commit them to your repository in the res/drawable directory. If your images are not there, your custom doodle will not work for others and you will NOT get credit for the work you did.
If you’re positioning a large number of images for Part 2, it is best to use a
CSV similar to data.csv which is used for the heart in Part 1. Include this as
part2.csv if necessary. Remember, the CSV coordinates are on a Pixel 2 and scaled to the
current screen in Doodler#addAllImagesFromData(FrameLayout).
Part 2 Video
Remember to submit a video of your custom doodle animation on Canvas at the same time you submit your code.
Follow these instructions to submit to GitGrade
- Make sure the code you want to submit is pushed to GitLab (origin/master)
- If you just commit locally and don’t push, GitGrade won’t see those changes
- (Optional) Go to your repo on GitLab to double check that the latest commit hash matches your latest local commit hash
- Go to the turn in link
- Check the box and click “Turn in”
- Turn in a video of your doodle assignment’s animation on Canvas
Reflection
The reflection will be turned in to Gradescope.
Grading (40pts)
This HW will be out of 40 points and will roughly (subject to small adjustments) be distributed as follows.
- Code (GitGrade) (20 pts)
-
DrawView: 2 pts -
CircleView: 2 pts -
LineView: 5 pts -
TextView: 4 pts -
MyView: 3 pts -
UWAnimation: 2 pts - Part 1 & 2 Code quality (2 pt)
-
- Peer Grade (Canvas) (4 pt)
- Active custom Doodle as verified through Peer Evaluation
- 5 seconds long (1 pt)
- Quality of Video (1 pt)
- Reasonably complex mixture of images, text and shapes: (1 pt)
- Complete all peer reviews (1 pt)
- Active custom Doodle as verified through Peer Evaluation
- Part 4: Reflection (Gradecope) (16 pts)
- Sketch for part 2 is turned in with reflection and shows planning (3 pts)
- Each of the 4 questions is worth 3 point (12 pts total)
- Acknowledgements (1pt)