Homework 4
Due: Tuesday, Dec 3rd, 2024 by 10:00 pm
Goals & Implementation Notes
In this assignment you will build on your HW3 implementation to implement a multithreaded Web server front-end to your query processor. In Part A, you will read through some of our code to learn about the infrastructure we have built for you. In Part B, you will complete some of our classes and routines to finish the implementation of a simple Web server. In Part C, you have the option to fix some security problems in our web server.
As before, please read through this entire document before beginning the assignment, and please start early!
General Implementation Notes
-
In HW4, as with HW2 and HW3, you don't need to worry about
propagating errors back to callers in all situations. You will use
Verify333()'s to spot some kinds of errors and cause your program to crash. However, no matter what a client does, or what input the web server reads, your web server must handle that; only internal issues (such as out of memory) should cause your web server to crash. - As before, you may not modify any of the existing header files or class definitions distributed with the code. If you wish to add extra "helper" functions you can to do that by including additional static functions in the implementation (.cc) files.
- You also may not modify the
Makefiledistributed with the project. In particular, there are reasonable ways to do the necessary string handling without using the Boost Regex library.
Suggested Work Schedule
To help you schedule your time, here's a suggested order for the parts of this assignment. We're not going to enforce a schedule; it's up to you to manage your time.
- Read over the project specifications and understand which code is responsible for what.
- Finish
ServerSocket.cc. Make sure to cover all functionality, not just what is in the unit tests. - Implement
FileReader.cc, which should be very easy, andGetNextRequest()inHttpConnection.cc. - Complete
ParseRequest()inHttpConnection.cc. This can be tricky, as it involves both Boost and string parsing. - Finish the code for
http333d.cc. - Implement
HttpServer_ThrFn()inHttpServer.cc. - Complete
ProcessFileRequest()andProcessQueryRequest()inHttpServer.cc. At this point, you should be able to search the "333gle" site and view the webpages available under/static/, e.g.http://localhost:5555/static/bikeapalooza_2011/index.html. - Fix the security issues with the website, if you decide to do the optional Part C.
- Make sure everything works as it is supposed to.
Multithreaded Web Server
Part A: Read Through Our Code
 Our web server is a fairly straightforward multithreaded
application. Every time a client connects to the server,
the server dispatches a thread to handle all interactions
with that client. Threads do not interact with each other
at all, which greatly simplifies the design of the server.
Our web server is a fairly straightforward multithreaded
application. Every time a client connects to the server,
the server dispatches a thread to handle all interactions
with that client. Threads do not interact with each other
at all, which greatly simplifies the design of the server.
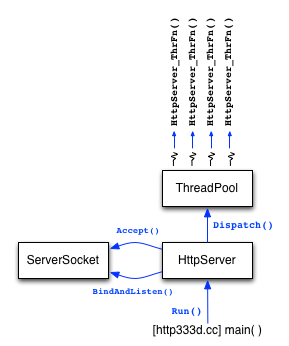
The figure to the right shows the high-level architecture of
the server. There is a main class called HttpServer
that uses a ServerSocket class to create a listening
socket, and then sits in a loop waiting to accept new
connections from clients. For each new connection that the
HttpServer receives, it dispatches a thread from
a ThreadPool class to handle the connection. The
dispatched thread springs to life in a function
called HttpServer_ThrFn() within the
HttpServer.cc file.
 The
The HttpServer_ThrFn() function handles reading
requests from one client. For each request that the client
sends, the HttpServer_ThrFn() invokes
GetNextRequest() on the HttpConnection
object to read in the next request and parse it.
To read a request, the GetNextRequest() method
invokes WrappedRead() some number of times until
it spots the end of the request. To parse a request, the method
invokes the ParseRequest() method (also within
HttpConnection). At this point, the
HttpServer_ThrFun() has a fully parsed
HttpRequest object (defined in
HttpRequest.h).
 The next job of
 HttpServer_ThrFn() is to process
the request. To do this, it invokes the
ProcessRequest() function, which looks
at the request URI to determine if this is a request for
a static file, or if it is a request associated with the
search functionality. Depending on what it discovers,
it either invokes ProcessFileRequest()
or ProcessSearchRequest().
Once those functions return an HttpResponse, the
HttpServer_ThrFn() invokes the
WriteResponse() method on the
HttpConnection object to write the response
back to the client.
Our web server isn't too complicated, but there is a fair amount of plumbing to get set up. In this part of the assignment, we want you to read through a bunch of lower-level code that we've provided for you. You need to understand how this code works to finish our web server implementation, but we won't have you modify this plumbing.
Instructions
- Change to a directory with your local copy of your
CSE 333 gitlab repository, which has your
hw1/,hw2/,hw3/, andprojdocs/directories in it. Usegit pullto retrieve the newhw4/folder with the starter code for this assignment. As with previous parts of the project, you can use thesolution_binaries/versions of the previous parts of the project if you wish. - Run
maketo compile the HW4 binaries. One of them is the usual unit test binary calledtest_suite. Run it to discover failing unit tests that you'll need to fix. The second binary is the web server itself:http333d; try running it to see its command line arguments. When you're ready to run it for real, you can use a command like:./http333d 5555 ../projdocs ../projdocs/unit_test_indices/*
We STRONGLY suggest using a different port than 5555, since it's likely that multiple students will be testing their http333d on the same machine as you! You should also try oursolution_binariesserver, which has fully implemented all the required functionality. It can be run using a similar command line:./solution_binaries/http333d 5555 ../projdocs ../projdocs/unit_test_indices/*
Next, use a web browser to explore the server's functionality:
- If you are running the code on a lab computer or the CSE Home VM: Launch Firefox or Chrome on that machine, visit http://localhost:5555/, and try issuing some searches. As well, visit http://localhost:5555/static/bikeapalooza_2011/Bikeapalooza.html and click around. This is what your finished web server will be capable of.
-
If you are running the code on
attuover an SSH connection: Follow the same steps as above, but navigate to the address for the instance ofattuyour code is running on. For example, if you are running your code onattu4, you would visit the following addresses: http://attu4.cs.washington.edu:5555/ and http://attu4.cs.washington.edu:5555/static/bikeapalooza_2011/Bikeapalooza.html
When you are done with the
http333dserver, the most graceful way to shut it down is to open another terminal window on the same machine and run the commandkill pid
wherepidis the server process id. Use theps -ucommand on the same machine (attu or local VM) to find that process id. You also can probably shut down the server by typing control-C in the window where it is running, but this isn't as graceful and doesn't always work as reliably as akillcommand. - Read through
ThreadPool.handThreadPool.cc. You don't need to implement anything in either, but several pieces of the project rely on this code. The header file is well-documented, so it ought to be clear how it's used. (There's also a unit test file that you can peek at.) - Read through
HttpUtils.handHttpUtils.cc. This class defines a number of utility functions that the rest of HW4 uses. You do not have to implement this file (the default implementations are sufficient if you don't plan on doing Part C), but make sure that you understand what each of them does, and why. - Finally, read through
HttpRequest.handHttpResponse.h. These files define theHttpRequestandHttpResponseclasses, which represent a parsed HTTP request and response, respectively.
It's time to start coding in Part B.
Part B: Basic Web Server
You are now going to finish a basic implementation of the
http333d web server. You will need to implement
some of the event handling routines at different layers of
abstraction in the web server, culiminating with generating
HTTP and HTML to send to the client.
Instructions
- Take a look at
ServerSocket.h. This file contains a helpful class for creating a server-side listening socket, and accepting a new connection from a client. We've provided you with the class declaration inServerSocket.hbut no implementation inServerSocket.cc; your next job is to build it. You'll need to make the code handle both IPv4 and IPv6 clients. Run the test_suite to see if you make it past theServerSocketunittests. - Read through
FileReader.handFileReader.cc. Note that the implementation ofFileReader.ccis missing; go ahead and implement it. See if you make it past theFileReaderunittests. - Read through
HttpConnection.handHttpConnection.cc. The two major functions inHttpConnection.cchave their implementations missing, but have generous comments for you to follow. Implement the missing functions, and see if you make it past theHttpConnectionunittests. - Read through
HttpUtils.handHttpUtils.cc. There are two functions inHttpUtils.ccthat have their implementations missing, but have generous comments to help you figure out their implementation if you choose to to Part C. If you do choose to skip this part, you can ignore theHttpUtilsunittests. - Read through
HttpServer.cc,HttpServer.h, andhttp333d.cc. Note that some parts ofHttpServer.ccandhttp333d.ccare missing; go ahead and implement those missing functions. Once you think you have them working, test yourhttp333d; be sure to test both the web search functionality as well as static file serving (eg, bikeapalooza and Project Gutenberg books). Hint: you'll want to look at our solution binary's generated HTML; focus on the links and their link text.
At this point, your web server should run correctly, and everything should compile with no warnings. If you wish, you can change the appearance of the front page ("dark mode", different graphics, etc.) but please refrain from changing or adding to the functionality of the server.
As usual, run the test_suite under valgrind to
ensure there are no memory issues. You should also launch
the web server under valgrind to make sure there are no
memory issues there; after the web server has launched, exercise
it by issuing a few queries, then kill the web server. (The
supplied code does have some leaks, but your code should not
make things significantly worse.)
For Fun: Part C: Fix Security Vulnerabilities
Now that the basic web server works, you will discover that your web server (probably) has two security vulnerabilities. We are going to point these out to you, and you can fix them if you'd like! Note that this section is purely for fun; you are not required to implement it, and you will not earn extra credit if you do.
Instructions
At this point, it's likely point that your implementation has two security flaws (however, it is possible that the way you implemented your server may have already dealth with the flaws).
- The first flaw is called a
cross-site
scripting flaw, more commonly abbreviated as "XSS".
Type the following query into our solution_binaries web
server and into your own web server (note: that you
will need to do this test in Firefox or Safari; Chrome
attempts to help web servers by preventing this attack
on the client-side!)
hello <script>alert("Boo!");</script>Your browser will pop up a dialog box saying "Boo!" when you use your flawed server. To fix this flaw, you will need to "escape" (ie, replace) certain types of input from the client before you relay it to output. We've provided you with a function inHttpUtilsthat detects input which requires escaping and performs any necessary replacement, and you should implement it. - Use
ncto connect to your flawed web server and to our solution binary. Manually send a request for the following URL (note: browsers are smart enough to protect webservers from this attack, so you can't just type it into the URL bar. But nothing prevents attackers from directly connecting to your server with a program of their own!)/static/../hw4/http333d.cc
This second flaw is called a directory traversal attack. Instead of trusting the file pathname provided by a client, you need to normalize the path and verify that it names a file within your document subdirectory tree (in our example command, that subdirectory is../projdocs/). If the file path names something outside of that subdirectory, you should return an error message instead of the file contents. We've provided you with a second function inHttpUtils.hto determine whether a path is safe or not.
Fix these two security flaws, assuming they do in fact exist in
your server. As a point of reference, in
solution_binaries/, we've provided a version of
our web server that has both of these flaws in place
(http333d_withflaws). Feel free to
try it out, but DO NOT leave this server running, as it
will potentially expose all of your files to anybody that
connects to it.
Congrats, you're done with the CSE 333 project sequence!!
Testing
As with previous homeworks, you compile your implementation
using the make command. This will result in several
output files, including an executable called
test_suite. You can run all of the tests in that
suite with the usual command:
bash$ ./test_suite
You can also run only specific tests by passing command line
arguments into test_suite. For example, to only
run the HttpConnection tests, you can type:
bash$ ./test_suite --gtest_filter=Test_HttpConnection.*
In general, you can specify which tests are run for any of the tests in the assignment; you just need to know the names of the tests, which can be obtained by running:
bash$ ./test_suite --gtest_list_tests
You can also run test_suite and specify particular
tests that should NOT be run. For instance, the
ServerSocket tests can take a while to run; to run all
tests expect for those, enter
bash$ ./test_suite --gtest_filter=-Test_ServerSocket.*
These settings can be helpful for debugging specific parts of the
assignment, especially since test_suite can be run
with these settings through valgrind and
gdb! However, you should not debug your code using
only the supplied tests! The test setup and code are complex
enough that it can be hard to isolate problems effectively
without spending excessive amounts of time trying to
reverse-engineer the details of the test_suite code.
Be sure to also run your code on small sample files and
directories where you can predict in advance exactly what data
structures should be created and what their contents should be, and
then use gdb or other tools to verify that things are
working exactly as expected.
Code Quality
In addition to passing tests, your code should be high quality and readable. This includes several aspects:
- Modularity: Your code should be divided into
reasonable modules (e.g., functions) and should not have
excessive redundancies that could be removed by replacing
redundant code with calls to suitable, possibly new,
functions. If you create any additional private (e.g.,
static) helper functions, be sure to provide good comments that explain the function inputs, outputs, and behavior. These comments can often be relatively brief as long as they convey to the reader the information needed to understand how to use the function and what it does when executed. - Readability: Your code should blend smoothly with the code surrounding it. Follow the existing conventions in the code for capitalization; naming of functions, variables, and other items; using comments to document aspects of the code; and layout conventions such as indenting and spacing.
- Automated bug checking: Use the provided tools
(
cpplint.pyandValgrind) to look for common coding bugs and fix reported issues before submitting your code. Exception: ifcpplintreports style problems in the supplied starter code, you should leave that code as-is. - Style guide: Refer to the Google C++ Style Guide for advice.
- Good development practices: We will look through your git activity (eg, tags and commits) to verify that you are following the development practices described in class. This may include correct tagnames, succinct commit messages, and incremental checkins (eg, commiting after a major milestone like passing a test or implementing a feature).
Project Submission & Evaluation
Project Submission
When you are ready to turn in your assignment, you should follow
the same procedures you used for previous assignments, except this
time tag the repository with hw4-final. Remember to
clean up, commit, and push all necessary files to your
repository before you add the tag. After you have created and
pushed the tag, remember to
test everything in the CSE Linux environment
by creating a new clone of the repository in a separate, empty
directory, checking out the hw4-final tag, and
verifying that everything works as expected. Refer to the
hw0 turnin instructions
for details, and follow those steps carefully.
It is YOUR responsibility to check your work. If your project doesn't build properly when the course staff does these exact steps to grade it, you may lose a huge amount of the possible credit ... even if almost absolutely everything is correct.
Grading
We will be basing your grade on several elements:
- The degree to which your code passes the unit tests
contained in
test_suite.cc. If your code fails a test, we won't attempt to understand why: we're planning on just including the number of points that the test drivers print out. - We have some additional unit tests that test a few additional cases that aren't in the supplied test drivers. We'll be checking to see if your code passes these as well.
- The quality and readability of your code. We'll be judging this on several qualitative aspects described above.
Remember: Both code correctness and code quality matter. Both are weighed significantly in the evaluation of your project.