Gitlab Guide
Throughout CSE 333, you will use Gitlab and git control flow in order to work collaboratively on homeworks and exercises. This guide will help you get started with Gitlab and how to use Git effectively in this course.
CSE 333 Gitlab Setup
The following instructions are for connecting your CSE Linux environment (attu or VM) to your GitLab repo in preparation for hw0 – hw4. The following section has more tips and tricks for using git as you work on your hw, including if you have a partner.
Find Your 333 Repository
- Navigate to https://gitlab.cs.washington.edu
- If you have a CSENetID, use the green "CSE NetID" button; otherwise, use the white "UW NetID" button
- In your list of Projects, you should see a CSE333 repo named
cse333-22wi-students/cse333-22wi-<netid> created
for you already.
- These are usually created the night of Lecture 2 for the quarter. If it is past then and you still don't see your repo, please contact your instructor ASAP to have one created
Add Your SSH Key
This will allow you to access your repo without having to authenticate (i.e., type your password) every time and will greatly improve your workflow.
- Check to see if your CSE Linux environment (attu or VM)
account already has an SSH key by running:
cat ~/.ssh/id_rsa.pub
- If you see a long string starting with ssh-rsa or ssh-dsa, skip to Step 3.
- Generate a new SSH key by running:
ssh-keygen -t rsa -C "<netid>@cs.washington.edu"
- Print your SSH key to the terminal by running:
cat ~/.ssh/id_rsa.pub
- Highlight and copy the complete key (i.e., starting with ssh- and ending with your username and host)
- Add your SSH key to GitLab
- Navigate to your SSH Keys page by clicking on your avatar in the upper-right, then "Preferences", then "SSH Keys" in the left-side menu.
- Paste your SSH key from Step 4 into the "Key" text box and give a "Title" to idenfity what machine the key is for.
- Click the "Add key" button below "Title".
Your First Commit
Any commands shown below should be run from your CSE Linux environment (attu or VM).
- Find your repo's URL by navigating to your project's details page, clicking the blue "Clone" button on the right, and then clicking the copy icon under "Clone with SSH".
git clone <repo url>
touch README.md
- This creates an empty file called
README.md.
- This creates an empty file called
git status
- This prints out the status of the repo – you
should see 1 new file named
README.md.
- This prints out the status of the repo – you
should see 1 new file named
git add README.md
- Stages a new file/updated file for commit. This time,
it should output
git status: README.md staged for
				commit
- Stages a new file/updated file for commit. This time,
it should output
git commit -m "First Commit"
- Commits all staged files with the provided comment/message.
This time, it should output
git status: Your branch is
				ahead by 1 commit
- Commits all staged files with the provided comment/message.
This time, it should output
git push
- Publishes the changes to the central repo, which should now be viewable in the web interface. You may need to refresh your browser first.
Developing with Git Workflow
Once you have a made a local copy of your Gitlab repository in your CSE Linux environment (attu or VM), you can now have access to and make changes to files your repository locally! However, note that the repository on Gitlab and the copy in your CSE environment do not automatically update with each other, so we have an additional responsibility of keeping both of them up to date (so you don't have unupdated copies).
- Updating Local and Gitlab Repositories
- Methods in recovering weird Git situations
- Managing Homework Tags
It is recommended to look through the expected git workflow on this page (if you are interested in more details, the Git Community Book is a great resource as well).
Updating Local and Gitlab Repositories
Update your local copy of the repository with information in the Gitlab repository, type into the command line (in your local repository):
[attu]$ git pull
Commit and add changes from your local copy to the Gitlab repository:
- Make sure that all files are saved in your local copy first and you are in your local copy of the repository!
[attu]$ git pull # make sure your local copy is up to date with Gitlab-
[attu]$ git add <files> # stages files to commit to Gitlab- You may want to use
.(period character) in<files>from the top-level git repository directory to stage all files to be added to Gitlab repository. (Note:.represents current directory, so at top-level of the repository, you are adding and staging all changes in local copy of the repository!) - You can omit files in
git addthat you do not want to commit to the Gitlab repository
- You may want to use
[attu]$ git commit -m “<message here>” # add a descriptive message about your update[attu]$ git push # push your changes to your Gitlab
.gitignore
file that will state which files will be ignored when updating
the Gitlab repository. This may be particularly useful for not
including executables or object files (.o files),
which is already done for you. You can add more files that you
may not want to include in .gitignore.
Methods in Recovering from Weird Git Situations
Keeping your workspace organized is crucial to keeping your flow smooth, efficient, and as productive as it can be. By making sure to frequently update your local and Gitlab repository, you reduce the chance in getting. Nevertheless, you will end up in a “Git spaghetti ball,” so here are some useful survival tips and commands.
Recovery from Messiness Locally
These git commands are ways to manage local changes to your git repository before pushing to your Gitlab repository.
- Hides changes and gives you a clean working directory without having to commit a meaningless snapshot in order to save the current state.
git stash
git stash pop
git stash drop
git reset --hard HEAD
git checkout HEAD -- path/to/file
git reset --soft HEAD~1
Reverting to an Old Commit on Gitlab
Sometimes, you may have added a commit that you don't like and wish to remove, but you have already pushed it onto Gitlab! No worries, there is a way to handle this. (these instructions take inspiration from Gitlab documentation)
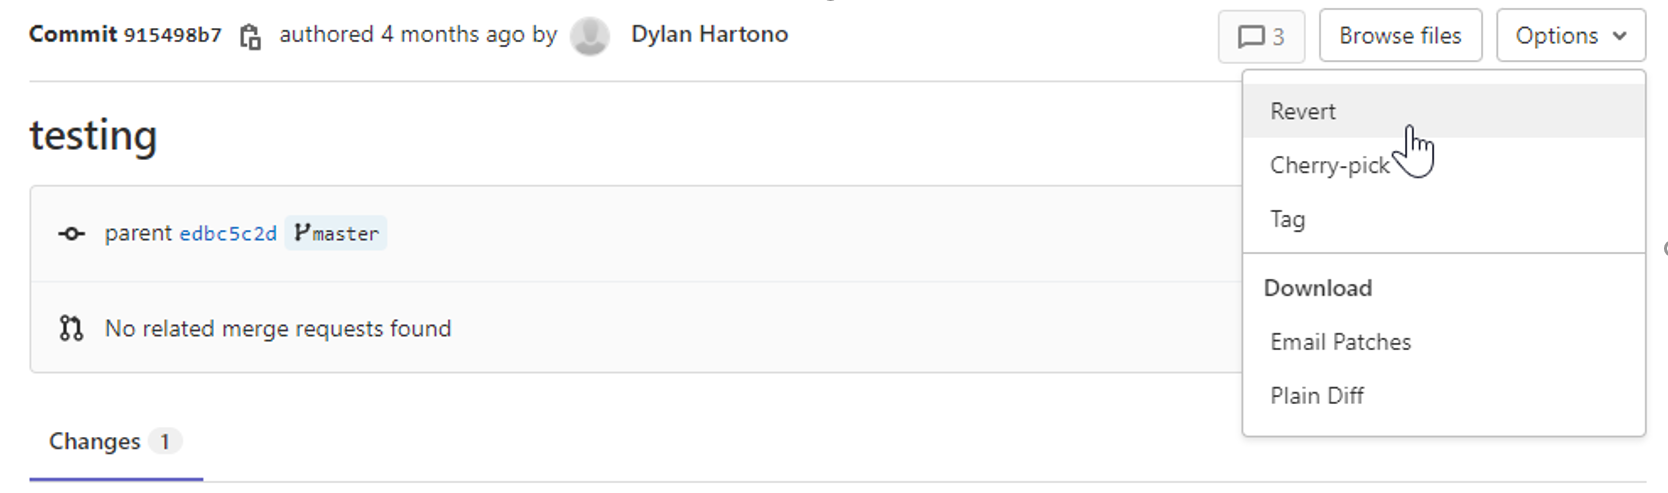
- Log on to the Gitlab web interface and navigate to your repo for CSE 333. On the left menu, hover over "Repository" and then click on "Commits" to view your repo's commits in reverse chronological order.
-
Go to the specific commit you want to revert (the last commit
you want to remove) by clicking on its title.

-
Click on options on the top right side of the page and press revert.
-
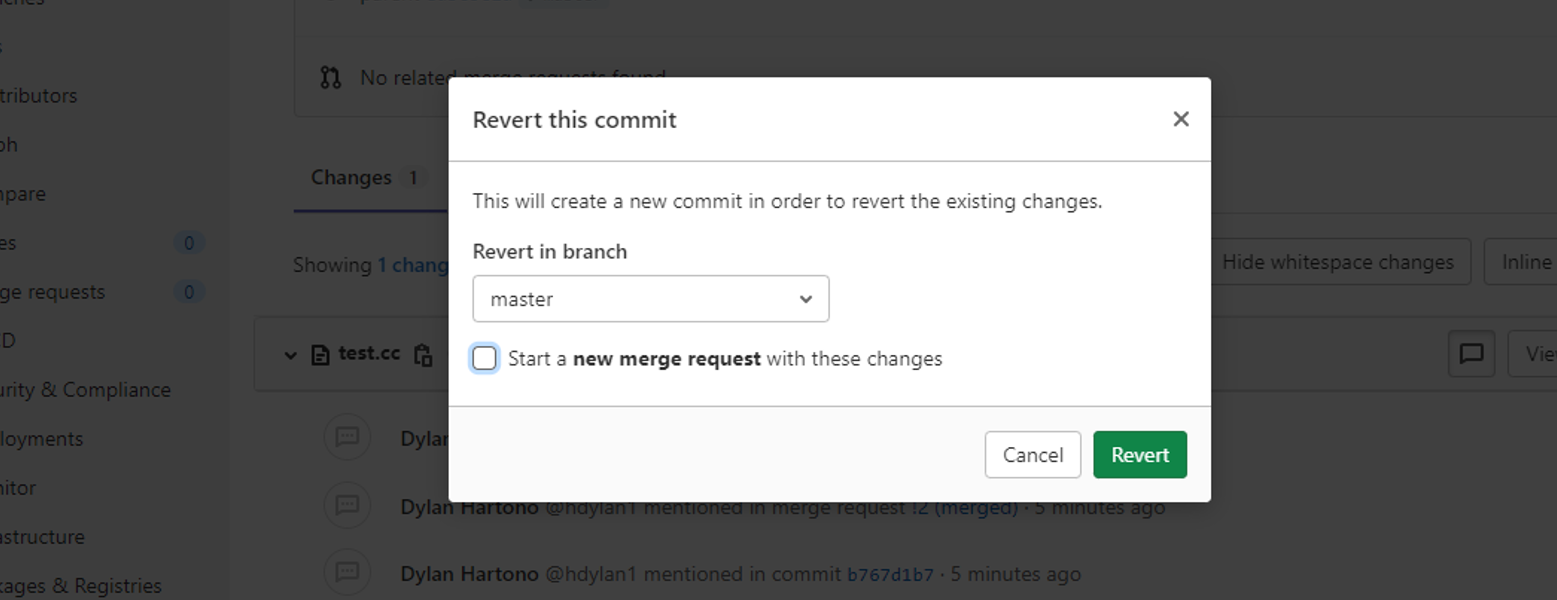
Unselect the “start a new merge request these
changes” and click revert! (you won't need a merge
request for changing your own work! Unless you want to).
-
Your repository has been updated! Update your changes on your
local repository.
