CSE 333 21wi Homework 1
Out: Monday, January 11, 2021
Due: Thursday, January 28, 2021 by 11:00 pm
Goals
For Homework #1, you will finish our implementation of two C data structures: a doubly-linked list (Part A) and a chained hash table (Part B).
Please read through this entire document before beginning the assignment, and please start early! This assignment involves pointer manipulation and malloc/free puzzles, and these can cause arbitrarily awful bugs that take time and patience to find and fix.
All CSE 333 assignments, including this homework, are fully supported on attu, CSE lab workstations (which you can access remotely this quarter), and the current CSE Home Linux VM. We cannot fully support building and running this assignment in any other work environments, including other versions of Linux. We will grade in the fully supported environment, and code developed in other environments may or may not port without modification. Test before submitting!
C Data Structures
Part A: Doubly-Linked List
If you've programmed in Java, you're used to having a fairly rich library of elemental data structures upon which you can build, such as vectors and hash tables. In C, the standard library provides much less. Rather than being part of the language definition, useful, general functionality is often implemented as a set of C functions distributed as a library (as compiled code). What you're doing in this home is writing such a library. The eventual client for it will be you -- we'll use the data structures implemented in hw1 in later homeworks. In this assignment you will complete a skeletal implementation of a generic doubly-linked list.
At a high-level, our implementation represents the elements stored in a doubly-linked list like this:

Each node in a doubly-linked list has three fields: a
payload, a pointer to the previous element in the list (or
NULL if there is no previous element), and a
pointer to the next element in the list (or NULL).
If the list is empty, there are no nodes.
So, what makes implementing this in C tricky? Quite a few things:
- First, we want to make the list "generic": useful for storing
payloads of any type. Because C type checking is done at compile
time, and because we can't know what the client's type will be
when compiling our list code, in C generics ususally mean
that "the payload" is a
void*. The client can set thevoid*to point at "the actual payload" it wants to remember in the list. Alternatively, and bizarrely except in C, if the client's data requires fewer bytes to store than the number of bytes in avoid*, the client can hand the list the actual data, after casting it to avoid*. - Second, we want to hide details about our implementation of the list by providing only a nicely abstracted, high-level API with the usual list operations, including a Java-like iterator abstraction for navigating through the list. Further, we'd like to prevent the client from seeing the internals of our implementation, to force them to go through our public interface. This is easier to do in C++ than C, but we can still take some steps to make it at least inconvenient for the client to go around our interface and exploit our implementation.
- Third, C is not a garbage-collected language: the programmer is
responsible for both memory allocation and deallocation.
This means our list implementation needs to
malloc()aLinkedListNodestructure when it adds a node to a list, and it needs tofree()theLinkedListNodestructure when its element is removed from the list.
The picture above shows only the data elements in a list. A list needs a way to find those elements, so it needs some kind of head pointer. Our lists support iterators, which also point at/into the list. A more complete representation of our implementation of a linked list looks like this:
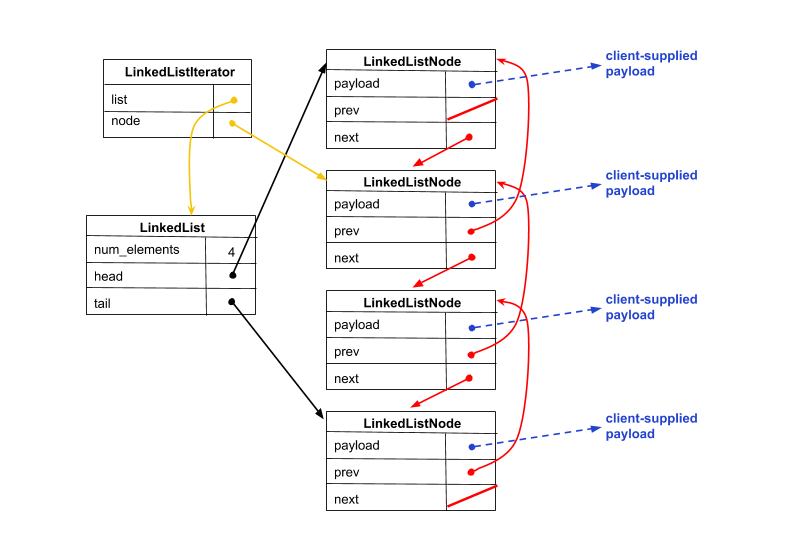
Specifically, we define the following types and structures:
- LinkedList: The structure providing access to our
linked list's data.
When our client asks us to create a new linked list,
we
malloc()and initialize an instance of this structure and then return a pointer to thatmalloc()'ed structure to the client. (That pointer is sometimes called "an opaque handle." The client knows that the thing it has, the pointer, can be used to identify the list it wants to operate on when it adds an element, say, but that's all the client knows. It doesn't know that it points at a structure that looks like the one in the image above.) - LinkedListNode: this structure represents a
node in a doubly-linked list. It contains a field for
stashing away (a pointer to) the client-supplied payload
and fields pointing to the previous and next
LinkedListNodein the list. When a client requests that we add an element to the linked list, wemalloc()a newLinkedListNode, set its payload field to the pointer the client supplied as an argument, and splice the newLinkedListNodeinto the data structure. - LLIterator: sometimes clients want to navigate
through a linked list. To help them do that, we provide
iterators. (The picture above shows just one iterator
associated with that list, but there can be any number.)
LLIteratorcontains bookkeeping associated with an iterator. In particular, it has pointes to the list that the iterator is associated with and the node in the list that the iterator currently points to. Note that there is a a potentially tricky problem here: if a client uses a list iterator to remove a node that a different iterator on the same list is pointing to, some existing iterator becomes inconsistent because it referenced the deleted node. So, we make our clients promise that they will free any live iterators before mutating the linked list. (Since we are generous, we do allow a client to keep an iterator if the mutation was done using that iterator.) When a client asks for a new iterator, wemalloc()an instance and return a pointer to it to the client.
Instructions
You should follow these steps to do this part of the assignment:
- Make sure you are comfortable with C pointers, structures,
malloc(), andfree(). We will cover them in lecture, but you might need to brush up and practice a bit on your own; you should have no problem Googling for practice programming exercises on the Web for each of these topics. - The starter source files for hw1 will be pushed to your repository.
Navigate to the directory that
contains the checked-out copy of your cse333 Git repository and
run the command
git pull. Ahw1subdirectory should appear. - Look inside hw1d. You'll see a number of
files and subdirectories, including these that are
relevant to Part A:
- Makefile: a makefile you can use to
compile the assignment using the Linux command
makeon the CSE Linux machines. - LinkedList.h: a header file that defines and documents the API of the linked list. A client of the linked list includes this header file and uses the functions defined within in. Read through this header file very carefully to understand how the linked list is expected to behave.
- LinkedList_priv.h &
LinkedList.c:
LinkedList_priv.his a private header file included byLinkedList.c; it defines the structures we diagrammed above. These implementation details would typically be withheld from the client by placing the contents of this header directly inLinkedList.c; however, we have opted to place them in a "private .h" instead so that our unit test code can verify the correctness of the linked list's internals.
LinkedList.ccontains the partially completed implementation of our doubly-linked list. Your task will be to finish the implementation. Take a minute and read through both files; note that there are a bunch of places in LinkedList.c that say "STEP X:" these labels identify the missing pieces of the implementation that you will finish. - example_program_ll.c: this is a simple example of how a client might use the linked list; in it, you can see how a client can allocate a linked list, add elements to it, create an iterator, use the iterator to navigate a bit, and then clean up.
- test_linkedlist.cc: this file contains unit tests for the linked list implementation. The unit tests are written to use the Google Test unit testing framework, which has similarities to Java's JUnit testing framework. As well, this test driver will assist the course staff in grading your assignment. As you add more pieces to the implementation, the test driver will make it further through the unit tests, and it will print out a cumulative score along the way. You don't need to understand what's in the test driver for this assignment, though if you peek inside it, you might get hints for what kinds of things you should be doing in your implementation!
- solution_binaries: in this directory,
you'll find some Linux executables, including
example_program_llandtest_suite. These binaries were compiled with a complete, working version ofLinkedList.c; you can run them to explore what should be displayed when your assignment is working!
- Makefile: a makefile you can use to
compile the assignment using the Linux command
- Run
makeon a CSE Linux machine to verify that you can build your own versions ofexample_program_llandtest_suite.makeshould print out a few things, and you should end up with new binaries inside the hw1 directory. - Since you haven't yet finished the implementation of
LinkedList.c, the binaries you just compiled won't work correctly yet. Try running them, and note thatexample_program_llhalts with an assertion error or a segfault andtest_suiteprints out some information indicating failed tests, and may crash before terminating. - This is the hard step: finish the implementation of
LinkedList.c. Go throughLinkedList.c, find each comment that says "STEP X", and place working code there. (Please keep the "STEP X" comment for your graders' sanity so they can locate your code!) The initial steps are meant to be relatively straightforward, and some of the later steps are trickier. You will probably find it helpful to read through the code from top to bottom to figure out what's going on. You will also probably find it helpful to recompile frequently to see what compilation errors you've introduced and need to fix. When compilation works again, try running the test driver to see if you're closer to being finished.- Note: You may not modify any header
files or interfaces in this or later project
assignments. We may test your code by extracting your
implementations and compiling them with the
original header files or in some other test harness
where they are expected to behave as specified. You
certainly are free, of course, to add
additional private (eg,
static) helper functions in your implementation, and you should do that when it improves modularity. - Debugging hint:
Verify333is used in many places in the code to check for errors and terminate execution if something is wrong. You might find it helpful to discover the function that is called when this happens so you can place a debugger breakpoint there.
- Note: You may not modify any header
files or interfaces in this or later project
assignments. We may test your code by extracting your
implementations and compiling them with the
original header files or in some other test harness
where they are expected to behave as specified. You
certainly are free, of course, to add
additional private (eg,
- We'll also be testing your program for memory
leaks using Valgrind.
To try Valgrind yourself, do this:
- In the hw1 directory run the following command:
valgrind --leak-check=full ./solution_binaries/example_program_ll
Note that Valgrind prints out that no memory leaks were found. Similarly, try running the test driver under Valgrind:valgrind --leak-check=full ./solution_binaries/test_suite
and note that Valgrind again indicates that no memory leaks were found. - The previous commands check the supplied sample solutions for memory
leaks to demonstrate how Valgrind works. You will want to check your
own code to be sure it doesn't have memory problems.
While still in the hw1 directory, build your versions
of the
example_program_llandtest_suitebinaries, and try running them under Valgrind. If you have no memory leaks and thetest_suiteruns the linked list tests to completion, you're done with Part A! At this point, you don't know of any bugs in your code. Test suites can't prove there aren't any, though.
- In the hw1 directory run the following command:
Part B: Chained Hash Table
One implementation of a chained hash table is an array of buckets, where each bucket contains a linked list of elements. When a user inserts a key/value pair into the hash table, the hash table uses a hash function to map the key to the index of one of the buckets. If the hash table doens't currently contain a value for the given key, the key/value pair is added to that bucket's list. If there is already a value associated with that key in the hash table, the new value is inserted in its place and the old value is returned to the caller.
Over time, as more and more elements are added to the hash table, the linked lists hanging off of each bucket will start to grow. As long as the number of elements in the hash table is a small multiple of the number of buckets, lookup time is fast: you hash the key to find the bucket, then iterate through the (short) chain (linked list) hanging off the bucket until you find the key. As the number of elements gets larger, lookups become less efficient, so our hash table includes logic to resize itself by increasing the number of buckets to maintain short chains.
As with the linked list in Part A, we've given you a partial implementation of a hash table. Our hash table implementation looks approximately like this:
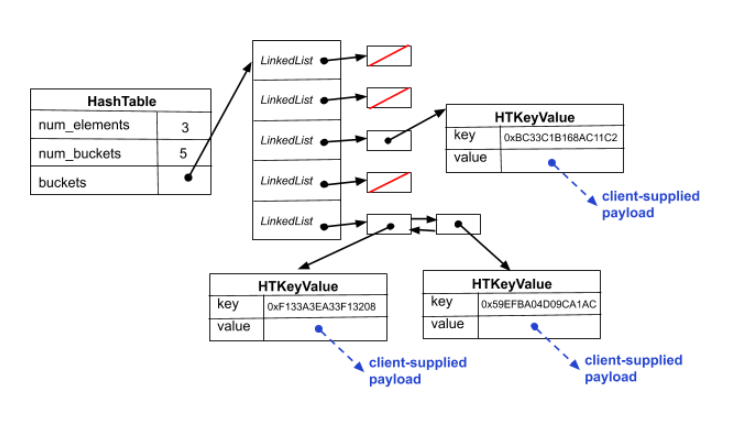
Specifically, we defined the following types and structures:
- HashTable: The "root" of the hashtable, allowing us
to find the rest of the struture. When a client asks us to
allocate a new, empty hash table, we
malloc()and initialize an instance of this (includingmalloc()'ing space for the bucket array that it uses and allocatingLinkedListsfor each bucket). We return a pointer to thatmalloc'ed structure to the client -- an "opaque handle." - HTIterator (not shown in the diagram): sometimes
clients want to iterate through all elements in a hash
table; to help them do that, we provide them with an
iterator.
HTIterataorpoints to a structure that contains bookkeeping associated with an iterator. Similar to a linked list iterator, the hash table iterator keeps track of the hash table the iterator is associated with and in addition has a linked list iterator for iterating through the bucket linked lists. When a client asks for a new iterator wemallocanHTIteratorand return a pointer to it.
Instructions
You should follow these steps to do this part of the assignment:
- The code you fetched in Part A also contains the
files you'll need to complete your hash table implementation
and test it. Similar to the linked list, the hash table
implementation is split across a few files:
HashTable.ccontains the implementation you need to finish,HashTable.hcontains the public interface to the hash table and documents all of the functions & structures that clients see, andHashTable_priv.hcontains some internal structures thatHashTable.cuses but that we don't want to be readily accessible to clients. (There is no "private" in the sense of Java. The best we can do is try to keep some things secret by not giving them to clients.) - Read through
HashTable.hfirst to get a sense of what the hash table interface semantics are. Then, take a look atexample_program_ht.c; this is a program that uses the hash table interface to insert/lookup/remove elements from a hash table, and uses the iterator interface to iterate through the elements of the hash table. - As before,
test_hashtable.cccontains our Google Test unit tests for the hash table. Run this -- on its own, and using valgrind -- to test your code for the kinds of errors it checks for. - Look through
HashTable.c, find all of the missing pieces (identified by STEP X comments, as before), and implement them. - In
solution_binaries, we've provided linux executables (i.e.example_program_htand the sametest_suite) that were compiled with our complete, working version ofHashTable.cYou can run them to determine what should be displayed when your part B implementation is working and look at the source code for examples of how to use the data structures.
Bonus: Code Coverage Statistics
You'll notice that we provided a second Makefile called
Makefile.coverage. You can use it to run
the gcov code coverage generation tool. Figure out
how to (a) use it to generate code coverage statistics for
LinkedList.c and HashTable.c,
(b) note that the code coverage for HashTable
is worse than that for the LinkedList, and (c) write additional
HashTable unit tests to improve HashTable's code coverage.
The bonus task is simple, but we're deliberately providing next to no detailed instructions on how to do it – figuring out how is part of the bonus task!
Please make sure your additional unit tests don't change the scoring mechanism that we use, obviously. (We'll be checking that.) Place your additional unit tests in a separate file from the original test suite. That will make it easier for us to find and evaluate your tests.
If you do this bonus part of the project, you must include
a hw1-bonus tag in your repository to identify the
commit that contains the bonus work. This tag is in addition to
the hw1-final tag for the basic project, which must still
be present
(see the Submission section below
for more about tags that need to be included).
When grading the project we will still test the hw1-final
basic part of the project and it must work correctly, even if you
do the bonus part. If your repository contains a hw1-bonus
tag, we will evaluate your work for this bonus part. If that extra tag
is not present, we will assume you did not do the bonus part, which is fine
and will not affect your grade for the basic project in any way.
Testing
As with hw0, you build your implementation using the
make command. This creates several output files, including
an executable called test_suite, which contains a variety of tests
for all parts of the project. You can run all of the
tests with the command
bash$ ./test_suiteIt is also possible to run only selected portions of the tests by supplying arguments to the
test_suite program.
For example, to only run the LinkedList tests, you can use the command
bash$ ./test_suite --gtest_filter=Test_LinkedList.*If you only want to test Push and Pop from LinkedList, you can use
bash$ ./test_suite --gtest_filter=Test_LinkedList.PushPop
You can specify which tests are run for any parts of the assignment. You just need to know the names of the tests, and you can do this by running
bash$ ./test_suite --gtest_list_tests
These settings can be helpful when debugging specific parts of the assignment,
especially since test_suite can be run with these options when
it is executed by valgrind or gdb!
One caution though: some parts of test_suite are fairly complex.
If one of the larger tests fails it can often be very frustrating to try to debug
your code by digging through the complex test code to figure out what happened.
An often effective strategy is to use the test_suite program to
identify parts of your code that seem to be misbehaving, then write some small test
programs of your own to isolate the problems in a much simpler setting
and debug/fix them there.
Submission
When you are ready to turn in your assignment, you should follow
exactly the same procedures you used in hw0, except this time tag
the repository with hw1-final instead
of hw0-final. Remember to clean up,
commit, and push all necessary files to your repository
before you add and push the tag.
If you do the bonus part of the assignment, you should also create
and push a hw1-bonus tag corresponding to the commit with
the extra work. If this tag is present, it will be used to check
out and grade the bonus part of the project.
If it is not present, we will assume you didn't do the bonus
part, which will have no effect on your grade for the basic project.
The basic project hw1-final tag must still be present in
the repository and the basic part of the project
will be graded separately even if the bonus tag is present.
After you have created and pushed the tag(s), be
absolutely sure to test everything
ON ATTU OR A LAB LINUX WORKSTATION OR THE CURRENT CSE LINUX VM
by creating a new
clone of the repository in a separate, empty directory, checking out
the hw1-final tag, and verifying that everything works
as expected.
If you did the bonus task, also checkout the hw1-bonus tag
and test that code.
If you discover any problems, you must delete this new
repository copy (clone) you've used for verification
and fix the problems in your original working repository.
Then make a new clone and check again to be sure the problems are
really fixed.
Refer to the hw0 submission instructions for details
and follow those steps carefully, including steps for deleting
a tag and then tagging a later commit.
If you fail to check your work and your project doesn't build properly when the same steps are done by the course staff to grade it, you may lose a huge amount of the possible credit for the assignment even if almost absolutely everything is actually correct.
Grading
We will be basing your grade on several elements:
- The degree to which your code passes the unit tests
contained in
test_linkedlist.ccandtest_hashtable.cc. If your code fails a test, we won't attempt to understand why: we're planning on just using the number of points that the test drivers print out. - We have some additional unit tests that test a few additional cases that aren't in the supplied test drivers. We'll be checking to see if your code passes these as well.
- The quality of your code. We'll be judging this on several qualitative aspects, including whether you've sufficiently factored your code and whether there is any redundancy in your code that could be eliminated.
- The readability of your code. While we don't
have detailed, formal coding style guidelines that you must
follow, you should attempt to mimic the style of code that we've
provided to you. Aspects you should mimic are conventions you
see for capitalization and naming of variables, functions,
and arguments, the use of comments to document aspects of
the code, including specification comments for any added private
(
static) functions, and general formatting, including indenting and layout. We strongly suggest using theclint.pytool to check your code for the style issues it can check, since it's so easy to do so. You also will find it useful to refer to the Google C++ Style Guide (see the course Resources web page for a link); much of this guide applies equally well to C.