Project Software Setup
Contents:- The options for where to work
- Before Attending the CSE 331 "Software Setup" Section...
- Cloning the project (creating your working copy)
- Configuring IntelliJ for 331
- Logging in to attu with SSH
The options for where to work
There are five main options for where to do your work. You can use multiple of these options! Doing so generally requires you to make multiple clones of your repository.
- You can do your work in the Gates Center or Allen Center labs. With this option, there is no software to install and you can proceed directly to learning how to use version control, IntelliJ, etc.
- You can do all your work by logging into
attu(a Linux computer cluster) and using it remotely. Again, there is no software to install. This combines the convenience of your own computer with the department installation of Linux. You have access to the same account and files as when working in the Gates/Allen Center labs. Logging in to attu is not a good way to run a graphical application such as IntelliJ. - You can remotely access a CSE Windows machine using Remote Desktop. This combines the convenience of your own computer with the department installation of Windows.
- You can use the department's home virtual machine on your own computer following the department's
instructions. This puts a copy of the lab's Linux installation on your own computer, even if
your computer does not otherwise have Linux. This combines the convenience of your own computer
with the department installation of Linux.
The Linux Home VM has almost the same software as CSE-managed computers. You will need to install IntelliJ IDEA yourself (the license is free for students).
- You can install tools on your own computer. Most people will do this. See below
for more
instructions on how to get set up. In 331, we do most of our set up together in sections, but there
is a
specific "before section" area of this page that you should follow before you get to section.
Disclaimer about using your own tools:
Many students find working directly on their own computer most convenient. You may use whatever tools you like to develop your code. The only thing the staff cares about is that your code works on attu.
The CSE 331 staff provides technical support only for using IntelliJ or the command line, on UW CSE machines. For other setups, we will try to help to the extent feasible. However, it can be difficult to predict and debug every installation/configuration problem, and we are not familiar with every operating system, text editor, or possible interaction between programs. We will prioritize helping students with homework, grading assignments, etc. over debugging the configuration on your own machine.
Most students have little trouble setting up their environment. If you spend 2 or more hours trying to debug a problem with your environment, we strongly suggest that you go to office hours or the ed board for help or stop and use one of the other options for getting your work done.
Before Attending the CSE 331 "Software Setup" Section...
Please do the following steps before you arrive at our software setup section (usually the second section of the quarter). If you have any trouble, just get as far as you can on your own and then come to section with what you have.
-
Install the Java 11 JDK. Download JDK 11 using the Eclipse Temurin installers provided on their homepage. Select OpenJDK 11 (LTS), then run the downloaded installer. MacOS and Linux users can just run the installers directly using the default options. Windows users should run the installers and additionally make sure "JavaSoft (Oracle) registry keys" and "Set JAVA_HOME variable" are checked when prompted. We generally suggest that Windows users uninstall all previous versions of Java (JDK or JRE) before installing the current version to reduce the chances that IntelliJ or other tools will pick the wrong version by accident.
-
To verify your installation, open a terminal (MacOS users open the Terminal application, Windows users can open Git Bash or Command Prompt, and Linux users open your terminal of choice) and type the following command:
javac --version
A message should be printed indicating version 11 is installed. If you get an older version or have trouble, try uninstalling older versions of Java you may have installed, or contact the course staff for more help.
-
Also, verify that you have an appropriate version of the javadoc tool installed:
javadoc --version
You should get a message indicating javadoc version 11.
-
-
Install the IntelliJ IDEA development environment. Either version of this environment will work for CSE 331, but we highly recommend using the "Ultimate" edition, which has features useful for some of the later assignments in the course. Students and other educational users can get a free license for the Ultimate version; see the IntelliJ download page for details. You should have the latest version of IntelliJ if you choose to use it, so make sure to update it if you already have it installed. You will need to configure IntelliJ once you get it running, as described later in this handout, but that can wait until attending the "software setup" CSE 331 section.
-
Install git if you don't already have it. Follow the standard instructions for installing it on your operating system. You can find git installers at the git homepage.
-
MacOS Users: If you'd like to install the full Apple developer command line tools package
instead,
which
includes git, you can run the command
xcode-select --installfrom the terminal. This includes many additional tools that some people will find useful for other courses (like c/c++ compilers and debuggers.) Note: This does not install the full XCode IDE, just the command line developer tools. The tools are also installed automatically if you have installed the Homebrew package manager (https://brew.sh/; also not required for CSE 331, but popular with many MacOS developers). - Windows Users: Installing git also automatically installs Git Bash, which is a bash terminal that we recommend for use during 331. If you choose to use a terminal other than Git Bash, it is your responsibility to know how to use it correctly.
-
MacOS Users: If you'd like to install the full Apple developer command line tools package
instead,
which
includes git, you can run the command
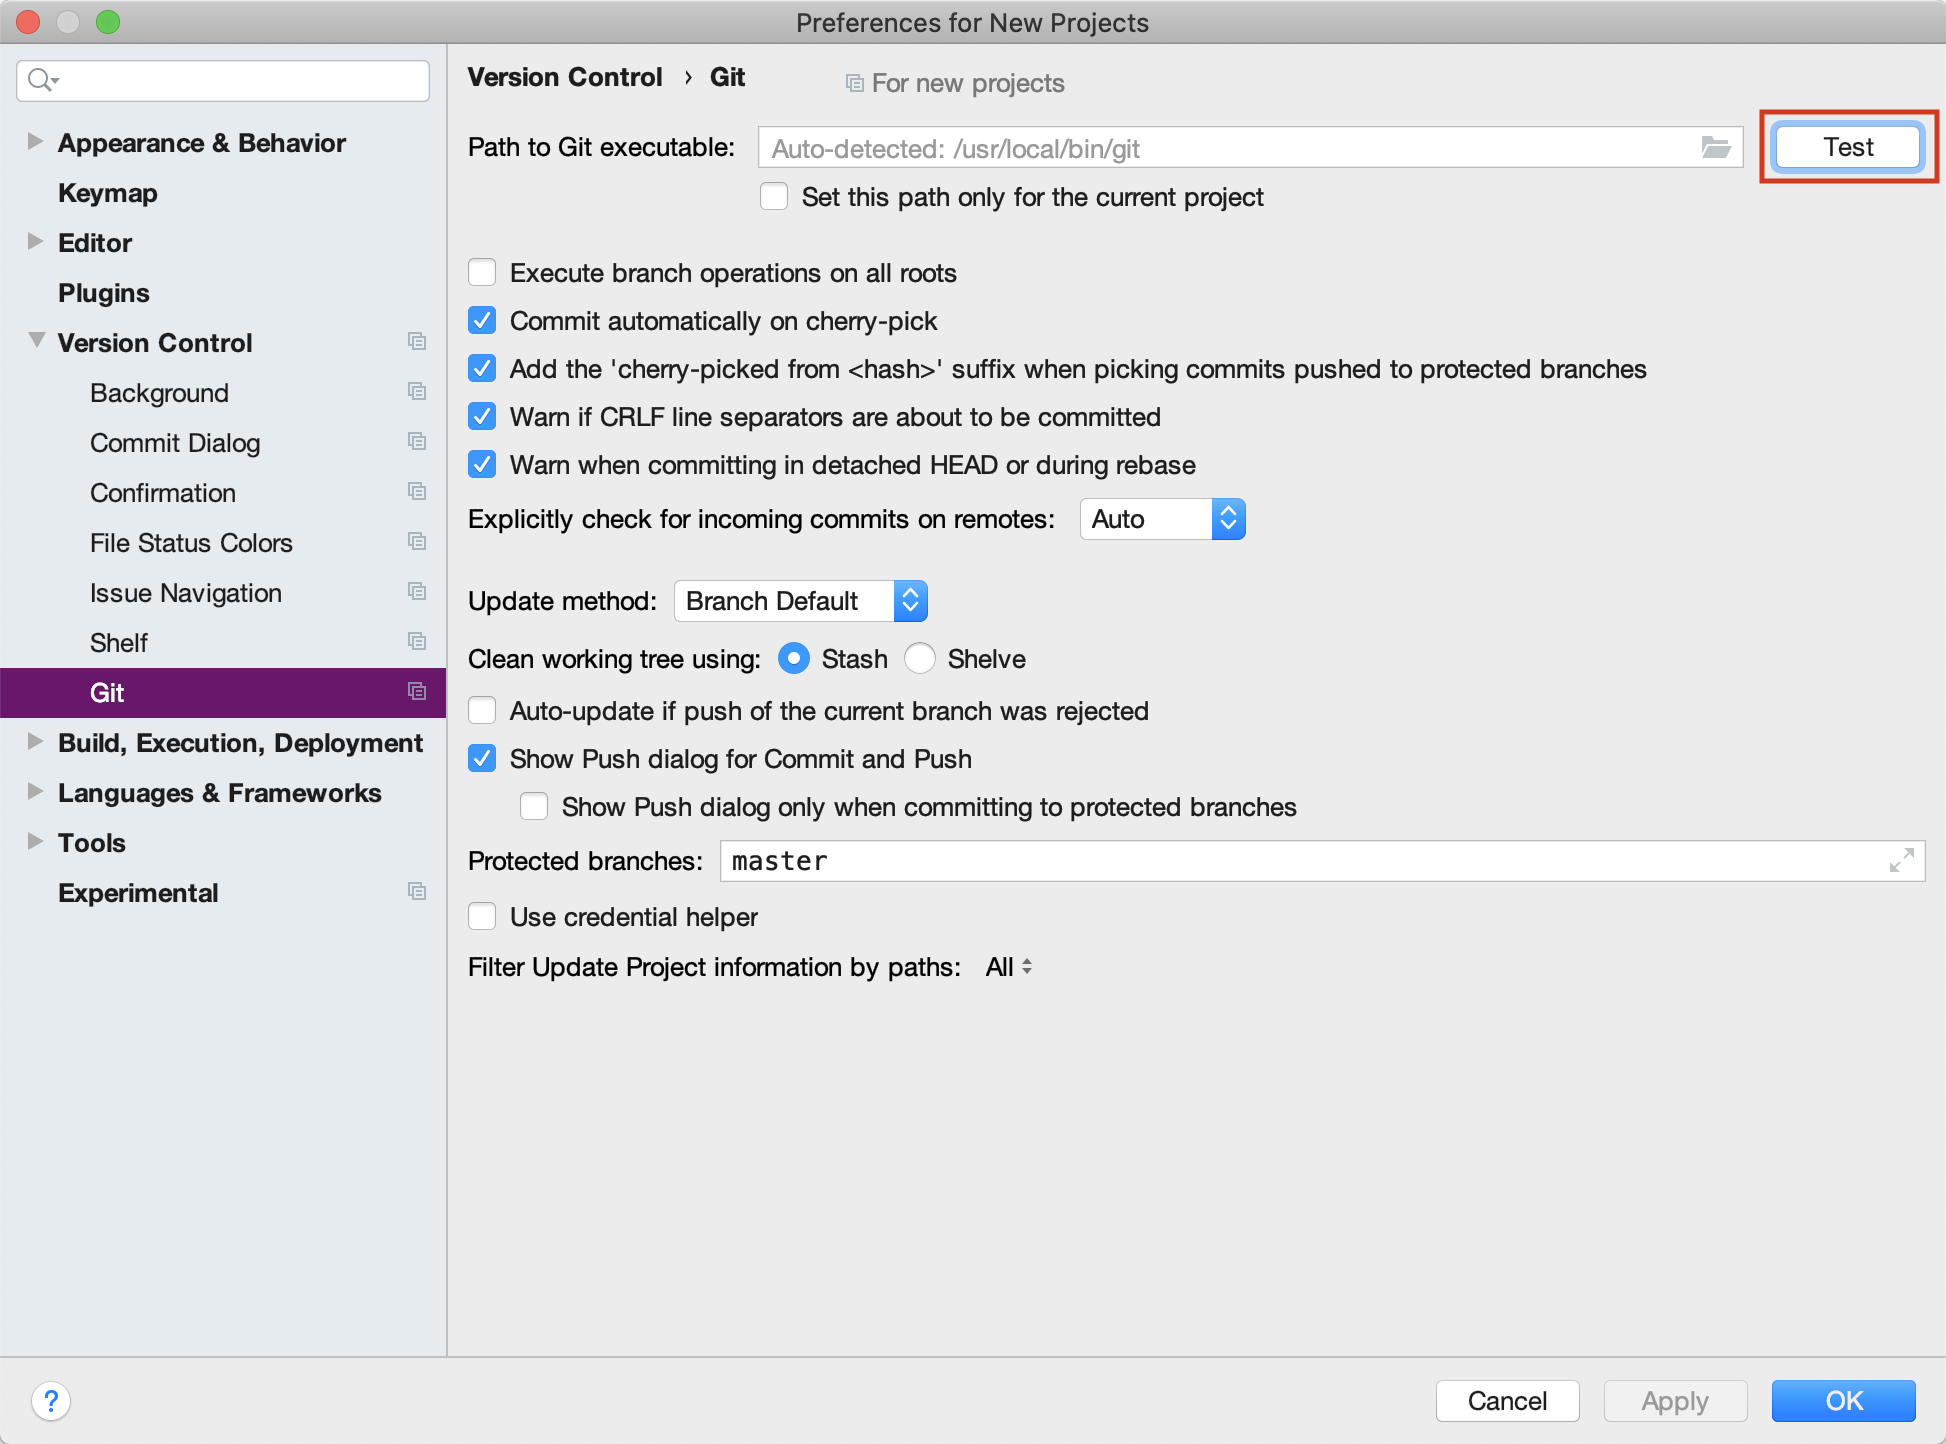
Once you have git installed, open IntelliJ and click through the initial setup steps. You do not need anything more than the default plugins and configuration for 331. At the splash screen, click "Configure" at the bottom-right and open "Preferences." Navigate to Version Control > Git and click the "Test" button at the top right. This test should succeed and report a git version. If you have any trouble with this, contact the course staff for help. See the below screenshot for an example of this preferences window.
You should stop here. We will complete the rest of the setup as described below during section as a group.
Cloning the project (creating your working copy)
You always edit your own personal copy of files that are under git control. Before you can make such edits, you must “clone” to create your local repository (which is stored in a hidden directory) and your working copy (where you will do your programming). You need to do this step only once at the beginning of the term. If you plan to work at both UW CSE and home, you need to do these setup steps both while logged into a department machine and from your home computer, so you have a local copy on both machines.
- Ensure that your repository exists, by browsing to https://gitlab.cs.washington.edu/cse331-QUARTER-students/cse331-QUARTER-YourCSENetID (be sure to change the YourCSENetID and QUARTER parts! (quarter is of the form '21au').
-
Setup an ssh key. Do this on each computer you plan to use.
- Open Terminal (macOS), Git Bash (Windows), or your desired terminal (linux), and run the
following command, replacing "your@email.com" with any identifying text (this is just
'comment' text). Do not remove
the quotations.
ssh-keygen -o -t rsa -b 4096 -C "your@email.com"
- Press enter when asked for a file name (use the default name)
- Do not use a passphrase
- You'll receive a message stating that "your public key is saved in [some file]". The file is probably called ~/.ssh/id_rsa.pub, but use whatever is listed from your command. It will end with ".pub".
- You need to copy/paste the contents of that public key, so open the file. Run the following
command:
cat [public key file name here] | clip    # Windows
cat [public key file name here]           # (macOS/linux)
For example, if your file was saved as id_rsa.pub, then on macOs/linux the command would be:cat ~/.ssh/id_rsa.pub
- Windows users: after running that command, your public key will be copied already, so all you'll need to do is paste it in the right place.
- MacOS/Linux users: running that command will print out the contents of the key. You should select and copy the entire key.
- Open Terminal (macOS), Git Bash (Windows), or your desired terminal (linux), and run the
following command, replacing "your@email.com" with any identifying text (this is just
'comment' text). Do not remove
the quotations.
- Navigate to CSE Gitlab and sign in. In the top right corner, open your profile menu in the top right corner and click "Settings". Choose "SSH Keys" from the left options bar, then paste your public key that you copied into the text box. The "Title" field can be whatever you want - we recommend writing something that identifies which computer you created the key on, like "Personal Laptop" or "attu." Finally, click the "Add Key" button.
-
Run the following command to ensure that your key is correctly setup. You should receive a welcome
message and should not be prompted for a password. If you receive a message saying "the
authenticity of the host could not be established", it's safe to type 'yes' to bypass this message.
ssh -T git@gitlab.cs.washington.edu
- Follow the below instructions for cloning the repository. Use the IntelliJ clone instructions when working on a normal development computer (your personal computer or a lab machine). If you are signed into attu on another computer that only has a command line interface or doesn't have Intellij, use the Command Line (attu cloning) instructions. You need not follow both sets of instructions, only the relevant set.
IntelliJ
NOTE: Occasionally, Windows users have had trouble cloning their repository within IntelliJ. These Windows users had success cloning their repository from the command line using the "git bash" tool, then doing all their work within IntelliJ after the initial clone step. Please try that if you have trouble.
First, set up an ssh key by following the instructions above.
- Open IntelliJ. On the splash screen, choose "Get from VCS". Select "Git" under the "Version Control" dropdown, and choose a convenient place on your computer for "Directory" - this is where you'll be storing your 331 work for the rest of the quarter. In the URL box, paste the text below with '22wi' in the place of "QUARTER" and your CSE NetID in the place of "NETID".
git@gitlab.cs.washington.edu:cse331-QUARTER-students/cse331-QUARTER-NETID.git
Command Line (attu cloning)
Use these instructions to clone your repository when you're signed into attu or another computer that
only has a command line interface or doesn't have IntelliJ. Execute the following commands at the
command prompt to clone the project and create a working copy in
~/cse331-QUARTER-NETID:
cd
git clone git@gitlab.cs.washington.edu:cse331-QUARTER-students/cse331-QUARTER-NETID.git
Note for those who are new to the command line: when you try to type passwords in the command line, you won't be able to see any text entered. Your typing isn't shown to protect your password. Just type your password as usual and press enter.
You can run any git command in any directory of your working copy.
Configuring IntelliJ for 331
There are some configurations that we'll be using in 331 to make sure IntelliJ works with all the different technologies that we're making use of in this class. Be sure to go through the description below and and verify that your configuration is correct.
Using Gradle Integration
In order to make full use of IntelliJ, we have to make sure that it is configured correctly to utilize the Gradle build that we're using for this class. By making sure this is configured correctly, IntelliJ will know that when you click the "Run", "Debug", and "Test" buttons throughout IntelliJ, it'll instruct Gradle to do those actions, which means all of our configurations will work properly.
Open the cse331-QUARTER-NETID project in IntelliJ and navigate to preferences (these are project specific preferences rather than general IntelliJ preferences). Follow Preferences » Build, Execution, Deployment » Build Tools » Gradle. Open the preference window and make sure that all of your settings match the settings highlighted in red in the image below. For settings not highlighted in red, they'll be specific to your project and you shouldn't worry about changing them from the defaults. Note that the Java version should say version 11, and the specific file path or minor version number doesn't matter - just the major version number.
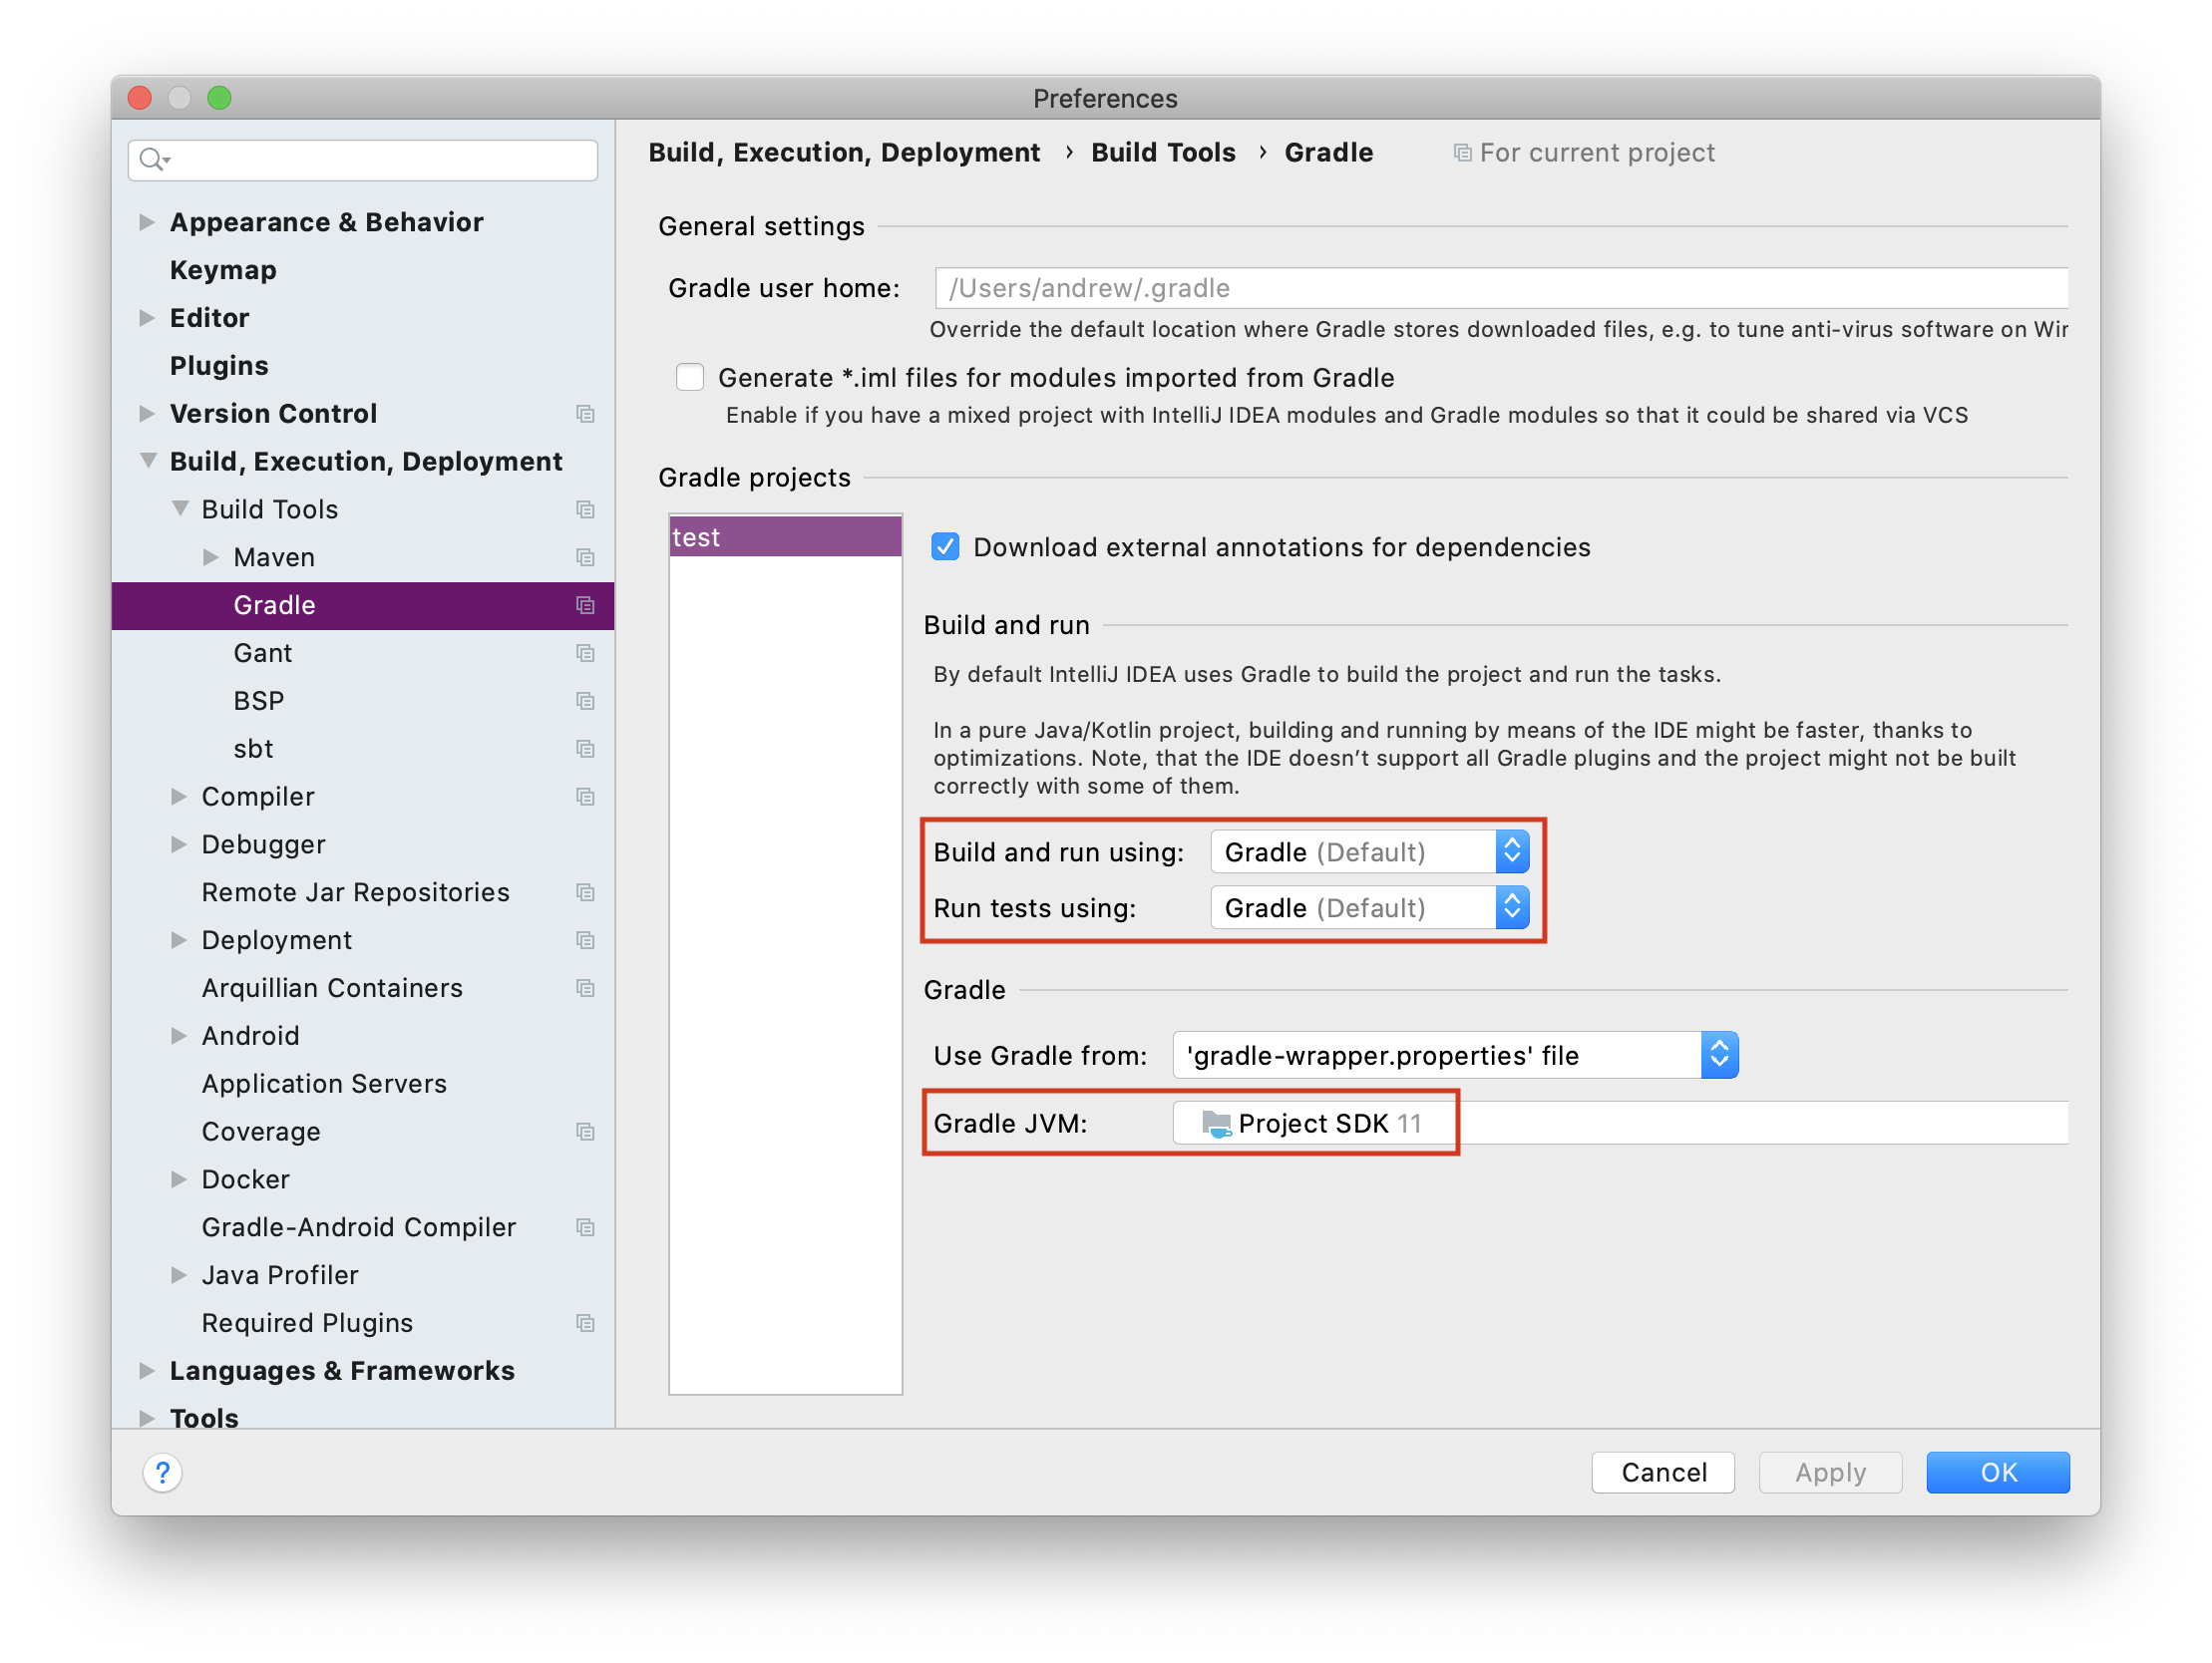
Now that the above settings are correctly configured, IntelliJ should always use gradle correctly and you'll be able to use all the built-in tools provided by IntelliJ to help you write better code.
Enabling Generics Error-Checking
We expect your code to not have any generics-related problems. For example, the following code is unacceptable:
List myList = new ArrayList();
myList.add("foo");
The generic type List of myList should be parametrized, for instance, to
String by replacing the first line with List<String> myList = new ArrayList<String>();
Note that List<String> myList = new ArrayList(); is also incorrect.
By default, IntelliJ doesn't show generics problems as errors. We want to tweak a setting to tell IntelliJ to help make sure you're following generics best practices and don't forget any type parameters. To do so, open the general IntelliJ preferences page and navigate to Editor » Inspections. Search for the inspection "Raw use of parameterized class" and enable it with the checkbox. With that inspection selected, disable all the "Ignore..." checkboxes in the right pane to make sure the inspection will check all of your code for any generics parametrization issues.
Enabling Git from IntelliJ
You may need to specify the path to the git executable: In the Settings/Preferences
dialog (Ctrl+Alt+S), select Version Control »
Git in the left pane. This is only needed if you get an error when you press "Test" in this
preference pane.
Correctly Converting Tabs/Spaces
It is often considered bad style to have tab characters in code files, because they display differently for different people. (Pressing the Tab key while using your editor is great, but that key should should insert spaces.) In IntelliJ IDEA, make sure that the Editor » Code Style » Java : Use tab character checkbox is not selected.
Extended Javadoc Tags
IntelliJ will warn you about unrecognized the 331 Javadoc tags (@spec.*). There are two
ways to eliminate the warnings.
- Disable the editor's Javadoc inspection.
- On the main menu, choose File » Settings for Windows and Linux or IntelliJ IDEA » Preferences for macOS
- Navigate to Editor » Inspections » Java » Javadoc and uncheck the box next to "Declaration has Javadoc problems".
- Add each of the extended tags as a known tag for IntelliJ. Using the keyboard shortcut:
- Place the caret on the extended tag with a warning and press
Alt + Enter. - Select "Add spec.* to custom tags".
- Open the Javadoc inspections settings by following the instructions in (1). You do not have to uncheck any boxes.
- Select "Declaration has Javadoc problems" and naviage to Options » Additional Javadoc Tags and add all of the extended tags.
- Place the caret on the extended tag with a warning and press
After you have done one of the above, the warnings for the extended tags will go away.
Logging in to attu with SSH
attu is the name of an Instructional Workstation (IWS) Linux machine. You will
occasionally need to log into this machine. How you log into attu depends on whether you are starting
from a Unix machine or a Windows machine.
SSH on Unix (including Linux and MacOS)
- Obtain a command prompt (a.k.a. a terminal or console). You can do so by clicking on Applications -> System Tools -> Terminal, or using the built-in terminal window at the bottom of IntelliJ.
- At the command prompt, run the following command:
ssh YourCSENetID@attu.cs.washington.edu
Use the same password you use to login to the Linux machines in the Gates/Allen Center software labs.
Note for those who are new to the command line: When you try to type passwords in the command line, you may be alarmed that you can't see any text entered. To protect your password your typing simply isn't being shown. Just type your password as normal and press enter.
If you are using the Linux machines in a Gates/Allen Center software lab, you can alternatively use a shorter version of the command:
ssh attu
This works because the username defaults to the username you are currently logged in with and the target domain defaults to the domain of the machine you are connecting from.
SSH on Windows
-
From a CSE instructional machine: Double-click on the SSH attu shortcut on the
Desktop.
If the shortcut is not on your Desktop, go to: All Programs » UNIX Connectivity » SSH » SSH attu in the start menu. -
From home:
- Install an SSH client. A great (and free) one is PuTTY.
- Using PuTTY, connect to
attu.cs.washington.eduby entering it in theHost Nametextbox and clickingOpen. You will be prompted for your username and password.
In either case, your username is your CSENetID, and your password is the same one you use to login to the Linux machines in the Gates/Allen Center software labs.
Server Authentication Warning
The first time you connecting to attu from a given machine, you will receive a server
authenticity warning like this:
The authenticity of host 'attu.cs.washington.edu (128.208.1.139)' can't be established.
Along with the warning, the SSH client will display the RSA key fingerprint of the remote host so that you can verify the host's identity if you wish. It is safe to say "yes" to continue connecting. When you connect, SSH will cache the host key in order to automatically verify the remote host's identity in the future.
File Transfer: SCP
If you only want to transfer files between your CSE account and your home machine, you can use
scp
("secure copy"). For CSE 331, you should rarely, if ever, need to manually transfer
files. All your code and other homework materials will be in a Git repository, allowing you
to automatically and safely synchronize your work across machines. We provide information about scp
as a reference for your general knowledge.
On a Unix (Linux or MacOS) machine, you can run scp at the command line. Run man scp for
documentation on this command. If you prefer a graphical interface or if you are using Windows, you
can install a file
transfer program such as WinSCP. Most of the directions above for establishing a remote connection
via ssh also apply to scp.