Contents:
Getting Set Up to Develop with React
Creating a User Interface using React
Introduction
In this assignment, you will build a web app that draws lines on a map, Map Lines, using Facebook's Javascript Framework React. This assignment is not directly related to any of the previous assignments, but will help you build a strong React foundation which will help you with your final assignment.
Important Instructions
As with previous assignments, if you have a question you should ask the course staff for assistance and support. In this assignment (and this assignment only), we encourage you to perform web searches if you are stuck and need assistance. However, you must note the following:
-
There are several different ways to perform the same task in React and JS/TS. If you use code “from the internet,” it may not always work due to a multitude of reasons.
-
You must understand all code you use in your assignment. A good rule of thumb is to never trust code from the internet unless it makes complete sense to you.
You don't need to use any formal javadoc-like comments in your code, but you should still have comments where appropriate. Common things to have commented in a react component are descriptions of props (what they are, what types are expected, how to use them) for clients of your component, descriptions of state (kinda like comments on instance variables in a Java class), and descriptions of the functionality of helper methods that you define.
Getting Set Up to Develop with React
We recommend you use IntelliJ Ultimate as opposed to IntelliJ Community for this and the next assignment. IntelliJ Ultimate has much better IDE support for writing Javascript/TypeScript, and so likely will be more helpful for your development. There are free student licenses for IntelliJ Ultimate available. See set up instructions in the Software Setup Handout. You can still complete this assignment with IntelliJ Community edition, it will simply be less helpful with auto-completing and error-checking.
The commands and installation procedures for Node and NPM (which are what we're using to manage our React development environment) are the same for both Windows and macOS/Linux users. First, navigate to the Node.js homepage and install the "LTS" version of Node.js. This will also install the correct version of NPM automatically. Windows users should make sure that the “Add to PATH” option is enabled during the installation process.
macOS users running modern versions of macOS may get a warning about the installer not coming from a “verified developer.” To resolve this, open System Preferences and navigate to Security & Privacy > General. There, you'll be able to click “Open” to run the Node/NPM installer.
Once you have Node.js and NPM installed,
restart IntelliJ (if it's open). Next, you need to
install React and all of the other things that React needs to work
correctly. We provided hw-lines/package.json, which tells NPM
how to install React and where to find all the things it needs. All you
need to do is run the installation. From the project root directory (which
you can get to by opening the terminal window in IntelliJ), run the
following two commands:
 cd hw-lines
 npm install
The first navigates you to the hw-lines directory, which
you'll need to run all your commands inside. The second tells NPM to read
the package.json file and perform the installation for you.
It's not uncommon for this installation to take 15+ minutes, depending on
the speed of your network connection and your computer, so don't worry if
it seems to be taking a while. You may get a few warnings and messages, but
nothing particularly tragic should be printed to the screen. You'll only
need to do this installation once for each place you have your repository
cloned. To test your installation, run npm start. This will run
your React application, which currently only has the starter code that we
provided. When it's done starting up, a browser window will automatically
open the website.
If the browser didn't automatically open, or the wrong browser opened, you
can manually navigate to http://localhost:3000 to view your
site. Now that the React server is up and running, you can edit the code
and the website will auto-reload without you having to stop and re-start
the React server. When you're done with development, you can stop the
running react server by clicking in the terminal window where it's running
and pressing Control-C.
In addition to the steps above, we require that you use an up-to-date version of the Chrome web browser. Other browsers have varying compatibility and have the potential to complicate grading or cause your code to fail when being run in the grading environment.
We strongly recommend using React Developer Tools, a Chrome Extension created by Facebook. Using this tool will help you debug your React code as you work on this assignment and the next assignment. It can help you view props and state of your components and trace how data is flowing between your components. It will also provide warnings in the console about common mistakes that it finds in your code.
Resources
We will not go deeply into either JavaScript/TS or HTML, so use these resources only to learn what you need and do not feel obligated to study them in depth.
This app is written using HTML and TypeScript, principally with the React framework.
To learn about HTML, see the W3 Schools HTML tutorial.
To learn about JavaScript (the basis for TypeScript), see the MDN JavaScript tutorial .
To learn about TypeScript (a superset of Javascript that adds type information), see the official TypeScript website.
To learn about React Leaflet (the map library we are using), see the official React Leaflet website.
We've created a React handout that explains some of the finer points of React and will guide you as you implement your applications in the next two assignments. It's especially important that you read the Advanced User Interface section before beginning this assignment - many of the concepts discussed there are used throughout this assignment.
Creating a User Interface using React
You will write a User Interface(UI) to let users run a version of a Connect the Dots drawing puzzle.
You will write the UI in *.tsx files under
hw-lines/src. You may create additional files as needed and may
edit provided files. Each file may contain no more than a single React
class/component. Be sure to add any new files to your repository as you
commit your changes. You may also add .ts files if you choose
to write any other code (i.e. helper functions) that aren't a part of a
specific component. (You aren't required to have separate .ts files if you
don't want to.)
The interface provided by the staff has the following elements:
A map of the UW campus
A multi-line text box
Some various text
2 buttons
Important Note
Much of the functionality in this starter code is only half-written, often with hard-coded values instead of actual interactivity. The code is full of unused variables and half-implemented functions for you to complete. For example, the “edges” text box currently can't be edited at all. It's your job to read and modify the provided code to complete the functionality of the application.
The starter code is half-written. This means you will need to add, change, or remove props, state, and functions in the components . You are not required to keep our existing code - please change it if you can think of a better design.
A Recommended Path through this Assignment
-
Read ALL of the code. Twice. Make sure you understand it. We can't stress that enough. If you make sure you fully understand how the data is flowing (or not flowing when it should be), it will be much easier to complete this assignment. We recommend you experiment by making small changes to the code to test your understanding and make sure things are behaving the way you think they should be. If it helps, draw a picture of how the components are related to each other and how the data travels between them. Once you are confident you understand how the basic functionality of this application works, you can move on to the next step. If you're not sure what's going on, re-read the Advanced User Interface section in the React handout, look at lecture or section materials, or ask a question on the discussion board or in office hours.
-
Currently, the text area in
EdgeListcannot be edited. You should store the value ofEdgeListin a state you can use and utilize the onChange prop to make your edges visible to the rest ofApp. Your program should have the following functionality with regards to edges:-
You'll want to make the text field editable so the user can enter edges. This will involve creating state to store the current contents of the text box, and then using that state with the onChange and value props of the textarea.
-
When the “Draw” button is pressed, you should parse the string into an object/array/whatever-works-for-you that represents all the edges to be drawn. When Draw is pressed, the entire contents of the map is replaced by whatever is currently in the edge list.
-
You'll need to get that edge data to the
Mapcomponent somehow, and add to the rendering/drawing code inside theMapcomponent so it renders lines inside of the map according to the edge data entered by the user. This probably will involve creating state/props in a number of components, to move the data between them. To render lines on the map, refer to the comment in Map.tsx - you will render lines using the MapLines component we provide, which takes x1, y1, x2, y2, color, and key as props. The first four being the start and end coordinates of the line, followed by the color of the line, and a unique key (can be a string representation, array index, anything unique). You will need to render an arbitrary number of lines, so we recommend creating an array of MapLines in the render method and rendering that array, similar to how we dynamically rendered checkboxes in the lecture demo. -
Edge data should be entered by the user in the following format:
x1 y1 x2 y2 COLOR
Each line in the text box represents one line that should be drawn on the map. The X and Y coordinates in this field correspond to the X and Y coordinates of specific points on the map, and the lines should be drawn connecting the two points. The upper-left coordinate of the map is defined to be (0, 0). This map is intended only for the UW campus, so the minimum possible coordinate should be (0, 0) and the maximum possible coordinate should be (4000, 4000). You should not allow users to exceed the minimum and maximum coordinates. For reference, 0,0 should be near the intersection of Latona Avenue Northeast and Northeast 47th street and 4000,4000 should be near 2340 Broadmoor Dr E. -
You should validate all user input and reject improperly formatted input by displaying a helpful message to the user. Nowhere in your program should it be possible for a user to cause a JS error to appear on the screen, even if the user is trying to cause an error. Note: You can assume that the color input is well-formed as long as it's some kind of string: you don't need to make sure that it actually spells out a reasonable color.
As an example, the following input in
EdgeListwould produce a red square in the top left of the map, near the west campus area.1000 1000 1000 1500 red 1000 1000 1500 1000 red 1500 1000 1500 1500 red 1000 1500 1500 1500 red
-
Think about where you want to handle the parsing logic: do you want to do all the parsing inside
EdgeListand then only hand the completed/parsed data object up toApp, OR do you want to hand the raw string from the text box up toAppand letAppdo the parsing, OR shouldApppass that string toMapand letMapdo the parsing? (Or something else entirely?) Think about cohesion/coupling and what makes sense from a design perspective. There are choices you can make at this step that can make implementing the rest of the application easier for yourself — the benefits of good design! Regardless, we recommend creating an Edge interface where you parse to make the parsed data storable and portable. -
Remember, you're allowed to modify any of the provided code anywhere in the assignment: this includes adding props that you need, removing props that you don't need, adding state variables, constructors, functions, or any other code to any components. If you really want to, you can also add your own components as part of your solution, though that's not necessary for a clean solution to this assignment.
-
-
Update the clear button so that it clears all the edges being drawn to the
Map. It is your choice whether you want to clear the contents of the text box, or just clear some internal piece of data so theMapstops drawing the edges.
Using TypeScript
It can be tempting, when the TypeScript compiler is complaining about
something, to simply add the any annotation to whatever is
causing your problem to get the compiler to be quiet. There are plenty of
reasonable uses for any, but you should always carefully
evaluate whether you are simply masking a bug before you use it.
For example, it's generally fine (in this course) to replace complex names
that come from React or HTML with any to keep the code simple.
There's a trade-off here - the code may be somewhat simpler, but (a) you get
less help from the TypeScript compiler, since it can't catch bugs that it
can't see, and (b) you get less help from IntelliJ, since it doesn't know
what kind of object it's dealing with. It's up to you to make a choice about
what types you want to write out, and what types you'll leave as
any. TypeScript is a tool - the more you use it, the more it
will help you.
At a minimum, you should attempt to use explicit types for the following:
React Components' props and state types
-
Function parameters and return values (at least the simple ones, like objects, arrays, and primitives)
-
Any custom interfaces/types/classes that you create (like, maybe, an Edge type)
One note - some TypeScript compiler errors can be long or confusing. When you encounter errors like this, resist the urge to randomly change the code in the hopes that it will go away. By not understanding the error behind what you wrote, you are making yourself more likely to make the same mistake in the future, and you're robbing yourself the opportunity to understand why the compiler said what it said, and why the code that was there had a problem. When you're faced with an error you don't understand, here are some tips for figuring out what's going on:
-
Often times, compiler errors are caused by a mismatch between what the compiler thinks should be there, and what the compiler sees actually is there. Compilers generally have a funny way of saying this: they usually try their best to make things work, and then complain when that fails. They'll say something like: "number is not assignable to string." This message simply means that the compiler was expecting a string, and you gave it a number - when it tried to put that number where the string should go ("assign" it), it failed. This is somewhat analogous to someone telling you "I cannot fit the square peg in the round hole" instead of telling you "This is a round hole, you need to give me a round peg" - it's simply a different way of phrasing things.
-
If you're having trouble understanding what the English explanation of an error is (make sure you always read error messages slowly and carefully), try looking at the snippets of code that the error message is showing you. See if you can spot the difference between two pieces of code that it might be showing you, and see if that might help give you a clue as to what it's complaining about.
-
If you're really stuck, try asking on the discussion board. Often times another student or a TA can help you decipher the meaning of an error message.
Testing
Writing automated tests for GUIs is important, but it can be difficult and usually involves special frameworks that are beyond the scope of this course. For this reason, you are not required to write unit tests or a test driver. We will test your solution by running your main program.
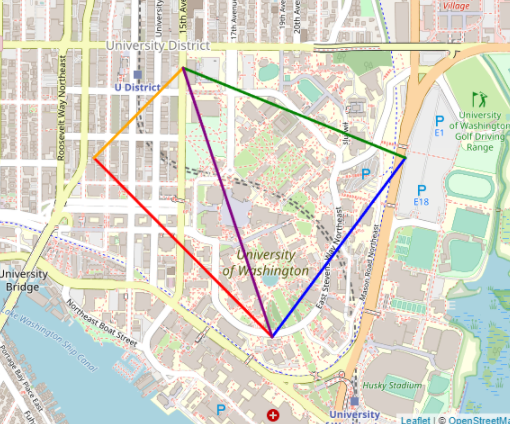
If you would like to run a sanity check on your code to ensure that your code works as expected, use the following statements to draw edges in your application and make sure the image matches the provided image below.
 1000 1000 2000 2000 red
 2000 2000 2750 1000 blue
 1500 500 2750 1000 green
 1000 1000 1500 500 orange
 2000 2000 1500 500 purple
UI Enhancements
You are responsible for creating a GUI that performs the required tasks, and that is easy to use and intuitive. You are permitted, but not required, to be creative and improve upon this basic design. (Don't do this until after you have completed all of the basic requirements for the assignment.)
Projects that go substantially beyond the basic requirements will receive a small amount of extra credit. Here are a few suggested enhancements (you're welcome to come up with your own too):
Allow the user to set a new map center
Allow the user to save the image with the drawn lines
-
Allow the user to add points and other features on the map (refer to React Leaflet resource)
Add some animations when lines are drawn.
Additional functionality should augment, not replace, the requirements of the assignment. Your internal code does not need to be structured like the provided code; you're welcome to throw it all out and re-write the app from scratch if you'd like, but the external functionality must be identical.
Please record all additional functionality you attempted to add in
hw-lines/extras.txt. Extra Credit points will not be
awarded for functionality that is not documented in that specific file.
Time management: there are lots of fun, interesting things that could be done here. Be sure though to get the main requirements done, and be sure you don't wind up attempting more than you have time to accomplish. Simple, meets the requirements, and works, is much better than very elaborate, super interesting, but not done or still buggy at the end.
Hints
Node/NPM/React Installation Issues
-
I get a message that says
E_LIFECYCLEwhen I runnpm start.-
You likely have the wrong version of Node.js and/or NPM installed. Make sure you're not using the CSE linux machines, and try re-installing Node.js.
-
-
I reinstalled Node/NPM or did something else to fix my problem, but I'm still having issues.
-
Delete
package-lock.json(NOT package.json), and thenode_modulesfolder, then re-runnpm installand try again.
-
-
npm is not recognized as in internal or external command...-
Make sure you enabled the "add to PATH variable" option during installation of Node.js. You may need to re-run the installer and double-check that option to fix this issue.
-
Javascript Hints
-
Approximately 100-200 lines of JavaScript are enough to complete the basic requirements of this assignment.
-
Do not use
ReactDOM.renderin your application. Onlyindex.tsx(which you do not need to edit) should callReactDOM.render. The Document Object Model (DOM) is a representation of HTML and XML documents and is the data object a JavaScript program manipulates to interact with a browser. The DOM represents the document as nodes and objects. A JavaScript program can change the DOM, which changes what the user sees in the browser. Using React allows React to manage the webpage and is more efficient because React does not need to keep communicating with the DOM. CallingReactDOM.renderwill require React to communicate with the DOM which affects performance and defeats the purpose of React, which normally updates the page without re-rendering all of it. -
Do not circumvent or bypass the use of React. You need to learn React in order to be prepared for the next assignment. Javascript calls such as
document.getElementByIdthat “go around React” are not permitted. -
Copy-paste-and-modify can be a useful way to make progress in a programming project like this. However, never do so without understanding the code you are using. Be especially careful when copying code from multiple sources, since those code snippets might not work together, and might not work with the particular software environment we're using. You should always be able to explain all the code in your project.
How to Turn In Your Homework
./gradlew validate will not validate your homework assignment
as it has in prior homeworks. Instead,
the staff strongly recommends you use the latest, standard version of Google
Chrome to test your code. Your UI must load when we use Google Chrome to
visit http://localhost:3000 after
running npm start from hw-lines/.
There are no new files that you must submit as part of the assignment,
unless you add any new files yourself. Make sure to commit any changes and
additional files you create. Don't forget to note any additional
functionality in extras.txt. You may notice that
package-lock.json may be modified after you run npm install -
this is expected and ok to commit.
Refer to the
assignment submission handout
for complete turnin instructions. You should use the tag
hw8-final to mark your final
submission.
There is no GitLab validation for this assignment, so not having a pipeline when you submit the tag is normal.